Setting up and checking the launch system
This system is used to start a cold engine and ensures its warming up by approximately 1.5-2.5 thousand revolutions.
When the engine warms up, the system is turned off manually and the engine starts idling at a speed of about 800-900 rpm. The second important gap is between the air damper and the wall of the primary chamber. When the damper is closed, this gap should be about 5-5.5 mm. It is adjusted by a screw, which is located under the brass threaded plug on the body of the vacuum air damper position regulator. The functionality of the starting system is checked with the air filter installed and the engine cold.
Acceleration pump
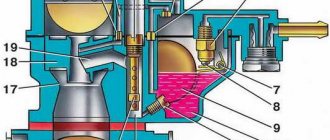
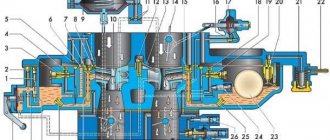
Enriches the fuel mixture when the throttle valve is opened sharply, ensuring good vehicle response. When the throttle valve 39 is sharply opened (see Fig. 33), the cam on the valve axis presses lever 1 and acts through the pusher on the diaphragm 48, overcoming the resistance of the return spring. The diaphragm supplies fuel through the channel and injects it through the atomizer 15 into the primary mixing chamber. Part of the fuel is passed through the bypass jet 47 back into the float chamber. The bypass jet is selected in such a way that when the throttle valve is opened smoothly, all the fuel is bypassed into the float chamber. The cam profile allows for dual injection. The second injection coincides with the beginning of the opening of the throttle valve of the secondary chamber.
The sprayer 12 has a marking (for example, 40) indicating the diameter of the sprayer opening (0.40 mm).
Step-by-step carburetor settings
Design and adjustment of the OKA 11113 carburetor
So, you can proceed directly to the setup procedure itself. Let's consider its step-by-step implementation.
Stage 1: Cleaning
Unscrew the fastening bolts holding the carburetor cover and remove it
There is no need to rush here; it is very important not to damage the bracket tongue and the float. Otherwise, the setup procedure will end before it even begins.
Then, turning the lid over, remove the fuel filter fasteners, take it out and rinse it thoroughly, after which we move on to the float chamber, which should also be cleaned and rinsed.
The jets, both air and fuel, are also cleaned, and exclusively using copper wire, after which they are washed and blown with compressed air. Various solvents are used as washing liquid - toluene, acetone, special washing liquids or gasoline.
Stage 2. Adjusting the float mechanism
Initially, it is necessary to find out the condition of the float, aligning, if necessary, the bracket that secures it. This will ensure a smooth immersion of the float into the chamber.
After this, you should start adjusting the needle valve in the closed position
This is quite simple to do - just open the chamber cover, move the float to the side and carefully tug the bracket tongue, ensuring that the gap between the cover gasket and the float itself is about 6-7 mm. In the immersed position of the float, the distance should be 1-2 mm
If more, it means the needle has become unusable and needs to be replaced. In the open position of the valve, the gap between the needle and the float should be at around 15 mm.
Stage 3. Setting up the launch system
At this stage, it is necessary to perform the following operations:
- Remove the air filter;
- Start the engine and pull the choke;
- Open the air damper about a third;
- Set the speed to somewhere around 3200-3600 rpm;
- Lower the damper into place, setting the rotation speed to 300 rpm less than the main parameter.
Stage 4. Adjusting the idle speed of the car
It is necessary to proceed to this stage only after the car has warmed up. Using the quality screw, the maximum speed value is set, while the quantity screw is not used. After this, using this screw, a value is set that is 100 turns higher than the required parameter. And finally, the engine starts and the desired speed is adjusted using the quality screw.
Summing up
At this point, work on adjusting the carburetor installed on the VAZ 2107 model is completed. We hope that our tips will help you carry out this procedure correctly and ensure long-term and uninterrupted operation of your car.
https://youtube.com/watch?v=-iYxxRFBWUo
What is a carburetor
Carburetor adjustment
A carburetor is a mechanism that is installed on internal combustion engines and feeds it with a mixture of air and gasoline. With its help, optimal mixing of the above components occurs, and you can also adjust the composition before this explosive mixture enters the engine cylinders.
Subsequently, progress did not stand still and instead of carburetors, new devices appeared - injectors, which are installed on all modern cars starting from the 80s.
To begin with, we need to understand what kind of carburetors you can find on your Zhiguli, especially if we are talking about the old Kopeyka - VAZ 2101 and its modifications.
If your car (-2101, -2102) is a rare example of the automobile industry, produced before 1974, then the carburetor on it is 2101-1107010.
If your car was produced from 1974 to the end of 1976, then here you will most likely see a carburetor 2101-1107010-02, and if it was produced between 1977 and 1980. - 2101-1107010-03.
In principle, they are almost the same, for example, the first two models had a float chamber unbalancing valve.
Kopek carburetor breakdowns
Adjusting the carburetor 4178 on the UAZ
Now it’s worth considering what problems can occur in the carburetor. If suddenly the engine begins to operate unstably in idle mode, changes in crankshaft speed are observed, or the engine stalls if you do not press the accelerator pedal, there is no need to blame the carburetor
. Repair of the VAZ 2105 carburetor: how to adjust the VAZ 2105 carburetor. In particular, this is relevant for those cases when such symptoms began to manifest themselves sharply, there were no prerequisites for this.
the carburetor suddenly fails
, or some of its nodes, or its settings are lost, then the change in operation does not occur abruptly, but smoothly. And also how to adjust the carburetor of a VAZ 2107. How to adjust it correctly. Very often, the cause of floating idle speed is the solenoid valve, which is installed on the VAZ carburetor. If your car has a similar device in its design, then first of all you need to check it.
To do this, disconnect the wire that goes to it, and then apply plus to the valve contact from the battery. If the winding is working properly, a slight click will be heard. After this, the presence of voltage is checked on the wire that is connected to the solenoid valve. If there is no voltage, then there is damage to the wiring from the ignition switch to the solenoid valve.
Also, the symptoms described above may appear in cases where there is very large carbon deposits on the spark plug electrodes. As a result, the spark power is simply not enough to ignite the air-fuel mixture. If there is carbon deposits on the electrodes, then the carburetor itself should be blamed for this. The fact is that it supplies a lot of air-fuel mixture to the combustion chambers. The saddest reason for this is a burnt-out intake valve.
But don’t grab your head right away, first try to set the gasoline level in the VAZ 2101 carburetor. The float position must be adjusted correctly. Often the penny begins to stall and sneeze at high crankshaft speeds. Carburetor
, as a rule, has nothing to do with it. The reason lies in the gasoline supply. The fuel pump diaphragm may already be worn out, but most often the fuel pump rod is worn out. You can read about it in a separate article
Primary diagnosis of carburetor engine malfunctions of a passenger car
When a particular malfunction occurs (sometimes unexpectedly) in the operation of a carburetor engine of a passenger car, it is sometimes difficult to immediately determine the cause of its occurrence. To quickly and accurately determine what happened (diagnose a malfunction), you should adhere to a certain algorithm for finding the problem. Each motorist has his own.
In this article, we will consider the generalized sequence of actions of a motorist when troubleshooting a car engine. This search algorithm is simple, based on a list of the most common malfunctions in the operation of a carburetor engine. Problem situations can be divided into only two groups: - the engine does not start at all - the engine starts, but does not work well
Car engine does not start
Crankshaft does not rotate
- the battery is dead - the starter is faulty
The crankshaft rotates
- there is no spark (the switch or breaker contacts are faulty) - fuel does not flow into the carburetor (the fuel pump is faulty) - the spark plugs are flooded due to fuel overflow in the carburetor
The car engine starts but runs poorly
- spark plugs do not work - high-voltage wires are broken - the distributor cover is broken - the gap between the contacts of the breaker does not correspond to the norm - the fuel pump is faulty - the solenoid valve in the carburetor is faulty or its jet is clogged - “suction” of foreign air into the carburetor
These are the main causes of problems in the operation of a carburetor engine. After checking all of the above, you can find the cause of the malfunction in 8 out of 10 cases. If this was not possible, then you will have to look for it in more depth. The majority of articles on the site twokarburators.ru are devoted to this search.
TWOKARBURATORS VK -More information on the topic in our VKontakte group
Source
Operation and repair of VAZ 2101, adjusting the carburetor
carburetor carburetor device VAZ 2109
Mostly older car models are equipped with carburetors. These components usually do not require any special maintenance or constant attention from the car owner, but in order for the combustible mixture to be supplied in the appropriate proportion, the carburetor must be configured correctly. This affects both the service life of the motor itself and the appetite of the unit.
What problems could there be with the carburetor?
Trouble idling
Unstable and incorrect operation of the engine at idle speed may indicate a problem not in the operation of the carburetor, but in the connecting wiring connecting it to the accelerator pedal. To find it more accurately, you need to remove this wire, turn on the engine and move the throttle. If the speed drops to normal, we conclude that the failure is in a faulty wire, otherwise there is a breakdown in the motor unit itself.
The appearance of dirt and dust on the spark plugs
The appearance of soot and aroma on candles can indicate only one thing - excess fuel supply. VAZ 2105, VAZ 2106, VAZ and convergence on the VAZ 2101 it is vertical as shown in. How to set the VAZ 2109 timing belt correctly and breakage. This can happen, in turn, in two cases: either the valve is burnt out, or the fuel level is not set as required (or maybe both). The fuel level may be disrupted due to problems with the float chamber, very high fuel pressure, or a poorly adjusted float itself.
The same prerequisites (pressure, difficulties with the chamber and float) can also lead to gasoline leakage. We check the pressure (the norm is 4-7psi), if this is not the reason, most likely you will have to change the float chamber.
Let's start adjusting the carburetor
So, the main thing in any work is proper preparation. In this case, it consists of checking whether the spark plugs, distributor and wires are in full working order. It is necessary to adjust the carburetor of a VAZ 2101 car, like any other car, on a warm engine. Also, if the unit is dirty or signs of corrosion appear, it must be painstakingly put in order. We replace carburetor cuffs (sold as part of a repair kit corresponding to the carburetor model) and, if necessary, jets.
Next, you need to disconnect the accelerator pedal cable from the throttle valve, disconnect the crankcase ventilation tube, and make sure that there is no vacuum in the advance regulator tube. Now we find the so-called property screws, which help adjust the fuel composition, and screw them alternately clockwise. When the unit starts to work more aggressively and “shakes”, we stop the process, because the upcoming action will end with the motor stopping. On the contrary, unscrew the screw 1 turn back and achieve smooth and stable operation of the unit. This operation must be done one by one with all high-quality screws until we achieve good engine performance.
Perhaps a novice driver will not be able to get by with just these tips and immediately perform all the necessary actions without outside help. But everything comes with practice. But experienced VAZ 2101 owners will be able to fully adjust
carburetor of your own car without the help of others.
Sample control procedure
The procedure for conducting inspections of the technical condition of vehicles is enshrined in the road safety instructions; recommendations can also be obtained from the Ministry of Transport.
The control plan includes a list of manipulations, the main ones look like this:
- study of the appearance of equipment;
- checking the body, driver's cabin, signals, lights, brakes, battery;
- control of the main systems: air suspension, steering, clutch, engine;
- checking axle parameters, integrity of hoses, turn signals;
- analysis of wheels, tires, bumpers.
Let us remind you that the driver is present when drawing up the inspection report.
Types and scope of checking the technical condition of a vehicle
Technical control is divided into visual and manual. The technician uses the second option if a specific part or system is suspicious. A diagnostic map using some diagrams - that is, bypassing the official expert opinion. Such “tricks” threaten the company with fines from the traffic police, and also increase the risk of accidents. Let's return to the “white” schemes.
Verification methods
Technical control (pre-shift and post-trip) is divided into a full inspection and monitoring of a specific system. A full inspection, required by orders of the Ministry of Transport, is designed to ensure road safety and control all components of the vehicle. Partial inspection is used when one of the systems breaks down or malfunctions. Let's look at the nuances in each machine system.
Brake systems
Checking the brake system.
Brakes are one of the main parts of the vehicle, responsible for the safety of the driver and others.
When inspecting them, the following problems may be revealed:
- reduced system efficiency;
- jamming, interruptions;
- fluid leak;
- failure of brake lights.
If the above is detected, the car is sent for a detailed examination.
Steering systems
Failures here can be like this:
- control jamming;
- violation of adjustment of parts.
The car is also sent to a repair station.
External lighting devices
When inspecting the headlights, a technician may find:
- contact closure;
- Malfunctions of the rear/front lights.
The vehicle is not allowed on the road until the situation is corrected.
Wheels and pneumatic tires
The fastening and external condition of the “shoes” of the vehicle are checked. If necessary, place the car on a jack and tighten the nuts. Rubber damage, bumps, different tread patterns, and worn tires are unacceptable.
Engine and its systems
The engine is the “heart” of the car. Its operation is checked at full and low speed, as well as at idle. An increased concentration of smoke, its entry into the driver’s cabin, and clutch failure are reasons to send the equipment to the station.
Other structural elements
The mounting of the tractor with the semi-trailer, stable mounting of mirrors, canopies and license plates are subject to detailed inspection.
The mechanic also rules out deep dents, damage to the platform, and cracked headlights. If the inspection reveals the above, the parts that have become unusable are replaced and the fastenings are adjusted.
Verification Tools
For full maintenance in the garage, organizations must have:
- several types of jacks (for each type of equipment);
- pressure gauge for checking wheels and tire pressure;
- hammer with a long handle;
- sets of tools (wrenches, nuts).
In large companies, it is advisable to supply equipment for computer diagnostics.
Documenting results
Documenting the results.
The monitoring results are recorded in the logbook. A sample document can be found in the public domain.
An example of the required graphs is:
- make and model (truck, passenger) of the vehicle;
- state number of the car;
- brief information about the driver;
- inspector data;
- time/date of recording the technical condition;
- odometer data, mileage;
- a note about passing a technical inspection;
- signatures of the inspector and the driver.
Also, the results of the inspection are included in the “travel book”.
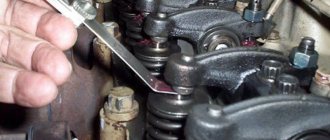
Checking and adjusting the float chamber
Before checking and adjusting the carburetor on the VAZ 2107, you must remove the air filter along with the housing. And at the same time, check its condition, since a clogged dust filter greatly restricts air access to the engine, and this can also affect both the proportions of the working mixture and the operation of carburetor peripheral systems. Once the filter and housing are removed, unscrew the carburetor cap and gain access to most of the jets, the float chamber and the primary and secondary chamber diffusers. To begin, unscrew the plug of the filter mesh at the bottom of the lid near the fuel supply fitting. The mesh is carefully cleaned, washed, the internal cavity of the screw plug is washed, and the condition of the aluminum or bronze sealing gasket is checked.
When cleaning the internal cavities of the carburetor, you must follow important rules. Firstly, it is extremely undesirable to clean with fluffy or hard rags, since the fluff can easily clog the channels and jets. Secondly, when mechanically cleaning channels and jets, you should never use metal objects. They can irreversibly disrupt the throughput of the calibrated holes, then it will not be possible to correctly adjust the VAZ 2107 carburetor. The jets are cleaned only with wood chips, and ideally with compressed air or special cleaning liquids. The cone valve and its seat are cleaned using the same method.
Video tips for setting a stable idle
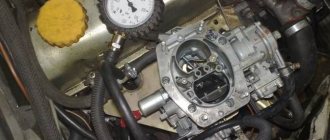
Before adjusting the fuel level in the carburetor, you need to make sure that the float is intact, has no mechanical damage and does not leak gasoline or sink in it. Otherwise, the brass float is replaced. The float is adjusted by changing the angle of the thrust tabs. The factory recommends maintaining the following clearances - with the needle valve closed, the distance from the float body to the carburetor cover gasket should be 6.5 mm. In this case, the maximum free play of the float body should be no more than 8 mm, and the distance to the gasket in the extreme position should be within 14-14.5 mm. These values are achieved by bending the persistent tabs. Check the operation of the float and cone valve by supplying gasoline with the cap installed, followed by monitoring the fuel level in the chamber.
Econostat
Enriches the fuel mixture at maximum engine speeds and is included in the secondary chamber. Fuel from float chamber 4 (see Fig. 33) through fuel jet 8 of the econostat enters the channels located in the carburetor cover, where air from jet 6 is mixed.
The fuel-air emulsion passes through the channel through the emulsion nozzle 10 and enters through the atomizer 11 into the diffuser. The econostat comes into operation at speeds close to maximum, with the throttle valves fully open.
Classification
Carburetor for VAZ 2101
A large number of classic Zhiguli models use the VAZ 2101 carburetor in various modifications. There are several modifications of manufactured carburetors, which differ not only in the size of the installed jets, but also in the presence or absence of a vacuum corrector system.
The VAZ 2101 carburetor of all modifications is intended only for VAZ 2101 and 21011 engines, where an ignition distributor without a vacuum corrector is installed. On cars of later production systems are installed that are already equipped with vacuum correctors. It should be remembered that the use of carburetors for VAZ 2101, 21011 and 2105 engines without a vacuum regulator cannot be used on other engines and vice versa. The carburetor of the VAZ 2103 and VAZ 2016 is used in a similar way - only on models where there is no vacuum corrector.
Maintenance at home is a rather complex procedure that requires certain skills, knowledge and tools. You can independently adjust the idle speed, replace gaskets, clean jets, fuel channels, and also visually check the operation of the accelerator pump and, if necessary, replace it. But it is advisable to carry out final adjustments and adjustments in a car service center that has diagnostic equipment for checking the level of carbon monoxide in the exhaust gases.
Jet markings
The bulk of the jets are marked with a three-digit number, which means its capacity, as written above, of a column of water 1000 mm high.
Carburetor maintenance, jet cleaning
So that your car does not let you down at the most inopportune moment, you need to maintain the fuel system and carburetor, including, do not leave it for later or crawl under the hood if something does not work, and so on.
10,000 km - you need to blow out all the carburetor jets, without removing it from the engine, with compressed air, this also applies to the fuel intake filter.
20,000 km - after such a mileage, you need to wash all carburetor parts. For these purposes, as a rule, unleaded gasoline or benzene is used; anything that cannot be cleaned with these liquids is then used with a solvent.
To clean fuel, air and other jets of a VAZ carburetor, do not use needles, wire or the like. It is advisable to clean them with plastic or wooden sticks; you can also use rags that do not leave marks (lint).
After cleaning and rinsing, all jets are checked to ensure compliance with their established sizes for a given type of carburetor. You can check the diameters of the holes using sewing needles of the appropriate diameter.
Below I have given the dimensions of the jets for the carb VAZ 2101
Dimensions of jets for carburetor VAZ 2101
Main fuel jet 1.35 1.25
Idle and transition system fuel jets 0.45 0.60
Accelerator pump bypass jet 0.40 -
Accelerator pump jet 0.40 —
Main air jet 1.70 1.90
Idle and transition system air jets 1.80 0.70
Econostat fuel jet - 1.50
Econostat air jet - 0.90
Econostat emulsion jet - 1.70
Air jet of the starting device 0.70-0.725 —
The size of the calibrated nozzle hole, mm, the first number is for the primary, and the second for the secondary chambers. The data is taken from a book that was inherited from my grandfather along with Kopeechka (VAZ 21013).
Solex jet ratio
Below in the picture I have shown the ratio of air and fuel jets for a Solex carburetor. There is a description below the sign, I think you’ll figure it out.
Adjusting the idle speed of the VAZ carburetor
Details
The VAZ-2107 car is equipped with a 2107-1107010 carburetor with an autonomous idle system, which means that when the engine is idling, both throttle valves are completely closed. The emulsion (a mixture of fuel and air) prepared by the carburetor enters the throttle space (under the throttle valve) through the idle channel, bypassing the throttle valve.
It is important that the carburetor adjustment is made after the following have been adjusted:
- gas distribution mechanism (valve), - ignition system, - and only then the carburetor.
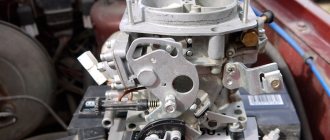
The idle speed is adjusted with two screws - quality (3) and quantity (1). These screws are located on the right side of the carburetor (in the direction of travel of the car) in its lower part.
Rice. 1.1 – screw for adjusting the amount of idle mixture; 2 – pipe for supplying vacuum to the vacuum ignition distribution regulator; 3 – screw for adjusting the quality of the idle mixture; 4 – locking screw of the throttle valve of the 1st chamber; 5 – accelerator pump cover; 6 – solenoid valve
We adjust the idle speed as follows (with the engine not running): - screw the quality screw (3) all the way and unscrew it by 4-5 turns, thereby completely enriching the mixture, - quantity screw (1), also screw it all the way and unscrew it to 3 turns, - start the engine (preheated or warmed up to operating temperature), - begin to tighten the quantity screw (1), setting the minimum stable idle speed within 800 rpm, - then gradually tighten the quality screw (3), while tightening screw, the engine speed should first increase slightly, and with further tightening it should begin to decrease and become unstable. At the moment when the revolutions began to become unstable, we unscrew the screw back (0.5-1 turn) until the engine speed is stable. Then, if necessary, use the quantity screw (1) to adjust the speed to the nominal 850+/-50 revolutions. Don’t forget to check how the engine speed changes when the load on the generator increases, with additional equipment turned on (lights, heater...) if necessary, the speed can be increased to 1000, especially in winter.
A little theory
When the engine starts, a vacuum is created in the intake manifold under the carburetor, which is transmitted through the idle channel, bypassing the throttle valve, to the emulsion well. Under the influence of vacuum, fuel is sucked into the emulsion well from the float chamber of the carburetor, which is calibrated by the fuel nozzle of the MDS (Main Dosing System). At the same time, air is sucked in through the air channel from the upper part of the mixing chamber, which in turn is calibrated by the GDS air jet. Getting simultaneously into the emulsion well, in which an emulsion tube is installed for better mixing, the fuel and air are mixed turning into an emulsion. The emulsion flows through the same idle channel into the intake manifold, and then into the engine cylinders. Moreover, it comes in sufficient quantities to ensure uninterrupted operation of the engine in idle mode with the throttle valve closed. In order to relatively accurately calibrate the amount of emulsion entering the intake manifold, an additional idle jet with a holder in model 05 (an electromagnetic valve in model 07) is installed in the idle channel, which is screwed into the carburetor body. After the emulsion has been calibrated with the idle jet, we only need to make finer adjustments using the QUALITY (3) and QUANTITY (1) screws.
Back
You have no rights to post comments
Device
As with all carburetors, the tasks of this unit include preparing the fuel assembly (a mixture of air and fuel). Mixing must be carried out according to a clear and programmed scheme, otherwise the car engine will receive unbalanced power. The device must recognize the dissimilarity of power unit loads at idle, medium and optimal speeds.
Carburetor components:
- Housing with float chamber.
- Dampers controlled by an actuator integrated with the vehicle's gas pedal.
- A lid in which the design provides a locking mechanism and an air damper.
- The idle system is designed for stable operation of the engine in this mode. It, in turn, includes in the design a return channel, screws for settings with O-rings, jets, etc.
- The main dosing system (MDS) is necessary for direct mixing of fuel assemblies. Consists of channels for various purposes.
- The econostat is designed to enrich the fuel assembly when the engine is operating at its limit. In essence, this is a system of additional channels that supply additional portions of gasoline when the dampers are opened.
- An accelerator pump that allows the car to accelerate without any jerks or dips. A group of additional paths in a housing with a ball valve, a membrane and a fuel atomizer.
- The transition system is used to smoothly increase the speed. Refers to the secondary chamber, consists of separate jets.
K-151 is a two-chamber mechanism with fittings, at the inlet of which there is a filter mesh that protects against the passage of debris and impurities. The carburetor of this model is equipped with a “return” through which excess fuel flows back into the fuel tank. The channel simultaneously prevents the creation of excess pressure inside the unit.
Several hoses are connected to K-151, one of which represents the suction system. Its presence simplifies engine starting in the cold season. It is more correct to call the element a trigger control handle. By using it, you can increase the supply of gasoline. The fuel assembly turns out to be more enriched.
The K-151 suction system simplifies engine starting in winter
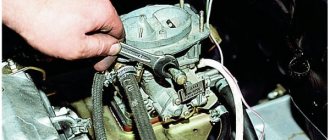
Preparing the carburetor for adjustment
VAZ 2107 - in the photo - the car is carburetor and is sensitive to fuel quality, therefore sometimes it needs to correct the capacity of channels and gaps
If the engine starts and runs stably at any speed and under any load, fine adjustment is unlikely to be needed. As a rule, this must be done in cases where the engine's fuel consumption exceeds the nominal values, when the engine is difficult to start, and dips appear in transient operating modes during sudden acceleration. Absence or instability of idle speed can also be treated by adjusting or cleaning channels and cavities.
Sometimes there are situations and clear symptoms that it is necessary to adjust the ignition timing or adjust the valves of the VAZ 2107, but the carburetor may be quite serviceable. Therefore, it is worth adjusting it only when there is confidence in the serviceability of the ignition system, the accuracy of setting the thermal clearances of the valves, after checking the functionality of the fuel pump, and good compression in each of the cylinders.
Adjustment may not bring results if the carburetor is clogged or has obvious mechanical problems or leaks. Therefore, a thorough inspection and assessment of the external condition of the device is necessary. Adjustment and configuration begin only when all these conditions are met.
How to adjust the carburetor on a VAZ-2101
The power unit of any vehicle, like the human heart, could not work without many auxiliary elements. The functionality of the engine directly depends on the quality supply of gasoline to the cylinders. In view of this circumstance, adjusting the VAZ-2101 carburetor becomes simply necessary. However, not every car owner will be able to properly configure the device. A person who wants to independently understand the operation of the engine and carburetor must have knowledge of their power supply system. Of course, even without the necessary experience, a motorist will be able to roughly adjust the device, but for more detailed settings, he will still have to contact more experienced service center specialists.
The functionality of the engine directly depends on the correct adjustment of the VAZ-2101 carburetor
The owner of a domestic vehicle who does not know how to adjust the carburetor on a VAZ-2101 can independently study all the intricacies that relate to setting up such a device. This will especially help those motorists who cannot find competent craftsmen. To begin with, you will only have to study the principle of operation of the carburetor, which will allow you to navigate between the jets located in the fuel supply system. The fact is that these small elements are responsible for the quality of the resulting mixture of air and gasoline.
Adjusting the VAZ-2101 carburetor is a mandatory process that allows the power unit to operate in normal mode. The internal combustion engine directly affects power, resource, efficiency and fuel consumption. In addition, the carburetor should not be readjusted too often.
It is enough just to occasionally clean the channels, flush the carburetor itself and change the jets. The motorist must ensure the timely replacement of fuel and air filters
In addition to the fact that parts need to be replaced, it is important to select high-quality components. When purchasing such parts on the market, it is important to monitor their condition in order to protect yourself in advance from malfunctions that may subsequently arise in the fuel injection system
It is necessary to ensure timely replacement of fuel and air filters
Repair instructions
As a rule, carburetor adjustment is required after 7500–8000 km. If the car is not used much, then this work should be carried out at least once a year. Before tuning, thoroughly clean the spark plugs, distributor and check the wiring.
Tip: During repairs, new cuffs and jets may be needed; these parts should be purchased in advance.
List of tools and preparatory work
Adjustment does not require much physical strength, the main thing is to do everything accurately and accurately. Preparing the tool:
- set of wrenches;
- flat and Phillips screwdrivers;
- rags;
- latex gloves;
- toothpicks;
- solvent;
- pump or can of compressed air.
The first step is to remove the top cover, float and vacuum valve from the carburetor.
After unscrewing the 4 nuts, remove the top cover of the carburetor and clean the chambers
The internal chambers must be thoroughly cleaned of dust and soot residues. replacing the timing belt on a VAZ 2109. Detailed instructions for bleeding the brakes on a VAZ 2101 yourself + video. In this article you will learn how to properly bleed the brake system of a VAZ. How to properly tighten the timing belt on a VAZ 2108. We clean small holes with air using a spray can or a regular pump. Warm up the engine and set it to the handbrake.
How to adjust the carburetor on a VAZ 2101
What is needed for adjustment
First you need to prepare the appropriate repair kit for the VAZ 2101 carburetor. You will also need new cuffs, carburetor jets and other spare parts. To adjust the carburetor, you will need a repair kit, which includes the following tools:
- Spanners.
- Rags.
- Screwdrivers (phillips, flat).
- Protective gloves.
- Solvent.
- Toothpicks.
- Compressed air can or pump.
After appropriate preparation of the repair kit, you can begin adjusting the VAZ-2101 carburetor. This does not require much effort. All actions must be careful and precise.
You also need to inspect the components on which the operation of the motor may depend. You need to inspect the spark plugs. By their appearance you can tell in what proportions the fuel is mixed with air.
The carburetor needs to be cleaned. To do this, dismantle its top cover. The float and vacuum valve are removed. The interior of the chambers needs to be cleaned. Soot and dirt accumulate here. Cleaning is carried out using an air can or a pump.
Another mandatory action is to check the gap between the distributor electrodes, as well as the high-voltage coil and wires. The adjustment is carried out only after the engine has warmed up to 90ºС. Cars are put on handbrake.
Throttle valve adjustment
Adjusting the VAZ-2101 carburetor begins with adjusting the throttle valve. This is a simple procedure. It can be done in three stages. Manually turn the damper control lever counterclockwise. It opens completely.
The distance to the primary chamber is measured. The carburetor design suggests that this figure is 12.5-13.5 mm. If the result is different, you need to bend the rod antennae. Throttle adjustment involves determining the opening value of the throttle valve. It should be 14.5-15.5 mm. Otherwise, you will need to tighten the pneumatic drive rod.
Starter battery correction
At the second stage, you will need to adjust the operation of the starting device. The throttle lever on the secondary chamber is manually turned counterclockwise. It will close. The tip of the thrust lever should fit snugly against the axis of the primary chamber throttle valve.
At the very end there should be a starter rod. Otherwise, you will need to adjust its position. To do this, the rod is bent. This device in carburetor engines is fragile. If you apply too much force to it, the rod will break off.
Checking the pump accelerator and repairing it
You need to start checking by testing the functionality of the system. You need to collect in a beaker the fuel that will be generated during 10 cycles of operation of the throttle lever. From 5.2 to 8.7 cm³ of fuel should accumulate. If this is not the case, you need to clean the VAZ 2101 carburetor jets. To do this, bleed the pump. This will help clear clogged injectors. This procedure is performed about 10 times. Then the fuel is measured again.
If the purging procedure does not give the desired result, the accelerator will need to be completely replaced.
If the engine malfunctions at high speeds, you need to check the pump diaphragm. It could wear out. The fuel pump rod often wears out.
Idle speed adjustment
Adjusting the fuel system involves adjusting the idle speed at the final stage. You will need to warm up the engine for 15 minutes. Then the engine must be turned off. The quantity and quality screws are tightened until they stop. The first of them needs to be released 3 turns. The quality screw is unscrewed 5 turns.
The motor starts. The quantity screw sets the speed, which is about 800 per minute. Then the quality screw is slowly tightened. This way you can reduce the enrichment of the fuel mixture. This procedure is carried out until the speed begins to drop. After this, the quality screw must be unscrewed another half turn and fixed in this position.
Knowing how the carburetor adjustment procedure is carried out, you can do the job well yourself. The engine will operate stably, and the VAZ 2101 will operate in normal mode.
Boats and motors in questions and answers
Rules of communication in the forum
| See all advertisements in the archive |
| Before you ask a question! How to correctly ask questions in the forum and use site materials. |
| Moscow time 08:07:46 | Your local time | Vladivostok time 15:07:46 |
| Author: Vlad (Tolyatti) Crimea B25 (178.45.168.—) Date: 05-03-12 02:27 A little off topic from boats. The carburetor on my car was completely screwed up. Engine 2101 1200 cm3. It was 2105. DAAZ. I have a 2107-1107010-20 that has never been used, also a DAAZ. There is from 21083, in principle, still alive. Only the landing plane was curved. I spent the whole evening leveling it yesterday, I think it was level. Tell me what is better to put. And what pitfalls might there be (except for connecting gas drives, choke, fuel hoses on 2183) I read all sorts of auto forums. They write who does what. |
| Author: Anatoliipif (2.93.163.—) Date: 05-03-12 02:33 Hello. VAZ 21083 will do. Drive from NIVA. Problems in winter - until it warms up, it won’t run. Good luck. Anatoly. |
| Author: Oleg 1974 (—.broadband.corbina.ru) Date: 05-03-12 03:54 Hello everyone! Better put 2107, believe me, this is the best option. The 21083 carburetor sucks, and for the classics you need to install different jets, redo the rods, etc. And 2107 will fit without problems, just don’t touch anything inside, the jets should remain as they are. I once made a living by repairing carburetors for quite a long time, so trust my experience. |
| Author: Vyacheslav D. (—.dynamic.mts-nn.ru) Date: 05-03-12 04:29 Anatoliipif wrote: > Hello. VAZ 21083 will do. Not really. The figure-eight carburetor is designed for transverse engines. The difference is in the location of the float chamber. If you put carb 2108 on 2101, then the level in the float chamber will change when driving uphill and downhill.... |
| Author: Bubble with PDA (—.cust.tele2.ru) Date: 05-03-12 04:51 But the nivovods from 21073 don’t know that their level is changing))). And the Solex 21051 was the export five. For the vehicle: put 21083, rods from Niva 21213. Be sure to connect the heating element of the primary chamber to the hose coming from the manifold - without it it’s bad. And don’t listen to anyone - Solex is better than Ozone. |
| Author: Bubble with PDA (—.cust.tele2.ru) Date: 05-03-12 04:54 Choke cable: you can stick a new wire (from 8) into the old shell, because staff is not enough. |
| Author: Maslov (—.opera-mini.net) Date: 05-03-12 05:36 When I bought a VAZ 2001 11 years ago, I installed contactless ignition and a V8 carburetor at 1100. The positive thing that happened was that it started well in winter and straightaway. After sitting in the garage for a couple of weeks, since I rarely drove for the last three years, I came, pumped up the gas, pressed the gas pedal 15 times and it started. I could start an argument. The carburetor did not fill the spark plugs. Somehow I tried to start the 7 in this way, it wouldn’t start, I had to pull the choke and not accelerate at all. Consumption at first (2 years) was 7.2 liters. The bad news was that the idle jet was constantly clogged. In 9 years I changed three jets. And indeed, during a long descent, when braking at the bottom, it stalled. So I sold it last year. In stores they sell a kit for installing from eight to classic. |
| Author: Vyacheslav D. (—.dynamic.mts-nn.ru) Date: 05-03-12 05:47 Bubble with PDA wrote: > Now the nivovods from 21073 don’t know that their level > is changing))). And for the export fives they used Solex 21051. For the vehicle: > put 21083, rods from Niva 21213. Be sure to connect to the hose > coming from the manifold, heating element of the primary chamber - without it it’s bad. And don’t listen to anyone - Solex is better than Ozone. What do 21073 and 21051 have to do with it. These carbs were designed for a longitudinal engine arrangement, unlike the figure-eight carb. Carbs 21073 and 21083 differ, among other things, in the float chamber rotated 90 degrees. |
| Author: s494 (—.broadband.corbina.ru) Date: 03/05/12 05:55 Since 1994, I know that eight-wheel carbs are installed on classics and they drive happily, without being driven by how the float chamber is located. If we assume that the level changes in such a way that it is noticeable for the operation of the engine, then a classic car with its original carb should stall in turns due to overflow or lack of fuel... well, this is so insignificant, because you yourself understand, why argue about it... |
| Author: lednic606 (85.26.164.—) Date: 05-03-12 06:37 Another “note” from experience... Solex is very sensitive to dirt in gasoline, be sure to install 2 fuel filters in a row, “troubles” will disappear. |