Most of the cars of the Samara family, including the Nine, were equipped with a carburetor power system, and only a small number of cars of the latest 2109 series were equipped with an injector. It is believed that Solex carburetors, which were installed on the VAZ 2109 and other models, are quite reliable, characterized by their simplicity of design, low cost and availability of spare parts. At the same time, it is no secret that over time, the carburetor settings may go wrong, which will lead to unstable engine operation in all or some modes and an increase in fuel consumption.
This scenario can be corrected or completely avoided by performing a simple carburetor adjustment procedure.
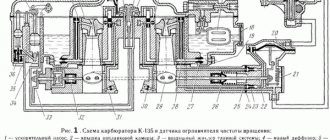
The design of the “nine” carburetor
Experienced, and even more so, novice car enthusiasts should learn the design of the carburetor of their car - this will help solve problems that are inevitable during long-term use of the car.
The user manual describes in sufficient detail the diagram of the carburetor, the purpose of its components and systems, describes operating modes and methods for eliminating the most common problems. In other words, this manual can be called your first and main textbook, allowing you to learn the basics of repairing car parts, including the carburetor.
The only thing worth mentioning is that in this manual you will not see any detailed information and nuances regarding carburetor disassembly that you may encounter. You will have to deal with them along the way, on your own or by turning to the World Wide Web for help - on the Internet you can find answers to almost any automotive questions, especially regarding the VAZ 2109.
Cars of this family were equipped with a Solex carburetor, a domestic development adapted for VAZ classics and later production models. For this reason, if the carburetor fails, it will not be easy to find a suitable analogue - the auto-choke system is rarely present in carburetors of other brands. However, Solexes are still produced, despite the fact that the era of carburetor cars has sunk into oblivion.
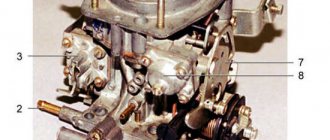
Design features of the VAZ carburetor:
- it is two-chamber, between the chambers there are fuel and air jets;
- Solex has a main part and a cover connected with screws. The lid contains floats, an air damper, a starting device is located here, and a solenoid valve is installed;
- The main part includes diffusers, an exhaust system, gasoline dosages, and an accelerator pump. There was also a place for both the economizer and the heating system;
- At the top of the lid there is a fuel supply pipe, as well as a pipe for returning excess fuel to the gas tank.
The design of the carburetor was constantly improved, but the improvements did not affect the principle of operation of the main units and systems.
Preliminary work
Although our primary task is to adjust the VAZ 2109 carburetor, we need to start cleaning the unit from carbon deposits and dirt. Often plaque is the cause of the problem, so you will need a good cleaning agent. In the auto supply store you can find various chemicals for such needs; You need to ask specifically for the carburetor. WD 40 is not suitable for cleaning due to the abundance of oil in the composition.
In addition to chemistry, the following items will also be useful to you:
- Small stiff brush. In extreme cases, a toothbrush or even toothpicks will do.
- Rubber and fabric gloves. You can take two pairs of rubber ones - just in case, because cleaning products are very aggressive.
- Set of keys and screwdrivers.
- User manual for VAZ 2109 with Solex circuit.
- A can of compressed air for blowing parts.
What is the spray can for? The fact is that the nozzle channels are very narrow, which is why mechanical cleaning using narrow tools will be useless, but a powerful directed air stream is suitable for such a task.
You need to carefully clean both the outside and inside of the carburetor. Fastenings - screws and bolts, put them in separate boxes, they should also be processed and blown out at the end.
Be sure to remove all rubber parts from the assembly, otherwise the chemical will simply dissolve them. The same should be done with plastic. Only metal parts need to be treated with the cleaner. This is done in two stages:
- The chemical is applied, after which you need to wait 10 minutes.
- When the coating has partially dissolved, you need to rinse the parts and housings under running water.
If any deposits remain, they can be easily removed with a toothpick, stick or brush. The last stage of cleaning is drying.
How does a VAZ 2109 carburetor work?
We will not consider in detail the operating principle of Solex: firstly, it is long, and secondly, we have already discussed this topic. But let’s outline it in general terms.
The main purpose of any carburetor is an uninterrupted supply of the engine with a fuel-air mixture (FA), regardless of the current operating mode of the power unit.
Normal starting of a cold engine is ensured by opening the air damper; on Solex, this is done manually using a choke lever from inside the car. This will enrich the fuel assembly so that the engine starts. As it warms up, the choke is removed, the air intake closes, and the carburetor begins to function normally.
Fuel is pumped by a gasoline pump into the float chambers to a certain level, regulated by a needle valve. From the float chamber, gasoline is directed to the main jet, and from there to the primary chamber. The supply volumes depend on how much the accelerator pedal, connected through a rod to the throttle valve, is pressed. If the pedal is pressed halfway, the secondary chamber begins to work, allowing you to smoothly transition from medium to high speeds without failures.
The idle mode is also distinguished by its specificity - the main metering system is not used in the fuel supply process, both gasoline and outside air enter the carburetor through separate channels, which also have their own jets.
Most often, carburetor problems begin with the XX mode, but on Solex this can be adjusted.
What to do if the spark is lost?
The peculiarities of our climate and roads provoke a situation where the spark is lost and the engine does not start.
The reasons why the spark is lost are usually the following:
- The switch is not working properly;
- The Hall sensor is not functioning correctly;
- The ignition coil has failed;
- Contacts are oxidized or dirty;
- There was a breakdown of the high-voltage wire;
- The ignition switch is not working properly and needs repair.
There is another reason, the consequence of which is that the spark has disappeared - the spark plugs, or rather the contacts, have become black from soot. The spark may be lost if the ignition timing of the carburetor is set incorrectly. There may be more reasons why the spark disappears and the engine does not start; you need to check the carburetor for malfunctions and, if necessary, carry out repairs.
Setting up the “nine” carburetor
In addition to adjusting the crankshaft speed (when the power unit is operating without load, that is, in idle mode), on the VAZ 2109 you can independently adjust the fuel level in the float chambers. Adjustment procedures are used as needed in the following cases:
- when the engine begins to “float” at idle speed;
- the engine starts reluctantly, many attempts are required;
- when you press the gas sharply, the acceleration dynamics do not meet expectations;
- During acceleration of the WTO, failures in the operation of the motor are observed.
Each of the above symptoms indicates that the problem most likely lies in abnormal carburetor operation. In approximately half of the cases, it is due to a fuel level violation.
Reasons why candles flood
This question worries owners of carburetor cars much more often than owners of injection cars. This happens especially often in winter. There are several reasons for this malfunction:
- In order to mix the working mixture in the winter, much more effort is required than in the summer. To avoid this problem, it is necessary to fill the engine with high-quality oil, keep the battery fully charged, and also monitor the serviceability of the starter;
- the engine is very worn out;
- Poor quality spark plugs or spark plug wires.
Adjusting the float of the "nine" carburetor
Setting up floats in Solex chambers is a simple procedure that does not require the use of specialized tools or special skills.
However, in the factory, this procedure is partially automated and is performed using a special template, which significantly simplifies the adjustment. But if you do the work yourself, you don’t need a template, but we will need the following tools and equipment:
- two screwdrivers, with a flat head and a Phillips head;
- a caliper or ruler (it is better not to use metal, wood or plastic);
- a piece of wire with a diameter of no more than 2 mm (you can use a thin drill or a similar round rod).
This set is sufficient to perform the entire range of adjustment procedures.
Classic method
In accordance with the recommended method, adjusting the fuel level of a Solex carburetor is carried out in stages in the following sequence:
- start the engine and let it run for a couple of minutes to fill the carburetor chambers with gasoline;
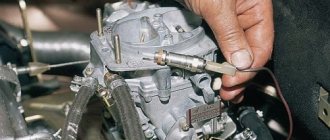
- Structurally, access to the carburetor is blocked by the air filter, so it must be removed along with the housing. This is done simply: unscrew the top nut, unfasten the side fasteners to remove the cover, remove the filter itself, and then dismantle the air filter housing by unscrewing the 4 fastening nuts;
- after lifting the case, it is necessary to disconnect the rubber pipes from it;
- now we perform the same operation with the fuel pipes connected to the carburetor; when removing them, there is a risk of spilling gasoline remaining in the system, this circumstance must be taken into account;
- now you need to disconnect the wire going to the solenoid valve of the XX system;
- the turn has come to disconnect the air damper drive (the cable coming from the choke handle);
- you can begin to remove the Solex cover, which is secured with five screws;
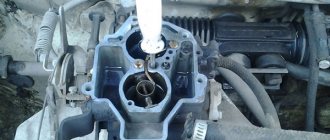
- After the carburetor cover is put aside, you can immediately measure the current fuel level in the PC using a caliper depth gauge or simply lowering the ruler down all the way. Normally, this distance should be within 2.5-2.6 cm; if this is the case, subsequent adjustment of the fuel level of the Solex carburetor is not required;
- if the gasoline level is less or more, you need to inspect the mechanism for attaching the floats, and if everything is normal, adjust them;
- to do this, place the previously removed cover on a horizontal surface, the floats will be at the top;
- We carefully examine the relative position of the elements. The outer sides of the floats must be strictly parallel to the imprints made on the gasket. If there are distortions, this may cause the floats to come into contact with adjacent surfaces and parts, which leads to a change in the fuel level. The problem is solved by bending the fastening levers so that after this the floats move freely and do not touch anything;
- if this is not the case, measure the distance between the gasket and the floats. This gap should be equal to two millimeters, for which we needed a wire of the appropriate diameter. If the distance does not correspond to the standard, bend the tongue through which the float pushes the valve (needle). After this, we measure the height of the floats (guideline - 3.4 cm). If it was not possible to achieve the specified distance, we repeat the procedure with bending the tongue until we achieve the goal;
- The final stage of the procedure is measuring the working chord of the floats. The principle is simple: we install a caliper near the float, measure the distance from the surface of the Solex cap to the lower edge of the float, and then lift the float with our hands until it stops. We fix where its lower corner is now located. Normally, the working stroke should be 1.5 cm, if it is more/less, we again turn to the procedure of bending the float tongue.
Quality screw removal method
With Solex carburetors, the XX channel in the body itself often becomes clogged, and in order to clear it thoroughly, it is necessary to remove the quality screw. But this screw, as mentioned above, has a very tight fit and is not easy to get out. There are several methods for dismantling a part; we will consider only one option.
We take a piece of an old antenna from any radio receiver, select the outer diameter so that the tube fits into the channel of the carburetor body, usually the outer thickness of the “puller” is about 4 mm. We cut off a small piece, make a cut at one end (about 1 cm deep), use another quality screw (a spare one, or you can buy it specially in a store), and check how tightly the tube fits onto the head of the screw.
Now you can unscrew the screw and use a homemade puller to remove it from the KU body.
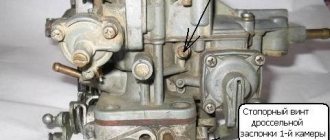
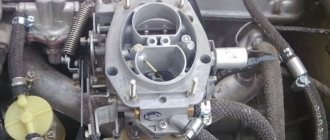
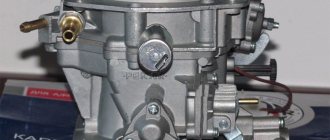
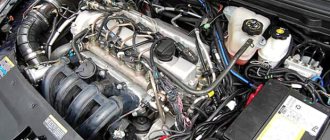
Adjusting carburetors is a delicate process and requires some caution. In order to obtain the desired result, the idle speed is usually adjusted. So, here is a standard carburetor for a VAZ 2109:
The “quantity” and “quality” screws with which the carburetor is calibrated are clearly visible here.
Fine adjustments are not made with the engine running. This is important - don't forget. What to do:
- Warm up the engine and turn it off.
- Take the mixture quality screw. First you need to tighten it to the limit. Then unscrew it four or five turns. As a result, we get a completely enriched mixture.
- Next, we do the same with the quantity screw, but unscrew it three turns.
- The preheated engine can now be started.
- Using the quantity screw you need to adjust the idle speed. The limit is 800 rpm.
- Now, slowly tighten the mixture quality screw. An important point is that the gas distribution mechanism, ignition and the carburetor itself must be in good working order!
- We adjust the speed further. They will grow a little at first. Then they will become less stable. As you continue to tighten the screw, they will become smaller. As soon as you notice that the speed is unstable, you can unscrew the screw half a turn.
- Next, we correct the speed using the quantity screw. Don't forget to check the number of revolutions under increased loads - with the oven on, for example. In winter, even from the usual 850 rpm, you should raise it to 1000.