Published:
04.03.2017
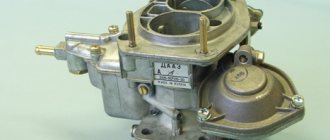
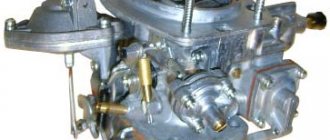
With the start of serial production of the “nines”, a newer and more advanced version of the Solex carburetor appeared, which is characterized by increased performance and efficiency. These carburetors were equipped with all modifications of the VAZ-2109 until the manufacturer began using injection engines. When servicing and repairing a carburetor, many drivers limit themselves to simply removing and purging it, entrusting the task of more in-depth repairs to car service specialists. If you intend to carry out all the repair work yourself, but do not have the necessary information on how to remove and repair the carburetor on a VAZ-2109, read this article.
You can remove, clean and repair the unit yourself, following our instructions
Due to harsh use or as a result of natural wear and tear of individual parts, the carburetor may fail. Even an inexperienced car enthusiast can determine whether the problem is a malfunction of this unit - you just need to monitor the operation of the engine. You can correctly diagnose a malfunction if you know what characteristic signs are inherent in it. Thus, malfunctions in the operation of the carburetor may be indicated by:
- uneven engine operation and unstable idling;
- difficult starting and reduced engine power;
- increased exhaust smoke;
- increased fuel consumption.
If all or one of the above “symptoms” are identified, the carburetor needs to be repaired. To do this, you can contact a service station or perform all the necessary operations yourself. This way you will be able to save a little and get to know your car better from its technical side.
The performance of the entire engine directly depends on the condition of the carburetor.
DIY carburetor repair
Before you take a screwdriver and start turning the screws of the fuel unit, you need to understand one important point. It is as follows: adjusting the Solex carburetor is not a separate operation, but the final stage of the troubleshooting procedure or its scheduled cleaning. The only exception is if the settings were accidentally or unknowingly changed by you or someone else.
The following signs indicate interruptions in the supply of the air-fuel mixture to the engine associated with Solex problems:
- the car began to stall at idle;
- fuel consumption has risen above normal and is accompanied by unstable operation of the power unit;
- a cold engine starts and immediately stalls, you have to make several attempts by manipulating the choke lever and the accelerator pedal;
- when you press the gas, a “failure” occurs, accelerating dynamics are completely absent;
- The car stalls while driving when you release the accelerator pedal while coasting.
Point two: fixing not every problem ends with adjusting the fuel supply. The issue will be covered in more detail below, along with methods for repairing common breakdowns of the G8 carburetor. But in some cases you can’t do without adjustment:
- after removing or disassembling the Solex for the purpose of repair;
- upon successful cleaning or purging of the unit’s channels;
- after replacing rings or the entire piston group in a car engine;
- as a result of reconfiguring the timing in the ignition system, replacing high-voltage wires or installing new spark plugs.
The first adjustment of the Solex is performed during the assembly process. This is the installation of the trigger drive cable. Press the “choke” handle all the way, insert the cable into the hole in the lever, and clamp its casing on the bracket. Then secure the cable with a bolt when the damper is in the “fully open” position and check the operation of the mechanism.
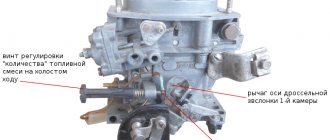
2 screws are responsible for the fuel supply settings:
- a plastic handle installed on the right wall of the unit and regulating the amount of mixture;
- on the same side, at the end of the carburetor sole, there is a well where a screw is hidden - a mixture quality regulator, which is responsible for the ratio of air and fuel for idling.
The operation of the VAZ 2108 carburetor is adjusted on a warm engine, so after assembly, start it and bring it to operating temperature. If the engine stalls during warm-up, add speed manually by slightly tightening the fuel quantity screw. Perform the settings in the following sequence:
- Using a thin flat screwdriver, unscrew the quality screw until the engine speed stops increasing. Then tighten it half a turn.
- Reduce engine speed to 100 rpm by turning the plastic quantity screw knob counterclockwise.
- Achieve a crankshaft speed of 850 rpm by tightening the mixture quality screw.
If you have previously corrected minor problems, as a result of which the engine idle speed has become higher, then you do not need to touch the quality screw. Reduce them by turning the plastic handle, bringing them to the norm - 850 rpm.
How to adjust a Solex carburetor yourself
What is the repair of a VAZ-2109 carburetor, what does it involve? Repair work involves removing, disassembling and cleaning all its systems. And also, if necessary, replacement of elements that are unsuitable for further use is carried out. But before you start removing or disassembling anything, you should purchase a carburetor repair kit in advance, consisting of jets, gaskets and diaphragms for the accelerator pump and starter.
The first stage of repair work is dismantling. The following manual will tell you how to remove the VAZ-2109 carburetor:
- The carburetor can only be accessed after removing the air filter. To do this, you need to unscrew the four fixing nuts, and it is better to first close the diffusers with a clean rag so as not to accidentally drop the nut into the carburetor;
- Next, you need to disconnect the pipes, disconnect the accelerator linkage and disconnect the air damper drive cable;
- Now, using a wrench, unscrew the four nuts that secure the carburetor to the intake manifold.
Sometimes it happens that after unscrewing the nuts, the carburetor does not come off. The reason for this is the studs stuck to its body due to moisture penetration. When trying to tamper with something, be careful, as the carburetor body is made of a soft metal alloy and can be damaged.
How to disassemble a carburetor
After dismantling has been completed, you can begin disassembly. You can learn how to disassemble a VAZ-2109 carburetor from the step-by-step instructions below. But first, you should pay attention to the fact that all work must be performed on a clean table or workbench, on which there are no unnecessary parts that are in no way related to the repair process. The disassembly itself is carried out as follows:
- First of all, unscrew the solenoid valve, from the body of which the fuel nozzle should be removed.
- Next, unscrew the five screws using a Phillips screwdriver and remove the carburetor cover. Care must be taken here as there is a chance of damaging the float.
- Now it is possible to remove the fuel system float. This is done by extruding the axis of its fastening using any thin tool.
- After this, you need to remove the sealing gasket. Considering that this is a consumable item, it is better to replace it, like other consumables. This way you will extend the life of the carburetor without interruption.
- Using a spanner or socket (so as not to deform the edges), remove the fuel valve. Carry out an external inspection of it and make sure it is in good condition - there should be no jamming or play when the needle moves.
- Visually inspect the diaphragms and trigger for mechanical defects and wear.
- The fuel filter located on the side of the cover must be unscrewed, after which the accelerator pump nozzles can be removed. If necessary, replace the nozzles and rubber sealing elements.
- Now the accelerator pump diaphragm must be removed. To do this, you will have to remove its cover by unscrewing four screws using a Phillips screwdriver. If the cover and return spring are simply washed in acetone, then the diaphragm itself must be replaced.
- Next, having unscrewed the two emulsion tubes, you will find fuel nozzles underneath them - they should be unscrewed with a screwdriver and shaken out, turning the carburetor over.
- And the last disassembly operation is to unscrew the mixture quality adjustment screw, but before that you need to remove the wire from the sensor shank.
DETAILS: Car diagnostics by hearing knocks and whistles under the hood
This is how disassembly is carried out, after which you can proceed to the next procedure - washing the parts.
Cleaning the carburetor on the “nine”
How to clean the carburetor on a VAZ-2109 car yourself? To begin with, it should be noted that there are two types of device flushing - external and internal. The need for the first type of cleaning does not arise so often and only in cases where, due to accumulated dirt, the operation of moving parts is disrupted.
To work, you will need acetone or kerosene to wash parts. If one of the indicated liquids is available, and you purchased the repair kit in advance, you can proceed. So, it is necessary to clean the following components included in the carburetor design:
- fuel valve;
- jets and fuel main jets;
- accelerator pump nozzles;
- accelerator pump cover;
- emulsion tubes.
If you understand the question of how to flush a VAZ-2109 carburetor and which parts must go through this procedure, then all of them must be dried after completion of the work. You can use compressed air for this.
As mentioned earlier, in order to properly adjust the carburetor, you need to contact a good specialist. To do this, you need to go to a service station. Well, I want to drive more or less normally. Therefore, you can at least adjust the idle speed and the amount of mixture.
After adjustment, the engine will run relatively normally. The adjustment is made according to the user manual (a book with the device of a VAZ 2109 car) or “by eye”. In the second option, it is necessary to set it so that the idle speed is within 1000 rpm, and when you press the gas pedal the car does not “stupid” and quickly gained momentum. Adjustment is carried out using the fuel quality and idle speed screws.
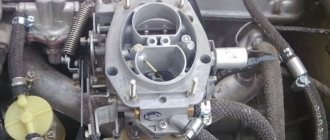
Carburetor VAZ 2109: how does it work?
All VAZ “eights” and “nines” were equipped with domestically produced automobile carburetors “Solex”, which are classified as emulsion-type units.
He has:
- two main dosing systems;
- an idle mechanism and a transition system of the first chamber, equipped with a shut-off solenoid valve;
- diaphragm starting device;
- transition mechanism of the second chamber;
- accelerator diaphragm pump;
- power mode economizer;
- econostat.
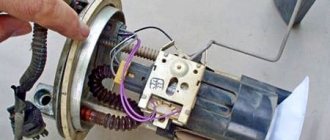
Also, the car carburetor we are considering has an idle economizer, which is forced to start. It consists of:
- a screw switch, which is designed to adjust the idle mixture volume;
- control unit (electronic);
- shut-off valve;
- a set of wires connecting all specified elements of the system.
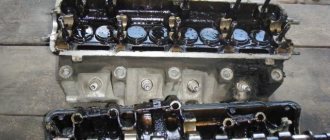
The carburetor is installed using four studs on the intake pipe. Secure it with nuts. The throttle valves are opened using a pedal located inside the car. A cable in a special sheath is attached to its upper part, which allows you to control the dampers.
Setting the fuel level
Adjusting the amount of fuel in the chambers of Solex carburetors is a simple procedure and does not require specialized equipment. Although in the factory this adjustment is performed using a special template, which simplifies and speeds up the work. But at home you can do without this template. To carry out adjustment work yourself you need:
- screwdrivers (phillips, flat);
- ruler (preferably a caliper);
- round rod with a diameter of 2 mm (wire or drill will do).
With such equipment you can quickly complete all work.
Preparing tools and devices
If you intend to thoroughly clean the carburetor of your V8, then you will not be able to do it without a compressor. To blow out accumulated dirt from the channels, it is necessary to supply air at a pressure of at least 6 bar. The remaining tools are common ones found in every garage:
- 2 screwdrivers - Phillips and thin with a narrow flat slot;
- a set of small open-end wrenches - 8, 10, 13 mm;
- round nose pliers;
- rubber bulb (syringe);
- 2-3 wooden toothpicks;
- rags.
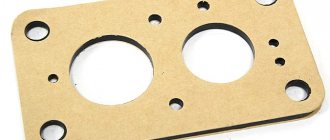
A special product sold in aerosol cans (for example, from the ABRO brand) is excellent for cleaning channels. Do not use acetone or inorganic solvents, which corrode plastic parts, for cleaning. Buy new paper gaskets for DAAZ 2108 carburetors in advance (they will also fit the “nine”).
Aerosols
It is convenient to work with them, since the aerosol comes out under pressure and additionally clears blockages with a flow of air with the mixture. Sprayers contain propane, acetone and a number of other dangerous components. Therefore, avoid getting them in your eyes and hands. They catch fire easily and can only be extinguished with carbon dioxide fire extinguishers.
Aerosol Abro for carburetor cleaning
Aerosols do an excellent job, but they cannot clean the float chamber.
The cleaning process is the same for all cars:
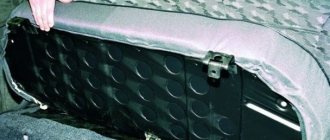
- Remove the air filter;
- Spray cleaner through the tubes outside and inside;
- After 3 minutes, start the engine at high speed and spray the product intermittently for 2 minutes.
This process will take you a maximum of 15 minutes.
Carburetor jets VAZ 2109
In terms of their effect on the quality and composition of the fuel mixture, they are opposite:
- depletion of the mixture is fixed when the cross-sectional area of the air jet increases;
- enrichment is noted as the cross-section of the fuel nozzle increases.
Moreover, the level of their influence depends on the specific operating mode of Solex. The composition of the combustible mixture is regulated in direct proportion to any throttling modes by the cross-section of the fuel nozzle. But the impact of its “brother” is more noticeable with an increase in the throttle opening angle.
Due to these features of the VAZ 2109 carburetor jets, you should remember that:
- the fuel mixture curve must be changed using an air jet;
- The composition of the mixture according to the range of characteristics is changed by the fuel nozzle.
Why do the revs fluctuate?
This is also a common problem that begins to appear in a car after a significant mileage. To check, turn on the idle speed of the car, and then turn on the various mechanisms in turn. If you see that the speed is floating, it means that the problem needs to be solved. One of the causes of the malfunction may be a short circuit.
Another problem is that the idle speed has disappeared. As a rule, there are three reasons for this - clogged nozzle, burnt out or lack of power to the solenoid valve. If the idle speed disappears, check this first.
Setting up and adjusting the VAZ 2109 carburetor is quite easy and solves many of the above problems, including reducing fuel consumption, but if you go to a car repair shop it will cost a significant amount of money. It is more convenient to carry out the work with an assistant, this will reduce the time spent. No special tools or equipment are required. If repairs are required, it is better not to do them yourself, but to contact specialists.
In order for carburetor repairs to be required as rarely as possible, you need to use high-quality fuel for the car.
Regularly lubricate quality screws and choke cables. The cables still need regular replacement.
What to do with increased consumption
Before you tightly grasp the carburetor, be sure to make sure that the other systems are in good working order - the spark plugs are in working order, the high-voltage wires do not break through to ground, and there is compression in the engine cylinders (the minimum value for the VAZ 2108 is 11 Bar). Unscrew the spark plugs and check the condition of the electrodes.
DETAILS: Reasons the car does not start when cold
The most unpleasant problem is an increase in fuel consumption, which occurs for the following reasons:
- the economizer diaphragm is worn out;
- the main air jet or channels inside the unit are clogged;
- the needle valve, which limits the flow of fuel into the float chamber, does not hold;
- jets of unknown origin from a repair kit were installed.
To check the diaphragm, remove the air filter housing (the cover is secured with 3 10 mm nuts, the housing with 4 8 mm nuts). On the left wall of the carburetor in the direction of travel of the car, find a triangular economizer cap screwed with 3 screws, unscrew them with a Phillips screwdriver. Underneath there is a spring-loaded membrane that needs to be checked and replaced if necessary.
To eliminate other causes, you will have to remove the top cover of the Solex by disconnecting the starter cable and unscrewing the 5 fastening screws with a Phillips screwdriver. Then follow the instructions:
- Unscrew the air jets, remembering where each one should be. Fuel jets are hidden under them in the wells; unscrew them with a thin screwdriver and pull them out with a toothpick. Blow through the calibrated holes thoroughly.
- Using a blower, suck the gasoline out of the float chamber along with the dirt. Fill all channels and diffusers with the product from an aerosol can, wait for the time indicated on it and carefully blow out the carburetor without removing it from the car.
- Take the removed cover of the unit, turn it with the floats up and try to blow into the fuel supply pipe, plugging the pressure release fitting with your finger. If air passes through, replace the needle valve as it will also allow gasoline to pass through unhindered.
- If you replaced all the jets before increasing the flow rate, feel free to unscrew them and throw them away, and return the standard ones to their place.
- Before assembly, make sure that the floats do not touch the walls of the chamber; if necessary, carefully bend them.
- Reassemble the Solex in reverse order and begin adjusting.
Reasons for tuning
Two carburetors instead of one is a fairly effective tuning that has sound reasons. It’s even surprising why engineers didn’t think of this before at the stage of development of the VAZ 2109 model. One of the main reasons that contributed to the emergence of such a modernization is a design error in the power unit, as a result of which the manifold pipes have different lengths. This opinion is shared by many tuner experts. This difference has led to the fact that the largest amount of fuel falls on the first and fourth cylinders, while the rest do not receive enough fuel.
Setting the float chamber of the Solex carburetor
To check the fuel level and adjust it to the driver’s individual needs, the float chamber should be adjusted. This is done like this:
- start the engine for a few minutes, then turn it off;
- remove the filter (air) from the carburetor;
- the fuel supply hose is disconnected;
- remove the carburetor cover (to do this you need to unscrew five bolts).
After this, measure the distance between the fuel level in the float chambers and their edges using the shank of a caliper. The optimal distance is 25.5 millimeters. The distance can be brought to this value by bending the float brackets (their tongues). The required result is usually achieved by repeating the folding procedure 2-3 times.
When the cover is removed, it is also recommended to immediately check the parallelism of the floats (the edges of these elements). Parallelism can be adjusted by acting on their brackets.
On a VAZ 2109, carburetor repair involves cleaning the main elements. There is also the possibility of replacing some parts of the carburetor.
To carry out DIY repairs, you will need the following tools: wrenches, screwdrivers, rinsing agent (gasoline, acetone), a rinsing container, and a clean rag. After all the preparatory work has been completed, you can begin to remove the carburetor.
Removal
Removing the carburetor occurs in the following order:
- Disconnect the air filter from the carburetor. Unscrew the nuts securing it, and also remove the pipes.
- Then you need to remove the accelerator rod and also disconnect the choke cable.
- After this, use a wrench to unscrew the carburetor fastenings from the intake manifold.
Disassembly
Disassembly instructions:
- The first step is to remove the solenoid valve on a previously removed carburetor. The fuel nozzle must be removed from this valve.
- The next step is to remove the carburetor cover. It is secured with 5 Phillips screws. The cover must be removed carefully enough to avoid damaging the float.
- Remove the fuel float. Nothing complicated - just use something thin to press out the fastening axis and it comes off.
- Removing the sealing gasket. It is recommended to change the gaskets. You should look at the mark on the gasket - if it is uniform, then everything is in order. If the trace from the body is interrupted, then the planes of the carburetor and the cover do not coincide. The lid needs to be ground into the body.
- The next step is to remove the fuel valve. It is advisable to do this with a spanner or a socket - there is less chance of licking off the edges. Check the valve for functionality. The needle moves without jamming, there is no lateral play, the ball moves easily - these are signs of a working valve. If one of the points falls out, the fuel valve needs to be replaced.
- Checking the trigger and diaphragm. The spring is not very stretched, the diaphragm is intact and elastic, there are no mechanical damages.
- Remove the fuel filter located on the side of the carburetor.
- Accelerator pump nozzles. They just pull out. It is advisable to replace the rubber bands and sprayers (if necessary).
- Replace the accelerator pump diaphragm. Unscrew the screws, remove the cover, diaphragm and spring.
- Unscrew the two emulsion tubes.
- Fuel jets are located under the tubes. They also need to be removed. Use a screwdriver.
- Then unscrew the screw for adjusting the amount of mixture.
We looked at the VAZ 2109 carburetor - repair, or rather disassembly, is not difficult. Next, you need to clean the parts yourself and replace some parts if necessary.
Cleaning
After disassembling the VAZ 2109 carburetor, it is necessary to wash some parts in acetone or gasoline. If you decide to change parts, then, accordingly, you can simply throw away the old ones. If you leave them, then washing and cleaning them yourself will ensure better performance of the carburetor in the future, and it will also last longer until the next repair. On a VAZ 2109, the carburetor requires careful repair - and cleaning, of course, too. List of what needs to be soaked in kerosene:
- solenoid valve jet;
- fuel valve;
- fuel filter;
- accelerator pump nozzles;
- accelerator pump cover;
- main fuel jets;
- emulsion tubes.
After washing, it is also necessary to blow out all parts with compressed air. It is very convenient to do this using a compressor.
DETAILS: Kia Rio maintenance: overview, list of works
Assembly
Typically the assembly process is the reverse of the disassembly process. But to avoid any confusion, a detailed list of works is provided in the sequence for assembling the VAZ 2109 carburetor. So:
- Installing the fuel filter. Either new or a well-cleaned old one. Install the plug.
- Install the float into the chamber. Be sure to check the float for integrity. Place it in a container of fuel for a couple of minutes and if there is gasoline in the float, it should be replaced. Replace the gasket if necessary.
- Replacement of all diaphragms.
- Assembling the accelerator pump, fuel pump, economizer.
- Solenoid valve. Checking functionality - connect it to the battery. Plus to the valve terminal, minus to the body. The needle should retract. If not, replace it with a new one.
- Installation of emulsion tubes.
- The last thing is to put back the carburetor cover.
- Note. After washing and assembling the carburetor, it is advisable to blow out the carburetor assembly with compressed air. So to speak, a control shot.
Installation
The installation process is simple, but there are some details to pay attention to. When installing the carburetor on the intake manifold, pay attention to whether the body is flat. In simple terms, whether it is flat or has been deformed. You can check this using a rule or level, for example.
Troubleshooting other problems
Among minor problems, the most common problems are idle speed. They are decided depending on the reason:
- The electric valve that opens the idle jet does not work. Check the voltage supply to it with the ignition on, and then unscrew the valve and watch how it retracts the needle. If this does not happen, replace the part.
- The idle jet is clogged. Again, unscrew the valve and blow through the calibrated hole.
- The rubber o-ring on the valve has become loose. As a result, air leaks occur, causing the engine to operate unstably. Replace the seal.
- The rubber ring sealing the idle channel is torn or weakened. It is put on a thin brass tube pressed into the carburetor body. To get to it, you need to remove the unit cover.
- The channels supplying the fuel mixture for idling are clogged. The issue is resolved by washing and purging, as described in the previous section.
When the car stalls during a cold start, you need to change the trigger diaphragm. Due to the breakthrough, it does not retract the air damper, causing the engine to “suffocate.” The unit is located on the right side (in the direction of travel), its square cover is held on by 4 screws. Unscrew them and change the diaphragm.
When you feel a “failure” when you press the accelerator and accelerate the car, your actions should be as follows:
- Check the accelerator pump diaphragm, located under the cover on the left wall of the carburetor (in the direction of travel of the car). If it is torn, replace it.
- Remove the air filter housing and the top cover of the Solex. Underneath it, look for nozzles built into the fuel supply diffusers. Pry them off with a screwdriver, pull them out and blow them out. Replace the rubber ring if it is torn.
- Test how well the accelerator pump lever presses the diaphragm. If play is detected, change this lever.
The last malfunction lies in the electronic unit EPHH, which controls the operation of the electric valve. If the “eight” stalls when coasting in gear, then the reason is precisely this block. Changing it is not a problem; the price of this part is low.
As a rule, after eliminating the listed problems, carburetor adjustment is not required. But if you notice a change in speed in one direction or another, then the settings can be slightly adjusted.
Diagnostics of VAZ 2108 carburetors - video
Idle speed adjustment
The most common problem with a Solex carburetor is the disappearance of normal idle speed; the engine begins to operate intermittently at low speeds. Very often, the cause of such a malfunction is either a clogged EMG jet or the solenoid valve itself. It is very easy to check this - while the engine is running at idle, we disconnect the wiring from the EMG; if the nature of the internal combustion engine does not change at all, and when the valve is unscrewed, the speed increases noticeably, then the defect is present.
You can try to restore normal operation of the XX without removing the entire assembly, and this procedure is quite simple:
- With the engine off, remove the air filter with housing:
- disconnect the EMG wire, unscrew the valve itself;
- we start the engine, plugging the “idle” channel with a finger, “accelerate” several times;
- we stop the engine, do not forget to blow out the EMG and its nozzle using a compressor or hand pump, separating these parts from each other;
- we put the parts in place, do a test start of the internal combustion engine: if the idle speed has stabilized, and when the wiring was removed, the speed changed, it means that the reason was precisely the blockage, and now the idle speed has “returned to normal.”
But it is not always possible to clean the channel in this way; specks may get stuck in the area of the quality screw. Here you already need to remove and disassemble the carburetor, dismantle the screw, which in general is not very difficult, since it is located deep in the channel and is held there by a rubber sealing ring.