According to many years of experience of various car enthusiasts, replacing the cylinder head of a VAZ 2109 is most often associated with problems arising with the gasket. But there may be others that can cause the engine to overheat or even seize.
Every driver can repair and modify the cylinder head on a VAZ 2109, but special tools and a little knowledge of the operating principle of this unit are required. Recently, tuning of this unit has become increasingly popular, due to which the power of the car increases. Carrying out tuning yourself is possible if you have experience in such work. Working with valves and actuators requires specialized knowledge and skills.
When is it time to change?
- When replacing or repairing a cylinder head, you may begin to notice that fuel consumption has increased or the unit's power has decreased.
- Also, improper assembly and installation of valves and cylinders can lead to malfunctions in the cylinder head system.
- If you constantly fill your car with low-quality gasoline, do not be surprised that over time this system will begin to malfunction and will require repairs.
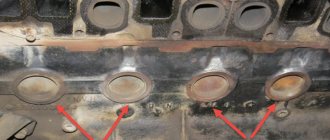
- The resulting crack in the block cannot be repaired except by completely replacing the element.
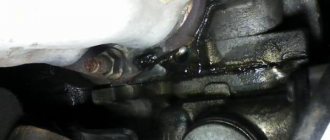
- A sign of a problem in the cylinder head may be white smoke coming from the exhaust pipe, caused by coolant entering the engine cylinders.
- If there are oil stains on the surface of the coolant in the tank, the unit requires repair. This is due to the fact that the oil somehow began to get where it shouldn’t.
- It is rare, but it happens that exhaust gases begin to penetrate through the gasket. In this case, there is no other option but to remove the head and replace the gasket.
- For VAZ 2109 tuning, restoration, problems with spark plugs, forging bolts or boring cylinders, disassembling the cylinder head may be required.
White smoke from the exhaust pipe
Design of the VAZ 2109 cylinder head
The design of the VAZ 2109 cylinder head consists of the following parts:
- a crankcase with a combustion chamber in which the air-fuel mixture is ignited and all cylinder head components are located;
- gas distribution mechanism (GRM), including valves installed at an angle of 7°30′ to the cylinder axis, and a timing drive with a camshaft;
- threaded outlets for spark plugs and injectors;
- landing planes for intake and exhaust manifolds;
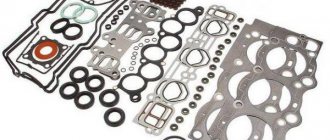
- gasket that separates the cylinder head from the cylinder block itself.
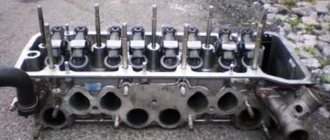
The timing camshaft of the VAZ-2109 is cast from cast iron and has five supports, with eight cams on it for opening the valves. It is driven from the crankshaft pulley by a toothed belt. Valve seats and guides are pressed into the cylinder head. On the inside of the bushings there are grooves for supplying lubricant; the bushings are closed on top with oil deflector caps.
The valves are steel, and the intake valve head is made of heat-resistant steel. The inlet valve is larger in diameter than the outlet valve. The gaps between the valves and camshaft cams are adjusted using special washers that have increased wear resistance. Valve pushers are metal cups that move in the cylinder head holes. To improve wear resistance, their surface is cemented.
The cylinder head (cylinder head) of the VAZ 2109 is connected to the cylinder block through a special gasket. The gasket must ensure tightness of the cooling system channels, oil pipeline and combustion chamber. In order for it to withstand high temperatures and high pressures, it is often made of reinforced metal.
The gasket is disposable and cannot be repaired; if it fails, it must be replaced. Replacing the cylinder head gasket on a VAZ 2109 can easily be done with your own hands.
Process
Before you begin disassembling and repairing the VAZ 2109 cylinder head, it is necessary to perform certain preparatory work in sequence.
Removal
- First of all, remove the air purifier housing.
- Disconnect the hoses and lines from the carburetor or injector.
- After this, you need to disconnect the pants from the manifold.
- Remove the grinding wheel.
- Unscrew the valve cover.
- Remove the carburetor and manifolds.
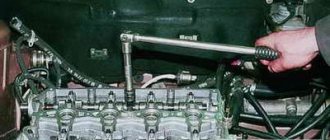
- To unscrew the head bolts on a VAZ 2109, most likely you will need a gate and a hexagon, since the screws are screwed in with decent force. Tube as a lever
- Remove the cylinder head bolts and washers.
- We remove the VAZ 2109 cylinder head from the power unit.
- Remove the gasket. A gasket that has reached the end of its life and needs to be replaced.
- In addition, if necessary, engine block components are repaired or modified.
The pipe is like a lever.
Remove the screws.
A gasket that has reached the end of its service life must be replaced.
Tuning
Proper adjustment, modification and tuning of the VAZ 2109 head will help to fully reveal the capabilities of your power unit. You've probably heard about it, read a lot, or even watched videos on the Internet. Typically tuning is done by boring and aligning the bores, which reduces turbulence and reduces power. The valves were replaced with larger ones and ground into their seats. Tuning may also include replacing the standard valve guides with bronze ones.
Valve lapping
The following is a check of the running-in process:
- the assembled head is on its side;
- the collector holes are filled with liquid (ordinary water can be used).
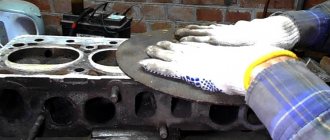
If fluid does not leak through the valves, the job is done well and the valves are lapped properly. After eliminating all defects, you can proceed to assembling the head.
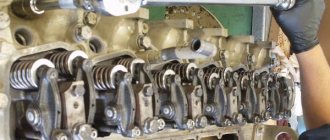
What is a cylinder head
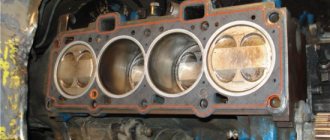
The cylinder head on a VAZ 2109 in a disassembled state.
The VAZ 2109 cylinder head is a special unit whose main purpose is to close the cylinders. It is attached directly to the block itself using special bolts. The cylinder head is important because it is a direct participant in numerous processes during engine operation. The cylinder heads of power units of cars produced today are distinguished by a rather complex structure and are assembled from a significant number of parts.
Also check out
- When disassembling the valve mechanism, it is necessary to place a wooden block under the valve plate.
- Dry the valve. Remove it from the cylinder head guide bushing.
- Using a key “13”, unscrew the 2 nuts securing the inlet pipe.
- Remove the gasket and pipe.
Assemble and install the cylinder head in the reverse order.
Recommendations :
- Valve stems with engine oil. The same applies to guide bushings.
- Before installation, remove dirt, oil, and remnants of the old gasket from the surface of the cylinder block.
- The cylinder head gasket should be replaced using two special centering bushings.
- Install the mounting screws; the diagram below shows 4 steps on how to tighten them.
- The first tightening torque of the screws is 20 N.m (2 kgf.m);
- The second - with a moment of 69.4–85.7 N.m (7.1–8.7 kgf.m);
- The third - with an extension of 90°;
- The fourth is to turn the screws 90°.
Video “How to remove the head on a VAZ car”
In this video, the master will show you how to correctly and quickly remove the cylinder head on a VAZ 21099 with your own hands. On a VAZ 2109 car, the head is removed in the same way.
Recent Entries
Judging by VW Group vehicles, there's no end in sight for owners
The Kangarooing problem with manual 1.5 TSI Evo cars has been going on for seven months; VW admits the problem but has no solution
Tesla Model 3 sets new electric car cannonball launch record
BYD - ADL celebrate over 100 double decker bus sales in UK
Cooling immersion battery concept for electric vehicles
Categories
Test Drive
Also check
- When removing the valve train, place a block of wood under the valve plate.
- Enter the valve. Remove it from the cylinder head guide sleeve.
- Unscrew the 2 nuts securing the inlet pipe using the “13” wrench.
- Remove the gasket and pipe.
Reassemble and install the cylinder head in reverse order.
Recommendations :
- The valve is connected to the engine oil. The same applies to guide bushings.
- Before installation, remove dirt, oil, and old gasket remnants from the surface of the cylinder block.
- Replacing the cylinder head gasket is then followed by two special central bushings.
- Install the mounting screws, the diagram below shows 4 ways to tighten them.
- The first tightening torque is 20 nm (2 kgf);
- The other is with a torque of 69.4–85.7 Nm (7.1–8.7 kgf);
- The third is with 90° coverage;
- Fourth, turn the screws 90°.
READ How to Unlock Radio Opel Vectra
Puff
Reassembling the unit if you strictly follow the instructions for dismantling work will not pose any particular problems.
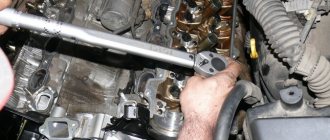
An incredibly important aspect of replacing the cylinder head gasket and all other activities associated with removing the head is the correct adjustment and tightening of the bolts.
Tightening the bolts is done strictly with a torque wrench, which will allow you to control the tension torque.
Here are some guidelines for using this specialized wrench and checking the current tension condition:
- Place the holder in the zero position. This will indicate that now the key data is equal to the moment of the original position;
- Look at the torque tool readings as you begin to tighten the bolts;
- Rotate the holder, monitor the indicators;
- If the torque does not change, the fastener may be stretchable, which is normal. This is exactly what should happen;
- If the torque increases rapidly, bolt movement should be achieved. That is, the stretch of the holder is small, it needs to be stabilized.
Golden rules of tightening
To properly reassemble the cylinder head, you need to adhere to the golden rules:
- Strictly follow the tightening torque data corresponding to the VAZ 2109;
- Make adjustments only using a torque wrench. Other tools do not allow you to get the desired result;
- To install the cylinder head, use only serviceable bolts that meet the requirements of your engine installed on the VAZ 2109;
- Before work, make sure that the holders are in good condition.
Checking the bolts
Tightening diagram
In addition to observing the required tightening torques for the cylinder head mounting bolts, one more rule must be observed here.
Returning the bolts to their places is carried out strictly according to the diagram below.
Tightening sequence
Next, do the work according to the table, and you will do everything right.
Tightening is performed in four circles, following the sequence of work with the mounting bolts indicated in the diagram.
| Tightening circle | Your actions |
| First round | All bolts are tightened using a torque wrench according to the diagram with an applied torque of up to 2.0 kg/cm m |
| Second round | Tightening in the second circle is carried out even according to the diagram, but the torque is applied up to 8 kg/cm m |
| Third circle | Each bolt on the third installation circle must be tightened 90 degrees. |
| Fourth circle | The fourth and final round of tightening the cylinder head bolts requires re-tightening the fasteners an additional 90 degrees. |
Make sure your bolts meet the specifications before following the instructions and diagram. Otherwise, even the most correct, strictly observed tightening will not give any result.
Ridiculous cases
If the engine seizes, signs of thickened oil may indicate sugar entering the system. Similar consequences occur when stirring a raw egg, which, when the motor is running, will certainly heat up and weld all the channels. How the latter substance enters the system is known only to the owner of the car.
Sugar can be poured into the fuel by ill-wishers through the refueling hatch. There are many substances that change the composition of the oil. It happens that a driver may mistakenly pour a mixture that is lethal to iron into the engine neck.
A malfunction where coolant penetrates into the oil can also lead to jamming of the rubbing metals. This can be noticed when measuring the level using the dipstick. The changed composition is noticeable to the eye and to the touch: by color, viscosity, and the presence of foam. A whitish tint indicates a loss of oil quality.
Step-by-step scheme of work
The procedure and torque for tightening the cylinder head of a VAZ 2109 with various types of engines was initially established at the manufacturer’s factory and written in full and step by step in the book. According to the diagram, the procedure for pulling the cylinder head of a VAZ 2109 should be done with 2 central bolts.
How to properly tighten the cylinder head of a VAZ 2109:
What kind of oil should I use and how much?
Owners of the VAZ 21099 (and its modifications with 1.3 and 1.5 liter engines) often fill in semi-synthetic oils with a viscosity of 10W-40.
A smaller part (but still there is one) prefer to use synthetics with a 5W-40 class. The manufacturer recommends maintenance every 15,000 km. In practice, owners try to change the engine oil at 8-10 thousand. If you choose something in between these numbers, it will be the “Golden Mean”, but of course everyone decides for themselves.
When purchasing, be guided by a filling volume of 4 liters, because... the engine consumes a little more than 3 liters at a time. Do not forget to leave at least 0.5 liters for daily monitoring and, if necessary, topping up the level in the engine.
The choice of a particular company is not important; for “Ninety-Ninth” you can buy both oils from the middle and low price ranges. Here are some of the many products on sale today.
- G-energy 10w40;
- Totachi Touring 5w40;
- Sibi MOTOR 5W40;
- Motul 5W40 300V;
- Eni i-sint 10w40 and many others.
Along with the fluid, the oil filter also needs to be changed. Today, many manufacturers are available for sale at low prices.
- 0 451 103 274 BOSCH ~$4;
- 2108-1012005 AG Auto Parts ~ $1.5;
- 2108-1012005 WIX ~ 2.5$;
- MANN W914/2 ~ 5$;
... and a large number of other filters that can be found on the Internet today.