Tightening the cylinder head is an important and responsible procedure. This operation is performed during engine reassembly after removing the cylinder head. Correct tightening of the cylinder head bolts affects the serviceability and performance of the power unit, since the head is part of the combustion chamber. In other words, after tightening, the cylinder head is a single unit with the cylinder block. A sealing gasket is additionally installed between the block and the block head. If the head is not tightened correctly, there is a high probability of damage to the cylinder head itself, the gasket, the head bolts and the bolt holes in the cylinder head.
We also recommend reading the article about what engine overhaul is. From this article you will learn about the features of engine overhaul, as well as its main differences from an internal combustion engine overhaul.
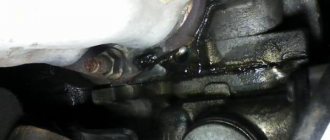
In some cases, leaks appear at the gasket installation site. Also, if the cylinder head does not fit tightly during operation of the internal combustion engine, exhaust gases may leak into the channels of the engine lubrication and cooling system, and antifreeze may also enter the oil and vice versa. As a result, the properties of the lubricant and coolant change, which can quickly damage the engine. Next we will talk about what order of tightening the cylinder head bolts must be followed, how the cylinder head bolts are tightened with a torque wrench, and also what the head tightening force should be.
Consequences of incorrect cylinder head installation
Correct tightening of the cylinder head is very important, since the performance of the motor directly depends on it. The cylinder head acts as a cylinder cover, and any violations in its fit affect the processes occurring inside the power unit.
Insufficient tightening of the head leads to a drop in compression due to loss of tightness at the junction of the cylinder head with the cylinder block, burnout of the gasket, breakthrough of working gases from the cylinders and their entry into the channels of the lubrication or cooling systems, penetration of technical fluids into the combustion chambers, which in turn is negative affects the functioning of the power unit and can cause very serious damage.
Excessive tightening also does not bring anything good; in this case, damage to the head often occurs - cracks appear, or fasteners are destroyed - bolts break, threads break, etc.
Uneven or incorrect tightening often causes warping of the head, due to which gaps appear at the junction of it with the block, which leads to the same consequences as insufficient tightening.
Where is the cylinder head gasket located on a VAZ 2114?
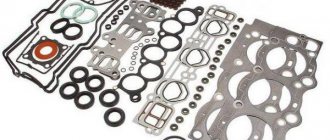
In a VAZ 2114 car, an injector with an engine of 8 or 16 valves, the seal is installed at the junction of the cylinder head with the block itself. Structurally, this element consists of several layers. High-quality sealing is ensured thanks to sheet steel, fiber, cardboard and other materials that are pressed together and covered with one layer of sealant.
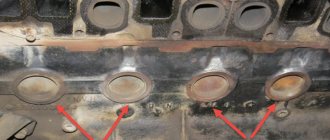
Damaged cylinder head gasket VAZ 2114
Part Features
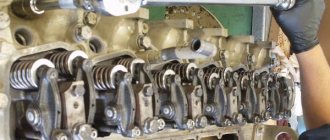
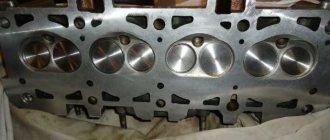
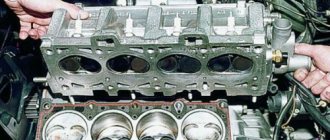
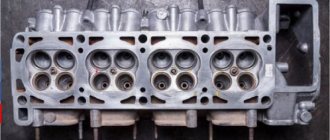
The cylinder head is a structurally quite complex part. It is a massive plate in which there are channels for the circulation of fluids of the lubrication and cooling system, and technological holes - spark plugs, for injectors (in diesel engines), mounting holes.
Also on top of the cylinder head there is a so-called “bed” of the camshaft - a seat for its installation.
Despite its massiveness, the block head is a fragile part due to the voids inside, so excessive tightening force often leads to cracks in the walls and bridges.
For the manufacture of cylinder head, two types of metals are used - aluminum (the most common) and cast iron.
To secure the latter, steel bolts or studs with nuts are used. For example, the head of the UAZ 31519 block is secured with studs.
The difference in the materials used to make the head and its fasteners has one negative factor - different thermal expansion of the components when heated, especially for aluminum cylinder heads.
Uneven tightening of fasteners (nuts, studs, etc.) during thermal expansion leads to the appearance of excessive stress in the metal structure, resulting in warping of the head.
How to remove a bolt with torn edges from a cylinder head
You can unscrew the bolt using an extractor.
The edges of the cylinder head bolts sometimes break off, which significantly complicates the process of removing the cylinder head. You can solve the problem of unscrewing a bolt with torn edges in different ways:
- Shrinkage (suitable for the classic VAZ line). The bolt is struck with a heavy tool, causing it to shrink. It is first recommended to try to unscrew it using an 11-mm socket, which is pressed onto it. If the method does not lead to a positive result, then you need to act with the help of two hammers, one of which is installed on the bolt with a flat base, and the other is hit on the first one. Having flattened the cap, stuff the head onto it, and then, using a long pipe as a lever, unscrew it. To prevent damage to the cylinder head, the remaining fasteners must be tightened.
- Drilling and using a chisel. Using a 10mm drill, drill a recess in the center of the fastening element below the edges of the bolt head. Then, placing the chisel perpendicular to the head, hit it with a hammer to make a slot a couple of millimeters deep. Having placed the chisel at an angle of 45, hit it in a counterclockwise direction.
- Welding on the nut/head. On a fastener with licked edges you need to weld a suitable nut or, better yet, a head. After waiting for the metal to cool, unscrew the bolt with a wrench. The lever can and should be lengthened.
- Extractor. This tool is specifically designed for removing bolts with stripped edges. You need to select an extractor of the appropriate size, place it on the head of the bolt with a hammer and unscrew it with a 3/8-inch square wrench. If necessary, use a lever.
- Drilling a key hole. The essence of the method is to prepare a hole in the fastener using a hammer drill into which a concrete drill is inserted. Having drilled into the hole, you need to insert a 25mm Torx into it, and then use the lever to unscrew it.
These are the main features of tightening cylinder head bolts. The most important thing is that the requirements are variable and depend on the make and model of the car, and small changes can be made to the design. However, in any case, the fasteners are twisted from the middle to the edges.
Did you manage to solve your problem using the recommendations from the article?
Yes!
46.45%
No. More answers required. I'll ask in the comments now.
37.84%
Partially. There are still questions. I'll write in the comments now.
15.71%
Voted: 732
Bolt tightening conditions
When installing the cylinder head, it is important to comply with the tightening technology, which includes a number of criteria:
- Tightening order;
- An effort;
- Condition of fasteners (for example, studs with nuts);
Each engine has its own tightening order, which must be followed to ensure uniform tightening of the head to the block and to prevent the occurrence of stress on any surface areas. For example, on a VAZ 2105 it looks like this.
Force is another important factor for the correct fastening of this engine element. Attracting the plate is carried out in several approaches (their number differs on different motors), each of which is performed with its own force.
The cylinder head fasteners are tightened with quite a lot of force, which leads to them being pulled out. Therefore, on many engines, bolts cannot be reused; they must be replaced. But there are also motors for which replacement of fasteners is not necessary and their re-installation is possible.
All information regarding the cylinder head tightening technology is indicated in the technical specifications. documentation for the car, it is also often indicated on the packaging of head gaskets and fasteners.
conclusions
Replacing the head gasket on a VAZ-2114 is quite difficult, since you need to know the design features of this engine, as well as have experience in performing such operations on similar engines.
The choice of gasket should be approached seriously and carefully, since the normal operation of many components depends on its condition. If the process described in the article seems quite complicated and the motorist is not able to carry out the operation on his own, then it is recommended to contact a car service center, where they will help and do everything quickly and efficiently.
General rules for performing work, methods used
There are a number of general rules that must be followed when installing the block head:
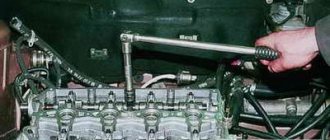
- It is important to strictly observe the tightening torque. For these purposes, a special tool is used - a torque wrench. It is not recommended to perform this operation with regular keys;
- The head bolts must be pulled smoothly, jerking is not allowed. Since the tightening force on the last approaches is significant, extending the wrench arm with a pipe can simplify the procedure and ensure smooth, uniform tightening;
- Before installing the bolts, you need to carefully inspect the condition of the threads on them. There should be no dirt or foreign particles on the coils.
- The threads of fasteners should be lubricated with engine oil before tightening. But you should not pour grease into the holes for the bolts (especially for “blind” holes), since in the future it will not allow the fasteners to be fully tightened.
Despite the fact that each engine has its own characteristics of tightening the cylinder head, the general technology of this operation is the same. In general, two methods are used to tighten fasteners:
- In several approaches, bringing the tightening force to the required value;
- Tightening the fasteners to a certain force (in one or more approaches), and then tightening the bolts twice to a certain angle.
The tightening method is selected based on the type of bolts.
The first method is used when using non-stretching bolts (these are not used now, but they can be found on old cars). But often this type of fasteners requires tightening after a certain period of engine operation in order to compensate for the shrinkage of the cylinder head gasket. But such fasteners are allowed for reuse, and more than once.
The second method of tightening the block is relevant for most modern cars. And all due to the use of tensile bolts (the so-called TTY type).
Such fasteners, due to elastic deformation, are able to compensate for thermal expansion of the head and shrinkage of the gasket, but for this they need to be put into deformation mode (in fact, just stretched a little).
To do this, it is necessary to tighten the bolts twice to a certain angle. On some cars this angle is 45 degrees, on others it is 90 degrees.
But after the elements are put into elastic deformation mode, they will no longer be able to return to their original state, and therefore their reuse is not allowed due to the high probability of destruction.
Basic recommendations
First of all, it should be noted that such a procedure can be carried out after repairing the power unit or in order to check the tightening torque of the bolts during engine operation. If the cylinder head has been dismantled, you should carefully inspect the bolts, as well as the holes in the cylinder block for their installation. Screws must not have elongation or deformation of the threaded part. The holes in the block for the bolts are cleaned of any remaining engine oil, liquid, or other foreign particles. If this is not done, the cylinder block may be damaged, and the cylinder head will not be able to be tightened with the required force.
Work should begin only after reading the vehicle manufacturers' recommendations for operation and repair. There the driver will find all the necessary information to complete the job, including the forces and sequence of tightening the bolts.
Important! For engines with TTY bolts, there is a prohibition on reuse, as they may break.
Another feature of using such bolts is their installation at a certain angle. To do this, you will need a special key with an indicator that will show the degree of inclination.
User Igor Ivanov shows in the video the installation and tightening of the cylinder head.
.
What errors may occur
Unfortunately, drivers who independently restore the power unit make annoying mistakes that can harm the cylinder block and the working tool.
These include the following:
- leaving motor grease or other foreign particles in places where fasteners are installed;
- overestimation of the bolt tightening force;
- using a tool not intended for this operation;
- non-compliance with the sequence of tightening the cylinder head;
- use of bolts of inappropriate length.
If the moment of tightening the motor mounting screws is determined “by eye,” most often overtightening occurs, which leads to the bolts breaking. Worn edges of the key can damage the head of the fastener, after which it will be impossible to screw it in or out. Changing the order of installing the bolts yourself will lead to overstresses in the head housing, and this can lead to the appearance of cracks. They can be through, which contributes to the appearance of lubricant or coolant leaks. A gas breakthrough will appear in the intake or exhaust manifold. Interruptions in the operation of the motor will begin and its power will be lost.
Cylinder head crack
If engine cooling fluid enters the lubrication system through cracks or burnouts, the engine oil will dilute. After this, the lubricant pressure will decrease, and its supply to the friction points will be insufficient, and the crankshaft liners may turn. Many documents allow the reuse of fasteners, but it is better to use new products. The cylinder head should be attached to the cylinder block only with high-quality screws.
General procedure
Although tightening the cylinder head has many nuances and features, the general technology of the operation is not complicated, it is only important to comply with the conditions.
The general algorithm of work is as follows:
- We study the documentation (tightening order and force);
- We prepare the tool;
- We inspect and wipe the surfaces of the block and head, clean the mounting holes (with a rag or compressed air);
- We lay the gasket;
- We put the block head in place (the correct placement of the gasket and head is ensured by guide bushings);
- Lubricate the threads of the fasteners;
- We install the latter in the holes and tighten them by hand;
- We specify the drawing scheme, the number of approaches and the force of each of them, as well as the time of breaks between approaches (all this is indicated in the documentation);
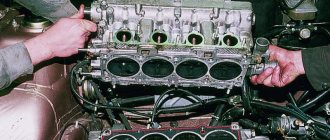
- We make the first approach, observing the tightening order (for convenience, you can mark the bolts according to the order with a marker). In the photo is a VAZ 2103;
- We carry out all subsequent approaches.
Some vehicles additionally require re-tightening of fasteners after a certain period of vehicle operation. This information must be indicated in the technical documentation.
Tools used
Manufacturers offer various types of wrenches that help limit the tightening force of threaded connections. The three most common types of torque wrenches are:
- click (mechanical);
- pointers (analog);
- electronic (digital).
Motorists select models that have optimal characteristics. Sometimes, advice from friends or articles on the Internet help you make the right choice.
Snap
The key got its name due to the specific sound it makes. This ratchet is in demand in small auto repair shops or among drivers who prefer to carry out repairs themselves.
Positive characteristics are affordable cost and acceptable torque error of 5%. In online stores, the device has a price of 2–2.5 thousand rubles. Popular models are Arsenal and Berger.
Some nuances
The tightening torque is one of the main factors for the normal fit of the block head. But this criterion is influenced not only by the applied force, but also by the fasteners themselves:
- General condition of the bolts – new or used;
- Presence of lubricant on the threaded part;
- Thread condition.
The type of power plant (petrol, diesel), as well as the number of valves, does not affect the cylinder head tightening technology. But this does not mean that the force and tightening procedure are identical for all motors, and before seating the head, you should definitely study the conditions for performing the operation and all its features.
Tightening connections without a torque wrench
When there is no dynamo key and a homemade device or steelyard is used for tightening, you need to calculate the force. The recommended torque in the manual is indicated in Newtons per meter, and the scales display the value in kilograms. It is important to know the parameter kgf m, which is calculated by the formula:
kgf m=m/L, where kgf m is kg force per meter, m is the value on the scales, L is the distance from the center of the bolt to the scale mount.
1 kgf m = 9.81 Newtons.
Hence the formula for determining the required tightening force in kg, if this value in N is known:
m = N 0.102 (1/L),
Where:
- m – value on the scales,
- N – required tightening torque,
- L – distance from the center of the bolt to the scale mount.
Common Mistakes
Despite the fact that automakers clearly indicate the procedure and nuances of tightening the cylinder head, many car enthusiasts make mistakes when assembling the engine. The most common of them are:
- Pouring oil into the mounting holes to lubricate the threads (the liquid is incompressible, so poured oil will not allow the head to be properly tightened);
- Over-tightening (exceeding tightening forces leads to damage to the cylinder head and the fasteners themselves);
- The use of damaged or inappropriate keys (the edges of the bolt heads may be torn off, after which it will be problematic to tighten or unscrew them normally);
- Use of unsuitable bolts as replacements (fasteners from different engines may differ in length, thread spacing, head height and diameter);
To avoid problems in the future, you should use only fasteners designed for a specific engine and fully comply with the work conditions.
DIY torque wrench
Controlling the tightening torque using a steelyard
Torque wrenches, especially those varieties that are convenient to use, are very expensive, so many motorists are interested in how to make such a device from improvised means at minimal cost. Understanding the principle of operation of a dynamo key, you can make it from a regular open-end or ring wrench, a 20 kg steelyard and a pipe 0.5 m long. The pipe must be metal and of such a diameter that the handle of the key can easily fit into it. After making holes in the pipe, fix the scales at an angle of 90 degrees to the pipe. A dynamo wrench made from the specified parts allows you to tighten bolts and nuts with a torque of no more than 100 Nm. However, the accuracy of this device leaves much to be desired.
Features of the work performed using the example of some cars
To prove the proposition that each power plant has its own characteristics of tightening the cylinder head, let’s consider the nuances of performing work on specific models.
VAZ-2112 16 valves
A number of modifications of the VAZ-2112 were equipped with two types of 16-valve power plants (factory indexes - 21120 and 21124). These two motors, despite some design features, have identical head tightening technology.
These units use 93mm long tension bolts. In this case, reuse of fasteners is allowed, but under one condition - if their length does not exceed 95 mm (if it is longer, they should be replaced). 10 bolts are used to secure the head.
Tightening is carried out in three approaches:
- The bolts are tightened according to the order with a force of 2 kg/m;
- Turning 90 degrees;
- Repeated tightening to 90 degrees.
The drawing diagram is shown below.
Between the 2nd and 3rd approaches you need to take a 20-minute break.
Since these engines use tensile bolts, additional tightening is not required during vehicle operation.
VAZ-2107
On the VAZ-2107, all installed modifications of power units are 8-valve.
The block head is attached to them with 11 bolts, 10 of which are main, and 1 is an auxiliary side bolt (installed in the side protrusion).
On this car, tightening fasteners is also performed in three approaches:
- 10 main bolts are tightened in order with a force of 3.5-4.0 kg/m;
- The same bolts reach with a torque of 11.5-12.0 kg/m;
- The auxiliary is tightened with a force of 3.5-4.0 kg/m.
Additional tightening of the cylinder head is not required when operating the VAZ-2107.
"Samara", 10th family, Priora
On models of the Samara family (2108-21099), as well as VAZ 2110-2112 with 8-valve units, tightening is already performed in 4 approaches:
- Tightening with a force of 2.0 kg/m;
- Reaching with a moment of 7.5-8.5 kg/m;
- Turn 90 degrees;
- Repeated rotation by 90 degrees.
The break between points 3 and 4 is 20 minutes.
As for the VAZ of the “tenth” family, which are equipped with 16-valve engines, their tightening technology is the same as that of the VAZ-2112 (described above).
The same applies to the Lada Priora; on 8-valve units, a method with 4 approaches is used (VAZ 2108-21099), and on 16-valve units, 3 approaches are used (VAZ 2112 with a 16-valve engine).
"Volga"
On ZMZ-406 engines installed on the Volga, according to the automaker’s technical documentation, tightening the engine block head bolts is carried out in two approaches:
- With a force of 4.0-6.0 kg/m;
- With a moment of 13.0-14.5 kg/m.
But many car owners of this car note that this technology does not allow the cylinder head to be properly tightened, so they use techniques with a large number of approaches.
A common method is the cross method, performed in 4 stages and with the following efforts:
- 4.0-4.3 kg/m;
- 7.5 kg/m;
- 11.0 kg/m;
- 14.3-14.5 kg/m.
Subsequent tightening of the bolts is not required when operating on this engine.
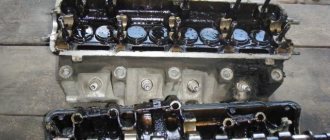
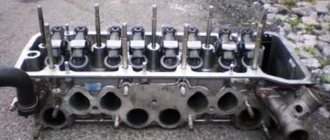
VAZ-2114 engine structure diagram
Cylinder head gasket close up (engine removed)
In order to understand the process and principle of replacing engine gaskets, you need to know the structure and sequence of parts in the main power unit.
So, let's look at the design of the VAZ-2114 engine:
Engine diagram and structure
| № | Detail number | Part name |
| 1 | 2108-1003298 | screw |
| 2 | 2108-1003278-01 | Washer |
| 3 | 2108-1003277-01 | Sleeve |
| 3 | 2108-1003277-02 | Sleeve |
| 4 | 2108-1003274 | Cover pin |
| 5 | 2111-1003260 | Cylinder head cover |
| 6 | 2108-1003271 | Bolt M12x1.25x135 |
| 7 | 2108-1003265 | Washer |
| 8 | 14328201 | Plug 10 cup |
| 9 | 14329101 | Plug 30 cup |
| 10 | 1118-1003011 | Cylinder head |
| 11 | 2101-1002042 | Sleeve |
| 12 | 14329201 | Plug 36 cup |
| 13 | 10158601 | Plug 16 spherical |
| 14 | 11183-1002011-10 | Cylinder block |
| 15 | 14234330 | Bolt M10x1.25x65 |
| 16 | 2108-1003284-10 | Ring sealing |
| 17 | 2111-1003284 | Ring sealing |
| 18 | 2111-1003286 | Bolt |
| 19 | 2111-1003288-10 | Stub |
| 20 | 10725911 | Nut M6 low |
| 21 | 11197773 | Conical spring washer 6 |
| 22 | 13541221 | Hairpin M6x22 |
| 23 | 2108-1003270-10 | Cover gasket |
| 23 | 2108-1003270-11 | Cylinder head cover gasket |
| 24 | 21083-1003020-10 | Head gasket |
| 24 | 21083-1003020-11 | Head gasket |
| 25 | 2112-3855020 | Knock sensor |
| 25 | 2112-3855020-01 | Knock sensor |
| 25 | 2112-3855020-02 | Knock sensor |
| 25 | 2112-3855020-03 | Knock sensor |
| 26 | 2101-1002040 | Sleeve |