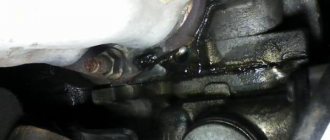
From time to time, the cylinder head gasket may fail due to wear and tear of its material or burnout. The main signs that it is time to replace the gasket with a new one are the appearance of local leaks of oil and coolant at the point of contact between the cylinder head and the engine. Tightening torque of the cylinder head VAZ 2114 8 valves: consider the subtleties of the process.
Cylinder head gaskets
It should be remembered that when replacing a gasket, not only the tightening torque of the VAZ 2114 cylinder head is important, but also the entire sequence of operations - after all, the replacement itself is a very important and serious procedure, errors during which can lead to engine malfunction.
The correct tightening torque for the cylinder head on a VAZ-2114
Any, even the most reliable car can fail over time. Unfortunately, no unit or unit installed on it can work forever. Sometimes breakdowns occur in the cylinder block. The least difficult of them is the wear of the cylinder head gasket. A leaky sealing element ceases to provide a tight seal, resulting in lubricant or antifreeze leaks, power drops, or the stability of the engine’s functioning is lost. When replacing a gasket, not only the correct choice of a new one and its proper installation are important, but also such an aspect as the tightening torque. We will describe in detail below what indicators are optimal specifically for the cylinder head installed on the VAZ model 2114, equipped with an 8-valve power plant.
. 2115
| Van046 Blog Refinement of the cylinder head of the VAZ classic, ͷ () | ||
| 121,25 | . «» | |
| 8 | 20,87-25,77 (2,13-2,63) | |
| M10x1.25 | 33,23-41,16 (3,4-4,2) | |
| 8 | 18,38-22,64 (1,87-2,31) | |
| M10 | 67,42-83,3 (6,88-8,5) | |
| 6 | 6,66-8,23 (0,68-0,84) | |
| 8 | 15,97-22,64 (1,63-2,31) | |
| M10x1.25 | 68,31-84,38 (6,97-8,61) | |
| 6 | 5,15-8,23 (0,52-0,84) | |
| 91 | 43,32-53,51 (4,42-5,46) | |
| M10x1.25 | 60,96-87,42 (6,22-8,92) | |
| 6 | 7,64-8,01 (0,78-0,82) | |
| 121,25 | 97,9-108,78 (9,9-11,1) | |
| 6 | 4,17-5,15 (0,425-0,525) | |
| 81,25 | 20,87-25,77 (2,13-2,63) | |
| 81,25 | 15,97-22,64 (1,63-2,31) | |
| M10 | 41,65-51,45 (4,25-5,25) | |
| M10 | 41,65-51,45 (4,25-5,25) | |
| M10 | 31,85-51,45 (3,25-5,25) | |
| M10 | 27,44-34 (2,8-3,47) | |
| M12 | 60,7-98 (6,2-10) | |
| 6 | 8,33-10,29 (0,85-1,05) | |
| 6 | 6,86-8,23 (0,7-0,84) | |
| 6 | 8,33-10,29 (0,85-1,05) | |
| 6 | 7,2-9,2 (0,735-0,94) | |
| 161,5 | 45,5-73,5 (4,64-7,5) | |
| 201,5 | 37,48-87,47 (3,8-8,9) | |
| 141,5 | 24-27 (2,45-2,75) | |
| 8 | 12,8-15,9 (1,3-1,6) | |
| 6 | 1,96-4,6 (0,2-0,47) | |
| 121,25 | 54,2-87,6 (5,53-8,93) | |
| 121,25 | 54,2-87,6 (5,53-8,93) | |
| 6 | 3,8-6,2 (0,39-0,63) | |
| 8 | 19,13-30,9 (1,95-3,15) | |
| 8 | 15,7-25,5 (1,6-2,6) | |
| 6 | 4,78-7,75 (0,49-0,79) | |
| 8 | 16,3-20,1 (1,66-2,05) | |
| 6 | 5,1-8,2 (0,5-0,83) | |
| 8 | 15,7-25,5 (1,6-2,6) | |
| 8 | 15,7-25,5 (1,6-2,6) | |
| 201,5 | 120,8-149,2 (12,3-15,2) | |
| 141,5 | 28,4-45,1 (2,9-4,6) | |
| 6 | 11,7-18,6 (1,2-1,9) | |
| 8 | 15,7-25,5 (1,6-2,6) | |
| M10x1.25 | 63,5-82,5 (6,5-8,4) | |
| 6 | 4,5-7,2 (0,45-0,73) | |
| 8 | 15,7-25,5 (1,6-2,6) | |
| 8 | 15,7-25,5 (1,6-2,6) | |
| 161,5 | 28,4-45,3 (2,89-4,6) | |
| 8 | 28,4-35 (2,89-3,57) | |
| 8 | 15,7-25,5 (1,6-2,6) | |
| 221,5 | 28,7-46,3 (2,9-4,7) | |
| 8 | 19,6-24,2 (2-2,47) | |
| 121,25 | 77,5-96,1 (7,9-9,8) | |
| 121,25 | 77,5-96,1 (7,9-9,8) | |
| 121,25 | 77,5-96,1 (7,9-9,8) | |
| 121,25 | 77,5-96,1 (7,9-9,8) | |
| 161,25 | 160-176,4 (16,3-18) | |
| 101,25 | 42,1-52,0 (4,29-5,3) | |
| 8 | 12,9-16,0 (1,32-1,63) | |
| 101,25 | 42,14-51,94 (4,3-5,3) | |
| 141,5 | 65,86-81,2 (6,72-8,29) | |
| 101,25 | 49-61,74 (5,0-6,3) | |
| 201,5 | 186,3-225,6 (19-23) | |
| 201,5 | 225,6-247,2 (23-25,2) | |
| 121,25 | 65,2-92,6 (6,65-9,45) | |
| 121,25 | 115-150 (11,72-15,3) | |
| 8 | 31-38 (3,16-3,88) | |
| 101,25 | 29,1-36 (2,97-3,67) | |
| 101,25 | 34,3-42,63 (3,5-4,35) | |
| 8 | 9,8-15,7 (1,0-1,6) | |
| M10 | 26,5-32,3 (2,7-3,3) | |
| M10 | 26,5-32,3 (2,7-3,3) | |
| M10 | 14,7-18,16 (1,5-1,9) | |
| M10x1.25 | 29,4-33,4 (3,0-3,4) | |
| M12x1.25 | 66,6-82,3 (6,8-8,4) | |
| M12x1.25 | 66,6-82,3 (6,8-8,4) | |
| 101,2 5 | 27,4-34 (2,8-3,46) | |
| 101,25 | 30,01-37,07 (3,06-3,78) | |
| 201,5 | 186,3-225,6 (19-23) | |
| 8 | 15-18,6 (1,53-1,9) | |
| 8 | 15-18,6 (1,53-1,9) | |
| 6 | ||
| 8 | 25,5-27,4 (2,3-2,8) | |
| 161,5 | 31,4-51 (3,2-5,2) | |
| 181,5 | 121-149,4 (12,3-15,2) | |
| 121,25 | 27,05-33,42 (2,76-3,41) | |
| M10x1 | 70-86 (7,13-8,6) | |
| 38×1,5 | 45-55 (4,6-5,6) | |
| M14x1.25 | 30,67-39 (3,13-3,99) | |
| 94.3701 | 8 | 15,8-24,2 (1,5-2,46) |
| 37.3701 | 121,25 | 58,3-72 (5,95-7,35) |
| 37.3701 | 101,25 | 28,08-45,3 (2,86-4,62) |
A set of tools required for work
In order to avoid wasting time looking for this or that tool at the critical moments of replacing the gasket on a VAZ (or actually tightening it), it is better to prepare everything in advance.
You will definitely need:
- wrench with heads and extension;
- Screwdriver Set;
- torque wrench;
- new gasket;
- sealant.
It is better to park the car on a level surface, turn on the handbrake, and additionally secure it with stops.
Opening hours and prices at the AvtoVAZ Prototype Museum
Opening hours coincide with the schedule of the entire Technical Park named after. Sakharov. The museum is open daily, seven days a week, from 08:00 to 20:00.
Since the hangar with the prototypes is located on the territory of the park, you must pay a general admission ticket + a ticket to the museum.
- Entrance ticket to the park: adults - 200 rubles, children, students, disabled people - 100 rubles.
- Entrance ticket to the Museum of Prototypes - 50 rubles.
VAZ-1121 (Oka-2), Igor Butyrskii
Excursion services (at park sites):
- group of up to 15 people: adults - 250 rubles, children - 150 rubles.
- individual: entrance ticket + 1000 rubles.
Preferential groups have free access days. For detailed information, please visit the museum's website or call.
The museum has rules of conduct. It is strictly forbidden to touch, climb or sit in cars, or open doors. You cannot cross the fence line, litter, come to the museum with animals, etc. Amateur photo and video shooting is free.
Full price list of Park complex services on the official website
Lada 21109 “Consul”, Igor Butyrskii
Work order
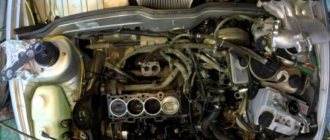
Before tightening, you will have to get to the block head. This can be done no earlier than after disassembling a good half of the engine.
First, open the connectors, the connecting wires leading to the antifreeze temperature sensors and the oil level control sensors. Once done, drain the coolant. It is necessary to dwell on this important point separately. Be careful - the composition mentioned above is quite toxic, so it is better to work with gloves. To collect coolant, prepare a container with a volume of at least 9 liters.
To drain the fluid, open the distribution tank, and then unscrew the plug located directly on the cylinder block. When the leak stops, move the container to the radiator - there is a separate drain here. After removing all the antifreeze, screw on the caps.
- remove the thermostat, and behind it the air filter;
- disconnect the exhaust pipe from the manifold;
- Remove the protective housing and the belt from the VAZ camshaft;
- The throttle valve drive cables must be separated from the carburetor;
- remove all cables leading to the cylinder head, as well as tubes, hoses, etc. (be sure to loosen the clamps that secure them, otherwise you won’t be able to move them to the side).
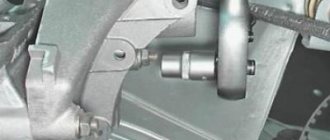
You now have direct access to the head. Unscrew all the bolts holding it, and, using the help of a partner, remove the cylinder head. After this, tear off the old gasket.
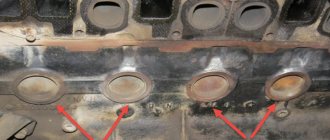
Carefully clean the rear surface of the VAZ 8-valve engine block from dirt and adhered fragments of the sealing element material. Sand it with fine sandpaper - you should be left with a completely smooth, matte base. At the same time, check all valves and seals.
Be sure to remove any oil or debris from the bolt holes. Lubrication helps reduce the friction force, which in this case is fraught with many troubles, and foreign fragments will not allow reliable fastening.
All that remains is to install a new gasket and reinstall the VAZ-2114 cylinder head. This is where the time comes to talk about what tightening torque is required.
How is the tightening torque of VAZ 2109 bolts adjusted?
If it is necessary to tighten the cylinder head of a Nine engine, it is important to observe not only the strength and degree of tightening of the bolts, but also other conditions. Below we will look at how to correctly stretch the cylinder head on a VAZ 2109
What will you need?
The procedure for tightening fasteners after removal and repair, as well as when installing the cylinder head, is carried out exclusively with a torque wrench.
A dynamometer is a tool designed to tighten the cylinder head screws of various engines.
In addition to the key, you will also need a caliper or a regular ruler.
User Marat Ibatullin made a video in which he clearly showed how the task of tightening the screws is performed.
Scheme of work
The order of tightening the bolts on cars with an injector or carburetor engine is determined by the manufacturer and is indicated in the service book for the car. According to the diagram, the pulling procedure begins with the central two cylinder head bolts.
The cylinder head bolts must be tightened as follows:
- First, you need to twist the screws with a force in Newtons of 2.0 kg/cm.
- Then the bolts are tightened to a torque of 7.5-8.5 kg/cm.
- After this, all screws must be tightened 90 degrees.
- At the end, each bolt is rotated 90 degrees again.
How to tighten the head screws of a VAZ 2109 block with your own hands:
- The torque wrench holder is placed in the zero position. This indicates that the instrument data corresponds to the moment of the initial position.
- Evaluate the indicators on the key before starting the tightening procedure.
- The tool holder can now be rotated. Monitor the readings as you complete the task.
- If it happens that the torque does not change during tightening, then the head mount may be stretched. This is quite normal, as it should be. First, use a wrench to tighten the screws to 2 kg/cm. Follow the tension sequence shown in the diagram.
- At the next stage, the covering is performed again in the same sequence. Only now the bolts need to be pulled to approximately 8 kg/cm.
- At the end of the procedure, the screws must be tightened once 90 degrees in a circle, and then again 90 degrees.
Channel RUS13 in its video showed how to install the cylinder head on a VAZ 2109 engine and tighten the bolts.
Tightening rules
What nuances should be taken into account when carrying out this procedure:
Observe the appropriate tightening torque for the VAZ 2109 cylinder head. The use of wrenches and other tools is not allowed, since the degree of tension can only be determined using a dynamometer. To perform tensioning, only working screws are allowed. The bolts must meet the requirements of the power unit installed on the machine. Before completing the task, make sure that the holders are in good working order. If the cylinder head has been replaced or repaired, then the old bolts cannot be used for tension; new ones must be purchased. On sixteen-valve power units, it is allowed to re-use screws to fix the block head, but only if the length of the parts is no more than 9.5 cm. It is necessary to measure the length of the screw only with a washer. If the bolts are larger than 9.5 cm, they must be replaced. If the vehicle is equipped with an aluminum head, then the cylinder head is fixed with TTU type screws
They cannot be tightened because they are screwed into a thread with a certain degree. When purchasing a cylinder head gasket, you need to pay attention to the manufacturer's specifications. They often prescribe a certain tightening ratio required for specific gaskets.
Please note that the indicated moment of force should not diverge much from the one applied during the work process. In power units equipped with aluminum cylinder heads, the tightening procedure is carried out on a cold engine. As for cast iron engines, in such internal combustion engines it is necessary to perform the tightening while it is hot.
Correct tightening of bolts - nuances
Before you begin the tightening procedure, carefully examine the wear of the bolts. Make sure that the threads on them are in satisfactory condition and that the length does not exceed the standard. In accordance with the technical documentation, the bolts holding the cylinder head are no larger and no smaller than 135.5 millimeters. Use a caliper to measure.
Stretched bolts do not allow for reliable tightening and quickly loosen. If the elements comply with the standard, then nothing prevents them from being used in the future. Worn ones are replaced with new ones - they are inexpensive.
First tighten the bolts that have passed the test until they stop with your bare hands. Next, take a torque wrench and start tightening. If you don’t have such a tool, then buy it or borrow it - you won’t be able to do anything by eye.
Gasket selection
The product must meet the following properties:
- elastic deformation, which will not allow the gasket to wear out quickly;
- impermeability of liquids - water and engine oil;
- resistance to gases;
- maintaining its characteristics over time;
- resistance to various chemical influences.
In case of burnout, in accordance with the technical manual, to ensure the working condition of the mechanism, only original gaskets must be used.
The article number for this product is 21083-1003020. The dimensions of this gasket are optimally designed for installation in the seats on the VAZ 2114 head. The product is manufactured at the AvtoVAZ plant. You can use analogues from manufacturers Patron, Rains, Master-Sport, Trialli, etc. The cost of some similar products can be 2-3 times higher than the original.
An overview of the faulty gasket and the procedure for solving the problem is shown in the video published by the KV Avtoservis channel.
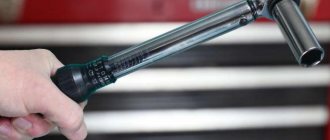
How to use a torque wrench
To obtain the correct tightening torque, you need to understand how to use such a specific tool as a torque wrench.
Before starting work, it must be set to zero. After this, the tool is put on the bolt (or nut) and begins to rotate slowly, tracking the dynamics on the scale. When the force reaches the required torque, the key is removed.
Sometimes it happens that the tool does not show anything at first. In this case, continue rotating. The fact is that over time, its internal mechanisms stretch, but this practically does not affect the accuracy of determining the tightening torque.
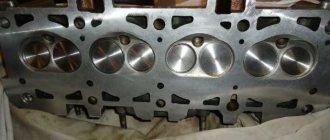
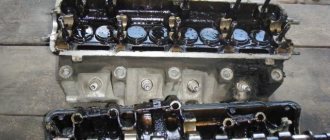
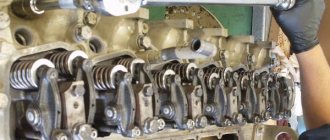
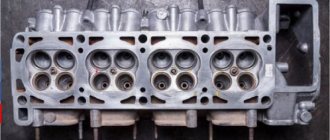
What does the cylinder head consist of?
The cylinder head is designed the same on any type of engine. It consists of:
- housing (head), in which the channels of the oil and cooling systems pass;
- intake and exhaust valves;
- one or two camshafts.
The housing is the main element of the cylinder head. It circulates lubricant and coolant and is the basis for camshafts and valves. If the cylinder head housing is correctly secured to the engine block, then all engine systems operate normally.
If the cylinder head is not tightened evenly, then there is a high probability of cracks forming in the head housing. The cylinder head is made of aluminum, and the mounting bolts are made of steel. Therefore, the thermal expansion of the head and bolts is not the same.
If any part of the cylinder head is not tightened well, this will lead to stress in it, because one part of the head will increase more than the other.
Tightening torque of the cylinder head VAZ 2114 8 valves: consider the subtleties of the process
From time to time, the cylinder head gasket may fail due to wear and tear of its material or burnout. The main signs that it is time to replace the gasket with a new one are the appearance of local leaks of oil and coolant at the point of contact between the cylinder head and the engine. Tightening torque of the cylinder head VAZ 2114 8 valves: consider the subtleties of the process.
It should be remembered that when replacing a gasket, not only the tightening torque of the VAZ 2114 cylinder head is important, but also the entire sequence of operations - after all, the replacement itself is a very important and serious procedure, errors during which can lead to engine malfunction.
Is it necessary to broach the cylinder head?
Welcome, friends, to the DIY auto repair website. The cylinder head (cylinder head) is an important element of the power unit, which only at first glance seems simple.
Cylinder head broaching
The mechanism includes spark plugs, gas distribution valves, combustion chamber blocks, and so on.
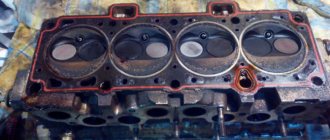
In this case, the cylinder block itself and its head are separated by a special gasket made of a special material (usually steel asbestos).
The head and block are fixed using special bolts, which are always tightened with a certain force.
Required Tools and Process
In order to do it correctly, you will need:
- set of socket heads;
- extension;
- ratchet/wrench;
- torque wrench.
The replacement process itself should be performed according to the following scheme:
- Disconnect the wires leading to the emergency oil level and coolant temperature sensors.
- Drain the coolant.
- Remove the thermostat.
- Remove the air filter housing.
- Disconnect the exhaust pipe inlet from the manifold.
- Remove the casing, as well as the camshaft belt itself.
- Disconnect the drive rods of both dampers from the carburetor.
- Disconnect the wires going to the cylinder head.
- Disconnect the hoses suitable for the cylinder head by loosening their clamps.
- Remove the cylinder head.
- Remove the worn gasket.
- Clean the contact surface of the cylinder head from any remaining gasket material.
Installing the gasket and mounting the cylinder head in place is carried out in exactly the same sequence, but in reverse order. At the same time, it is worth paying close attention to such a factor as the tightening torque of the cylinder head of the VAZ 2114 8 valves - we will talk about it below.
Sequence of repair work
Installing the cylinder head
Also need a new head gasket and valve cover gasket. Having all this, you can begin the renovation. The sequence of actions for repairs is as follows:
Replacement of cylinder head gasket for VAZ 2115 8 valves.
- The car is placed in the garage, the gearbox is set to neutral, and chocks are placed under the rear wheels. The first thing that is done after setting up the car is to de-energize the on-board network by disconnecting the “-” terminal from the battery.
- The pressure in the fuel system is relieved. For this purpose, there is a control valve on the fuel rail in the form of a regular tire valve. You need to place a container under this valve and clamp the spool. When the pressure is released, gasoline will leak out. You will also need to drain the coolant using drain plugs.
- On the engine, you need to set the piston of the 1st cylinder to the TDC position. To do this, remove the protective cover of the timing belt and rotate the crankshaft until the marks on the pulley, camshaft and flywheel match.
- The next step is to remove the valve covers. To do this, all pipes, the throttle drive rod, the accelerator drive bracket and the valve cover mounting nuts are disconnected from the cover fittings.
- The exhaust pipe of the exhaust gas removal system is disconnected from the exhaust manifold. These works are carried out under the car.
- The wiring is disconnected from the mass flow sensor, the air supply pipe to the throttle assembly is removed, after which it is completely dismantled along with the air filter housing.
- Then you need to disconnect from the head all the elements suitable for the head - pipes of the cooling system of the throttle assembly, vacuum booster, throttle drive linkage, ground wires, bracket for the exhaust manifold supply pipe.
- The intake manifold strut mounts are also loosened, and the struts themselves are removed. Next, the wiring is disconnected from - oil pressure sensors, coolant temperature and throttle position sensors, XX regulator, injectors, high-voltage wires from spark plugs.
- Then the timing belt is removed. Before this, you need to once again check the alignment of the marks on the crankshaft pulley and the timing gear. After this, the belt tension is loosened and it is removed from the timing gear.
- To remove the camshaft gear, you will need to fix it through the technological holes and unscrew the fastening bolt. You need to remove it from the shaft carefully so as not to lose the key. After this, you will need to remove the rear cover, located behind the removed gear, from the head and block.
- The cooling system pipes are removed from the head along with the thermostat from the head, as well as the rest of the wiring. The fuel supply and drain pipes are also disconnected.
- All that remains is to unscrew the head bolts. But to do this, they must first be weakened, and in a strictly defined order. And only after relaxation do they completely unscrew. If disassembly is done correctly, after removing the bolts, you can remove the head and remove the damaged gasket. At this point, the first part of the repair is considered complete.
How to tighten cylinder head bolts correctly?
Before you begin installing the cylinder head, you should first pay attention to the condition of its bolts. They must have a good thread and the length meet the required standards.
The normal overall length of the cylinder head bolt is 135.5 mm. If the bolts removed during gasket replacement meet this parameter, they can be reused. If the bolts have lengthened during engine operation, then they can no longer be used and new ones should be purchased.
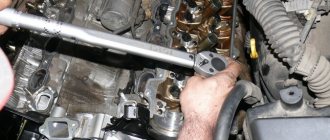
Having dealt with the bolts in this way and installing them in place, you should proceed to tightening. It must be done only with a torque wrench. Tightening bolts “by eye” can lead to very serious consequences, including damage to the engine itself.
Useful video
You can glean additional useful information from the video below:
Well, in the end, we should once again remind you that before you start tightening, you need to check the length of all bolts (it should be 135.5 mm). If the length differs from the specified one, especially upward, then even the most careful tightening of such bolts will make no sense. Cylinder head tightening procedure and torque
The procedure for tightening the cylinder head of an 8-valve VAZ engine.
Tightening torque of the cylinder head VAZ 2114 8 valves: correct operation with a torque wrench
A tool such as a torque wrench, which allows you to tighten bolts with equal force, requires great care in operation and certain skills.
An approximate sequence for tightening bolts with this wrench is as follows:
- set the holder to the “zero” position;
- begin smooth rotation of the instrument, while simultaneously monitoring its readings;
- if the tool rotates (especially at the initial stage of tightening) without changing the torque on the indicator, this may indicate a slight internal stretch of the fasteners. This phenomenon is absolutely normal and the rotation of the tool should be continued;
- When the tightening torque corresponding to the required one is reached, the movement of the tool should be stopped.
Instead of using a torque wrench, you should not use any other tool (including a mechanized one, with the ability to regulate the tightening force). After all, only with a wrench can you achieve absolutely precise and smooth tightening of the bolts, thanks to which the gasket will be evenly pressed over the entire surface of the block. This will help maximize its service life, avoid burnouts, oil leaks and coolant leakage.
Reinstalling the head
Torque and procedure for tightening head bolts in a VAZ-2109 car: video
Now you can carefully install the cylinder head in its place, making sure that at this moment the gasket does not slip out or move to the side. Of course, the guides fix it, but you should still be extremely careful.
Next, we will need a torque wrench, since the bolts will have to be tightened with a certain torque. It is also worth keeping in mind that the tightening order must be observed. The diagram below shows the sequence in which to twist:
Now regarding the force with which it is necessary to tighten the bolts. This should be done in 4 steps:
- First, a torque of 20 Nm
- Second reception with a torque of 75-85 Nm
- Tighten each bolt another 90 degrees.
- Finally turn it 90 degrees.
After this, all that remains is to install all the equipment removed from the car, fill in the coolant, connect all the sensors, wires and hoses and check the work done. Usually everything becomes visible immediately after pouring antifreeze. If wet marks appear at the junction of the head and block, you can take everything back and do the whole job again! But I hope that this will not happen in your practice! Happy renovation!
Replacement
To change the gasket, you will need to dismantle the assembly, get rid of the worn cylinder head gasket and reassemble the structure in the reverse order, following the recommendations regarding the tightening torques of the cylinder head bolts. We will tell you about all this in more detail.
- Disconnect the wiring from the coolant temperature sensor and emergency oil pressure sensor.
- Remove the thermostat, just remember to drain the coolant first.
- Remove the air filter housing. There is no need to remove the carburetor, because it will not interfere with replacing the gasket.
- Disconnect the exhaust pipe from the exhaust manifold.
- Remove the camshaft drive gear after first setting the piston of the first cylinder to the TDC position. Now you can remove the protective casing of the camshaft drive belt, loosen the gear fixing bolts, securing the gear from turning.
- Remove the camshaft drive belt. Then you can completely unscrew the mounting bolts and remove the gear.
- Press the latch to disconnect the wiring block from the ignition distributor.
- Similarly, turn off the central high voltage.
- Loosen the clamps to remove the fuel supply hose from the fuel pump.
- Disconnect the throttle and air damper drive rods from the carburetor.
- Disconnect the power supply from the solenoid valve.
- Remove the vacuum booster hose from the intake pipe fitting.
- Disconnect the tube from the vacuum ignition corrector.
- Loosen the tension on the clamps to remove the interior heating hoses from the pipes.
- Remove the cylinder head. Using a socket with an extension, the mounting bolts are unscrewed.
- Rock the head a little jerkily, then remove the element.
- Remove the old gasket, clean it of any remaining rubber seal and other contaminants. Wipe dry thoroughly, after which you can reassemble.
- Before assembly, check whether the length of the cylinder head bolts is within the normal range. Ideally, their length is 135.5 millimeters. If the bolts have lengthened during use, then all bolts will have to be replaced.
Replacement process (for 8 valve cars)
DIY cylinder head tightening torque for Lada Priora 8 and 16 valves
It is better to carry out the procedure on an overpass or inspection hole. To work you should prepare:
- torque wrench;
- spanners;
- socket heads, including “Torx”;
- screwdriver;
- new gasket;
- container for draining coolant;
- clean rags.
The procedure for replacing the cylinder head gasket on a VAZ 2114 with your own hands consists of the following steps:
- First you need to turn off the power to the car. To do this, disconnect the negative terminal from the battery.
- Next, you should fix the piston of the first cylinder to the TDC position.
- Then drain the coolant into the prepared container.
- After this, you need to relieve the pressure in the fuel system if the car has recently been on a trip.
- The next step is to disconnect the exhaust pipe from the exhaust manifold.
- Remove the cylinder head cover. Together with it, you can disconnect the receiver and throttle assembly, as well as the intake and exhaust manifolds.
- Having loosened the clamp holding the air supply pipe to the throttle assembly, remove it from the assembly along with the air intake hose and the air filter housing.
- At the left end of the VAZ 2114 head there are “mass wires” that need to be disconnected and the fuel frame with fuel system elements removed.
- After unscrewing the mounting screws that secure the front cover, remove it and the timing belt. Be sure to secure the crankshaft and camshaft from turning.
- Next, remove the tension roller and spacer washer.
- After unscrewing the mounting bolt, remove the camshaft toothed pulley.
- At the next stage, remove the back cover: first unscrew the nut holding the cover, and then the remaining fastening bolts.
- Using a Phillips screwdriver, unscrew the screws, loosening the clamps and sequentially disconnecting all hoses from the outlet pipe of the VAZ 2114 cylinder head: radiator inlet pipe, thermostat with hose, as well as inlet hoses of the throttle unit and heating,
- After unscrewing the fastening nuts, you need to disconnect the drain and fuel supply hoses from the fuel pipes.
- Next, using a hexagon, you need to unscrew 10 mounting bolts. It is advisable to turn them sequentially by half a turn according to a certain pattern. This relieves tension and prevents deformation of the lid. Then you should remove the screws along with washers.
- At the next stage, the cylinder head is dismantled along with the gasket.
- Next, be sure to clean the contacting surfaces from dirt and metal shavings. In addition, you should check that there is no oil in the threaded holes of the head mounting bolts.
- We install a new gasket taking into account 2 centering bushings so that the hole with a copper edging, intended for the passage of oil, is located between the third and fourth cylinders.
- Before installing the cylinder head, you must check that both valves on cylinder 1 are closed.
- Next, insert the screws into the holes and tighten them in four stages according to the diagram below.
At the first stage, the screws should be tightened with a torque of 20 N.m, at the second - 69.4–85.7 N.m, at the third stage the screws should be tightened by 90 degrees, at the fourth stage the screws should be finally turned by 90 degrees.
- After replacing the cylinder heads, reconnect all the hoses in reverse order and connect the wires and sensor connectors. When installing the camshaft pulley, make sure that the protruding part of the hub faces the engine.
- Next, you need to check and adjust, if necessary, the clearances in the valve drive. After installing the timing belt, check its tension.
Puff
Reassembling the unit if you strictly follow the instructions for dismantling work will not pose any particular problems.
An incredibly important aspect of replacing the cylinder head gasket and all other activities associated with removing the head is the correct adjustment and tightening of the bolts.
Tightening the bolts is done strictly with a torque wrench, which will allow you to control the tension torque.
Here are some guidelines for using this specialized wrench and checking the current tension condition:
- Place the holder in the zero position. This will indicate that now the key data is equal to the moment of the original position;
- Look at the torque tool readings as you begin to tighten the bolts;
- Rotate the holder, monitor the indicators;
- If the torque does not change, the fastener may be stretchable, which is normal. This is exactly what should happen;
- If the torque increases rapidly, bolt movement should be achieved. That is, the stretch of the holder is small, it needs to be stabilized.
Golden rules of tightening
To properly reassemble the cylinder head, you need to adhere to the golden rules:
- Strictly follow the tightening torque data corresponding to the VAZ 2109;
- Make adjustments only using a torque wrench. Other tools do not allow you to get the desired result;
- To install the cylinder head, use only serviceable bolts that meet the requirements of your engine installed on the VAZ 2109;
- Before work, make sure that the holders are in good condition.
Checking the bolts
Features of cylinder head installation
Differences can be identified when working with engines that have different numbers of cylinders. The order in which the cylinder head is tightened will also be different. But the principle is the same. It consists in tightening the bolts from the center to the periphery of the head. This is necessary so that when tightening, the stresses that arise move away from the center beyond the limits, and not vice versa. This will preserve the tightness of the gasket and reduce metal stress during engine operation.
The tightening torque is controlled using a torque wrench.
It is a wrench with a long flexible handle. There is an arrow on its handle that deflects when force is applied. The arrow points to the scale, which is fixed motionless. There is also an electronic torque wrench option. It is more reliable and shows force more accurately.
After installing the head, you need to tighten all the mounting bolts in the holes of the block. Tighten them by hand as much as possible. You don't need to use the key right away. This can lead to the bolt misaligning, after which the threads on the cylinder block will have to be restored.