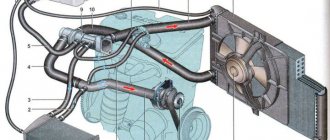
The temperature in the VAZ-2115 cabin is maintained using a built-in stove. The car has an automatic control system that regulates air heating with a small error. The air is heated using a radiator. Once it passes through the deflectors, the heat is distributed inside the machine.
To ensure that the radiator of the VAZ-2115 stove is replaced without various problems, we recommend that you carefully study this article.
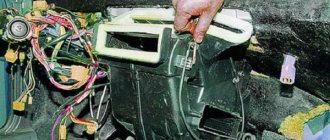
Unscrew a few bolts
We unscrew the bolts on the passenger side, the first two bolts must be unscrewed with a screwdriver (they hold the dashboard itself directly), and the third bolt with an “8″ wrench or a socket head (this will be much more convenient. And the fourth is located on the driver’s side in the same place, as well as the third bolt. They hold, so to speak, BRAINS))).
After the bolts are unscrewed, the dashboard will have free play, which will allow you to move the dashboard and get to the radiator itself.
Drain the ANTIFREEZE / ANTIFREEZE
We unscrew the bolt, but before doing this, do not forget to place a container underneath into which the liquid will be drained. It is worth unscrewing a little at a time, gradually draining the liquid, and when the bulk is drained, you can unscrew the cap of the expansion tank. But you shouldn’t do this right away, as the pressure will be strong and the liquid will spill with a 99% chance.
Useful tips
I would also like to give some useful tips on how to extend the life of your heater radiator.
- Don't skimp on coolant. Cheap coolant is the main cause of problems with the heater core.
- Check the coolant level regularly. This will not only help identify its leak, but will also protect the engine from overheating.
- In the summer, open the heater tap at least once a month to allow coolant to flow into the radiator. This solution will prevent the faucet shut-off mechanism from souring, and will also allow the radiator not to “dry out”.
- When replacing coolant, be sure to flush the system with a special fluid. This will slow down the scale deposition process.
- Having identified problems with the system, do not delay repairs.
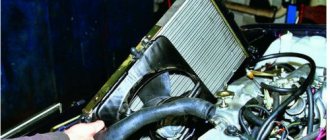
Unscrew the pipes
After draining the liquid from the system, you need to unscrew the pipes leading to the radiator. Be careful, there may be liquid left in the radiator.
Then we unscrew the three screws that hold the radiator itself and pull it out.
Don't forget to clean the inside of the stove from leaves and other debris. Then we install a new radiator and reassemble in the reverse order.
This method helped me save a lot of time and did not require complete disassembly of the dashboard, which is good news.
Cleaning and flushing the radiator of the VAZ 2114/15 stove
You can increase the efficiency of the stove by cleaning and flushing the radiator. The procedure can be performed without dismantling the radiator or with dismantling it. In the first case, you will need to remove the outlet and inlet pipes from the heater and pour a cleaning solution into it. Citric acid, plumbing cleaners (for example, “Mole”), etc. are used as such a solution. Then the radiator is washed with running water and coolant is added. You can clean the radiator better by removing it from the car. This will allow you to wash it not only from the inside, but also from the outside, removing dirt between the honeycombs. Washing is usually carried out with running water.
If after performing these procedures the stove does not work better, the radiator must be replaced.
Inconvenient design solutions
VAZ-2114 and 2115 cars are quite modern and quite popular cars in the economy segment.
But these cars, like most new models, have a not very pleasant feature.
By increasing the comfort of the interior and the layout of the front panel, designers significantly complicate the maintenance of the heating system.
The heater radiator in these cars is hidden deep under the panel and is not so easy to get to.
But the heating radiator is a rather vulnerable element of the cooling system. And if the interior heating has deteriorated, in more than half of the cases the problems are related to the heat exchanger.
And all this despite the fact that the element itself is practically not repaired and is often simply replaced.
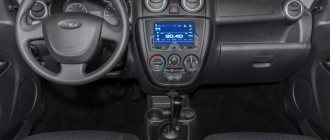
How to diagnose the performance of the VAZ-2115 heater
- Turn on switch 1 first, then second and third speeds.
- Using levers 2 and 4, you can adjust the desired direction of the air flow, and the latter also makes it possible to select the desired temperature.
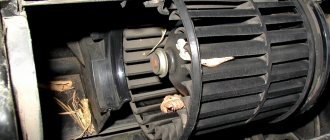
- A faulty fan means the stove does not work at all.
- If the radiator still shows signs of life, then the breakdown may be a failure of the additional resistor or the interior heater does not respond to switch commands.
- But the stove tap can also leak or become stuck, in which case it must be urgently replaced.
- When the fan is running at full power and the temperature is at maximum, and the engine is warm, then perhaps the heater radiator is clogged. To clean or replace it, you will need to disassemble it.
Main reasons for replacement
There are not many reasons why it may be necessary to replace the radiator of an internal heating system. One of them is the aspect of loss.
Heat exchangers are made of non-ferrous metals: copper or aluminum.
Gradually, these metals oxidize under the influence of the liquid, which leads to the appearance of cracks through which the coolant escapes.
The second reason for replacing a stove radiator is that the pipes are clogged with contaminants. The coolant, circulating through the cooling system, washes away corrosion products, small particles, etc.
In addition, the liquid cannot contain them on its own, and these contaminants are deposited on surfaces, including the furnace radiator.
As a result, first the heating system loses its efficiency, and later (in case of severe contamination) it simply stops working.
In some cases, radiator blocks can be removed by washing them with chemicals.
But if the pipe blockage is severe, then the dirt plugs can only be removed mechanically. And this can only be done with the radiator removed.
Before you start disassembling, you should first make sure that the problems are with the radiator.
Therefore, the loss of this element is manifested by the appearance of traces of antifreeze on the interior floor.
But the same result can be caused by damage to the radiator pipes or loss of tightness at their connection to the heat exchanger.
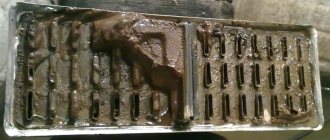
A drop in heating efficiency can occur not only due to clogged radiator pipes, but also due to severe clogging of its honeycombs.
Dust, fluff, leaves, and insect remains get clogged between the cooling fins, so the transfer of heat to the air is difficult.
But in this case, identifying the problem is very simple - turn on the stove fan at full power and check the air flow from the deflectors.
If it is not strong, the radiator must be cleaned, which also cannot be done effectively without removing the element.
Also, the stove may stop heating due to radiator ventilation, which often happens when the coolant is changed. Often the cause is also a malfunction of the cooling system elements, especially the thermostat.
In general, before removing the heater radiator, you need to make sure that the cause of poor interior heating is hidden. And for this you will have to almost completely check the cooling system.
Symptoms of a problem
The main reason why probably 90% of people who want to replace the stove radiator turn to a car service center is the following: “the stove is not heating well, what should I do?” In this case (at least in a normal car service, where the mechanics’ task is to solve the client’s problem, and not to fulfill “any whim for your money”), first of all, the cooling system is checked for problems.
Problems that cause this symptom include:
- faulty thermostat;
- air lock in the cooling system;
- the heating radiator is clogged;
- The stove tap is closed.
Let's look at each in more detail below.
Thermostat
One of the reasons for poor heating of the stove in the cold season may be the thermostat being stuck in the open position. In this case, the coolant immediately goes into a large circle when the engine starts. As a result, the car takes a very long time to warm up, the engine does not warm up properly, and the heater does not heat up either.
If in your case poor heating of the interior in winter is combined with slow warming up of the engine, pay attention to the thermostat. By the way, in the hot summer this problem may not be noticed
The engine warms up more slowly than usual, but only an experienced car enthusiast will notice this.
It also happens that the thermostat gets stuck in the closed position. In this case, the stove also does not work, and the engine, on the contrary, boils faster than usual. In cold winter, the problem may not be noticed if you only drive short distances and avoid traffic jams.
Airlock
An air lock most often forms after replacing antifreeze. But there may be other reasons for airing the system. We have a special material on our website completely devoted to this issue. If necessary, we recommend contacting him. It’s easy to check the system: you need to warm up the car until the fan turns on and carefully probe all the pipes
Pay special attention to those connected to the radiator valve fittings. By feeling an area whose temperature is different from the neighboring one, you can verify the presence of this problem.
Heating radiator clogged
Another reason for a poorly functioning stove is this. The radiator clogs for a number of reasons:
- antifreeze does not change at the correct frequency, which is why deposits appear on its walls, which clog the channels;
- there was a breakdown of the pump impeller, particles of which got into the radiator;
- destruction of the inner surface of the radiator due to age-related reasons.
If there is a suspicion of clogging (and there should be, if all other elements of the cooling system are working normally), you should use special means for flushing the cooling system.
Stove tap
It may clog or sour in the half-closed position. Or is it simply covered up? Perhaps the previous owner preferred to drive cool. Check how it opens and closes and whether there are any leaks.
And finally, if all of the above didn't work, congratulations. It begins...
Methods for replacing a radiator
There are two ways to remove the heater radiator on a VAZ-2113, 2114, 2115. The first involves completely removing the front panel, which is necessary to access the heat exchanger.
Please note that complete disassembly is a relative concept, since the panel itself is not removed from the car, but is only separated from the body, which allows it to be moved and thus brought closer to the radiator.
You will also need to move the torpedo itself.
The second method is without removing the panel. But it is not suitable for everyone, since to provide access it is necessary to make cuts in some places so that the lower part of the panel in the area where the heat exchanger is located can be bent.
The disadvantage of the first method is the laboriousness of the work, since you will have to unscrew many fasteners and disconnect the wiring, which is quite suitable for the panel.
As for the second method, the panel itself will essentially be damaged, although it will be cut in places hidden from view.
Additionally, once the replacement is complete, you will need to think about how to reattach and secure the cut pieces.
But since the stove radiator can leak at any time, ease of access is very important, so the second method is preferable.
List of new spare parts and tools for repair
We replace the stove radiator on a Lada Granta with our own hands + video
High-quality parts that will be needed to replace the heater valve on a VAZ 2115 and similar 2113, 2114 must be certified by the manufacturer and have original part numbers, which guarantees their compatibility and long service life. To fix this problem, the car owner will need the following spare parts:
- New heater valve (art. 21080 - 8101150 - 00) Here it is worth giving preference to a ball valve, which has reliable structural elements and greater heat transfer, in contrast to the ceramic and membrane type.
- Two pipes from the tap to the heater radiator (repair kit 237РШ).
- Four metal sealing ties (clamps).
- A can of coolant compatible with what was previously poured into the vehicle's system.
Repair work is carried out using standard tools, the list of which looks like this:
- a set of screwdrivers with a short tip;
- open-end spanners 10 and 13 mm;
- compact-sized coupling heads with a cardan and a knob;
- container for draining old coolant;
- sealant;
- flashlight for a better view under the torpedo space of the vehicle;
- gloves for hand safety.
In official Lada car repair shops, at the end of 2022, the price for replacing a heater valve on a VAZ 2114 is, without taking into account the cost of new parts, from 2000 to 2500 rubles; small, private workshops will ask for about 1500 rubles for the work. The work itself is not difficult and any car owner can do the repairs with his own hands after studying the steps below.
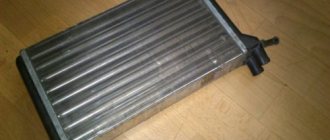
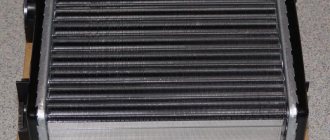
Selecting a replacement radiator
But before you begin the removal and replacement operation, you must first select a new heat exchanger.
You can purchase a factory heater radiator, catalog number 2108-8101060. But similar products DAAZ, Luzar, Fenox, Weber, Termal are quite suitable.”
As for the material, it is recommended to use copper heat exchangers, but they are much more expensive than aluminum ones. Although it is not for everyone, many people use aluminum products and are quite satisfied.
In general, the main thing is that the radiator is designed specifically for these cars.
On the VAZ-2113, 2114 and 2115 models, the designers used the same front panel design, so the procedure for replacing them is the same.
Next, we will look at how to remove the radiator of the internal heating system using the example of a VAZ-2114 and how this is done in different ways.
How to wash the heat exchanger honeycombs?
To remove deposits and dirt from the interior heater radiator, the following chemical compounds can be used:
- car detergent sold in specialized stores (for example, from the Mannol brand);
- food grade citric acid;
- household reagents intended for cleaning sewer pipes;
- caustic soda solution.
A radiator made of copper can be washed with all of the above means. The only caution: carefully read the instructions for the household reagent and make sure that the liquid will not damage rubber hoses and plastic parts. If the clog is severe, it is better to purchase two chemicals - acid-based and alkaline-based.
Since the aluminum stove radiator does not tolerate contact with alkali, it is worth purchasing citric acid or a factory-made automotive product designed for such heat exchangers. As a last resort, use weak alkaline solutions for a short time, followed by thorough rinsing with distillate.
Replace without removing the panel
But no matter what method is used, the coolant must first be drained from the system. Therefore, you will need to stock up on antifreeze in the required quantity in advance.
First, let's look at a replacement method without removing the panel. As already mentioned, for this you will have to make cuts here and there.
To complete the work you will need:
- Set of screwdrivers of different lengths;
- Rags.
- Metal cloth;
- Flat container for draining remaining coolant from the radiator;
Having prepared everything and drained the coolant from the cooling system, you can start working:
- Remove the glove box (glove compartment) from the panel, for which you need to unscrew the 6 screws that secure it;
- Remove the side trims on the center console;
- Using a metal cloth, we make the necessary cuts: the first vertical cut is made on the inner wall of the panel near the center console (behind the metal strip of the glove compartment). And here you need to make two cuts.
The second cut is horizontal, running at the top of the rear wall of the opening under the glove box.The third is also vertical, but not through. Performed on the right on the back wall of the lower shelf of the panel;
- After all the cuts, part of the panel along with the wall can be folded back to gain access to the radiator. We fold this part and fix it;
- We unscrew the nearest bracket for fastening the heating system hatch control cable and move the cable to the side;
- We loosen the clamps of the coolant supply pipes to the radiator. In this case, it is necessary to replace the prepared container under the connection points, since liquid leaks from the heat exchanger. We remove the pipes;
- We unscrew the three screws securing the radiator, remove it and immediately inspect it.
Then we replace the heat exchanger, fix it in the socket, connect the pipes to it and fix it with clamps. To make the tubes easy to insert, lubricate them with soap.
At this stage of operation, the cooling system must be filled with liquid and expelled to remove air pockets.
After this, it remains to make sure that the joints of the pipes with the radiator do not leak, and that the damper and tap are connected without errors.
After this, all that remains is to return the cut out part of the panel to its place and secure it. For this you can use screws and plates.
The main thing is to secure it in several places so that the cut part does not move when moved. Use sealant or silicone.
This method is convenient because when you replace the radiator again (which is quite possible), it will be very easy to do all the work - just remove the storage box and unscrew a few screws.
In addition, all the cuts are made in such places that after assembling the panel and installing the glove compartment, they will not be noticeable.
Work order
Remember that the price of replacing the VAZ 2114 heater radiator depends only on you! First of all, treat the purchase of a new radiator with full responsibility.
Replacing the VAZ 2114 heater radiator begins with preparing the tool. Knowledgeable people advise lubricating your hands with cream or wearing gloves. There will be fewer cuts. After completing the work, it is easier to clean your hands of dirt.
To drain the coolant (coolant), wrap the hose into the hole in the plug of the power unit, and the antifreeze will go into a container that must first be placed.
We insert the hose from the mixer directly into the engine drain hole. At the second stage, we will remove the glove compartment and the sides of the panel. It is necessary to unscrew all the bolts and screws that come into view.
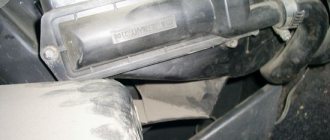
The glove compartment you will remove consists of 3 parts. If the process doesn't go as expected, you may have forgotten or missed the two bolt-on mountings on the front panel. They hold the structure, pressing it to the floor. Look at the photo. You can see that the mount is located at the bottom of the ECU (electronic control unit).
We unscrew the fastenings holding the cables alternately on the left and right sides.
Now you can take a break, look around and check that all retaining elements have been removed
Pay attention to the two screws located closer to the front passenger door. Another one in the upper right part of the panel
It is hidden behind a plug.
A video about replacing the radiator of a VAZ 2114 stove can be viewed here.
If the process is going slowly, you need to make sure that all fasteners are removed and unscrewed. As a safe option, you can remove the adjusting tips from the stove and damper. For the convenience of pressing the structure, you can use any objects. Simple and reliable, as you can see.
Before unscrewing the two clamps attached to the radiator, do not forget to place a container under the antifreeze. Otherwise the whole salon will be in it!
Choose a receiving container for antifreeze that is flat and voluminous so that you don’t have to run around pouring out the technical fluid several times.
To save money, the working fluid can be poured into a previously prepared container. In this case, into a canister.
Replacing the radiator pipes of a VAZ 2114 is mandatory, some say. Others argue that there is no urgent need for this. You can remove the pipe or squeeze it out, as shown in the photo, and the antifreeze will flow by gravity.
When the working fluid is drained and the clamps are removed, it is difficult to dismantle the radiator yourself. It rests on the bottom edge of the panel. We need another assistant.
Even using improvised means, nothing will work. Just waste your time, energy and nerves, believe me.
It’s easier and faster to cope with two people – that’s a fact! Installing a new radiator occurs in the reverse order. By the way, replacing the radiator of the VAZ 2115, VAZ 2113 stove is carried out in a similar way.