string(10) “error stat”
With the onset of the first cold weather, every car owner pays special attention to the heating system of his car. This is especially true for domestically produced machines, in which malfunctions occur quite often. Often, owners of such cars are faced with the problem that the interior is poorly heated or does not warm up. Among the possible causes, the most common are the following:
- An air lock that has formed in the cooling system. In this case, high pressure is created in the radiator, which can lead to depressurization of the system;
- Heater motor malfunction;
- The stove faucet does not open completely. Quite often it happens that it turns sour and does not open;
- The heater radiator is clogged due to which warm air does not enter the car interior;
- Wear or corrosion damage to the structure.
If these problems are identified, for further operation of the heating system it is necessary to remove or replace the stove radiator. In some cases, it can be repaired, but before that, you need to find out the material of the radiator. Basically, they are made of copper or aluminum. Radiators made from copper are more expensive, but have a long service life, and in some cases they can be repaired. Repair of the stove radiator is carried out by soldering. Their cost varies between 1500-2000 rubles.
Due to their low price, aluminum products are more common, but less reliable. The price of aluminum radiators is approximately 700-1000 rubles. In any case, you first need to remove the heater radiator from the car, and then plan your next actions.
Reasons for replacing the heater in a car
Most often, problems with the heater radiator occur in domestically produced cars. Most often you have to change the heater radiator yourself on a Gazelle.
One of the reasons for a malfunction of the heater radiator may be:
- depressurization of the system. This is caused by the formation of an air lock in the system;
- heater motor is faulty;
- the stove faucet has turned sour and does not open;
- the heater radiator may be clogged, which prevents the flow of warm air into the car interior;
Heating system repair
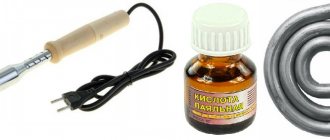
Some drivers repair the interior heater in cars such as Audi, Ford, BMW and other models using sealant or a soldering iron. The method allows us to partially solve the problem of radiator failure, but over time this leads to malfunctions of other working units.
CarCity car service employees strongly recommend contacting a service station if the radiator or other parts of the car are faulty. Professionals will conduct a full computer diagnostic and find out the exact cause of the breakdown.
The car service provides the following types of heating radiator repair services:
- Car diagnostics;
- replacing antifreeze;
- stove damper repair;
- interior heater motor repair;
- flushing the heater radiator.
The catalog can be found on the company's official website. The operator will advise on any issue regarding car repairs. In order to ask for help less often, our employees recommend following the operating instructions and periodically conducting a complete diagnostic of the vehicle.
Tools for work
Since the designs of the cars are similar to each other, replacing the stove on a Gazelle will not be much different from replacing the stove on a Renault Logan. Therefore, identical tools will be needed.
In order to replace the heater radiator in a car yourself, you must:
- a screwdriver or screwdriver, the main thing is that it has a cross-shaped and slotted tip;
- wrenches are usually taken as a set;
- a hose with a container for draining coolant;
- rags and a small piece of oilcloth;
Design and operation diagram of the interior heater of the VAZ 2114
During the cold season, the interior of the VAZ 2114 car is heated using a heater or stove. The basis of the stove is the radiator. Using a system of air ducts and dampers, the heat from it is directed to different areas of the cabin. This creates a microclimate that prevents the glass from freezing and provides comfortable conditions for the driver.
The stove in a VAZ 2114 car works on a fairly simple principle.
The heater operation scheme is quite simple. The heat source is a running engine, for cooling of which a special liquid is used - antifreeze. When the antifreeze moves in a vicious circle, heat is transferred from the hot motor to the cooling zones. There are two such zones in a passenger car - these are the radiators of the engine cooling system and the heater. Hot antifreeze transfers heat to cold air, which circulates through the radiator honeycombs using fans. Thus, the antifreeze cools down and returns to the engine, where it heats up again. This process must be continuous while the engine is running.
Removing the heater radiator
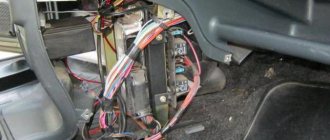
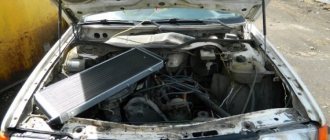
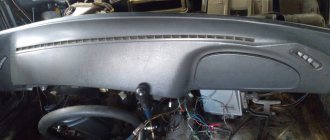
Removing a stove radiator is far from an easy process, and most often it is necessary to remove the instrument panel. But there is also a second method, an easier one, in which it is enough to pull out the glove compartment.
Most of the work related to replacing the heater radiator will be carried out at the top of the engine and inside the car. So repairs can be carried out without a pit and a jack.
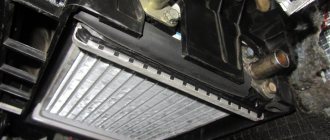
HEATER RADIATOR
If it turns out that the heater radiator on a VAZ 2114 needs to be replaced, first of all you need to find out where it is and how to get to it. The heater radiator on the VAZ 2114 is located below the instrument panel on the right passenger side in the car interior. The design of the model 2114 stove is fundamentally no different from the heating system diagram of any other car. The VAZ 2114 stove consists of the following elements (stove diagram):
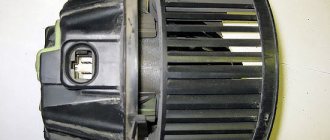
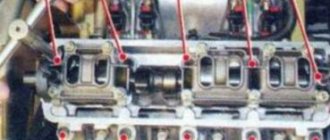
- Main body (the radiator and heater motor are mounted on it);
- Motor (located on top of the body, dismantled from above, from the engine compartment);
- Two pipes;
- Air ducts. They are located along the entire length of the instrument panel. There are also air ducts in the lower part, they are needed to heat the feet of front and rear passengers;
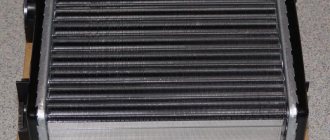
- Heater radiator;
- Stove tap.
Heater tap
The heater radiator is relatively inexpensive, prices depend on the manufacturer and region of sale. In addition, the parts differ in the material of manufacture, that is, they can be copper (brass) and aluminum. A copper radiator is more expensive (ranging from 1400-2000 rubles), and it is believed that it has the following advantages:
- Greater heat transfer (that is, it will be warmer in the cabin);
- Maintainability (it is possible to solder it if a coolant leak is detected).
An aluminum radiator is cheaper (700-1000 rubles) and does not transfer heat to the interior as efficiently. But this is only in theory. If you go to car enthusiast forums on the Internet, you can “hear” from users the opinion that copper is actually less effective. In fact, it turns out that the copper stove practically does not heat the engine at idle speed, and at these speeds the car has to work quite a lot in winter.
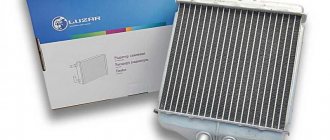
Among the manufacturers of VAZ radiators it is worth noting:
- Copper products – OR LLC (Orenburg) and SHAAZ;
- Brass - DAAZ, LUZAR and KRAFT.
A new radiator should be chosen carefully, since replacing it is quite labor-intensive for a car enthusiast.
Moreover, if you perform this procedure yourself for the first time, it will seem long and tedious to you. Car repair shops charge from 1,500 to 2,000 rubles on average for replacing a radiator and do the work quite quickly.
When purchasing spare parts, there is always a risk of buying a fake. To avoid such a purchase, you should adhere to certain rules:
- Do not buy a product whose price is suspiciously low;
- Ask sellers for a certificate for the product;
- Try to purchase spare parts in original packaging.
Buy goods from well-known manufacturers (in packaging with documents).
If the product is suspicious, you can always refuse it. Now there is no shortage of spare parts for the VAZ 2114; if in doubt, it is better to buy a heater radiator elsewhere.
Methods for replacing the stove
If you suddenly decide to replace the radiator of the Lada Kalina stove with your own hands, then be prepared for minor difficulties. Car enthusiasts managed to simplify this process in the second way, without disassembling the instrument panel.
First, let's look at a more complex option:
- We take out the instrument panel;
- The electronic control unit was in plain sight. It must be removed to the side to avoid damage.
- The heater radiator is ready for dismantling.
The difficulty of this repair is that the instrument panel must be pulled out very carefully, otherwise it may break.
The second method, which has proven to be easier, is performed in the following order:
- Disconnect the negative terminal;
- Remove the steering wheel by unscrewing 4 bolts;
- Remove the pedal covers;
- The gas pedal must be depressed and the brake pedal must be turned off;
- Unscrew the pipes from the heater radiator;
- Remove the bottom part of the panel;
- If you change the heater radiator on Kalina with your own hands, you will have to work a little while removing the radiator itself. Some, making their work easier, cut it into two parts. This method is used to replace the radiator on many cars.
The technique of replacing a radiator is not much different in different brands of cars. When replacing the heater radiator with your own hands and on a Skoda Rapid, you will need the same tool and the replacement technique will also work.
The last step in replacing the radiator is to pour coolant into the expansion tank. To avoid an air lock in the system, it is necessary to loosen the clamp and remove the hose from the throttle assembly.
It is necessary to fill until coolant begins to flow out from the other end of the hose.
Replace without removing the panel
But no matter what method is used, the coolant must first be drained from the system. Therefore, you will need to stock up on antifreeze in the required quantity in advance.
First, let's look at a replacement method without removing the panel. As already mentioned, for this you will have to make cuts here and there.
To complete the work you will need:
- Set of screwdrivers of different lengths;
- Rags.
- Metal cloth;
- Flat container for draining remaining coolant from the radiator;
Having prepared everything and drained the coolant from the cooling system, you can start working:
- Remove the glove box (glove compartment) from the panel, for which you need to unscrew the 6 screws that secure it;
- Remove the side trims on the center console;
- Using a metal cloth, we make the necessary cuts: the first vertical cut is made on the inner wall of the panel near the center console (behind the metal strip of the glove compartment). And here you need to make two cuts.
The second cut is horizontal, running at the top of the rear wall of the opening under the glove box.The third is also vertical, but not through. Performed on the right on the back wall of the lower shelf of the panel;
- After all the cuts, part of the panel along with the wall can be folded back to gain access to the radiator. We fold this part and fix it;
- We unscrew the nearest bracket for fastening the heating system hatch control cable and move the cable to the side;
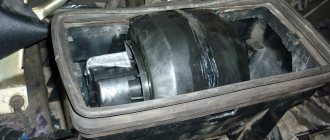
- We loosen the clamps of the coolant supply pipes to the radiator. In this case, it is necessary to replace the prepared container under the connection points, since liquid leaks from the heat exchanger. We remove the pipes;
- We unscrew the three screws securing the radiator, remove it and immediately inspect it.
Then we replace the heat exchanger, fix it in the socket, connect the pipes to it and fix it with clamps. To make the tubes easy to insert, lubricate them with soap.
At this stage of operation, the cooling system must be filled with liquid and expelled to remove air pockets.
After this, it remains to make sure that the joints of the pipes with the radiator do not leak, and that the damper and tap are connected without errors.
After this, all that remains is to return the cut out part of the panel to its place and secure it. For this you can use screws and plates.
The main thing is to secure it in several places so that the cut part does not move when moved. Use sealant or silicone.
This method is convenient because when you replace the radiator again (which is quite possible), it will be very easy to do all the work - just remove the storage box and unscrew a few screws.
In addition, all the cuts are made in such places that after assembling the panel and installing the glove compartment, they will not be noticeable.
Radiator selection
No matter what car you change the heater radiator on, when buying a new one you should pay attention to the following nuances:
- How frequently are the cross plates installed?
- How hard and strong are the plates?
- Aluminum tubes must have plastic swirlers.
When replacing the stove radiator yourself, it is recommended to lubricate the hoses suitable for it with sealant, thereby extending the life of the new radiator.
And after assembling the car, pay attention that there are no unnecessary parts left, and all clamps must be well tightened.
No matter how it may seem at first glance that replacing a radiator with your own hands is not difficult, this is not so. This process is quite labor-intensive and requires a lot of time.
Selecting a replacement radiator
But before you begin the removal and replacement operation, you must first select a new heat exchanger.
You can purchase a factory heater radiator, catalog number 2108-8101060. But similar products DAAZ, Luzar, Fenox, Weber, Termal are quite suitable.”
As for the material, it is recommended to use copper heat exchangers, but they are much more expensive than aluminum ones. Although it is not for everyone, many people use aluminum products and are quite satisfied.
In general, the main thing is that the radiator is designed specifically for these cars.
On the VAZ-2113, 2114 and 2115 models, the designers used the same front panel design, so the procedure for replacing them is the same.
Next, we will look at how to remove the radiator of the internal heating system using the example of a VAZ-2114 and how this is done in different ways.
Photo of replacing a stove radiator with your own hands
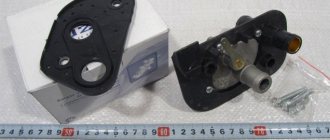
Replacing the heater valve VAZ 2114
- Unscrew the two 10mm nuts on the engine shield. (photo at the beginning of the article)
- If you are changing both the faucet and the radiator, then remove the faucet along with the pipes after disconnecting them from the radiator
- Remove the latch and cable
Stove valve control cable.
- We insert mounting bolts into the new stove faucet, and also mount the pipes in the position in which they were on the old faucet and tighten the clamps so that there is no pain later.
A small life hack. After installing the bolts, drop a little superglue on the seats, so they will not jump out when installing the faucet in place.
- Before installing the stove tap in place, we connect the cable and check that the tap opens and closes completely when changing the position of the manual heat-cold switch.
- If everything is normal, we install the faucet in place, connect the pipes and fill in antifreeze and enjoy the hot air from the heater even when idling.
Just for fun, I measured the air temperature at the outlet of the vent on the center console; with the engines fully warmed up and the outside air temperature +12, the thermometer showed +43 degrees in the second position of the fan.
Everything is very simple, it took about 1.5 hours to replace the radiator, and 30 minutes to replace the faucet. This procedure is easy to perform with your own hands, in a regular garage, even without an assistant.
Good luck on the roads. Not a nail. Not a rod!