Where is it located and how to remove the wiper motor of the Lada Priora
If your car's windshield wiper refuses to work or moves slowly and stops, then you should change the wiper motor on your Priora.
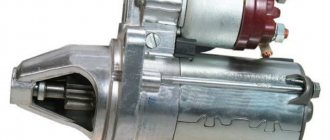
Alternatively, you can try to remove and disassemble the old motor, check the presence of lubricant in the gearbox, the condition of the armature and its winding, brushes, bushings. The removal of the windshield wiper motor is carried out together with the trapezoid. We dismantle the wiper arms and the hood seal. After removing the plastic plugs, remove the screws holding the frill. Do not forget about the expansion tank hose, which must be pulled out of the insulation by loosening the clamp. Having put the expansion tank and insulation aside, you can begin to dismantle the trapezoid with the motor. Disassembling the windshield wiper motor is not difficult. First you need to unscrew the gearbox mounting bolts. Then unscrew the screws securing the electric motor housing to the gearbox and remove everything together with the armature. You can begin to prevent and repair the windshield wiper motor of the Lada Priora. Assembly should be carried out in reverse order. If you decide to replace a faulty motor, the question immediately arises of which one to install.
When choosing a windshield wiper motor, you have several options to choose from:
- Buy an original one at an auto parts store;
- Buy a used one for analysis.
These are the most popular options.
But where is the guarantee that after several thousand kilometers this motor will not have to be changed again? There is also a third option - find out which motors from other car brands can be installed on the Priora. The most suitable, as practice shows, are motors from Japanese cars. It is more advisable to install on your Priora a wiper motor from a Japanese car, which is distinguished by its quality and long service life. When choosing a Japanese motor, you need to be extremely careful, because not all models are similar in size and mounts. In most cases, the fasteners have to be overcooked. But it's worth it. The most important condition is that the ex length does not change. If installed from Priora, the splines will be erased during operation. And this is a replacement for the trapezoid.
Don’t be afraid that the Japanese motor has 4 contacts, while the motor from the Lada Priora has 5. The fifth contact is an additional “ground”. If the Japanese one does not have an additional “trick,” then the fifth contact should be screwed onto the body of the motor itself. See the contact designation diagram for both motors.
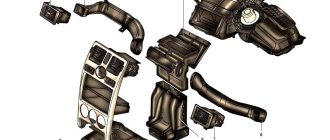
Removing and disassembling the windshield wiper motor
All the important parts of the rear windshield wiper are located under the trim. To remove it, I had to tinker, since it was attached to special holders, which are not so easy to remove without special tools. Fortunately, I had a nail puller at hand and it was perfect for removing these fasteners.
After unscrewing the rear wiper mount, I unscrewed the mount of the motor itself. I disconnected it from the block and took it home for inspection.
There appears to be no damage. Then he unscrewed the mount of the motor housing and pulled the structure out of it. The mechanism itself is covered in lubricant; there was plenty of it.
I looked at the gears, they were intact. Next, I examined the wires attached to the microcircuit. They had a raid. I thought this was probably the reason and decided to move them a little (in a good way, it would be better to resolder them), the “dust” flew off.
- That’s it, there’s nothing more to look at, I put the mechanism back together and went to connect the motor to the wiring block to see if it works or not.
I turn on the ignition and rear window wiper. That's it, the rear wiper is working. Hooray! I screwed everything into place and went for inspection.
Removing the windshield wiper trapezoid assembly with the motor on a Priora
The first step is to remove the wiper arms, as well as the rubber seal on the top of the hood. After this, using a thin knife, we pry off the decorative plugs, under which there are screws securing the frill.
Under these plugs we unscrew the screws securing the frill.
Now, again, on the left side, unscrew several screws securing the insulation to the frill, as shown in the photo below.
After which you can remove one part of the frill:
Also, loosen the clamp bolt on the thin hose of the expansion tank and remove it from the hole in the insulation:
The engine compartment insulation is also attached from below, which is not very clearly visible, but in the photo below this screw is quite clearly visible.
Now you can lift the expander up and move the insulation section to the side, as shown in the photo below.
Now you can begin to unscrew the mounting nuts and bolts of the motor with the trapezoid. Top left:
And top right:
But to get to the trapezoid mounting bolt in the bottom center, you must first unscrew and remove the expansion tank mounting bracket. Two mounting bolts are located on top, as can be seen in the photo:
And two more bolts on the inside of the wing, of course, after first removing the fender liner.
Now the platform can be removed and the last bolt securing the Priora trapezoid can be unscrewed.
Now we carefully remove the entire assembly, finding the desired position so that the trapezoid does not cling to the body and heater housing.
There is still one thing left to do - disconnect the block with the power wiring harness.
Now the entire trapeze assembly with the motor can be removed without any problems.
Dimensions
It should be noted: a feature of this car is the ability to install custom-sized wipers. If the length is more than 508 mm, no difficulties will arise. The following sets of pairs of brushes can be installed:
- 550 mm + 500 mm;
- 530 mm + 530 mm;
- 530 mm + 510 mm;
- 530 mm + 500 mm.
| Year of issue | Driver side | Passenger side | Rear | Mounting type |
| 2007- 2018 | 20 inches - 508 mm | 20 inches - 508 mm | Absent | "Hook" - hook |
The operation process itself usually does not cause problems. But you need to remember that the increased weight, length and generally non-standard design have a greater impact on the gearbox, engine and slots - on which the leads are installed. Long-term increased load, especially at high speed, can lead to rapid wear of the splines. Or failure of the electric motor.
Original articles
AvtoVAZ, like many other car manufacturers, does not independently manufacture small parts. Including brushes. The official supplier of VAZ wipers until 2022 is Bosch. The products of this company are supplied to the AvtoVAZ plant. After which it is packaged in original boxes.
Replacing the windshield wiper motor on a Priora
To replace the wiper motor itself, you must first note the position of the trapezoid bar relative to its body, so that later you can install everything in the same order.
Unscrew the three motor mounting bolts:
And the central nut using a 13 mm wrench. We remove the motor and replace it with a new one if necessary.
Installation occurs in reverse order. The price of a new trapezoid is from 1000 rubles for the original one produced by AvtoVAZ. You will have to pay at least 2000 rubles for the motor.
VAZ 2170 | Diagnosis of windshield wiper faults
Diagnosis of windshield wiper faults
Windshield wiper motor does not work
ґThe wires are damaged, their tips are oxidized or loose, fuse 2 has blown (1 if the tailgate glass cleaner does not work)
Crimp the terminals, replace faulty wires, fuse. Eliminate the cause of its burnout
ґThe brushes are frozen to the glass
Turning the ignition key to the off position, carefully separate the brushes from the glass, make sure that the rubber scraper is intact, and restore the mobility of the brush joints
ґA foreign object has gotten between the moving parts of the crank
Check the correct installation of the arms, straighten deformed arms or replace the wiper
ґThe steering column wiper switch is faulty
Replace the faulty switch
ґThe motor brushes are stuck, the commutator is very dirty or burnt
Eliminate sticking brushes, clean the commutator with glass sandpaper, and wipe with a cloth soaked in gasoline. If there is severe wear, replace the gearmotor
ґOpen or short circuit in the armature winding of the electric motor
Windshield wiper motor does not operate intermittently
ґWiper relay is faulty
ґThe steering column switch is faulty
Replace the faulty switch
Wiper motor does not stop intermittently
ґWiper relay is faulty
ґThe contact plate of the gearmotor limit switch does not bend when the cam passes
Disassemble the gearmotor and bend the contact plate or replace the gearmotor
Limit switch contacts are oxidized
Clean the contacts or replace the wiper motor
The brushes stop in any position
ґThe limit switch contacts do not press well or are oxidized
Clean the contacts, if necessary, bend the switch plate or replace the gear motor
ґThe nut securing the crank on the gear motor shaft is loose
Having correctly installed the crank, tighten the nut (it is advisable to first apply paint or anaerobic sealant to the threads)
The windshield wiper motor runs but the blades do not move.
ґThe nut securing the crank on the gear motor shaft is loose
Having correctly installed the crank, tighten the nut (it is advisable to first apply paint or anaerobic sealant to the threads)
Gearmotor gear teeth are chipped
Removing the trapezium wipers of the Priora
Procedure:
- Unscrew the 2 nuts of the lower fastening of the expansion tank bracket (in the front left wheel arch) using a 10mm socket.
- Unscrew the 2 bolts of the upper fastening of the tank bracket (in the engine compartment) using a 10mm socket.
- Remove the bracket.
- Disconnect the block from the wiring harness of the Priora wiper motor by pressing the latch.
- Unscrew the screw of the upper heater mounting using a Phillips screwdriver.
- Unscrew two nuts No. 1 and bolt No. 2 securing the purifier using a 10mm socket.
- Remove the Priora windshield wiper by squeezing the top part of the heater by hand.
- If you plan to further remove the wiper motor from the bracket, then do not forget to mark the position of the crank relative to the wiper bracket.
How to change wipers on a Priora
In bad weather, driving with faulty windshield wipers becomes unsafe. While driving, the driver must clearly see the space in front of him in order to quickly react and make the right decision in the event of an extreme situation. Over time, the wipers on the Priora begin to work worse and the quality of cleaning decreases - streaks and unwiped areas appear. The reason may be a breakdown of the wipers, motor or brushes. In this case, it is better to repair the windshield wipers on the Priora at a car service center. Since this is not always possible, the question arises of how to change the wipers on a Lada Priora yourself.
Most experts recommend replacing windshield wipers on a Priora once a year, regardless of the intensity of use of the car. It is best to change brushes after winter, since this is the time of year that most negatively affects the condition of the entire car. According to technical requirements, windshield wipers must efficiently remove snow and dirt from the windshield for 400 thousand cycles, which is approximately equal to one year of use.
How to choose wipers
Windshield wipers come in regular and frameless types. The first ones consist of a metal frame, are noisy and quickly become loose. Since the wipers on the Priora are not interchangeable, it is necessary to select them taking into account the length. For winter, there are special brushes that help combat icing. The VAZ Priora is equipped with frame windshield wipers at the factory. This type allows you to only replace the brushes if necessary, although frameless ones have better cleaning quality.
There are also hybrid wipers - the most expensive option. They borrowed rocker arms and supports from frame wipers, and a plastic body from the frameless type. This option is the most advanced and is distinguished by its durability. Replacing the tape in frameless and hybrid wipers requires certain skills, while anyone can change the rubber bands in conventional windshield wipers.
Manufacturers and prices of analogues
Analogs include frame, frameless, and hybrid brushes. There are several options on the market. Choose the one that suits you best - no matter whether it has a frame or not. The main thing is not to let the old windshield wiper start to scratch the windshield or rear window.
When replacing cleaning brushes, use the following dimensions in millimeters (driver - passenger side):
- 630 – 480;
- 530 – 510;
- 510 – 500.
Other layouts are considered by car owners to be not as effective. Among the well-known analogs of windshield wiper blades are:
- Bosch Aerotwin - frameless, made in Belgium. Full name: Bosch aerotwin retrofitar 532 s. Price – 1200-1300 rubles. The length of the driver's seat is 53 cm, the passenger's length is 50 cm. Sold as a set.
- Bosch Twin is a simpler model. They have the same dimensions, but despite the lower price they are famous for their reliability. The cost is about 800 rubles.
- Bosch Eco is the most economical option. They are inexpensive and sold individually. Price – 300 rubles for one brush. Length – 50 cm.
- Denso Hybrid is recognized as almost the best model on the market. Withstands cold and heat. Price per piece – 500 rubles. Length 50 cm.
- Alca - simple, 500 rubles apiece. The length is 50 cm, but on the passenger side an area of approximately 5 cm wide is left uncovered.
Read more: VAZ 2106 rear axle gearbox: gear ratio and other technical characteristics, malfunctions and repairs, oil seal replacement, instructions
How to change rubber bands
You can replace the rubber bands yourself, which will save you money on buying new brushes. You will need pliers and a wide blade screwdriver. First of all, to replace the wiper blades on a Priora, you need to install them perpendicular to the arms, press the locking brackets and then pull them out. After removing the wipers, carefully bend the rubber band clamps located at the edges of the pressure plate to a minimum angle. This is done so that the rubber can easily come out of the wiper. It is better to bend the clamps with pliers, as there is a risk of damaging the clamps.
Replacing the trapezoid wipers on a Priora
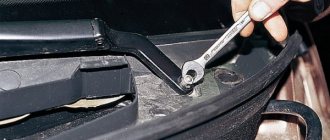
To repair the Priora trapezoid, you will need a repair kit, with which replacing the motor or trapezoid rods will not take much time. First of all, to replace the motor on a Priora, you need to prepare the engine compartment: disconnect the battery terminal with the “-” sign, remove the left side of the sound insulation and move the expansion tank to the side. From the Priora windshield wiper repair kit, you will first need a flat and Phillips screwdriver, as well as a 10mm head.
How to remove trapezium wipers on Lada Priora
- In the front left wheel arch, unscrew the two nuts that secure the expansion tank bracket from below using a 10mm socket. In the engine compartment, unscrew the two upper mounting bolts using the same 10mm socket and remove the bracket.
- Release the latch and disconnect the block from the motor wiring.
- Using a Phillips screwdriver, unscrew the screw on the top heater mounting.
- Using a 10mm socket, unscrew the heater mounting bolt and nut, then remove the windshield wiper by pressing out the top part of the heater.
- Next, you need to mark the location of the crank relative to the bracket if you need to completely remove the Priora windshield wiper motor.
Installing the windshield wiper trapezoid on the VAZ-2170 occurs in the reverse order. You need to turn on the motor using the steering column switch, then turn it off and wait until the electric motor shaft stops. Next, you should install the crank according to the mark made before.
What is a trapezoid: design and signs of the need for replacement (repair)
A trapezoid on a car is a drive mechanism consisting of a system of rods and levers that perform reciprocating movements, moving the windshield wiper blades. On most cars, including the Lada Priora, such devices are located in a niche under the windshield.
With the help of a trapezoid, reciprocating movements are created. This is achieved precisely with the help of a special device circuit. Below is the design of the Priora trapezoid.
In addition to creating reciprocating movements, the trapezoid also performs another important function. With its help, the wipers move synchronously to clean the windshield. The malfunction of this mechanism leads to the operation of the wipers being disrupted. If malfunctions occur, the device must be repaired. The ability to repair depends on the type of damage. Most often, hinge joints fail, which can be replaced using a repair kit. If they are in good working order, then when removing the trapezoid, they must be lubricated.
If the integrity of the threaded connections is compromised or parts of the levers and rods are damaged, then the trapezoid must be replaced. Determining the malfunction of the device is not difficult. Defects can be identified by a number of characteristic signs:
- slow operation of windshield wipers;
- the wipers do not work at all or only one of the two wipers functions;
- intermittent and jerky movement of the brushes, which may indicate souring of the driver drive in the bushings (which is why they must also be lubricated).
It is necessary to dismantle the trapezoid and repair it in any of the above cases. Excessive load negatively affects the operation of the gearmotor, which can simply burn out due to overheating. That is why pay due attention to the device if there are signs indicating a malfunction.
Replacing the windshield wiper motor on a Priora
To replace the wiper motor itself, you must first make a mark of the position of the trapezoid bar relative to its body. This is necessary in order to install it back in the same order. Next, unscrew the 3 bolts that secure the electric motor and the central nut using a 13mm wrench. After this, you can remove the motor and replace it with a new one, if necessary. An original trapezoid costs from a thousand rubles, a new gear motor costs from two thousand rubles.