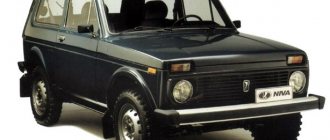
The basis of the VAZ-2170 Priora was the VAZ-2110, which has undergone such a thorough redesign that it is no longer recognizable in this model. About 1000 fundamental changes were made to the design, which allowed this machine to compete with foreign models in the market segment.
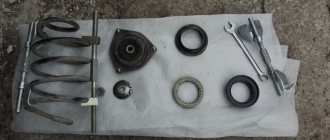
As a power plant, the VAZ-2170 is equipped with 8- and 16-valve engines with power from 90 to 100 hp. These engines have already been used on other models of the Volzhsky Automobile Plant, which made it possible to establish logistics for the supply of spare parts. The weak point of this model, despite the improvements implemented, remains the car’s suspension. Demand for both basic and advanced shock absorbers remains quite high. In addition, the remaining parts of the VAZ-2170 chassis are also often converted into reinforced versions.
It is noted that drivers of this car prefer to purchase consumables for periodic maintenance with a class above average, which is most likely due to the intuitive choice of the VAZ-2170 among other models of the Volzhsky Automobile Plant.
In the event of a serious breakdown of the generator, it should not be repaired, but completely replaced. Parts needed for repair may be missing, or the problem may not be repairable at all. Meanwhile, the on-board voltage and quality of battery charge depend on the proper functioning of the power unit. It's a pity when, even with a good engine, the electrical equipment does not work properly.
And if we are talking about VAZ cars, then sometimes replacement is required due to insufficient power of standard devices. Modern car manufacturers offer a lot of additional devices that increase the level of comfort while traveling, but at the same time they consume a lot of electricity, and old devices cannot cope, they need to be replaced with more powerful ones.
Many people are interested in: which generator should they buy if they have a VAZ? Here it is necessary to consider separately by model, so before purchasing, read the recommendations of specialists and compare them with your own wishes and capabilities.
Which generator is better to install?
Regardless of which generator is installed on the Priora, the owners of these cars often replace the unit due to the fact that not all devices allow connecting various equipment to the on-board network. Which manufacturer is good and which device is better to install on the Lada Priora?
You can supply generators of the following brands:
- BATE 90 ampere;
- KZATE 115a;
- BOSCH 120 amp;
- devices manufactured by VAZ for 120 or 115a.
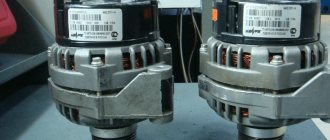
Generator unit for Priora
In principle, other models of generator devices for domestic cars can be found on sale. When purchasing, the main thing is to check the integrity of the unit so that there are no signs of damage on the body. It is better to use high power so that there is a power reserve, thereby the device will last longer. In addition, it should be taken into account that it is not recommended to install less powerful generators, especially if many devices are connected to the vehicle’s on-board network.
Improvements to Shnivy continue.
Starting from February 6, Chevrolet NIVA cars of the L, LC, LE, GLS, GLC trim levels are equipped with a new, more powerful generator from Bosch (110A, 14V). Also, from the end of January, cars of all versions are equipped with:
— gas-filled shock absorbers with improved hinge design; — front seats of a new design with a reinforced frame and backrest tilt adjustment, more pronounced lateral support and improved cut; — front brake pads with improved friction composition. In total, over 20 changes were introduced in 2013 to increase reliability and improve the quality of Chevrolet NIVA components and assemblies. These include: changing the material of the expansion tank to an imported one, increasing the reliability of door locks, as well as changing the design and material of the gutter seals. In the near future, it is planned to install the “Anti-dust” package, which will reduce dust entering the car interior. https://gm-avtovaz.ru/company/news/chevrolet_niva_uluchsheniya_prodolzhayutsya/ Most of these changes have already been tried by Shniv owners. We installed a generator from a Priora, took out and sawed through tanks from foreign cars, and changed seats.
Possible malfunctions and ways to eliminate them
The operation of Lada Priora generating devices may occasionally fail.
For what reasons may a generator from Priora not work correctly:
- Elements F12 have burned out on the fuse diagram. In this case, the devices on the dashboard will stop working, and the lamp will not light up when the ignition is turned on. Replacing the part will solve the problem.
- There has been a break in the power supply circuit of the instrument devices; the symptoms will be similar to those described above. To fix the problem, you need to check the connections, as well as the contacts from the orange wiring.
- The ignition switch refuses to function. Regardless of what kind of lock it may be, it needs to be changed.
- Souring or wear of the mechanism brushes, oxidation of slip rings. Symptoms of malfunction will be the same. To solve the problem, you need to change the voltage regulator on the Lada Priora, and also clean the contacts. Many priority drivers today use a three-level voltage regulator - three levels allow you to always control the voltage level in the network.
- The excitation winding leads have broken. The problem can only be solved by replacing the rotor of the unit.
- If the drive belt slips, the battery discharge lamp will indicate this - adjusting the tension will solve the problem.
- Another reason why the Priora Lux generator may be faulty is damage to the valves of the rectifier device. The block itself will have to be replaced.
- The battery discharge lamp may appear when the diode batteries of the excitation winding are damaged. In this case, the rectifier unit will also have to be changed.
- A short circuit or break may occur in the stator winding - it will be necessary to repair the latter or install a new one instead. Also, the stator needs to be changed in case of an interturn short circuit or a short circuit to ground.
- The bearing elements have worn out - the car owner will be informed about this by third-party sounds when the generator unit is operating. In the video below you can familiarize yourself with the procedure for repairing a mechanism at home (the author of the video is Repair and Tuning).
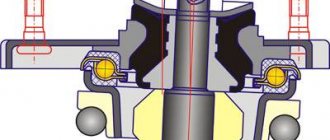
The rotor in the VAZ 2107 generator circuit is the last of the most important elements
This is a shaft with a pressed sleeve and steel poles. Together forming a core. The excitation winding is placed in the frame on the bushing. There is a plastic bushing with slip rings on the shaft. The winding outputs are soldered to them. At the other end of the shaft there is a pulley with a fan impeller. The shaft itself rotates on bearings located in the generator covers, with the rear bearing pressed onto the shaft, and the front bearing located in the cover.
On some cars, another type of generator 9412.3701 was installed; the distinctive features of the design are the impeller located inside its body and the rectifier unit was placed outside the cover. Smaller slip rings to reduce brush wear.
The installation method and circuit diagram of the VAZ 2107 generator does not change.
Removal and installation instructions
As practice shows, the main reason why a unit fails is the connection of various electronic devices to the car’s on-board network. Many energy consumers need high voltage generators. Therefore, when purchasing a node, you need to consider how many devices will connect to it. If you take a 115A or 120A mechanism, this will be the most reasonable choice for cars “stuffed” with electronics.
Find out more about dismantling and installation below:
- To perform the work, you will need a 13 key. First of all, you need to disconnect the battery.
- In accordance with the operating instructions, dismantle the mechanism drive belt. After this, you can disconnect the wiring block from the D+ connector on the device.
- Then you will need to move the rubber boot and unscrew the nut. Having done this, you can disconnect the wiring from the terminal pin.
- After these steps, unscrew the nut of the screw of the lower clamp of the assembly to the special bracket. The nut itself can be removed with a spacer sleeve.
- Next, remove the retaining screw. After this, the nut securing the assembly to the upper mount can be completely unscrewed. The adjusting screw also needs to be completely unscrewed, then remove the tension bar.
- After completing all these steps, you can remove the mechanism from the machine. The unit is being repaired with the replacement of all necessary elements. After the repair is completed, the generator can be put back in place; the installation procedure looks identical to dismantling, only all steps are repeated in reverse order. After installation, it is necessary to adjust the strap tension. If the belt is not adjusted, this may cause the mechanism to malfunction. After all the actions completing the repair procedure, the tension bar fixation nut must be tightened to a torque of 20 Nm.
Generator replacement process
Most often, the unit fails precisely after connecting various electronic devices to the onboard part of the car. The more energy consumers there are, the higher the generator voltage should be.
This is why we recommend that you consider the number of electronic devices you use when purchasing a new node. The best option is generators with 115-120 amperes.
Let's get started with the work. To dismantle the generator you need a 13 key:
- Disconnect the battery. Remove the mechanism drive belt according to the operating instructions.
- Disconnect the connector from the D+ connector. Then move away the rubber boot to gain access to the fastening of the contact pin and the wiring block.
- Now unscrew the fixing nut and remove it. Remove the screw and get rid of the remaining fasteners. Don't forget about the adjusting screw.
- When all fasteners are removed, dismantle the tension bar.
- Remove the mechanism itself.
Now you can replace individual elements or purchase a new unit. After completing the repair work, all that remains is to install the generator in place; the process itself is almost identical (performed in reverse order).
Please note that if you are the owner of a Lada Priora with air conditioning, the process of removing the generator will be slightly different:
- Remove the protection and disconnect the positive terminal from the generator.
- Lower the belt tensioner roller and unscrew the air conditioner fasteners.
- Move the air conditioner away to make room for further removal of the generator.
- After unscrewing all the fasteners, carefully remove the device.
Don't forget to adjust the strap tension to avoid malfunctions of the mechanism. Then tighten the tension film fixing nut, maintaining a torque of 20 Nm. Be sure to rely on the diagrams during installation to avoid mistakes that will lead to system failure.
You may need additional replacement of bearings and diode bridge. If you have doubts and are not sure that you can carry out the procedure for replacing components yourself, it is better to contact a salon.
How to properly remove a generator on a Priora with air conditioning
Often the generator is removed in order to subsequently replace it or improve its operation. This procedure requires a lot of knowledge and appropriate tools. It is better for beginners not to risk removing the generator themselves. Those who have been driving for a long time and have encountered various problems should also understand the intricacies of this procedure. Let's look at which ones exactly.
Firstly, the compressor does not always need to be removed along with the generator. If the air conditioner is Panasonic, then there is no need to remove the compressor. If Halla has air conditioning, then there is no way to do without it. Also note that during removal a problem often arises with the engine bolt. If it is too long and is installed with the head down, then it will not be possible to completely remove it, since it rests on the engine mount, which also interferes with the removal of the generator. With this problem, you usually have to replace the bolt with a new one, which is located with the head facing outward. Sometimes it is enough to hang the engine with a jack and carefully remove the cushion. If you are ready for all these difficulties and have figured out how to solve them, you can proceed directly to removing the generator.
We make a backup wire from the generator to the battery with our own hands. NO to waste!
This article will be of interest not only to car audio enthusiasts, but also to ordinary amateur motorists. Many people are faced with this problem when, when they turn on the stove, headlights, air conditioning and other electrical consumers, the voltage in the network is loaded, the voltage decreases and there is a “drawdown”. The generator begins to wear out.
There is one very good way to help the generator - to power the backup wire from the generator to the battery. For some unknown reason, the original wires are thin, especially on domestic cars. When the load is high, these wires cannot supply a large amount of energy to the battery.
A wire with a cross-section of 25 squares is perfect.
KG markings (aka welding)
and PV3 (comes in different colors, usually yellow and blue)
Also, to the positive wire, as safety against short circuit (short circuit), you need to install an 80A fuse (with a cross section of 25 square meters)
If we duplicate the positive wire, then the negative wire requires similar duplication from the battery to the car body.
Sometimes such an installation increases the voltage by 0.7 volts
This will make the generator's work much easier.
Turned on the heater, headlights, heated rear window:
It would be nice to protect the wires with cable corrugation.
Source
How to remove a generator on a Priora with air conditioning
Before you begin the procedure, you need to acquire the following tools:
- locksmith's crank;
- cardan;
- extension;
- spanners;
- WD-40 product.
Next, you need to position the car over the hole, but do not forget to install chocks under the wheels so that the car does not roll.
The generator mounting points must be treated with WD-40 and only then begin the procedure, which consists of the following steps:
- First you need to remove the car engine protection.
- After this, you can begin to remove the compressor drive belt (if there is such a need).
- Next, you need to disconnect all the contacts of the generator, first under the rubber cap B+, and then under terminal D.
- Then unscrew the engine compartment mount and remove the bolt.
- If you remove the compressor, it must be moved down and then to the right.
- Next, we proceed to remove the bolt with a metal sleeve.
- Then you can remove the generator down the engine compartment.
It is important to note that in luxury cars you can pull out the generator through the top. In simple models this is done through the headlight. This is also a very important point to know when removing the device. One wrong action can disrupt the operation of the device and other parts adjacent to it.
Electronic devices of VAZ cars
All electronic equipment of VAZ family cars operates according to the same principle. General network wiring diagrams are subject to basic rules:
- All electronic devices have a single-wire connection circuit.
- Each wire is assigned a different color and labeled with the initial letter of that color.
- The negative output is attached directly to the body. That is, the body acts as a negative channel of the circuit. It is always black.
- The positive channel comes from the battery and is marked red. You need to know this in order to take it into account when installing any device.
- The connections of each system are equipped with a wiring harness
- Any connected electronic device is under voltage due to the battery being connected to the network
- Each section of the common circuit is equipped with a fuse.
- When connecting powerful equipment, a relay is used.
These main features are inherent in both carburetor and injection engines of VAZ models.
The wiring system in injection cars has a more extensive network. This is easily explained by the presence of an electronic monitoring and control system, consisting of a control unit, numerous sensors and actuators. All this is connected to the center and to each other by a multi-meter chain of wires.
What is the difference between removing a generator with and without air conditioning?
The main difference is in the sequence of actions. Removing a generator without air conditioning is carried out as follows:
- We start by removing the battery from the minus terminal;
- then we proceed to removing the generator drive belt;
- Next, disconnect the block with the wire from the “D+” generator.
- then you need to remove the rubber cover;
- Next, we proceed to disconnect the wire from the contact pin;
- then remove the nut from the lower mounting bolt of the device;
- Next, remove the nut with sleeve;
- then we pull out the bolt of the lower mounting of the generator;
- then remove the tension bar by unscrewing the bolt;
- remove the generator.
This completes the extraction of the generator. The procedure is quite labor-intensive, considering that not everyone has the necessary tools for this operation. You should not take risks and remove the generator if you do not have the appropriate knowledge and skills, otherwise you may damage the device. Today there are a lot of technical services that can quickly and efficiently resolve various problems and replace any car parts.
If you are confident in your abilities, follow the instructions strictly, and then the removal procedure will be successful. On average, this work takes 40-60 minutes. Car enthusiasts who do not have much experience in this spend 1.5-2 hours. Please note that the generator must be removed strictly according to the instructions. During work, various difficulties may arise for which you need to be prepared. If you thoroughly study all the nuances of this procedure, you can remove the generator with your own hands in a short time, saving money.
Precautionary measures
The voltage required to activate the generator when the ignition is on is supplied to its positive contact, having previously been connected to the control indicator. After the motor is fully started, the winding receives current from three rectifier diodes.
- The positive output of the battery must be in contact with the positive output of the generator, and the wire from the negative terminal must be connected to ground. Under no circumstances should mistakes be made, as this will entail a sharp increase in current, which will lead to damage to the generator valves.
- It is not allowed to operate the generator with the battery disconnected. Short overvoltages will damage the generator relay and electrical appliances of the vehicle network.
- It is prohibited to test the generator with electronic measuring instruments with a voltage higher than 12V. Sometimes it is necessary to check the stator windings with such devices. This can only be done with the generator disconnected.
- During welding work on the car body, all wires and contacts of the generator must be disconnected
How to remove a generator on a Priora with air conditioning? Step by step method
In some cases, the invented improvements backfire, since removing the generator on a Priora with air conditioning, according to some auto mechanics, is a rather labor-intensive mission and practically impossible without additional movements. And all this is connected with the design features of the parts, seemingly designed to create the comfort desired in many domestic cars.
A consultation at a service station can shock even an experienced motorist: they say you need to dismantle the radiators, then drain the freon from the air conditioner itself and remove the receiver. And in general - to disassemble almost half the car, since the generator, after twisting all its fasteners, rests on the engine support on one side, and on the other there is an air conditioning compressor almost end-to-end (these, alas, are the quirks of the ingenious developers of the option). And the point is not only that all this work is quite expensive, although you don’t want to waste money either.
The most worrying thing is that such a large-scale dismantling may subsequently lead to the emergence of more and more minor repairs - too many components are affected, and there is always the possibility that something could go wrong. One loose nut - and you're welcome back to the pit or to the lift, repaired and paid to specialists. And refilling the air conditioner is not cheap, and in this case, in our opinion, absolutely unnecessary.
How to remove a generator on a Priora with air conditioning?
The owners of such models, who have technical skills and the appropriate way of thinking, figured out this, frankly speaking, not a simple issue themselves. And everything turned out to be not at all as frightening as it was described by professional mechanics of car service centers.
How to dismantle?
The main difference from removing it from a car without air conditioning is the approach from below. The Priora is driven onto a lift or pit, and fairly simple manipulations are performed.
- The first step is to remove the protection from the engine;
- The tension roller of the generator drive belt is slightly loosened;
- First, the top bolt that secures the generator is unscrewed;
- From below, the process will take longer and require some power and technical skills: the fasteners are located very inconveniently. However, with the help of a 13mm socket, a ratchet wrench and Russian verbal folklore, this is quite possible;
- Next, the bolts are removed that secure the air conditioning compressor that is interfering with our work;
- Now carefully remove the belt that goes to both the generator and the compressor;
- The required generator is pulled from its position and slightly moved to the right, in the direction of the battery. This frees up access to the topmost bolt that holds the air conditioning compressor;
- After unscrewing the last fastener, the compressor is hung. There is no need to secure it in any additional way: it is securely supported by the surrounding parts - it will not fall, and the tubes leading to it are quite strong. And, as it turned out, it is not at all necessary to drain the coolant from this device;
- The bolts that secure the generator to the holder are screwed together;
- Its terminals are disconnected, and the generator is pulled straight down.
We cannot say that this is a matter of 5 minutes, however, as we see, nothing military will have to be done. Assembly, of course, is carried out in reverse order. For people who are no strangers to mechanics, the whole process took no more than 2 hours, including pulling the belt into the desired position.
Catalog brands
- home
- For wholesale buyers
- Contacts
- Delivery
- Payment
- Guarantee
- About Us
- For regular customers
- Guarantees
- Purchase returns
- Working hours:
Mon-Fri: 08:00-20:00, Sat-Sun: 10:00-18:00 - Phones:
+7-906-340-88-71 - OGRNIP
305631907700016
This information resource is not a public offer. The availability and cost of goods please call. Manufacturers reserve the right to change the technical specifications and appearance of products without prior notice.
So friends. After purchasing and replacing the KZATE 115A generator, one problem appeared that was familiar to many, namely a voltage drop for a couple of seconds when switching to neutral. At first I went and didn’t worry, but then I got pretty tired of it. After reading on the Internet and in particular on our favorite site, I came to the conclusion that it is necessary to change the voltage regulator (brushes), because A Chinese regulator is installed on this generator from the factory. Having gone to the store and saying what I needed, they showed me 2 regulators marked 849.3702 14V 5A and 897.3702 14V 5A, stating that they were the same. I doubted and postponed the purchase.
When I came home, I began to study how they differ, and how I realized that the regulator marked 849 is for a 90 A generator, and the regulator marked 897 is for a 115 A generator. It was the regulator marked 897.3702 that was purchased for 570 rubles. Then I went to an electrician I knew who replaced the regulator for me without removing the generator!
Features of removing a generator on a car with air conditioning
In a Lada Priora car with air conditioning, the air conditioning compressor and generator are driven by one belt. The design feature is such that it is impossible to dismantle the generator without removing the compressor. You must first disconnect the air conditioner pump from the bracket. This is the first difficulty encountered.
Generator Lada Priora from Bosch
A possible second problem awaits at the lower mounting of the generator. If the bolt is installed with its head towards the engine, it will not be possible to completely remove it . It is so long that it rests on the engine mount, and it is impossible to remove the generator. To remove the bolt, you need to jack up the engine and unscrew the mount. We advise you not to use this method. It’s easier to buy a new bolt and cut off the old one with a grinder. When installing the generator, install a new bolt, but with the head facing outward. This way you will save 10-15 minutes of your time in the future.
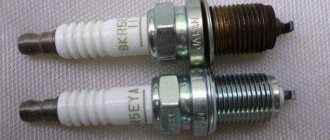
What signs will indicate that the generator brushes are faulty?
Lada Kalina Sport 1.6 Logbook Alternator belt tightening
- length of the element being inspected;
- if upon inspection it is discovered that the length of the brushes is less than 5 mm, they must be replaced;
- Replacement
also be required if the appearance of
the brushes
indicates uneven wear, that is, one element is heavily worn out, and the second is brand new.
Uneven wear of these elements will certainly negatively affect the operation of the generator
, so experts recommend replacing them without fail.
The cost of new components for the Priora does not exceed 150 rubles; of course, you can also find cheaper brushes for the generator, but it is unlikely that such elements will serve faithfully for a long period of time, and such savings will lead to a repeated procedure for replacing these components.
worn brushes
will be done correctly, and the problem with charging the battery was precisely the wear of these components, then the car owner will solve this issue, and without the help of service station employees, which will save a lot of his own money. The replacement process itself is quite simple, but if difficulties arise during the work, you can watch the training video on the Internet resource at any time, which is provided by professionals, choosing the most suitable time for viewing.
Preparation and necessary tools
It is more convenient to remove the generator on a Lada Priora on an overpass or inspection hole. Before you begin dismantling, prepare the following tools:
- locksmith's crank;
- extension;
- cardan from the tool kit;
- heads for 10, 12, 13, 17;
- spanners for 10, 12, 13, 17.
- WD-40 product.
When driving onto a pit or overpass, do not forget to install chocks under the wheels so that the car does not roll spontaneously. Then disconnect the negative terminal from the battery. Apply WD-40 to the mounting areas of the generator and air conditioning compressor. Wait 10-15 minutes for the product to take effect.
Step-by-step instruction
- Remove the engine protection from below.
- Remove the ridge belt driving the air conditioning compressor and generator.
- Disconnect the contacts from the generator: first, under the rubber protective cap, terminal B+ (it is secured with a 10 nut), then terminal D (white chip).
Using a 10 mm wrench, unscrew the generator contact
- Unscrew the top mount of the generator from the top of the engine compartment with two 13 mm spanners.
Using two 13 mm wrenches, unscrew the top mount of the generator - Remove the bolt.
Remove the generator mounting bolt - Unscrew the lower mounting bolt from the bottom of the engine compartment using a 17mm wrench.
Unscrew the lower mount of the generator with a 17mm spanner - Unscrew the compressor mount to the bracket with a 12mm wrench. The compressor is secured with 4 bolts: one short, three long. Start with the bottom ones. It is more convenient to unscrew the upper ones using a wrench, an extension, a cardan and a 12mm socket.
Start with the lower air conditioning compressor mounting bolt. - Move the compressor first downwards, then to the right towards the body side member. There is no need to remove the tubes. On a note. It is not necessary to secure the compressor. It will be held in place by the surrounding parts.
- Remove the bolt with metal sleeve from the lower mounting.
Remove the bolt with metal sleeve from the lower mounting of the generator - Pull the generator down from the engine compartment.
Pull the generator down from the engine compartment
Video report: How to remove the generator on a Lada Priora?
To clarify the process of removing the generator on a car with air conditioning, we suggest watching the video:
If you use the necessary tools and follow the instructions given above, you will be able to remove the generator on a Lada Priora with air conditioning in 40–60 minutes. Have you ever had to remove the alternator on your car? If yes, please share what difficulties you encountered and how you solved the problems. This can be done in the comments after the article. Let's help each other!
Lada Priora is one of the most common domestic cars. But sooner or later the moment comes when it is necessary to repair certain components. The electromechanical part is no exception; for example, Priora's generator bearings often fail.
In order to avoid surprises while driving, it is important to notice the malfunction in time and carry out repair work. You can learn more about how to replace a Priora generator bearing by reading this article. In this material we will consider the process of diagnosing and dismantling the VAZ generator and its parts, as well as the sequence of actions when replacing ball bearings with your own hands.
Selection of components
The original generator, installed on a car with a 16-valve engine at the factory, is marked with article number 5102.377. Its cost, as a rule, fluctuates around six to seven thousand.
Carefully check the generator itself and its packaging before purchasing so as not to encounter a counterfeit. It is important that the part is free of unevenness, chips and paint runs, as well as extraneous markings.
To avoid overpayments, you can purchase a similar original spare part. The following devices are suitable for installation on Lada Priora:
The price of analogues can be either higher or lower than that of the original. As a rule, it is in the region of 3500-6000 rubles. We choose a generator device with a large power reserve so that it lasts longer.
Keep in mind that installing less powerful generators is unacceptable, especially if you connect several different devices to the vehicle’s on-board network (when connecting a large number of electronics, it is generally recommended to increase the current). Before purchasing, we carefully check for damage to the case and the integrity of the unit.
Generator bearings Lada Priora: diagnostics and signs of malfunction, causes
The following circumstances may indicate that it is necessary to replace the generator bearing:
You can diagnose the malfunction as follows:
- remove the belt;
- start the engine and listen carefully. If nothing buzzes, then the sound came from the ball bearing;
- move the pulley. If there is play, it must be replaced.
These videos will help you understand the diagnostic procedure:
The Priora generator bearing is noisy:
Whistling in the electric generator and overheating:
How the electric generator hums:
How to check generator bearings:
Where is the generator located at Priora - the device of the VAZ 2170 unit
The unit itself for a car with air conditioning (or power steering) looks like this:
- Drive pulley for additional elements;
- Tension roller;
- Mounting the right side of the engine;
- Electric generator pulley;
- Air conditioning blower pulley.
If a VAZ Priora without air conditioning (or without power steering), the configuration changes slightly and looks like this.
During disassembly, you will have to disconnect the belt and remove the engine protection. The belt tensioner will need to be replaced. There is also the option of dismantling the part through the car headlight. Below we will describe in detail how to change bearings in a generator, including the process of dismantling, disassembling the electric generator itself, and installing new elements.
The most common breakdowns
There are several popular problems with the generator, most of which can be solved by simply replacing components. For example, a vehicle may have a faulty ignition switch, which will require immediate replacement. A break may also occur in the power supply circuit of the instrument devices. You will notice that when you turn the ignition on, the light will stop turning on.
When the generator light does not give any signals both when the engine is running and when the ignition is turned on, check the functionality of the instrument panel. Most likely, the battery is discharged, and the voltage regulator relay is out of order.
Also, the cause of this malfunction is oxidation of the contacts of the commutator rings and brushes, or their excessive wear or breakdown of the diode bridge. In this case, it is recommended to install new elements to replace those that have become unusable.
Even if the control light comes on, but the battery is being recharged, it is recommended to replace the voltage regulator relay. It would be a good idea to check the contact rings of the excitation trim and the contacts between electrical appliances and the generator terminals - they may have broken.
If the drive belt slips, it indicates that the voltage needs to be adjusted. If a malfunction occurs, the battery discharge lamp will light up. It also lights up if the diode batteries of the excitation winding have been damaged. The only rational solution in this case is to replace the rectifier unit.
Does the voltage drop sharply, problems arise with the power steering, does the generator not charge or is it overheating? In such cases, it will also need to be replaced.
Instructions for removing the unit on a car with air conditioning
Before replacing the generator bearing on a Priora, you should stock up on a set of tools, which will include:
- universal set of keys. Heads for 7, 10, 12, 13, 17, 24 are required;
- set of hexagons;
- universal puller for ball bearings;
- minus and Phillips screwdriver;
- To diagnose serviceability, you will need a multitester;
Removing a generator on a Priora Lux, with air conditioning and power steering
If you need to replace the generator bearing on a car that is not equipped with air conditioning, then it is convenient to remove it by dismantling the right headlight of the Lada Priora. The unit is located on the left side of the engine when viewed from the radiator. The best access to the mechanism is to remove the headlight and bumper mount on the passenger side.
- Disconnect the terminal.
- Remove the protective cover.
The headlight is attached to 2 bolts - one under the housing, the second from below the headlight. It can be accessed by removing the bumper mount on the right side.
- Unscrew the top headlight mount.
- Lower the right side of the bumper to gain access to the lower headlight mount.
- We unscrew the lower bolt and the headlight is removed from its mounts. Carefully disconnect the power cables and set the headlight aside.
- This is what you will see from the headlight side: access to the fasteners, pulley, and belt tension adjustment.
This is only part of the job. It is necessary to raise or lower the tubes and hoses of the hydraulic systems and dismantle everything that interferes with the removal of the mechanism. First, let's dismantle the absorber.
- Remove the absorber hoses.
- We remove the absorber. It is secured with 2 bolts: one in the picture, the second below.
The path is almost clear. The air conditioner pipes are in the way. They are attached to the bracket.
- We unscrew the bracket and the air conditioner tubes can be freely raised or lowered.
All. The path is clear. All that remains is to unscrew the mounting bolts. The top bolt is accessible.
- Unscrew the top bolt securing the unit.
You will have to tinker with the bottom bolt. There are 2 options:
- Stick your hand in with a 17mm socket wrench, feel for the bolt and put the wrench on hold. Bolt nut 13mm. Remember that there is a sleeve on the bolt under the head; do not lose it when you pull the bolt out.
- Carefully remove the electrical unit. Remember that there are wires going to it. Disconnect them as soon as possible.
Removing a generator on a Priora without air conditioning and power steering
Above we discussed the method of dismantling the generator through a removed headlight. Let's try to get to the electric generator from below. It is best to do this in a garage with a pit, but it can also be done outside.
- Raise the hood and remove the negative terminal of the battery;
- We remove the protection. Unscrew the fastening bolts. They are located around the perimeter and are easy to access. First unscrew the 2 bolts at the back.
- We hold the protection from below with our hand, unscrew the last front bolt, and remove it. Access to the lower mount is free.
- Using a 13mm wrench, unscrew the nut of the lower “gene” mounting bolt. Do not unscrew the nut all the way, because you will have to tap it to remove the bolt. Don't forget the bolt bushing.
- Unscrew the belt tensioner bolt.
- Then remove the wires under the rubber cap and the plug (indicated by arrows)
- We disconnect the top fastening using two 13mm keys.
- We hold it by the body, remove the top bolt and remove the “genu” through the bottom.
Installation at the mounting location, after repair or replacement of the unit, is performed in the reverse order.
ECU weight
How the mass of the ECU works, how to check the mass of the ECU, what problems may arise and how to modify it to avoid troubles in the future.
It is these very important questions that we will address on this page.
A reliable ECU ground is very important for the proper operation of the engine management system and the engine as a whole.
It would seem to be a primitive and reliable design that can serve well for years. But in reality this is far from the case.
It is very difficult to list all the possible problems that can arise due to poor ECU mass, since it can affect anything. But the main problems can be divided into two points:
- Incorrect collection of information from engine control system sensors. Personally, I had to deal with incorrect MAP sensor readings. It gave inflated barometric pressure readings precisely because of the poor weight of the ECU.
- Since almost all modern engine control units are able to adapt to real operating conditions, as a result of incorrect collection of information from sensors, adaptation leads to engine malfunctions. This is why for many, after resetting the adaptations, the engine begins to work much better. But then the problems return as the ECU adapts again. And again this does not happen quite adequately.
How to change bearings on a Priora generator
Failure of rolling elements of VAZ electric generators is fatigue wear due to long-term operation. Let's look at how you can replace the bearings yourself.
- Prepare the device for disassembly. Here's what it looks like with the cover removed.
- Unscrew the voltage regulator and disconnect the wires.
- Unscrew the terminals to remove the diode bridge (marked).
- Disconnect the capacitor.
- Unscrew the 4 studs.
- The studs are unscrewed. Lay the device on its side and use two screwdrivers to separate it into 2 parts.
- The top ball bearing will open.
- We turn the generator over and install it on a vice. Warm up the lower ball bearing race (You can try without warming up).
- Usually the seat expands when heated, and the ball bearing easily comes out of it. But it happens that the rotor shaft comes out, but the part remains in the seat.
- In this case, you need to continue heating and tapping the part to knock it off the seat. Don't overdo it to avoid breaking the lid. The ball bearing seating areas should be thoroughly cleaned.
- We remove the upper rolling element from the rotor shaft with a puller.
- Take the dimensions of the removed bearings and buy analogues (information is presented below). You might be able to read the numbers.
- Start installing new parts by preparing the seats. Sand with P1000, P1200 or P1500 sandpaper. Lubricate with graphite grease.
- Open the covers at the p/sh, check for the presence of lubricant.
- Add lubricant, close the covers, turn the part over and fill the other side with lubricant, close the covers. Ball bearings are ready for installation.
- Place the small ball bearing on the rotor shaft. Take a tube of the appropriate diameter so that the blows fall on the outer ring.
- Tap the end of the tube with precise blows of a light hammer. When the part snaps into place, you will feel a harsh kickback. This operation is also performed with a puller, only the legs are installed on top of the end.
- Now insert a large bearing into the cover socket and lightly hit the outer race with a hammer to drive it into the seat.
- When the ball bearing fits into the socket, do not forget to mint the edges of the seat in a circle at intervals of 3-4mm. To do this, select a core with a beveled tip (a small chisel or beard will do).
- We continue assembly in reverse order. We put on the pulley. Do this in a vice. Clamp the rotor poles, put on the pulley and tighten the nut tightly. There is no key on the shaft, so apply force to ensure the pulley fits snugly.
- Pay attention to the outer and inner washers. They may vary. When removing the pulley, it is advisable to make a mark so as not to mix it up during assembly.
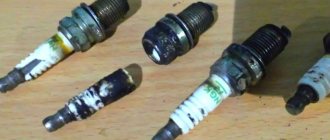
Basic generator malfunctions
The following parts are most often susceptible to breakdown in a generator:
- Electric current collector brushes;
- Breakdown of the diode bridge;
- Break or short circuit of the stator winding;
- Bearing failure;
- Excessive wear of collector rings;
- Damage to the voltage regulator;
- Generator pulley wear;
- Capacitor breakdown;
In case of all the above-described breakdowns, it is necessary to repair the generator.
What bearings are on the Priora generator (VAZ 2170): size, price, article number
We have already figured out how to replace failed parts. Now it remains to understand which bearing is better to buy. There are different generators on Priors - 115A or 90A. The second is for a less powerful car without air conditioning and power steering. Ball bearings have a number (marking). The front element is 6303, the rear element is 6202.
There are a lot of both original and non-original spare parts on the market:
- Front ball bearing 6303: FAG 6303 2ZR (Germany), SKF 6303-2Z (Sweden), KOYO 6303 ZZ, CM (Japan), NTN 6303 ZZ (Japan).
- Rear ball bearing 6202: FAG 6202-С-2HRS, SKF 6202-2-RSH, KOYO 2RS, NTN; 6202LLU.
In addition to the bearings listed above, below is a table that will help you navigate the offers on the market and select the best quality part:
Action of auxiliary elements
The list of equipment included in the auxiliary electrical circuit of the VAZ is wider than that discussed above. This:
- light and sound elements, lamps, signal, etc.;
- glass cleaning and washing system;
- interior ventilation unit;
- engine cooling fan;
- rear window heating unit;
- dashboard;
- electric booster;
- electric mirror drives;
- anti-theft system.
Source