Front spar burst
If the car owner has never encountered such a factor as replacing the front side member of a VAZ 2110, you should either contact specialists or carefully study the method of removing it and installing a new one. Most often, a breakdown occurs at the attachment point of the stabilizer, which is responsible for lateral stability, and the place where the steering wheel is attached. Despite the amplifiers available in these places, the spars fail and require either repair or replacement. Replacing the front side member on a VAZ 2110 can be easily done with your own hands.
Replacing the front spar on a VAZ 2110 on your own
Front spar burst
If the car owner has never encountered such a factor as replacing the front side member of a VAZ 2110, you should either contact specialists or carefully study the method of removing it and installing a new one. Most often, a breakdown occurs at the attachment point of the stabilizer, which is responsible for lateral stability, and the place where the steering wheel is attached. Despite the amplifiers available in these places, the spars fail and require either repair or replacement. Replacing the front side member on a VAZ 2110 can be easily done with your own hands.
Spars are an important component of the body
Note. In a neglected state, the part cannot be repaired and requires replacement. If damage is noticed in time, it can be repaired by welding into the inside of the spar.
Replacing the front side members of a VAZ 2110
When actively using the car or traveling on roads with harsh driving conditions, cracks appear in the side members, which are detected only during diagnostics of the chassis (see Repairing the chassis on your own). If you do not notice them for a long time or do not take the necessary actions, the part is destroyed and, subsequently, cannot be repaired. The causes of failure are usually:
- Poor quality road surface
- Driving over uneven surfaces at high speed
- Loosening fasteners
Front spar VAZ 2110
Due to the weakening of the rigidity of the steering mechanism fastening, a crack appears near the bottom bolt, followed by play in the body and, as a result, the wheels of the car become misaligned.
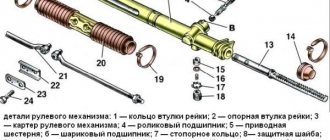
What is a spar and why are they needed?
The functions of the frame are made by the body in the form of spars
The main task of the side members is to take on all loads, both internal (car components, passengers, additional cargo, etc.) and external (vibrations transmitted from the wheels).
The spar is a simple pipe of rectangular cross-section. Moreover, in different places this cross-section can change in order to ensure the required rigidity of the body. There are technological holes made in them, with the help of which the components of the car are fastened and installed, and ventilation is performed so that moisture does not accumulate in them, which is a catalyst for the formation of corrosion processes.
But unlike a frame structure, where the frame is an entirely separate element of the car, in cars the side members are integrated into the body, in other words, they are an integral part of it and many body elements are attached to them by welding.
Replacing the front spar
Beam for front side members of VAZ 2110
To fully replace the side members, the following tools and spare parts are required. Without them, you can get yourself into trouble in the form of the inability to dismantle the old part and install a new one:
- Wing;
- Bolts for fastening the steering gearbox, if it is on the left side, or for fastening the pendulum, if it is on the right.
Note. Problems may arise when unscrewing the bolts. To overcome them, do not neglect any of the recommended tools.
- Bolts, washers and nuts of the steering gear, three pieces each;
- Bolts responsible for fastening the beam;
- Bolts for attaching the upper arm;
VAZ 2110 front side members
- Bracket with number 2121-2904242;
- Nuts required to fasten the beam;
- The spar itself and the mudguard;
- Ball joint fasteners (set).
VAZ 2110 front spar
You can purchase the spar and mudguard as a set or individually for each part. When trying to save money, they often decide to purchase separately and cook it themselves. This results in wasted time during installation and welding.
Note. The package of these elements separately does not include all the necessary parts and they will have to be purchased additionally.
Left front side member of VAZ 2110
To clearly understand further actions, you need to examine the engine shield. This is that part of the car, or rather its body, that separates the engine compartment from the interior. It is to the engine shield that the engine splash guard must be attached. If it is in a condition that does not evoke positive emotions, it will not be possible to weld the mudguard, which will significantly affect the rigidity of the body.
Front right side member VAZ 2110
Small corrosions that do not have a significant effect on the condition of the engine shield are not scary. To bring it into proper condition, you can use patches. They are made of metal, which you will also have on hand. In order to unscrew the upper ball joint, which simply needs to be dismantled, it is advisable to purchase fasteners for this ball joint. If the bolts are in poor condition, a lot of time will be lost. Tools that should be:
- Grinder (angle grinder)
- Impact screwdriver
- Regular screwdriver
- Chisel
- Welding
- Ties (needed to compress the spring)
Note. It is important to maintain consistency throughout the entire work process.
The process of replacing the spar begins with removing the door (see Repairing VAZ doors: how to do it correctly) using an impact screwdriver and removing it until the process is completed. Next you need:
- Raise the mats
- Remove noise and thermal insulation from the work area
- In the area of the engine splash guard and its connection to the shield, clear the surfaces of flammable products and those that are prone to smoldering
- Remove the wing
- Fix the front part of the VAZ using adjustable stands
- Fix the front axle beam well to avoid displacement
Note. To protect the drive boot, a small stand is installed under the front wheel beam. This way you can prevent it from falling at the moment when the upper ball is released from the lever. This prevents the brake disc from touching and damaging the brake flap.
- Tighten the springs
- Unscrew the 3 bolts from the upper ball joint
- Remove the upper arm
- If the bolts connecting the spar and the bridge beam are jammed, cut them off with a grinder or remove them in any other way.
- Unscrew the brace that secures the spar and beam
- Cut off the mudguard
- Divide the spar into two parts
- Separate from the body by first sawing behind the beam
- Thoroughly clean the fastening points and install a new spar
Note. You will have to try hard to get the spar into place without moving the body and bridge.
- It is necessary to carefully tighten the two bolts protruding from it on the new spar
- Weld the bottom part
- Weld the engine splash guard to the engine shield
The front spar of the VAZ 2110 burst
Unfortunately, it is not possible to bring in a new spar in its pure form. The reason is the welded front panel into which it must be inserted. To eliminate this discrepancy, you need to saw off the tip of the spar. Having installed the spar in place, the tip is inserted into the front panel, and then welded with a continuous seam, which restores the integrity of the part. So:
- Reassembling the front suspension in reverse order
Note. If defects in the engine shield are detected, they are eliminated during the process.
- The cavities are filled and coated with an anti-corrosion agent
- Wing being mounted
- The door is mounted
- The brakes are being pumped
How to change the rear spar
Replacement of the rear side member of a VAZ 2110 is carried out in case of visible damage, as well as after an impact in the rear of the car. Of course, the old spar can be straightened or welded, however, after the rapid aging of the metal, it loses its load-bearing capabilities and driving becomes difficult. In addition, rubber wear increases due to body deformation and displacement of suspension parts.
Replacement procedure:
- Raise the rear of the car using jacks and place it on strong supports. Consider the location of the work site and do not place supports exactly there.
- Carry out work to correct the proportions of the body. To do this, hydraulic struts are installed under the bottom and support the spacer from the ceiling. Then use pressure to correct the bent body parts.
- Remove the rear fenders.
- Now you need to remove the rear suspension elements. To do this, you can place the car on its side and place tires under the part being laid. To prevent the vehicle from tipping over, install reliable supports. After completing dismantling, clean the surface of the part being replaced from dirt and debris.
- The old spar is removed as follows: holes are drilled along the lines of the weld seam (the diameter of the drill must correspond to the diameter of the welding point), the places that could not be drilled with a drill are cut off with a grinder, and all the rest are cut off with a chisel. After dismantling the spar, straighten the body defects using a mechanic's hammer and clean the area of the future spar with a grinding wheel.
- Try on the new part against the body, trim off the excess. Drill it in 3 places at the site of the future weld. Then secure it in place and tack it with 3 points in the pre-drilled holes. After this, weld metal plates on the outside and inside of the seams to strengthen the structure. After this, completely weld the new spar to the body.
- Clean the welding areas with a grinding wheel and treat the seams with epoxy resin.
- All metal parts must be coated with two layers of primer.
- Reassemble the rear suspension in the reverse order and install the car on the wheels.
This completes the replacement of the side members. If you decide to carry out such work yourself, be sure to study the welding manual, because an incorrectly welded spar may sooner or later come off and the structure will lose its reinforcing properties. Thus, the car may fall apart while driving, and this, at a minimum, is not safe.
Replacing the spar on a VAZ 2110
Every car owner knows what a spar is - it is a longitudinal beam on a frame on which the body rests, springs and a number of parts are attached. It often breaks at the point where it comes into contact with the stabilizer, which makes the steering wheel stable, even despite the presence of amplifiers. Cracks appear there, which can be noticed when checking the chassis. And the deformation of the body geometry is associated with the active operation of the car in Russian conditions. If the owner of the car has not yet changed the VAZ 2110 spar, but is faced with its breakdown, the part is replaced with his own hands.
Please note that in a neglected state, the spar (VAZ 2110) is not repaired, but replaced.
The main thing is to pay attention to the breakdown in time and eliminate it by welding in the internal part of the product.
Despite the amplifiers available in these places, the spars fail and require either repair or replacement
The key causes of failure are:
- poor quality of road surface;
- driving over potholes at high speeds;
- weak fastenings. If the rigidity in the steering mechanism decreases, cracks appear near the bolts. Then there is play on the body, and then the wheels get toe defects.
Another problem: how to pull out the spar with your own hands? The procedure is required when it is bent to the side during an accident and involves a bench hood.
Washed down the spar — Lada 2110, 1.6 l., 2005 on DRIVE2
Well, I haven’t written anything so useful for a long time and many people have probably lost interest. Well, I began to do something further with the car) when the right drive was heavily underestimated, it hit the side member, the knock is not pleasant, I’ll tell you, from -100 and those who use pneuma will understand me. I started drinking almost a week ago, namely on August 16, 2013. I thank my friend Rodriguez102 very much, namely Oleg and Anton and the whole family) I won’t write much, just the key points) They said if you go down and stop by, we’ll do it) in the end I got there, went down and everything is ok)
We started somewhere around 10-11 o'clock and finished at 18:00
The first problem was to remove the stand; there are elongated studs on the support and they broke off and did not unscrew. They cut it off, then the spruce armor was removed, because the ears bent and tightened the nuts, it was unfortunate, but we took it off) and then we did everything slowly and in between times and helped them with the housework myself) Well, let's start, we took the grinder, marked what needed to be cut and away we go)
Mode
Oleg in progress)
Then they took a 3-4 mm pipe, Oleg not only cut it, but also directly adjusted it in everything)
We adjusted everything to the pipe, and because... 3-component longe, it was decided to open one layer and boil it in all places where possible
Middle layer
Oleg cursed for such a low car, it was hard for him to cook)
In general, we welded everything we could and as best we could, it looks like this) in fact, very conscientiously, really) everything was done neatly without rushing) well, just like I did for myself)
Then they cleaned up the whole thing and went over it with Movil, now there is no knocking)
And yes, I took off one spacer, then another second) now the muzzle is lower, the front fender covers the tires by 2-3 cm, and the wings hurt terribly when turning inside out; I already solved the problem yesterday, I just rolled up the edge more tightly and clamped it, ph no, they had no time )
I thank Oleg and Anton and his entire family for implementing and helping to solve this problem) THANK YOU SO MUCH
!
I’m waiting for banal comments “Why are you doing this, you’re an idiot, you’re ruining the car” and in that spirit) and for those who finished reading, please like it, it’s not difficult for you, but it’s nice for me)
Tools and materials
Replacing the spar (VAZ 2110) requires the following consumables:
- bolts that secure the steering mechanism (left) or pendulum (right);
- fasteners for the steering gearbox (3 pieces each);
- fasteners for beams (bolts and nuts);
- fasteners for the lever on top;
- bracket for longitudinal beam;
- splash guard;
- set of fasteners for ball joint;
- spar (VAZ 2110). It is sold separately or together with the mudguard. Experts advise buying a kit and not wasting time on welding. This ensures that a secure fastening is created. Please note that a separate purchase of the longitudinal beam will entail the need to purchase the necessary parts.
If damage is noticed in time, it can be repaired by welding with penetration into the inner part of the spar.
Replacing the front spar of a VAZ 2110 requires an examination of the engine shield - the part of the car body that separates the engine compartment from the car interior. The mudguard is attached there.
If there is corrosion on the surface, treat it with anti-corrosion agent, sand it and apply a patch.
To unscrew the ball joint, special fasteners are required. Of the tools you should have:
- grinder;
- impact and standard screwdrivers;
- chisel;
- welding machine;
- ties that compress springs.
Equipment and tools
Replacing rear side members on a VAZ 2110
Repair work to replace the spar must be carried out in an equipped and spacious garage. It is necessary to prepare equipment and tools:
- welding machine or gas welding;
- rear side members complete with rear suspension;
- two jacks, hydraulic racks;
- drill;
- Bulgarian;
- chisel;
- plumber's hammer;
- disc on a grinder for stripping metal where the old part was cut.
Before starting repairs, you must remove the battery and drain all remaining gasoline from the gas tank. If possible, cover the gas tank with fireproof material. To prevent spontaneous combustion from remaining gasoline vapors in the gas tank. Since the repair will be carried out using a power tool that produces a spark.
Replacement algorithm
To remove the side member (VAZ 2110), follow the instructions:
- remove the door using a screwdriver;
- Raise rugs, heat and sound insulation;
- in the area where the splash guard is located, clear the surface of flammable products;
- remove the car fender;
- secure the VAZ to the front on stands;
- install the beam on the bridge in front to prevent displacement;
- dismantle the springs, remove several fasteners from the ball and remove the lever;
- if the fasteners between the timber and the beam cannot be removed, cut them off using a grinder;
- unscrew the brace on the beam and cut the mudguard;
- divide the product into 2 parts and dismantle it from the body by making a cut behind the beam;
- After cleaning the fasteners, proceed with the installation of a new longitudinal beam.
Source
Main types
Depending on the design features of the car, the following types of their location can be classified:
- opposite each other in a horizontal position;
- horizontal arrangement with a certain angle of inclination;
- slightly curved in a vertical position;
- curved and horizontal.
Trucks are characterized by a parallel type of arrangement of side members, which are in a horizontal position. Other types of arrangement are typical for cars and SUVs. The inclined type provides maximum turning radius of the wheels. Thanks to the vertically curved side members, a relatively lower floor height in the vehicle interior is ensured. Horizontally curved elements also affect the floor level, but in addition to this, passive safety is further increased in the event of an emergency with a side collision.
The cross members are responsible for the level of rigidity of the main parts of the car. They are located between the side members. There are three main types of crossbars:
Mostly metal materials are used for manufacturing. In large trucks, the side members and cross members are connected by riveting, and in passenger cars, these two components are simply welded. At the same time, special brackets are used to firmly connect the frame, body, main parts of the transmission and engine. They, in turn, come in many sizes and also have a high level of strength.
Replacing the front spar on a VAZ 2110 on your own
If the car owner has never encountered such a factor as replacing the front side member of a VAZ 2110, you should either contact specialists or carefully study the method of removing it and installing a new one. Most often, a breakdown occurs at the attachment point of the stabilizer, which is responsible for lateral stability, and the place where the steering wheel is attached. Despite the amplifiers available in these places, the spars fail and require either repair or replacement. Replacing the front side member on a VAZ 2110 can be easily done with your own hands.
How to stretch the front wheels and side members of a VAZ 2110 after an impact?
Car owners often face this problem. The photographs above show the deformation of the front side members of the VAZ 2110. This rearward displacement of the wheels occurs when there is a strong impact on a curb or a pothole.
When a wheel or wheels (front) hit, the wheels go back, pulling the sabers (longitudinal braces), the sabers are attached to the beam, the beam to the side members. Thus, the side members pull down, and the shock absorber strut pushes the glass up. Consequently:
- The front wheels move back towards the front fender
- Longitudinal braces (sabers) bend
- There is a gap between the glass and the spar
- The gap between the front fender and the front door increases (top)
- It can bend the beam, and more often the saber mounting eye goes inward
The front side members are pulled out by a hydraulic stretcher (you will find its image in the photographs of the tools on my website).
Measure the difference between the obtained result and the distance of the non-emergency vehicle.
It happens that the side members are bent so much that the hydraulic extension begins to bend or the place of its support. In this case, you need to additionally pull the spars with winches.
In what cases does the spar need to be changed?
The decision to repair or replace the spar is made based on the degree of damage. Most often, side members are damaged during an accident. In addition, the reason for partial or complete replacement may be corrosion, as well as the appearance of cracks during the operation of the car.
If the damage after the accident is smooth, without sharp corners, then the spar must be repaired; if the damage has sharp corners (pressures with an angle of less than 90 degrees) in a small area, cracks, tears or corrosion that are difficult to remove after pulling, then the spar needs to be partially or completely change. The metal structure of the spar with such damage changes, as do its characteristics.
Spars with significant damage, made of ultra-high strength steel (UHSS-Ultra High Strength Steel) most often need to be replaced, as they are very difficult or impossible to repair. Heating significantly weakens the strength of such steel.
Design Features
So, we figured out that the spar is a simple pipe with a rectangular cross-section. Depending on the engineers’ ideas, they:
- are located in front and behind the car.
- extend along the entire length of the housing structure.
Due to the fact that various forces are constantly pressed on the side members, they must withstand serious loads: this includes the weight of the engine, the weight of people in the car, as well as a host of other automotive parts.
Also, this part is constantly subject to shock load, which is transmitted from car wheels while driving. If you look at the photo of the inside of the car, you will see that the frame frame looks like a ladder frame, similar to the letter "P", including the rear one. Ladder frames are commonly used for SUVs, crossovers, and trucks. Passenger cars are most often equipped with a load-bearing body structure.
↑ How and what the body is made of
The body is all-metal, welded, load-bearing structure. Most of the body panels are galvanized to improve their anti-corrosion properties. Electrozinc is applied on the inside to the front and middle floor panels, the side of the body, the wind strut amplifier, the outer panels of the trunk lid and doors, the front and rear fenders and a number of other parts (more than 30 positions in total). The rear wheel arches are galvanized on the outside. The rear panel, cross members and floor connectors, the inner panel of the trunk lid and hood, the trunk lid reinforcement and a number of other parts are coated with electrozinc on both sides.
The engine splash guard, radiator frame, AB platform, gas tank flap cover, extensions and connectors of the rear wheel arches and a number of other parts (about 10 positions) are treated with hot-dip galvanizing (on both sides). The thickness of the main body panels is 0.8 mm.
The body elements are connected to each other by contact welding, and in hard-to-reach places by semi-automatic electric welding in an inert gas environment. Panel joints and welds are sealed with mastic. After welding the panels, the body is phosphated, electrophoretic and secondary primers are applied and painted. Hidden body cavities are treated at the factory with the Oremin preservative.
All glass is curved, polished, safety type. The windshield is three-layer, the door glass and rear window are tempered. The rear window has a heating element. The windshield, rear and side windows are glued into the body openings and are part of its power circuit. The door windows are sliding.
Energy-absorbing bumpers are installed at the front and rear. Removable body parts: doors 8, 12, 22, 27, trunk lid 17, hood 7, front fenders 4 and 30, bumpers 20 and 36.
Replacement of rear side members of VAZ Lada 2110 in auto repair shops in Moscow
15 car repair companies
- Afto-service
- st. Polikarpova, 27, building 3
- +7 (495) 99… show all
- The site of the company
- Stomobil
- Tigerboxru
- Apollo Motors
- Dvs
- London-auto
- Tiger box
- Autoelite service
- Gag-auto
- RF-motors
- TSM Motors
- Lr-technik
Popular companies
Preparing to replace the spar:
- As mentioned above, to correctly replace the spar, it is necessary to have data on the distances between the control points of the body. Such data can be found in the repair manual for a specific car model. You can see symmetrical points on the whole spar from the opposite side (see details about measuring body geometry). A ruler for measuring body geometry, a measuring tape and a level should also be available.
- It is necessary to jack up the car before replacing the side member, remove the wheels for easier access and level them exactly on the stops (or on the slipway).
- Before replacing the side member, if necessary, the engine and suspension components must be removed. In some cases, when a partial spar replacement is performed, engine removal can be avoided.
- Before replacement, the spar must be pulled out as far as possible.
- Turn off the airbag systems (SIR).
- Remove and insulate the negative terminal of the battery.
- The arc welding process produces electromagnetic fields and heat that can damage the vehicle's electronic parts. There should be no electronic modules within a perimeter of 30 cm from the welding zone.
- Remove all panels and components adjacent to the side member.
How to pull out a spar
You can pull out the spar at home. To perform this work, it is necessary to prepare the necessary instruments and other devices. Of course, a lot depends on the availability of skills when performing repairs. In the case where such work has never been performed before, there are no ideas in the field of car repairs, it would be more correct to entrust this task to specialists. If you still decide to do everything yourself, you should prepare the following tools:
- angle grinder;
- welding machine;
- gas-burner;
- stand with grips;
- hammer;
- indicators of body repair parameters;
- hammer;
- tape with a hermetic base.
Body geometry of the VAZ 2114 and its meaning
Violations of the body geometry have certain consequences, which are reflected in the general condition of the car in the following ways:
- Deterioration in controllability and vibration when accelerating (manifests itself at 80 km/h and above).
- Increased tire wear.
- Noise from suspension elements.
- Increased fuel consumption, etc.
The VAZ 2114 has a hatchback body type, for which, however, as for other types (station wagon, sedan, etc.), violation of the geometry affects various parameters.
The symmetry of the wheels is broken, as can be judged by:
- reducing vehicle stability on the highway;
- uneven tire wear.
The diagonals of the body are broken, which is noticeable in the frames of the front/rear windows and in the doorways of the car.
Specific folds may form on the bottom or frame.
For cars that are used for a long time on roads of poor quality, it is recommended to periodically check the geometry of the body (at least 1-2 times a year).
Planned strengthening of the body of the VAZ-2110 — Lada 2110, 1.6 l., 2015 on DRIVE2
Peace to you!
Nezhdanchik aims at fairly fast “races”, both in appearance and in content, so torsional rigidity of the body is a relevant concept for him. The planned “arrival” is an improvement in handling and, at the same time, an increase in passive safety (after all, there will be no safety cage inside)
In racing they say about stiffness that you can’t spoil porridge with oil, for example, you should look at the table
As you can see, the stiffness of the racing VAZ (with an asterisk) is almost 6.5 times higher than the usual ten.
We can’t reach this level, but we can do something in a garage)
Look, for standard cars, a whole series of spacers are usually produced, purchased and screwed into the designated places
Such spacers are also sold for the Ten, but not all of them and some of them have already been purchased.
This is a spacer for the front glasses
front panel reinforcement subframe
Amplifier for rear glasses, something similar to this
And then we include the ability to integrate non-detachable amplifiers into the body; simply weld them tightly during body repairs, because with the amount of work we do on the body, you can do anything)
Look what I have planned, maybe you can advise me to add something)
Rear side member reinforcement. The very ends. I'll put it here.
Rear arches. I will connect the 2nd cup of the shock absorber with the spar with metal
Rear suspension mounting points. I’ll reinforce the spar with 2nd metal, something like this
Plus I'll add an amplifier between them
Bottom. I’ll put profiled pipes under the sills, extend the flimsy side members to the entire bottom and connect the side members with the sill reinforcement
I will make amplifiers for the front glasses
And finally, on the roof. I will put 3-4 additional standard amplifiers on the roof
And on the corners of the roof I will weld gussets made of 2 mm metal
I think that's probably enough. What do you say, will it be enough so that the interior trim does not creak due to the play of the body?))))
To completely replace the front side member you need:
- Remove sealant and anti-corrosion materials from the repair area.
- Drill out resistance welding points (see here).
- After temporarily installing the spar, you need to measure all the distances between the control points, and also check the height position of the spar with a level (in comparison with the whole spar).
- If all distances are within normal limits, then the spar can be welded.
- Install all adjacent panels and components.
- Apply sealant and do anti-corrosion treatment and painting.
Partial replacement of the spar:
Most often, it is enough to partially replace the spar.
Partial replacement involves stretching the spar to its original parameters, cutting out and replacing only the damaged part of the spar. This is advisable since the repair process does not affect the factory welding points and sealant in the undamaged area. Partial replacement of the spar should be carried out only in places recommended by the manufacturer. Improper replacement will affect the loss of rigidity and strength of the vehicle in an accident.
The joining area between the two parts of the spar must be easily accessible from all sides to form a weld. The joint area must be accessible for further corrosion protection.
You need to cut the damaged part a little further than necessary. This is necessary when making an overlap connection, and also to make it more convenient to align the joining area after cutting off the deformed part.
On small cars, partial replacement of the side member may be problematic due to its small size and lack of space for this.
So, to partially replace the front spar you need:
- Determine and mark the area on the spar where the part to be replaced will be cut. When joining with an overlap, you need to leave a little margin. We will look at this point in this article below.
- Draw cut lines on the surface of the spar. You can stick masking tape and use its edge to guide you.
- Cut off part of the spar along the marked lines or along the edge of the masking tape.
- Remove the cut part.
- The preparation of the new part of the spar is identical to that carried out on the damaged spar.
- Place the new part of the spar in place, align it taking into account the distances between the control points and secure with clamps.
- Weld the new part of the spar.
- Clean the seams.
Communities › Body Repair › Blog › Manufacturing the middle spar 2110 (repair insert)
The factory coating on the bottom dried out and began to crack and peel off here and there in layers with soil down to the metal, as a result, ferrous metal is crying all over the car, but since it is only 15 years old, we will repair it. Due to the above factors, the middle spars and much more rotted, first I changed the left side - I bought a piece of iron on the market (the price tag of 1700 is beautiful in cataphoresis and with a sticker) I was tired of cutting out the old metal, besides, it was a pity for it since in the area where the beam is attached and above the metal was in good condition, but everything below the beam to the threshold had holes. Proceeding to the right side, I cut out the problematic part.
Full size
I brought it to work and started making the pattern.
Full size
Marked, cut, bent on a sheet bending machine made of 1.5mm metal. Then it’s more interesting because the shape is tricky, I made an incision with a machine and bent the shelf to the side
Full size
It’s good that at work there is a plasma cutter with which you can quickly make a patch))
Full size
Further the task becomes more complicated: the vertical shelf must shrink and to do this we cut the metal from above and below, cut out a sector and hammer down the piece of iron with light blows of a 2 kg hammer
Full size
Full size
Since everything is done by eye, you need to melt the cracks))
Full size
It turns out, in my opinion, that the third grade is not a defect, but since our company has no competition, people cry but take it)) A little more than an hour was spent on work, last fitting at home
Full size
The width turned out to be a little larger, reduce it by another 3 mm and, in principle, it will work. As a result, I saved on hardware and gained invaluable experience! I liked this job, now I’m making a threshold.
Full size
And another photo of the threshold sampler))
Full size
Good luck to all ! There is no money, but we are holding on! Thank you for appreciating my work!