Required tools and accessories
The mounting scheme for bumpers on the VAZ-2110 is quite simple and does not require any special knowledge or equipment. At the same time, the procedure for dismantling and reinstalling standard plastic bumper covers is the same for cars with a sedan body (VAZ 2110), hatchback and station wagon. In order to remove the VAZ 2110 bumper, you will need the following tools or devices:
- 10 mm and 8 mm wrenches (preferably open-end and socket types).
- Flat head screwdriver.
- Phillips head screwdriver.
- A container of WD-40 liquid for soaking rusted hardware.
- Rags for wiping.
- Protective gloves.
Removing the component from the rear
Those who are looking for how to remove the rear bumper of a VAZ should pay attention to the following instructions:
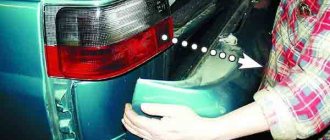
- take a 10mm wrench, unscrew a couple of nuts at the bottom where the rear bumper is attached to the body;
- Unscrew the fasteners on top of the same fastener. Next, removing the rear bumper of a VAZ 2110 involves moving the part away from the body to avoid damage to the electrical wiring;
- remove the rubber plug from the back, disconnect the wires in the block, first pulling it out.
Removing the rear bumper on a VAZ 2110 car
To understand how to remove a VAZ 2110 bumper, it is enough to familiarize yourself with how to remove the rear body kit on models 2111 or 2112. Replacing the rear type of component on the models is identical. The main feature is that 2 tongues must fit into the body brackets during installation.
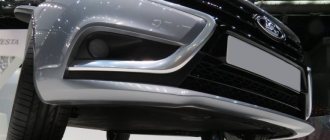
How to remove the front bumper on a VAZ-2110
Before starting work, it is advisable to place the car in a garage or enclosed area with good natural or artificial lighting. For ease of dismantling the lower attachment points, work should be carried out above the inspection hole. The procedure for replacing the front bumper of a VAZ 2110 is performed according to the following sequential steps:
- Using a Phillips screwdriver, unscrew the screws securing the bumper to the arch liners (carry out the operation on both sides).
- Unscrew the 2 screws that connect the bumper body kit to the lower edge of the fender liner.
- Moisten the two side mounting bolts with WD-40 and wait a few minutes until the liquid gets into the threads.
- Unscrew the hardware with an 8 mm wrench, turning the bolts counterclockwise. In this case, you should not apply much force, since you can bend the bolt head. If the use of WD-40 does not help, you need to rinse the bolt with this liquid again and try to swing it out of place with a wrench.
- Using a similar pattern, tighten the 10 mm nuts securing the lower side of the bumper. If it is difficult to move the nut, it is necessary to tighten and unscrew it along the threads, applying WD-40 to the contact point.
- Then you will have to remove the decorative radiator grille of the VAZ 2110.
- There are 2 8mm hex head screws on the top of the grille that need to be removed.
- Use your hand to pry the 4 plastic clips on the lower edge of the grille and pull them towards the radiator. Set the grate aside.
- Unscrew the last two bolts by 10 mm, which tighten the upper edge of the VAZ 2110 bumper.
- Disconnect the fog lamp wiring harness plugs.
- Pull the corner of the body kit towards you and remove it from the grooves of the metal bracket. Similarly, disengage the other corner and remove the bumper from the VAZ 2110 for further repair or replacement.
- The removed bumper can be disassembled by dismantling the headlight (left and right). If they are in good condition, these parts can be installed on the entire cladding.
Why are they replacing?
The reasons for replacing bumpers are different for everyone. But a few basic examples can be given.
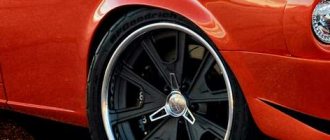
- The driver is a fan of tuning, so he decided to change these body elements.
- The old body kit is covered with scratches and chips, so it needs updating and painting. This work is complicated, so it’s easier to just replace it.
- As a result of an accident or an accident, the old bumpers have become unusable, so they need to be replaced with similar or more exclusive, original ones. Depending on the wishes of the car owner.
- There was a desire to install original optics in order to provide a visual effect and improve the quality of the headlights. But the old bumper is not suitable for these purposes. We have to dismantle it.
Removing the front bumper
So, you have made the appropriate decision, because the old body element will go to its well-deserved rest, and a new structure will take its place. Whether it will be a factory bumper or whether it will be about tuning is up to you. The main thing here is to dismantle the old structure and install another in its place - a matter of technology. More precisely, the reverse sequence of dismantling.
For removal you will need a certain set of tools and materials, which include:
- Open-end wrenches 10 and 8 millimeters;
- Socket wrenches 10 and 8 millimeters;
- A set of screwdrivers or one double-sided screwdriver;
- The almighty WD40;
- Dry, clean rags;
- New body parts, linings, etc.
Further, the set of tools and materials depends entirely on the front and rear body kit element you choose. Some bumper models require certain tools or attachments. It is best to ask the seller about this.
Now we can proceed directly to the task at hand.
- If you have fender liners, be sure to remove them. To do this, simply unscrew the fasteners along the entire line of the wheel arch.
Article on the topic: Do-it-yourself repair of the steering rack on a VAZ 2109 (Video)
Removing the wing fenders
- The left and right sides of the front bumper are held in place with one bolt each. The factory bolt requires an 8mm wrench.
- It is not uncommon for these bolts to rust and the heads to fall off under strong pressure when unscrewing. If the bolt remains there without a head, it will be difficult to reinstall the new bumper.
- Therefore, we recommend treating the bolts with WD40. An alternative is regular brake fluid. After treatment, allow the product to react. It is enough to wait about 5-10 minutes.
- Now carefully and gradually unscrew the bolts counterclockwise. If it still doesn’t budge, return the bolt to its original position, treat it again with the product, and finally remove it.
- It is not uncommon for the head to eventually fail, which leads to the need to drill out the old bolt and then cut a new thread. The task is not an easy one, so let’s hope that you can get by with little blood, as they say.
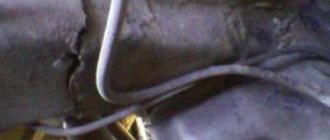
- Further it is not better, since the apron studs with 10 mm turnkey fasteners holding the bottom of the bumper are also characterized by similar properties of rusting and complicating dismantling work. Often this element of the apron is crumpled, deformed due to impacts on holes, curbs, as a result of off-road travel, and so on. At the same time, the bumper stubbornly continues to hold strong. This is what VAZ 2110 means.
- Be sure to carefully unscrew these nuts and treat with WD40 if necessary.
- Ahead of you are the last bolts holding the bumper, this time from above. There are two of them, they require a 10 mm wrench. But the problem is that to dismantle these very last two bolts you will have to remove the radiator grille. On the other hand, this is an excellent opportunity to tune the front of the car by installing not only bumpers and trims, but also a new grille.
- To remove the grille, lift the hood and unscrew the two screws on both sides of the radiator grille. Here you will need an 8mm wrench.
- Now we release the lower fasteners of the grates. Hook them with your fingers and slightly pull all four teeth towards the radiator itself. Just take it one at a time.
- Now you've reached the cherished last two bolts. It is not necessary to unscrew them completely. Unscrew a little, which will allow the fastener washers to release the edge of your bumper.
Article on the topic: How to remove a panel on a VAZ 2110
Removing the front end
Removing the rear bumper
If you additionally plan to replace the rear bumper, you will also have to remove it first. The work is not difficult, it will take you about an hour.
Rear bumper
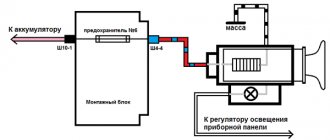
- Disconnect the negative terminal from the battery. This is necessary for the reason that the wiring from the license plate light goes to it. We don't need short circuits.
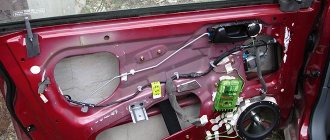
- Open the trunk and remove the rear trim. Not completely. It is enough to simply fold the part that interferes with work deep into the trunk.
- Move the trim on the left, which will allow you to get to the wiring block and disconnect the connector that goes to the license plate light.
- Unscrew the fastening nut and disconnect the wire going to ground, that is, the car body.
- Now unscrew the upper bumper mount. For this purpose, the VAZ 2110 has one bolt on each side.
- The two lower mounting bolts are unscrewed in the same way. One on each side.
- Next, the bumper is removed and brought back. Don't forget to pass all the wires through the back panel, where there is a hole.
- Unscrew the three mounting screws on the license plate illumination housing, as well as the three fasteners from the wiring harness clamps. The housing with optics is removed from the old body element and installed on the new one.
Removing the rear
Installing the front bumper
When reinstalling the bumper, you must first insert it into the guide brackets on the sides of the VAZ 2110. Then the trim is attached in the reverse order. All fasteners should be replaced with parts that have new threads. Before installation, it is advisable to lubricate the hardware, thus providing minimal protection against corrosion.
The fastening of the cladding should not be immediately tightened until it stops. It is necessary to align the part as evenly as possible, achieving gaps across the body of almost the same width. After this, you can finally secure the cladding by tightening all the fixing bolts and screws.
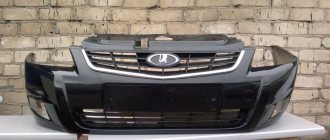
Rear bumper
The rear bumper suffers when parking unsuccessfully, when the VAZ 2110 hits a fence or other obstacle. In this case, the cladding cracks and loses its appearance, and the owner has no choice but to change the part. To perform bumper dismantling work you will need:
- 10 mm and 8 mm wrench (preferably open-end and socket types).
- A container of WD40 liquid for soaking rusted hardware.
- Rags for wiping.
- Protective gloves.
Stories from our readers
“Fucking basin. "
Hi all! My name is Mikhail, now I’ll tell you a story about how I managed to exchange my two-wheeler for a 2010 Camry. It all started with the fact that I began to be wildly irritated by the breakdowns of the two-wheeler, it seemed like nothing serious was broken, but damn it, there were so many little things that really started to irritate me. This is where the idea arose that it was time to change the car to a foreign car. The choice fell on the melting Camry of the tenth years.
Yes, I had matured morally, but financially I just couldn’t handle it. I’ll say right away that I am against loans and taking a car, especially not a new one, on credit is unreasonable. My salary is 24k a month, so collecting 600-700 thousand is almost impossible for me. I started looking for different ways to make money on the Internet. You can’t imagine how many scams there are, what I haven’t tried: sports betting, network marketing, and even the volcano casino, where I successfully lost about 10 thousand ((The only direction in which it seemed to me that I could make money was currency trading on the stock exchange, they call it Forex. But when I started delving into it, I realized that it was very difficult for me. I continued to dig further and came across binary options. The essence is the same as in Forex, but it’s much easier to understand. I started reading forums, studying trading strategies. I tried it on a demo account, then opened a real account. To be honest, I didn’t manage to start earning money right away, until I understood all the mechanics of options, I lost about 3,000 rubles, but as it turned out, it was a precious experience. Now I earn 5-7 thousand rubles a day. I managed to get the car buy after half a year, but in my opinion this is a good result, and it’s not about the car, my life has changed, I naturally quit my job, I have more free time for myself and my family. You’ll laugh, but I work directly on the phone)) If If you want to change your life like me, then here’s what I advise you to do right now: 1. Register on the site 2. Practice on a Demo account (it’s free). 3. As soon as you get something on the Demo account, top up your REAL ACCOUNT and go to REAL MONEY! I also advise you to download the application to your phone, it’s much more convenient to work from your phone. Download here.
- Loosen the five engine protection nuts using a 10mm socket wrench.
- Unscrew the two screws (one on each side) of the lower fastening of the fender liners to the bumper using a Phillips screwdriver.
- Unscrew the two self-tapping screws of the upper fender liner mounting.
Removal instructions
To remove the rear bumper of a VAZ 2110 or 2112, you must first turn off the power to the on-board network by removing the ground wire from the battery terminal. The rest of the work is carried out at the rear of the machine:
- Open the trunk lid and fold the rear trim to the side.
- On the left side there is a wiring connector for the license plate lamps that needs to be disconnected.
- Unscrew two 10 mm bolts that serve for the lower fastening of the side parts of the VAZ 2110 bumper. These bolts are highly susceptible to corrosion and are difficult to unscrew.
- Similar mounting points are located under the lower edge of the trunk lid near the rear lights.
- Pull the trim off the guide brackets. In this case, it is necessary to monitor the tension of the wiring of the backlight lamps to prevent it from breaking.
- Unscrew 3 cross-shaped screws securing the electrical wiring and 3 more for the housing of the backlights.
- Detach the light housing from the trim.
- The cladding has been completely removed and is ready for repair or replacement.
What is needed for disassembly
To remove body kits from a car, you will need the following tools:
- socket wrench or socket wrench size 8 mm;
- the same, size 10 mm;
- Phillips screwdriver;
- WD-40 aerosol lubricant, which facilitates the rotation of rusted threaded connections.
Minimum set of tools
Additionally, you should prepare the usual set of plumbing tools. They are useful for unscrewing the lower fastening of the front bumper, consisting of nuts and studs. The problem stems from the unfortunate design of this unit, where it is stipulated that the studs stick out 2-3 cm under the front overhang of the car. As soon as the driver slightly catches a curb or drives into an ice snowdrift, the ends of the studs bend or even break off completely. You'll probably have to tinker with them when disassembling them.
For the same reasons, removing the front one will require an inspection ditch. It is extremely inconvenient to twist rusted lower and side fasteners while lying under the car.
Very useful lubricant for rusty bolts and nuts
To replace the stock body kits that were on your car from the factory with beautiful styling products, you also do not need any special tools or equipment. Elements of a different shape, but intended for installation on the “ten”, are mounted on existing mounts. It’s another matter when you want to install the body kit you like from another car, for example, from a Lada Priora. In this case, the fasteners will need to be modified.
This is interesting: How to drain gasoline from a Niva Chevrolet tank - methods
How to put it in its place
Installation of the rear bumper (standard type) is carried out in the reverse order of dismantling. Before finally putting the part in place, it is necessary to set uniform gaps between the bumper and the body of the VAZ 2110 car. After this, all fastening points are tightened.
If it is intended to install a cladding of a different shape, the attachment points may differ. Such a part is adjusted to the VAZ 2110 car locally, modifying the standard attachment points.