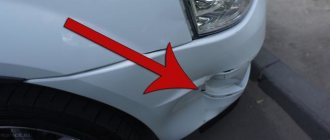
On the Lada Priora, as on other cars, the bumper performs an important protective function - softening the impact of a collision, and since it is made of plastic, it is often damaged. This situation can happen both on city streets and on country highways. Therefore, you need to know how to remove the bumper on a Priora in such cases.
Design and features of bumpers on Lada Priora
Previously, bumpers were made of metal; they were durable, but easily scratched. Nowadays, metal elements are installed mainly on SUVs and sports cars. The basic configuration of the Lada Priora uses plastic bumpers, which serve more of a decorative than a protective function. Therefore, the likelihood of damage is higher.
The front bumper is fixed at sixteen points, the rear bumper at only ten. The original part is marked 217 04-280 30 15-10. Starting from the second release of the Priora, it comes without an internal grille. Therefore, instead of a built-in grille, the original spare part should have a burr-free slot. Another difference from analogues is that all the holes for the bolts coincide with the slots in the body.
On Priora 2, the original grille comes with black honeycombs. There is no reinforcement for the brand logo badge that was present on older models. If dismantling is carried out, the bumper is often removed along with the amplifier - an additional metal beam that gives the structure strength. This part is always curved and must match the shape of the grille. The design of the amplifier depends on the year of manufacture; if desired, it can be removed and not put back. However, it performs a protective function and reduces damage in the event of an accident.
One of the types of amplifiers for the front bumper of a Priora
Bumper replacement is required in the following cases:
- after an accident;
- in case of cracks in the plastic caused by severe frosts;
- bad parking;
- tuning cars.
Reasons for withdrawal
In fact, there can be many reasons for removing the front end of your car. Everyone has their own views on this issue.
But let’s still name the main reasons why car owners most often turn to car services or decide to dismantle and even replace the front bumper on their own.
- The replacement was caused by damage to the element as a result of a collision or accident. The integrity of the structure is compromised, and driving with a broken front end is not particularly pleasant.
- Dismantling work with the subsequent return of elements to their place can be carried out due to engine repairs, when replacing the radiator and other components of the engine compartment.
- External modification in the form of tuning the front of the car.
- Replacement of headlights, installation of new optics.
- Installation of decorative overlays, mesh.
Article on the topic: Do-it-yourself repair of the steering rack on a VAZ 2110 (video)
Dismantling works
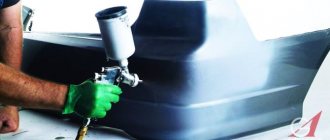
If the bumper is broken, then you have two ways to solve this issue - replace it with a new one or try to restore the old one. This largely depends on the desire and degree of breakdown of the previous element.
How to choose
When choosing a new bumper for the front of your car, you should adhere to several of the most important, but fairly simple rules and recommendations.
We will be happy to share them with you.
| Selection criterion | Peculiarity |
| Plastic thickness | Try to choose elements made from the thickest layer of plastic. This has a positive effect on quality and protection |
| Color | If you buy a bumper that is already painted, carefully match it to the body color of your car. If it's unpainted, then you'll have to guess with paint |
| Compatibility | Many people purchase body parts from other VAZ models or from foreign cars. For the 2114, many people call the Sniper bumper, designed for the VAZ 2115 model, ideal. Moreover, choose a design with holes for fog lights |
| Manufacturer | There are many companies producing bumpers today. But experts agree that native elements are best suited for VAZ |
| Price | The cost of domestic native bumpers is significantly lower compared to imported analogues. Moreover, the quality may be even higher than that of foreign models. The average price for a VAZ front end is 2000-2500 rubles |
An unpainted bumper is usually 500 rubles cheaper, but there may be problems finding suitable paint. Therefore, we advise you to pay a little more. AvtoVAZ produces elements painted exactly to match the colors of the cars they produce. Problems may arise here with foreign analogues.
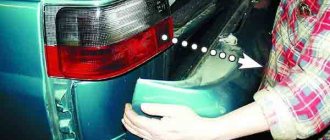
Removing the front bumper of a VAZ 2110
Repair of a VAZ-10 bumper after repair How to remove the rear bumper on a VAZ 2114,2113.
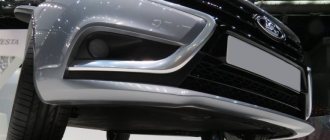
How to remove the front bumper on a Priora
The operation is simple, it will take no more than ten minutes; Naturally, provided that the bolts and screws are not stuck. On sedans, station wagons and hatchbacks, removal is carried out in a similar way. If the element is severely worn, dismantling the amplifier may be necessary.
The first step is to disconnect the negative cable from the battery. If fog lights are installed, disconnect their wires before carrying out the operation. To do this, you need to find a plug in the engine compartment. There are such plugs near each headlight; they need to be pulled out.
To turn off the fog lights, you need to remove the plug with wires from each of them
The Lada Priora of the latest configuration has parking sensors. Parking sensors are installed in both bumpers. Therefore, you will have to turn them off on both sides.
Removal begins with the fender liner, unscrewing three screws on each side. During this process, it is recommended to turn the left wheel to the right and the right wheel to the left to make it easier to unscrew the lower bolts.
Next, the hood opens and two plastic trims located above the headlights are unscrewed. They are held in place by 4 bolts. Then the pads are removed.
Removed trim
Next, you need to unscrew the two central screws from the protective casing in the radiator fan area.
Advice!
You can unscrew these two bolts not completely, then after all subsequent manipulations it will rest on them and will not fall when the lower bolts are unscrewed. Then all that remains is to unscrew these bolts and calmly remove the bumper.
Next, you need to go down under the car and use a 10mm wrench to unscrew the 5 nuts that hold the bumper on the bottom of the body.
Finally, all that remains is to unscrew three screws on each side located under the front wings.
Now you need to carefully remove the bumper. It is recommended to start from the side of the fender liners, carefully moving the bumper in this part towards you. Once this part is disengaged, the bumper can be easily removed.
Advice!
It is not recommended to snap off the bumper using rough and sharp objects such as screwdrivers, pry bars, steel rods, etc. It is recommended to do everything by hand. If you cannot manually snap off the bumper, it is recommended to wrap the screwdriver with a cloth or electrical tape so as not to damage or scratch the car’s paint.
Useful video instructions:
Step by step guide
1. Unscrew 3 screws on both sides in the wheel arch.
2. Unscrew the top plastic covers on both sides near the headlights and remove. They are secured with four screws each.
3. Unscrew 2 more screws securing the bumper in the area of the hood lock.
4. If you have built-in fog lights, then disconnect the power connectors from them.
5. Next, in the engine protection area, unscrew five nuts by ten.
6. At the corners of the bumper, unscrew three screws on each side.
7. Pull the bumper off the latches starting from the arch.
After all the latches have opened, remove the bumper.
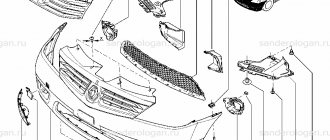
When replacing a bumper, you need to replace the radiator grille, lower plastic grille and fog lights (if equipped) with a new one from the old one.
The radiator grille is secured with eleven metal latches. The latches are removed using a screwdriver.
The lower plastic grille is secured to twelve metal latches, the same as those on the grille mount.
The fog lights are secured with Phillips screws.
When removing the bumper, it is advisable that you have an assistant.
How to remove the rear bumper on a Priora: hatchback, sedan, station wagon
The steps are approximately the same as when removing the front bumper. The main dismantling method is described below.
First, use a screwdriver to unscrew the fender liners, which are held on by three screws: 2 at the bumper and 1 at the mudguard.
Next, you need to open the trunk and, depending on the type of body, unscrew a certain number of fasteners.
- U Priory sedan you need to unscrew 6 bolts: 4 in the center and 2 on the sides (in some models - only two, on the sides).
- In the Priora Hatchback, you will need to unscrew 4 bolts: the 2 central ones are unscrewed with a 10 key, and the two outer ones with a 13 key.
- For bumper on Priore station wagon You will need to unscrew 5 bolts.
Next, you need to move under the car and unscrew 2 nuts on the sides of the bumper and 4 more screws along its length (the number of nuts and screws may vary depending on the version of the car, but they are all located there).
Everything is unscrewed, all that remains is to take the rear bumper on either side of the wheel arches and, as in the case of the front, pull it towards you.
To make everything go faster, you can use the following tools:
- Screwdriver. Use it to unscrew the bolts at the rear wheel arches.
- Head with extension . She unscrews the bolts of the upper bumper fastenings. They also unscrew the nuts on the bottom.
Useful videos with examples of rear bumper removal:
Adjusting the headlights
- Phillips screwdriver;
- round screwdriver;
- screwdriver;
- ruler;
- pencil.
To adjust the headlights, you need to park the car close to the wall and turn on the low beam mode. After this, you should alternately mark the centers of the traces of the two headlights and the centers of their symmetry. Connect the dots to form a straight horizontal line. The second line should be drawn parallel to the first, but with an interval of 5-12 cm, and the third - at a distance of 22 cm from the first. In addition to horizontal lines, it is necessary to draw a strictly vertical line through the center points of the headlights and the car.
Then the car must be driven to the distance indicated in the passport and the headlights must be turned on again. You can look at the passport and check the correct angle of the light beam. It is recommended to adjust the headlights one by one by twisting the screws. If anything from the marking description remains unclear, the presented photo will clearly show how to do it correctly.
Removing the front headlight units on a Lada Priora car is carried out to repair or replace them if restoration is impossible, as well as when carrying out other work in which the presence of headlights will interfere with the progress of their implementation. To carry out repair work, prepare a standard set of tools and perform the following sequence of actions:
- De-energize the vehicle by disconnecting the negative terminal from the battery.
- Dismantle the front bumper, as it will interfere with further work.
- We press out the plastic clips and disconnect the block with power wires from the headlight unit.
- Next, use a spanner wrench to unscrew the front lower and side bolts securing the headlight to the car body.
Now you need to remove the decorative headlight cover. To do this, use a Phillips screwdriver to unscrew the four screws that secure it.
- We unscrew the remaining upper mounting bolts and remove the headlight unit from the car.
- Make any necessary repairs or replacements, then perform installation in reverse order.
At this point, the repair work to remove the front headlight unit on the Lada Priora car has been completed.
Sources
- https://priora-remont.ru/zamena-blok-fary/
- https://1ladapriora.ru/tyuning/faryi-zamena-regulirovka-sveta.html
- https://zubilovaz.ru/lada-priora-kak-snyat-perednyuyu-blok-faru
Tips and tricks
The Priora's bumper is attached on the sides only to the fender liner, as in many foreign cars. At the joints the element simply fits into the grooves. This greatly simplifies the dismantling process. But sometimes you additionally have to remove the protection from the motor. After unscrewing the bolts, simply pull out the bumper.
To unscrew the lower screw that holds the fender liner in place, it is better to unscrew the wheel to the side in advance. If this is not possible, you can reach the hard-to-reach area using a small short screwdriver. When the bolts do not budge, they must be pre-treated with WD-40 lubricant.
The bumper contains upper and lower radiator grilles, as well as headlights. If replacement is necessary, all these elements can be easily removed. The grille is held on by metal latches. These latches can be pryed with a screwdriver and removed using pliers. The grille will then detach. The headlights are held on by self-tapping screws and can be easily unscrewed in one or two minutes.
Location of the radiator grille to bumper mounts
Metal elements under the bumper can quickly rust, so it is recommended to remove it along with the body kits. Parts must be cleaned of dirt and thoroughly washed in warm water. To avoid the formation of rust, it is advisable to treat the body with a protective compound. To do this, its surface is cleaned with a solvent, after which the anticorrosive agent is applied with a brush.
Let's start with body transformation
The manufacturer did not set out to create an original design. This car is an average urban station wagon from the 90s. The shapes are smooth, the body lines are straight, there are no bulges. Compared to modern models, Lada 111 remains unnoticed.
We begin tuning the VAZ 2111 with our own hands by installing new bumpers. We replace the civilian front bumper with a tuned one. The car accessories market is replete with all kinds of bumpers, stuffed with body kits, stampings and original parts. There are many options specifically for the standard mountings of the VAZ 2111. Installing front protection will instantly transform the frontal projection of the Lada.
Depending on the concept of tuning the Lada 2111, there are 2 main types of bumpers:
- sports;
- classic.
The first option is the details with which the appearance of the car becomes dynamic and aggressive. In this case, there are massive bumper shapes, body kits, original stamped transitions and a lowered design.
The classic style implies a solid low bumper without sharp inserts. This bumper has convenient large recesses for fog lights, radiator grille and air intake. An ergonomic location for the license plate seat must also be ensured.
After installing the front protective element, modifications are made to the side skirts and rear bumper. Leaving only the front bumper is unaesthetic, because when looking in profile, differences in ground clearance are visible. You can customize the parts included or combine styles. When installing tuned body elements, do not forget about the quality of Russian roads. Bumpers and skirts that are too low are impractical.
https://youtube.com/watch?v=5hVqzz5ioOY
What can be done What to pay attention to If you are going to repaint your Lada 111, do it before installing the bumpers, so that you can then match the protection to the color of the body. You can do the painting process yourself or rely on specialists. When painting a car with your own hands, you need to dismantle the civilian bumpers, and also seal all the windows, headlights and wheels. Additional tuning of the car after painting is the application of vinyl. Choose the design you like from the tuning studio. Then paste the stencil onto the surface of the body area and paint
After painting, we peel off the excess parts, resulting in an original drawing. The finishing touches will help complete the exterior tuning. This is the modernization of rear-view mirrors, installation of deflectors, air intakes on the hood and roof rails of the VAZ 2111. Many may disagree about the last element, because the roof rails of the VAZ 2111 give the car the appearance of a “country” cargo station wagon. A matter of taste.
Then paste the stencil onto the surface of the body area and paint. After painting, we peel off the excess parts, resulting in an original drawing. The finishing touches will help complete the exterior tuning. This is the modernization of rear-view mirrors, installation of deflectors, air intakes on the hood and roof rails of the VAZ 2111. Many may disagree about the last element, because the roof rails of the VAZ 2111 give the car the appearance of a “country” cargo station wagon. A matter of taste.
To begin with, we recommend bringing your ideas to life on the screen. Today there is a special 3D tuning for the VAZ 2111, which allows the driver to see the final picture and make adjustments where necessary.
What to do after replacing the bumper
When parking or driving in a traffic jam, you can easily damage the headlights or scratch the body. Therefore, it is better to install the bumper in its old place as soon as possible. Until the repair is completed, the motorist has the right to drive without a bumper. Traffic police officers can impose a fine only if the person has removed the part permanently and deliberately changed the design of the car. They have the right to fine you if you don’t have a rear bumper, since it must hold license plates.
Installation of a repaired old or new bumper is done using self-tapping screws. If a skirt or a tuned bumper is added, these elements are secured with screws. Before installation, it is important to ensure that there is a thread for the towing eye. Cars produced since 2011 have such a thread. The eyelet can be used either the original one or any other one that is suitable in size.