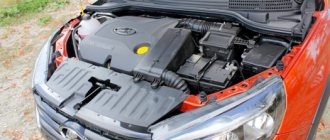
Disassembly procedure
Many people are interested in whether it is possible to remove the dashboard of a VAZ 2110 without “demolishing” the floor of the cabin?
It's probably possible, but it would be very inconvenient. Therefore, we act according to this plan:
- Let's prepare a marker and self-adhesive labels (which are usually glued to the product). They can be bought at points where all sorts of small things are sold such as napkins, bags, etc., as well as in stationery stores;
- We remove the front seats from the interior;
- We unscrew the screws on the sides, remove the tunnel (first its upper part, then the lower);
- We disassemble the steering column casing, remove it and the steering wheel. To do this, you need to unscrew 3 self-tapping screws and 4 screws. Please note that the VAZ 2110 steering wheel sits quite tightly on the splines, so you need to remove it by rocking and tugging, but being careful of a sharp blow to the face, if you suddenly overdo it and it will fly out;
- Next are the steering column switches. They also need to be removed;
- Don’t forget to mark everything and write down on a piece of paper what we are filming;
- We unscrew the glove compartment (in “understandable” language - the glove compartment) and also take it out;
- Next comes the disassembly of the mounting block and its cover. To do this, disconnect all connectors and relays;
- Now we have almost opened the instrument panel on the VAZ 2110. All that remains is to remove the strut covers, unscrew the headlight hydraulic adjustment and push it inward;
- Now the main task is to unscrew the screws securing the instrument panel to the body. To remove it completely, you need to unscrew the two studs located under the covers of the tunnels for supplying air to the side windows.
After all these manipulations, the panel hangs, and is held in place only by the steering shaft and the lower air duct.
An article discussing the process of replacing the panel overlay is located here: https://vazweb.ru/desyatka/salon/nakladka-na-panel.html
Selection of fog lights
Before you buy the first fog lights you come across, you must first carefully study: what features you should pay attention to when choosing PTFs. The first thing that can tell about the quality of a part is its appearance.
It's no secret that today the market is simply overflowing with counterfeit products that are of much lower quality than the original. So, in order to protect yourself from purchasing such a product, first of all pay attention to the appearance of the PTF. Their housing must be sealed and tightly fastened. At the same time, the material from which the case will be made must withstand any weather conditions.
Refinement of the instrument panel
Description of the Lada Granta instrument panel: symbols, repairs, instructions and tuning
Tuning the instrument panel on the Lada Vesta is no different from modernization on other VAZ models, although technologically it is a completely different panel. The main idea is to improve the backlight by replacing standard SMD LEDs with alternative ones. Decorative overlays and lighting modifications without firmware are also used.
Replacing backlight LEDs
Before you begin, you should take into account that you will have to work with a soldering iron; without knowledge of soldering technology, you can lose the backlight at best. At worst, the instrument panel will fail completely. To work, you will also need to purchase LEDs with a brightness of 3 to 15 lumens, depending on the level of desired brightness. During the tuning procedure, you need to follow some recommendations:
be careful and careful not to damage the traces of the microcircuits; When soldering, observe the correct polarity of the LEDs; Do not hold the soldering iron tip for too long - the LEDs will fail due to overheating.
To make sure the LEDs are working properly, you will need a multimeter. The tester probes are connected to the “legs” of the diodes - a working diode will indicate the integrity of the circuit (a sound signal).
Connecting the backlight to work with DRLs during the day
This can be done using firmware or a jumper directly on the electronic board. Any tampering with the electrical system will void the vehicle's warranty. In the absence of skills and experience, such actions can lead to failure of the instrument cluster.
The main task of the procedure is to solder a jumper from the contact of the LEDs responsible for illuminating the panel to the contacts of the LEDs responsible for illuminating the display of the on-board computer (lights up when the ignition key is turned). Any suitable piece of wire can be used as a jumper. At first glance it may seem complicated, but for experienced VAZ car owners such modifications are standard practice. Rarely do such requests come to specialized centers. The replacement of LEDs is not carried out by an official dealer, nor is the installation of all kinds of overlays.
Via PC
Instructions:
- For an Android smartphone, download and install the ECU Tweaker application. We copy the ecu.zip archive to the root of the internal or external memory without unpacking it.
- Connect the ELM327 V1.5 adapter to the OBDII port of the car.
- Turn on the ignition.
- Launch the “ECU Tweaker” application on your smartphone
- Open “BM lada (or Logan/Sandero II) ={amp}gt; USM ={amp}gt; EMM_EDISON_DDT2000_SW15_v1_1 ={amp}gt; EMM_Cornering ={amp}gt; EMM_Cornering - Configuration"
- Change “Nbx_Cornering_Cf” from “0” to “1”
- Click “Send”
Lada Vesta dashboard malfunctions
Pinout of old-style gazelle panel instruments instrument readings
If the instrument panel is faulty, it is immediately noticeable; the following signs may indicate a problem:
- The contact of the instrument panel with the on-board electrical network is broken. The reason may be a broken wiring or damaged connectors or contacts.
- Sensor malfunction. The dashboard displays incorrect information if the crankshaft position sensor, speed sensor, or fuel level have failed.
- Mechanical damage, for example, exposure to constant vibrations or a strong impact in an accident.
- Faults related to the electronic microcircuit.
- Burnt-out indicator lights - in this case, the backlight disappears.
These malfunctions are obvious, but there are also those whose causes are not easy to understand.
Arrow indicators do not work
If the arrows on the instruments do not work, this may indicate a failure of the sensors responsible for these readings:
- The tachometer does not work. If the tachometer needle does not move, the cause of the malfunction is the device itself. If the crankshaft position sensor or electronic control unit fails, the engine cannot be started.
- The speedometer does not work. If the device is working but does not indicate speed, the cause is a faulty speed sensor. This will also be indicated by the ABS warning light.
- There is no antifreeze temperature reading. The temperature sensor is faulty and transmits incorrect readings to the control unit, which are displayed on the instrument panel.
- No fuel level readings. The unit with the fuel pump is faulty, the ECU does not receive a signal.
You can remove the instrument panel to check the functionality of the elements only after testing all sensors for malfunctions.
Burnt out warning lights
Often the reason for the lack of readings of one or another indicator is burnt-out backlight bulbs. There is a special test to check their performance. When you turn the ignition key, the ECU should start all the instruments and light up all the warning lights in test mode. At this time, you should make sure that the red lamps are working properly (they indicate major problems in the operation of the systems):
- signal indicator of the hand brake and the serviceability of the brake system;
- power steering failure indicator;
- lack of battery charge;
- low oil pressure indicator;
- indicator of security system problems.
Ignoring failure of the listed sensors leads to serious consequences, including failure of the engine and some vital systems for the car.
Photo gallery
1. Designation of tidy elements for removal
2. Self-tapping screws are marked with number 1; they must be unscrewed
3. Number 3 marks the connector with wiring
Loading...
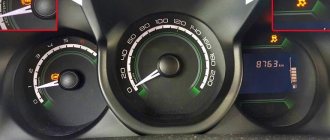
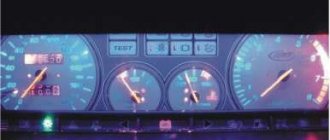
Functions and features of the Vesta panel device
The instrument cluster on the Lada Vesta is completely different from those used on the Priora, Grant and Kalina. It is now a completely redesigned multifunctional device.
The speedometer is located in the central well - this is the main element of any “tidy” in a production car. The scale implies acceleration to 200 km/h, although in fact the stated maximum speed of Vesta with the current engine is no more than 185 km/h. Next to the speedometer there is a small on-board computer display, on which the driver can see all the necessary information about the operation of the engine and other vehicle systems.
Inside the speedometer scale there are various indicators that inform the driver about different parameters: the hazard warning lights are on and the direction indicators are on, the brake pads are critically worn, the engine is malfunctioning and the engine oil level is low. On the left is the tachometer well, the scale of which is marked from 1 to 7 (1000-7000 rpm). The engine allows you to “spin” up to 5500 rpm - this way there is no harm to the motor. After this mark there is a red zone; prolonged operation of the power unit at such high speeds is not recommended. The tachometer also contains information indicators.
On the right side there is a well in which there are two indicators. One of them informs about the engine temperature, and the second – about the fuel level in the tank
In Grant, the temperature indicator was removed to reduce the cost of the car, but in the climatic conditions of Russia and the CIS countries, it is extremely important for the driver to know the current temperature of the engine oil in order to prevent possible overheating due to various malfunctions
The fuel tank indicator shows a scale of “full tank”, “half tank” and “empty”. You can see an arrow near the gas pump icon; it is needed to indicate to the driver which side the fuel filler neck is located (the indicator points to the right). There are also warning lights in the right well.
In general, the instrument panel has an attractive design; the scales are backlit in green and orange with white numbers. The only drawback is the poor design of the arrow indicators. The intermediate divisions of the scales are not informative, and you need to get used to them. With a quick glance while moving, it will not be easy to read the readings.
Reviews
Delivery of goods is carried out throughout Russia and the CIS:
1. Russian Post (from 350 rubles and above)
Delivery to all regions of the Russian Federation and CIS countries
2. Transport Companies (from 350 rubles and above)
Delivery throughout Russia and the Republic of Kazakhstan
- TK Energy (nrg-tk.ru)
- TC Business Lines (dellin.ru)
- TC SDEK (www.cdek.ru)
- TK PEK (pecom.ru)
- TK KIT (tk-kit.ru)
3. Pickup
The order can be picked up at the office at Tolyatti, 40 Let Pobedy 38, TD “Malachite”, 1st floor.
The waiting time for sending an order in our online store is approximately 2-7 working days, large orders 7-14 working days. days; color of bumpers, mirrors, body parts, spoilers, etc. 7-14 work. days; sewing covers, upholstery, steering wheels, gear knobs, EVA mats, etc. 7-14 work. days.
During this period, we will send you a tracking number by email. email to track the parcel en route.
Payment can be made in the following ways:
1. Payment to a Sberbank card
You can pay using the SBERBANK-Online application and other Bank applications.
After placing an order, making payment, do not indicate comments , we ourselves will understand by the amount of the order and the name of the sender. After receiving the funds, the status of your order will be changed to paid until 17.00 of the current day, or from 9.00 of the next Moscow time.
2. By bank card
Automatic acceptance of payments using MIR Bank cards, VISA International, Mastercard.
You can also pay with credit cards with a grace period.
To select payment for goods using a bank card, on the corresponding page you must click the “Pay for order by bank card” button.
What malfunctions occur?
For some motorists, the Lada vesta sw cross control panel stops functioning over time and works intermittently. Such problems arise if the following malfunctions appear:
- The contact between the on-board network and the instrument panel is deteriorating. Such problems arise if the contacts or connectors have certain damage.
- Indicators and sensors fail. Inaccurate information is displayed on the dashboard if the fuel level indicator, speed sensor, etc. have failed. This causes the master data to fail.
- The integrity of the shield is compromised due to strong vibration or mechanical stress. The front shield is being replaced. This procedure is performed by masters.
- The included electronic board is faulty. Its functionality is restored by specialists. No backlight indicates that certain bulbs have burned out.
Dashboard firmware
After the not entirely successful first “tidy” of Vesta, an updated one was released, with the defects corrected. The question arises - what should the owners of the first generation Lada Vesta do? In order for the backlight to work in the daytime without turning on the headlights, you can reflash the “tidy”. If the car is equipped with cruise control not at the factory, but by the owner, the corresponding indication on the old panel without firmware will not light up.
Without the skills and knowledge, installing software yourself can do more harm than good. The tailoring must be used strictly for the specific dashboard. It is not allowed to install updated software from a new device to an old one and vice versa.
LADA Vesta controls
Hello everyone, today we will take a closer look at driving a Lada Vesta. Of course, if you are an experienced car enthusiast, then you probably already know all the controls.
But, if you are a beginner, then the article should probably help you, and you will understand the controls of the West car. And what is responsible for what. So let's get started.
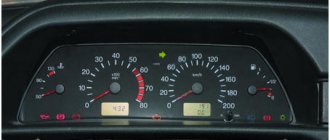
Features of the updated panel
- the numbers have become noticeably larger, reading readings while moving has become much easier;
- the backlight is used regardless of whether the lighting is on or not, the backlight is on on all scales at any time;
- instead of white backlight, red is used;
- a voice alert now warns of an unfastened seat belt; the audio also includes a GPS connection and much more;
- the volume of sound notification and voice guidance has increased (information and warning signals);
- the time on the display is now synchronized automatically by satellites of the ERA-GLONASS navigation system;
- The warning indicators have been changed (low tire pressure and unfastened seat belts front and rear).
https://youtube.com/watch?v=WijXqy4AlIs
Export models supplied to Germany and Hungary were the first to be equipped with the updated dashboard. Since 2022, the “tidy” has become available for the domestic market. A function such as adjusting the backlight level has not yet been implemented.
Lada Vesta Snow White neVESTA › Logbook › Installing PTF
Finally got some free time to work on the machine. My car does not have fog lights, so I definitely decided that I would install PTF in any case. We practically never have fogs, but I like how the fogs illuminate the side of the road, I appreciated this even on the grant. So, immediately after the purchase, I decided that I would install PTF. There is never too much light, and the appearance of a car with fog lights changes for the better.
I started thinking about installing a PTF on the Vesta, and, accordingly, studying this issue long ago.
I started from the very beginning - PTF buttons in the cabin. I immediately determined the best option for myself - to install a button instead of one of the plugs on the “beard” of the panel, next to the esp on/off button. I ordered the button itself with engraving. I contacted the seller, paid 190 rubles on the card and after 10 days the button was in my hands
Full sizeReady button with PTF engraving
They make them using their own plugs, the workmanship is excellent, so I can confidently recommend them for purchase.
Then I started tinkering with the electrics of the buttons. There is a lot of information on this issue. In short, you need to remove the board, solder a clock button onto it, LEDs - one white to illuminate the icon itself and the second (if needed) directly to indicate on/off + solder resistors and solder the button leads to ground and power supply for the LED.
All the necessary SMD components were purchased from the radio store:
- tact button. I didn’t get it right with the size, I bought a button slightly higher than the standard one and the button travel is longer than the original one - white LEDs, size 0805 - red LEDs, size 0805 I wanted orange ones, but I didn’t find them in stock, so for now it will be red - resistors 1.2 kOhm and 15 kOhm of standard size 1206 Everything turned out to be mere pennies.
Refinement of the instrument panel
Tuning the instrument panel on the Lada Vesta is no different from upgrading it on other VAZ models, although technologically it is a completely different panel. The main idea is to improve the backlight by replacing standard SMD LEDs with alternative ones. Decorative overlays and lighting modifications without firmware are also used.
Replacing backlight LEDs
Before you begin, you should take into account that you will have to work with a soldering iron; without knowledge of soldering technology, you can lose the backlight at best. At worst, the instrument panel will fail completely. To work, you will also need to purchase LEDs with a brightness of 3 to 15 lumens, depending on the level of desired brightness. During the tuning procedure, you need to follow some recommendations:
be careful and careful not to damage the traces of the microcircuits; When soldering, observe the correct polarity of the LEDs; Do not hold the soldering iron tip for too long - the LEDs will fail due to overheating.
To make sure the LEDs are working properly, you will need a multimeter. The tester probes are connected to the “legs” of the diodes - a working diode will indicate the integrity of the circuit (a sound signal).
If you are satisfied with the brightness level of the backlight, but would like to change the color, it is not at all necessary to solder the LEDs, you can purchase a special overlay for the instrument cluster or make it yourself - the drawings are freely available. Color film may be used. Before assembling the instrument panel, you can additionally paint the wells.
Connecting the backlight to work with DRLs during the day
This can be done using firmware or a jumper directly on the electronic board. Any tampering with the electrical system will void the vehicle's warranty. In the absence of skills and experience, such actions can lead to failure of the instrument cluster.
The main task of the procedure is to solder a jumper from the contact of the LEDs responsible for illuminating the panel to the contacts of the LEDs responsible for illuminating the display of the on-board computer (lights up when the ignition key is turned). Any suitable piece of wire can be used as a jumper. At first glance it may seem complicated, but for experienced VAZ car owners such modifications are standard practice. Rarely do such requests come to specialized centers. The replacement of LEDs is not carried out by an official dealer, nor is the installation of all kinds of overlays.
Preparing seats and attaching headlights
With the exception of the luxury version, plastic plugs are installed in place of the PTF. Using a special 76 mm bit, we drill holes.
This stage can be avoided if you purchase ready-made factory-made plastic inserts with cutouts in advance. The brackets are installed using three self-tapping screws.
Buy a mechanical button for the car interior in any shape you like. The standard installation location is to the left of the steering column, closer to the trunk lid opening button.
Do-it-yourself firmware
You need to be aware that all actions are performed at your own peril and risk. No one can guarantee that after installing the firmware yourself, the device will work correctly. To prevent this outcome, it is recommended to update the panel either at an authorized dealer or at specialized service stations.
There is no need to confuse the panel firmware with the multimedia firmware - these are different devices.
The cost of such a service varies from 1,500 to 2,500 thousand rubles. This is much cheaper than buying a new shield to replace a damaged one yourself. For dismantling and reflashing, the warranty may be revoked if the procedure is not carried out by an authorized dealer. If you decide to update the software yourself, you will need to make a backup copy of the standard firmware, then prepare the necessary tools:
- A device for flashing Usbdm OSBDM V4.95 - can be ordered on AliExpress, the cost is approximately 600-700 rubles.
- Install drivers and software for Windows from the disk included with the programmer.
- Dismantle the instrument panel, peel off the factory seal, and remove the cover from the back.
- Open the programmer and move the checkbox to the 3.3V position - at this voltage you will not need an external power source.
- Connect to the dashboard and PC.
- On a computer or laptop, open the HCS12 Programmer program, select and click on the “Detected” item.
- Go to the “Target” item and select the folder with the location of the firmware, check the box next to the “Auto Reload” item, then click on “Detect Chip”. The programmer will determine the chip type automatically.
- Go to the “Security” tab and check the “Unsecure” box.
- In the “Advanced” tab, check the “Enable” box.
- In the “Device Operations” section on the “Target” tab, select the “Erase Selective” item - only the firmware will be replaced, the immobilizer data and mileage will be saved.
Now you can click on the “Program Flash” button - the firmware process will start. This will last a few seconds. After completion, when prompted by the program to connect the dashboard, click “No”. The flashing device can be turned off and the instrument panel replaced.
Installation and repair instructions
How to remove the tidy with your own hands:
- After disconnecting the battery, you need to unscrew the two bolts that secure the shield.
- Then grab the front of the dash and pull it towards you without any extra effort. Pull until you hear the latches click.
- Next, you need to unscrew two more screws with a screwdriver, they are located on the sides of the shield.
- Pull the device towards you and disconnect the wiring plugs located on the back side. Dismantle the shield and repair or replace it.
New instrument panel
Recently, AvtoVAZ installed a new instrument panel on the Lada Vesta. What distinctive features does it have?
- The size of the numbers has been increased.
- When designing the scale, orange elements were used.
- The dashboard lighting also works during the day. Therefore, you can enter settings and study the description in the daytime, when the sun is shining brightly. The brightness can also be changed manually.
- The volume level of both warning and information signals has been increased. If the driver decides to leave the vehicle with the key left, he will receive a corresponding signal.
- Some commands received voice guidance. A female voice informs about the activity of the system or the functionality of the new shield.
- Introduction of light indicators that indicate passengers who have not fastened their seat belts. A signaling device has also been introduced, with the help of which the tire pressure level is set.
- Time synchronization is performed automatically. For this purpose, signals from the corresponding satellites are used. To use this function, you must first set the time zone.
- The temperature mode is displayed in steps. This greatly simplifies the process of studying and familiarizing yourself with the data.
The manufacturing company plans to release a trial series in order to test the new dashboard. Initially, vehicles with such shields will be sold abroad. After some time they will begin deliveries to our country.
If drivers purchased a Lada Vesta car earlier, then the problem can be solved in two ways:
- The shield, which is prepared according to the new model, is purchased separately. Estimated cost is about 7,500–8,000 rubles.
- Make adjustments yourself.
The second option is acceptable if the driver has certain experience and the required knowledge.
A test drive is required to evaluate all the benefits of the new shield. Our car enthusiasts will have the opportunity to implement it this year. After all, the new control panel will be delivered soon.
Share “Review of the Lada Vesta instrument panel”
LADA > Vesta
New instrument panel
AvtoVAZ has improved the instrument panel combinations and took into account all the needs of Lada Vesta owners. This once again confirms the fact that the manufacturer cares about improving cars according to the wishes of customers.
Let's look at the distinctive features of the instrument panel for the new Lada Vesta.
- The instrument scale has acquired the original orange finish.
- There is a new daylight backlight for comfortable reading of readings on the screen.
- The numbers have become larger.
- Voice commands have become louder (a signal that the seat belts are not fastened, a signal about adjusting the direction indicators, a signal reminding of the external lights not turned off, a signal about a key forgotten in the ignition).
- New light signals have become available, for example, a sign showing tire pressure.
- Sound “accompaniment” appeared. Now the woman’s soft voice warns: “Fasten your seat belts” or “GPS system is active.”
- The GLONASS navigation satellite system appeared.
- Stepped display of coolant temperature.
You may be interested in: Updated gearbox on Lada Vesta
The Izhevsk Automobile Plant is currently going to produce a pre-production model of a car for export. They plan to introduce the Lada Vesta with a new panel format into the domestic market. The approximate price for an updated dashboard for Lada Vesta is 7500-8000 rubles. The driver can only independently enter adjustments in the settings. This can be done mainly by experienced and knowledgeable car owners.
Russian car enthusiasts will have the chance to conduct a test drive to evaluate all the advantages of the new Lada Vesta instrument panel.
When do you plan to introduce innovations?
The Car Modifications Group (CMG) company is already close to the final stage of its development. The panel has passed the first test and is nearing completion. In the near future, brand representatives will announce when the first model with a digital panel will go on sale. Although the budget version of the new car tuning is available for purchase today.
The Dop-Shop company continues to improve its engineering development, conducts testing, eliminates shortcomings, and revises the combination of instrumentation.
One of the six provided dashboards for Vesta from Dop-Shop