A function such as heated rear window is by no means new on domestic VAZs. This option is available on all modern Volga-made cars, including “tens” and “nines”. Heated rear window is useful not only in winter, but also in summer (in particular, when it rains heavily). Clean glass is the key to your safety. After all, the visibility of the car thanks to the interior mirror increases by a third. Sometimes this system fails. The VAZ-2110 is no exception. Rear window heating not working? What to do and what are the reasons? You will find out the answers to these questions in our article today.
Device
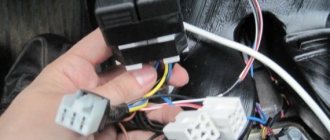
First, let's get acquainted with the structure of this system.
- The thread that provides heating.
- Wiring (positive and negative).
- System switch. Equipped with a warning light inside.
- Heating relay.
- Fuse.
- Control buttons.
This system works very simply. There is a conductive thread on the rear window. It warms up when power is applied. This way the glass is heated and condensation is removed from the inside.
Why does the rear window heating not work on a VAZ-2110 car? The reasons may be trivial. After all, the device has no mechanical parts. Therefore, all you need for diagnostics is a multimeter and a test lamp. This is the only way to find out why the heated rear window of the VAZ-2110 does not work. There is a photo of the diagram in our article.
The most common reason why the rear window heating does not work on a VAZ-2110 car is the relay. Over time, it burns out and stops passing current normally. How to check this element for serviceability? You will need a multimeter. But first we check whether the relay is emitting signs of life. We turn on the heating button and listen to its operation. A working relay should make a characteristic click. If it is not there, we continue to search for the problem deeper. We pull the relay out of the mounting location and apply the probe of the device to one of the contacts. The second wire goes to ground (that is, to a bare area of the body). If the device shows “zero”, most likely the element needs to be replaced. It is because of the relay that the rear window heating does not work well. The VAZ-2110 is equipped with an element of the “K6” brand. It can be bought at any car store for a price of no more than two hundred rubles.
Luggage compartment
Since the luggage compartment can be considered part of the car interior, it is necessary to clarify that there is also a flashlight here. It can be used to illuminate the contents of the trunk. In some situations, his work is irreplaceable. To access this mechanism, you must perform the following actions:
- The exterior lighting in the car is completely turned off.
- To release the lantern from its location, you must use a tool. For this purpose, you can use a simple screwdriver. She needs to remove the flashlight from the interior trim.
Note: To dismantle the lampshade, it is necessary to disconnect it from the two power wires. In order to eliminate the possibility of a short circuit when using this lighting device, it is necessary to insulate its connections with special adhesive tape or other sealant.
- The lamp is removed by pressing on the connecting elements. It occurs by analogy with the previous description of removing lamps from the socket.
- To turn on a new lamp, it is necessary to install it. It is pressed into the cartridge mount until it stops.
- To install the flashlight in its original place, you need to insert one end of the lampshade into the connector of the casing, and apply slight pressure on the other. A slight click will indicate that the light is fully connected to the connector in the luggage compartment.
Fuse
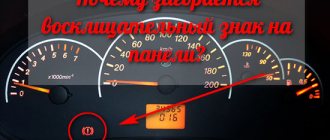
If your rear window heating does not work, your VAZ-2110 should be checked for a blown fuse. In the mounting block, check the elements in connector F8 (usually they are rated at 20 amperes). If the fuse looks like the one in the photo below, it needs to be replaced.
What is the reason for this phenomenon? Most often this happens due to a short circuit. At one point, the voltage on the on-board network increased above normal. To prevent the contacts from melting, the system is simply turned off by breaking the connecting elements. In this case, this is +12 V power and conductive elements on the rear window.
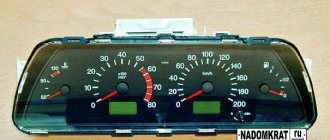
Description of the buttons on the panel
| Number in photo | Purpose |
| 10 | Additional equipment control module. |
| 18 | Steering rack position regulator. |
| 19 | Hood lock drive. |
| 20 | Horn button. |
| 22 | Trunk lock actuator button. |
| 24 | Hydrocorrector of headlights. |
| 25 | Switch for turning mode and headlights. |
| 26 | External lighting switch button. |
| 27/31 | Front/rear fog light switch. |
| 33 | Button for turning on the rear window heater. |
| 34 | Instrument lighting regulator. |
| 38 | Exhaust gas recirculation switch. |
| 39 | Air conditioner control buttons. |
| 40 | Heater damper position regulator. |
| 42 | Emergency button. |
| 43 | Switch for wipers and headlight washers. |
How to repair the conductive layer? Method No. 1
You can do this yourself. To do this, you do not need to dismantle the glass. All you need is to purchase a special conductive paste (available in auto stores or on the market) and apply it to the damaged area. It is important to prepare it carefully. To do this, carefully clean the varnish from the surface and degrease the area with alcohol (use a piece of soft rag). Next, we clean the ends of the damaged threads. We apply adhesive tape or electrical tape to its upper and lower parts so that there is a small gap (no wider than the thread itself). We apply a special adhesive into it. After a day, the composition will completely dry out. Next, you can remove the remaining tape and check the system for functionality. If the heating works only partially, it means that the break occurred in several places. Find the second place where the thread is damaged and treat it with a conductive compound using a similar principle. That's all. We will also consider the old-fashioned method of repairing threads.
On a VAZ 2110 car, the rear window heating does not work: reasons
A function such as heated rear window is by no means new on domestic VAZs. This option is available on all modern Volga-made cars, including “tens” and “nines”. Heated rear window is useful not only in winter, but also in summer (in particular, when it rains heavily). Clean glass is the key to your safety. After all, the visibility of the car thanks to the interior mirror increases by a third. Sometimes this system fails. The VAZ-2110 is no exception. Rear window heating not working? What to do and what are the reasons? You will find out the answers to these questions in our article today.
Operating principle of limit switches
Depending on the configuration, the Lada Granta can be equipped with one limit switch (driver's door only) - Standard equipment, or 4 limit switches - Norma+ and Luxury equipment.
Indeed, many Lada Granta car owners have replaced the limit switches in the threshold with switches in the door lock. In winter, limit switches in thresholds often do not respond to door opening due to loss of elasticity of the rubber cap. Also, sometimes there are cases when the limit switches of a Lada Grant in the thresholds themselves trigger when the car turns sharply, when the door may move slightly away from the body.
Switching to limit switches in the door lock eliminates these problems, and it can be done in-house. This will require additional wiring and plugs.
Removing the old limit switches
The old limit switches in the thresholds are removed quite simply. Depending on the design, they are attached either to rubber antennae or to a self-tapping screw.
- In the first case, you just need to carefully pull them towards you, since the switches are held in place by fixing tendrils.
Limit switches with “antennae” type fastening, such limit switches are located on the driver’s door
In the second case, you need to unscrew the end screw.
Self-tapping screw for fastening the end switches, pay attention to the gaps from the end switch to the body
Driver's door switch
On all four doors the principle of removing the limit switches is the same. True, on Grants in the “Standard” and “Norma” trim levels, only the driver’s door limit switch is installed from the factory, while the rest have rubber plugs in the thresholds. The same plug can also be used to seal the empty hole from the left front door end switch removed from the threshold.
Device
First, let's get acquainted with the structure of this system. It includes the following elements:
- The thread that provides heating.
- Wiring (positive and negative).
- System switch. Equipped with a warning light inside.
- Heating relay.
- Fuse.
- Control buttons.
This system works very simply. There is a conductive thread on the rear window. It warms up when power is applied. This way the glass is heated and condensation is removed from the inside.
Why does the rear window heating not work on a VAZ-2110 car? The reasons may be trivial. After all, the device has no mechanical parts. Therefore, all you need for diagnostics is a multimeter and a test lamp. This is the only way to find out why the heated rear window of the VAZ-2110 does not work. There is a photo of the diagram in our article. Below we will look at the main elements to check.
The most common reason why the rear window heating does not work on a VAZ-2110 car is the relay. Over time, it burns out and stops passing current normally. How to check this element for serviceability? You will need a multimeter. But first we check whether the relay is emitting signs of life. We turn on the heating button and listen to its operation. A working relay should make a characteristic click. If it is not there, we continue to search for the problem deeper. We pull the relay out of the mounting location and apply the probe of the device to one of the contacts. The second wire goes to ground (that is, to a bare area of the body). If the device shows “zero”, most likely the element needs to be replaced. It is because of the relay that the rear window heating does not work well. The VAZ-2110 is equipped with an element of the “K6” brand. It can be bought at any car store for a price of no more than two hundred rubles. If you don't have a multimeter, you can use a test lamp. It is important that it is 12 volts. We connect one wire to the “plus” of the relay. The second one is connected to ground. If the lamp does not light, then the relay is faulty. But contacts can also burn out, due to which the voltage will not be fully supplied. The light bulb will not be able to determine this. For more accurate diagnostics, experts recommend using a multimeter.
Installing a new cover
Installation of a new lining occurs after preliminary preparation:
- It is necessary to measure and trim off excess material;
- But it’s better not to cut off what seemed to be superfluous under the instrument panel, otherwise there will be a gap near the steering column, and you can make cuts to bend it a little if necessary;
- Near the side air ducts, trimming is also done during installation, measuring on site;
- We carry out fitting and adjust trimming;
- We apply anti-creak to avoid squeaking in future operation;
- We choose the method of installing the dashboard with a Euro trim: use new brackets included in the kit or drill them out from the old trim;
- All that remains is to install the instrument cluster you need and secure the Euro trim with self-tapping screws, which are then hidden under the plastic trim.
With panel disassembly
The first stage is carried out according to the plan already described. Next, we proceed like this:
- We assemble the trim, installing our instrument cluster, air duct panels and those accessories included in the kit;
- At the base of the panel we carefully attach the wiring harness;
- We connect the wires from the Euro pad to this harness, tightening everything with mounting ties;
- We connect devices to the required buttons using connectors;
- We secure the cover with self-tapping screws.
This method, although it takes more time, provides high-quality sound insulation to eliminate all annoying squeaks.
We also recommend replacing light bulbs with high-quality analogues or LEDs. So, the updated panel will look even more solid.
Fuse
If your rear window heating does not work, your VAZ-2110 should be checked for a blown fuse. In the mounting block, check the elements in connector F8 (usually they are rated at 20 amperes). If the fuse looks like the one in the photo below, it needs to be replaced. For the future, experienced car owners advise carrying a spare set in the glove compartment. After all, if the fuse for the fuel pump burns out (especially while on the road), then the car will not be able to start at all.
What is the reason for this phenomenon? Most often this happens due to a short circuit. At one point, the voltage on the on-board network increased above normal. To prevent the contacts from melting, the system is simply turned off by breaking the connecting elements. In this case, this is +12 V power and conductive elements on the rear window.
Removing the torpedo on the old model 2112
To completely remove the device from the car you will need:
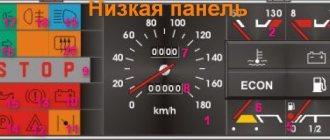
The standard dashboard of the Lada 2112 is thoughtful and informative. The symbols on the instrument panel are easy to read and understandable even for beginners.
Specialization : Graduated from the State Automobile University, worked for 20 years at GAZ-56, now I drive a Zhiguli.
Source
Damage to the heating filament
For what other reasons does the rear window heating not work? VAZ-2110 is equipped with special threads. A break can happen here too. The threads are a small layer of conductive substance.
It is easily damaged by the slightest mechanical impact (even with such harmless actions as removing tint). You can determine the location of the damage using a magnifying glass. It is advisable to carry out diagnostics during daylight hours. Damage to the threads is one of the obvious reasons why the rear window heating partially does not work on the VAZ-2110.
Interior lighting and courtesy lamp
VAZ 2110 interior lighting
The first step is to consider the case of a breakdown of the switch that supplies electricity to the lamp in the cabin. This device allows you to get a direct source of bright light inside the car. Sometimes it needs to be repaired or replaced. For this task you will need:
Note: To work on the vehicle lighting wiring, it is not necessary to disconnect and remove the battery from the hood.
It is necessary to prepare a Phillips screwdriver in advance. With its help, you need to unscrew the screw that attaches the switch to the VAZ door pillar.
VAZ 2110 interior lighting lamp
There is a small hole in the door pillar that contains this switch. It must be removed from this hole. There is a wire to which this mechanism is attached. A careful movement is performed to disconnect.
Note: A common cause of shorting is rust, which occurs at the junction of the screw with the door (pillar) of the car. To complete the assembly process of this mechanism, it is necessary to perform the same steps, but in reverse order.
Trouble can be caused by a breakdown of the ceiling light, which is located inside the car. It helps illuminate the entire interior of the car. Its illumination is enough to look at a map in the dark, read literature or solve a crossword puzzle in your free time from driving.
VAZ 2110 interior lamp
Burnt out light bulbs
Frequent breakdowns are burnt out light bulbs. To gain access to this mechanism, you must do the following:
- The vehicle must be installed in a position that will be advantageous for repairs.
- You will need a slotted screwdriver. With its help and a little attention, access to the spherical protrusion is made. It is also called the swing axis. With its help, the diffuser is dismantled.
Note: After removing the lampshade, access to the lamp becomes available. All subsequent operations must be performed only if it is necessary to replace the light bulb.
The lamp is attached to the base of the electrical wiring through a special contact. When you press lightly on it, the lamp automatically disconnects from the contacts. The removal process is best done with a screwdriver that has a rubber handle.
VAZ 2110 interior lighting diagram
- The new light bulb must be installed in place of the old one.
- In case of repairing the electrical supply system itself, it is necessary to unscrew the four screws that secure the main part of the lampshade to the roof of the car.
- To disconnect the main part of the lampshade, it is necessary to disconnect the wire fastening block. To perform this task, you need to pull the plastic nozzle away from the lampshade itself.
- Installation of the lampshade, after repair, cleaning and other work, occurs in the reverse order.
Note. To ensure that the installed lamp is fully functioning, you must ensure that there is tight contact with the base. The top cover, called the light diffuser, is inserted on one side into the lamp body, and slight pressure is applied to the other side until a slight click is obtained.
How to repair the conductive layer? Method No. 1
You can do this yourself. To do this, you do not need to dismantle the glass. All you need is to purchase a special conductive paste (available in auto stores or on the market) and apply it to the damaged area. It is important to prepare it carefully. To do this, carefully clean the varnish from the surface and degrease the area with alcohol (use a piece of soft rag). Next, we clean the ends of the damaged threads. We apply adhesive tape or electrical tape to its upper and lower parts so that there is a small gap (no wider than the thread itself). We apply a special adhesive into it. After a day, the composition will completely dry out. Next, you can remove the remaining tape and check the system for functionality. If the heating works only partially, it means that the break occurred in several places. Find the second place where the thread is damaged and treat it with a conductive compound using a similar principle. That's all. We will also consider the old-fashioned method of repairing threads.
Method number 2
This method involves the use of non-ferrous metal shavings as a conductive element. Also, to repair the thread, we will need a transparent varnish (it is advisable to use a thick one, like for nails).
Mix the shavings with a brush and apply to a strip previously sealed with tape, as in the previous case. After an hour, the varnish will completely dry. The method is quite old. It is not always possible to connect damaged contacts as needed. Therefore, if it is possible to buy conductive glue, it is better to use the first method. It will be much faster, easier and more reliable. The cost of a 10-gram tube with this composition is 78 rubles. This volume is more than enough to repair several damaged heating threads.
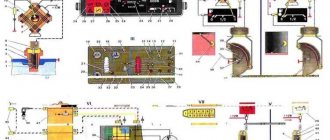
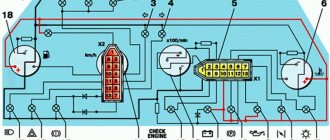
Rear window heating diagram for VAZ 2110, 2111 and 2112
1 – mounting block;
2 – ignition switch; 3 – rear window heating switch; 4 – control lamp for turning on the heating; 5 – rear window heating element; K6 – additional relay; K7 – relay for turning on the heated rear window; A – to power supplies The rear window heating is activated using the auxiliary relay K7 (type 904.3747-10). When the heating is turned on, the orange lamp 4, which is located next to the button, lights up. The heated rear window only works when the ignition is on, since voltage is supplied to the button through an additional relay K6, which is activated when the ignition is turned on. Power is supplied to the heating threads through the contacts of relay K7 from fuse F7, which is directly connected to the power sources.
Troubleshooting procedure
- Check fuses F8 (20A) and F8 (20A) (mounting block).
- We check the serviceability of the rear window heating button. Is there a “plus” on pin No. 10 of the switch button and after turning on the button on pin No. 9 (a test lamp or multimeter will be useful).
- We check +12V at the Ш5-2 output and at the connector near the rear window.
- We check the wires and their connections.
- We check the rear window heating relay - K7.
- We check the integrity of the glass heating filaments.
The algorithm for determining the cause of a malfunction is similar for most cars, the only differences are in the names of fuses, relays and connectors.
By the way, do you know that to extend the service life of the heating elements, they use a Glass Heating Regulator (DOC), and you can also install a Fresnel lens on the rear window?
Smooth ignition of car headlights
In addition to the aesthetic pleasures of the gradual lighting of the headlights, the ignition circuit also has practical value for lamps. There will be no sudden voltage surges on the lamps, which will increase its service life and protect against unwanted burnouts. To implement a smooth ignition circuit for car headlights, the most important element will be a field-effect transistor.
You need to take a fairly powerful transistor designed for currents up to 25 A. Naturally, the transistor will need to be installed on a heat sink, it will heat up decently.
The circuit can also be used for LED lamps or strips, then such a powerful transistor is not needed, but we will still consider the circuit for powerful incandescent lamps, because
it is valid in any case, regardless of what light source is on the load.
When setting the values shown in the diagram, the time to turn on/off the headlights will be approximately 3-4 seconds.
The delay time is set by an RC circuit (in the diagram there is a 51 kOhm resistor and a 220 µF capacitor). You can experiment with the resistor value, choosing the turn-on and decay time you need.
The smaller the resistor value, the faster the capacitor will charge/discharge.
- The field-effect transistor was used brand IRF9540; as a bipolar transistor that controls the switching on of the field switch, you can take S9014 or the domestic analogue KT3102.
Please note that the capacitor is polar, incorrect polarity applied to the electrolyte will immediately explode it, be careful. A power of 0.25 W is enough for all resistors in the circuit. Before installing it in your car, be sure to experiment with how long the on/off time is. If the values are set incorrectly, the delay time can extend to a couple of minutes.
Source: https://xn—-7sbgjfsnhxbk7a.xn--p1ai/plavnyj-rozzhig-avtomobilnyx-far
Shendys › Blog › Mounting block 2110
It doesn’t matter how the relays and fuses are located, the connections are the same (except for relay K8)
Thirdly, there are both those without generator excitation resistors (and the legs at the rear Ш4/9) which are needed if you have an old device (otherwise the generator will not give a charge until you rev it up).
Fourthly, A: there are blocks without legs on the K1 lamp serviceability relay, B: with legs but connected by tracks on the board itself (you can disassemble the block, cut them and install a relay), C: with legs under the relay. In this case, there is a relay or plug-in jumpers instead. Well, it doesn't matter.
The VAZ-2123 uses the same block (392.3722), only its lower mount is longer. And on the UAZ-3160 (43.3722) the rear fog light circuit is also connected differently.
Maybe they differ in some other way, but that’s all we’ve been able to find out so far.
Block diagram 2110 (with resistors and without relay K8)
Circuit diagram and pinout of block 3160
Block contacts using the example of 2110
Relay: K1 – relay for monitoring the health of the lamps (or not); K2 – windshield wiper relay; K3 – relay-interrupter for direction indicators and hazard warning lights; K4 – headlight low beam relay; K5 – headlight high beam relay; K6 – additional relay (ignition); K7 – relay for turning on the heated rear window; K8 – backup relay (or fog lights).
And an addition: I found instructions 2110 on the Internet, where they write “In the niche of the instrument panel behind the mounting block there is a fog lamp fuse installed.”
Apparently these are one of the first 2110s. I did not find any electrical diagrams with this separate fuse, nor with Sh4/9 connected, although some pinouts of the unit have it (there is a brown-white wire, the same as for the generator light bulb).
TOTAL:
When replacing the block, we look at: - the lower mount, - whether we need the K8 relay, - whether the wire goes to Ш4/9, - whether we need a leg on the new block or not.
52 likes Subscribe
Comments 6
Participate in the discussion can only registered users.
Helped a lot, thanks! At least I understood the wiring a little)
great recording. The stops stopped working, I discovered that the problem was in the mounting block, I took everything apart and looked and couldn’t figure out what was wrong. There was such a block 2110-3722010-08. I found this 2110-3722010-12 and installed it with the cigarette lighter and speedometer and tachometer not working! In the end I was able to revive mine.
Are injection units and carb units different?
thank you, useful post. I was just about to install a 2110 relay block on the old G-Class 85, otherwise there is not a single relay except for the turn signal and the wiper, only fuses and the entire load on the buttons, ignition switch and light switches.
Almost all VAZ models have heated rear windows, which makes driving the car much easier in special conditions. Most often, heating is needed in bad, cloudy weather, when the rear window fogs up from the condensation that forms, as well as in winter, when the glass becomes covered with ice.
The operating principle of the heater is quite simple:
- a conductive thread of a certain resistance is applied to the rear window, which heats up when current passes through it;
- supply voltage is provided by the following components: wiring, relay, fuse and power button;
This scheme is used on all VAZ cars (as well as on most foreign cars), from the “classics” to the latest models.
Stories from our readers
“Fucking basin. "
Hi all! My name is Mikhail, now I’ll tell you a story about how I managed to exchange my two-wheeler for a 2010 Camry. It all started with the fact that I began to be wildly irritated by the breakdowns of the two-wheeler, it seemed like nothing serious was broken, but damn it, there were so many little things that really started to irritate me. This is where the idea arose that it was time to change the car to a foreign car. The choice fell on the melting Camry of the tenth years.
Yes, I had matured morally, but financially I just couldn’t handle it. I’ll say right away that I am against loans and taking a car, especially not a new one, on credit is unreasonable. My salary is 24k a month, so collecting 600-700 thousand is almost impossible for me. I started looking for different ways to make money on the Internet. You can’t imagine how many scams there are, what I haven’t tried: sports betting, network marketing, and even the volcano casino, where I successfully lost about 10 thousand ((The only direction in which it seemed to me that I could make money was currency trading on the stock exchange, they call it Forex. But when I started delving into it, I realized that it was very difficult for me. I continued to dig further and came across binary options. The essence is the same as in Forex, but it’s much easier to understand. I started reading forums, studying trading strategies. I tried it on a demo account, then opened a real account. To be honest, I didn’t manage to start earning money right away, until I understood all the mechanics of options, I lost about 3,000 rubles, but as it turned out, it was a precious experience. Now I earn 5-7 thousand rubles a day. I managed to get the car buy after half a year, but in my opinion this is a good result, and it’s not about the car, my life has changed, I naturally quit my job, I have more free time for myself and my family. You’ll laugh, but I work directly on the phone)) If If you want to change your life like me, then here’s what I advise you to do right now: 1. Register on the site 2. Practice on a Demo account (it’s free). 3. As soon as you get something on the Demo account, top up your REAL ACCOUNT and go to REAL MONEY! I also advise you to download the application to your phone, it’s much more convenient to work from your phone. Download here.