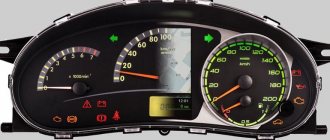
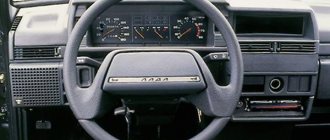
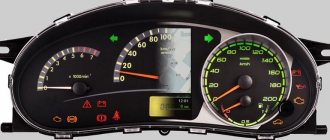
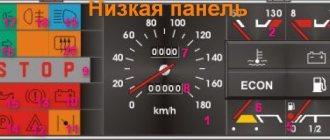
The Lada Priora/Kalina instrument cluster is designed to display driving characteristics, the current state of vehicle systems that ensure traffic safety, as well as the correct operation of the entire vehicle as a whole. If you are a novice driver, then this description of the dashboard will help you understand the readings of instruments and indicators.
- Tachometer. Shows engine speed in real time. The red scale zone indicates a dangerous operating mode for the engine;
- Malfunction lamp of the electronic brake force distributor. To check, the lamp lights up red for a few seconds when the ignition is turned on. The burning of the lamp in other cases indicates a malfunction; when driving with a burning lamp, increased safety measures must be observed;
- Battery charge lamp. To check, the lamp lights up red when the ignition is turned on and goes out after the engine starts. If the lamp is lit in other cases, it indicates a lack of battery charge;
- Left turn signal lamp. Flashes when the turn signal or hazard lights are on;
- Speedometer. Shows at what speed the car is currently moving;
- Engine oil pressure warning lamp. To check, the lamp lights up when the ignition is turned on and goes out after the engine starts. In other cases, the lamp is lit indicating low pressure in the engine lubrication system. It is not recommended to operate the engine in such conditions;
- Right turn signal lamp. Flashes when the turn signal or hazard lights are on;
- Handbrake lamp. Lights up red when the parking brake is applied;
- Coolant temperature gauge. Engine operating temperature is 90 degrees and above to the red zone. It is prohibited to operate the vehicle if it overheats. When the arrow reaches the red zone, a buzzer will sound. To extend engine life, it is recommended not to operate the engine at high speeds until the coolant temperature reaches operating temperature;
- Gasoline level indicator in the tank. The arrow shows the fuel level. Lack of gasoline can damage the fuel pump;
- Fuel reserve lamp. Lights up with an accompanying buzzer signal when there is less than 10 liters of fuel left in the tank;
- Button for switching display modes and resetting daily mileage readings. A short press switches between daily and total mileage. When you hold the button, the daily mileage is reset, accompanied by a sound;
- Hazard warning light. Flashes red when the emergency lights are turned on simultaneously with the turn signals.
- Electric power steering (EPS) malfunction lamp. To check, the lamp lights up yellow when the ignition is turned on for a few seconds. Lighting of the lamp in other cases indicates a malfunction of the EUR;
- Headlight high beam lamp. Lights up when the high beam headlights are turned on;
- Lamp for turning on external lighting. Lights up when the headlights are turned on or the headlights are low beam;
- Airbag system malfunction lamp. To check, the lamp lights up yellow when the ignition is turned on for a few seconds. In other cases, if the lamp is illuminated, it indicates a malfunction in the airbag system. In this case, in the event of an accident, the airbags will not deploy;
- Immobilizer lamp. If the system is working properly and the engine is allowed to start, when the ignition is turned on, the lamp flashes once and goes out. If the lamp flashes constantly (accompanied by short beeps), then the system is faulty. If, after turning on the ignition, the lamp lights up for 15 seconds and goes out, then the anti-theft system is not activated;
- Liquid crystal display of the on-board computer (BC). Displays daily and total mileage, as well as information from the BC;
- Seat belt warning light (optional). The lamp lights up when the driver's seat belt is not fastened, accompanied by buzzer signals for 1.5 minutes;
- Brake system emergency lamp. To check, the lamp lights up red when the ignition is turned on for 4 seconds. In other cases, the lamp is lit indicating an insufficient level of brake fluid, or another malfunction of the brake system;
- Front passenger airbag lamp (optional). Passenger airbag deactivation lamp;
- Anti-lock braking system fault lamp (optional). To check, the lamp lights up when the ignition is turned on and goes out after a few seconds or after the engine starts. When the lamp is lit, there is a malfunction in the ABS system, but the brakes remain fully operational;
- Engine management system malfunction lamp (Check Engine). To check, it lights up when the ignition is turned on and goes out after the engine starts. In other cases, the lamp is lit indicating a malfunction in the system. See the error code.
Standard instrument panel - article number and price
The original car tidy exists in three types.
- the first is an option for a pre-restyling car;
- the second panel is for a restyled car;
- and the third is the “Lux” option for the restyled one, which has become faintly similar to all previous torpedoes.
Each of them contains standard elements such as a tachometer, so their functionality does not decrease. . Who wants to do tuning of the instrument panel, this option is for them.
Priora first generation
The instrument cluster for the first generation Lada Priora received catalog number 2170-3801010. Cost – about 6,000 rubles. Everything is standard with it - from left to right there are four arc scales with red arrows: odometer, speedometer, coolant temperature, fuel level. Below the speedometer there is a small on-board computer display, and above the arches are all the indicators, including the direction indicators.
Priora 2
For the Priora “Lux” variation there are two more “subtypes” - with or without a CAN bus. Different subtypes were made so that the panel could be connected to any car. Catalog number – 2170-3801010-50 without tire, 2170-3801010-60 with tire. It is distinctive in that it contains an elongated display with a screen that can highlight the navigator.
The catalog number of the combination for the “Norma” assembly is 21720-03801010-20. Cost – 6,500 rubles. Like the “Lux” version, it received a brighter speedometer and odometer, and the coolant temperature along with the fuel level indicator is hidden at the bottom of the speedometer and odometer. The base will not create a route on the display, but will show all the information in color.
Symbols on the on-board computer
The instrument panel on the dashboard can provide a lot of diagnostic data.
The on-board computer display will help determine the breakdown, depending on the number:
- The on-board network is damaged due to increased current caused by a short circuit.
- There is a problem with the fuel sensor.
- Overheating of the cooling system or a malfunction in the sensor.
- The external thermometer is broken. Please note that until 2012 they were optional.
- The engine has overheated, you need to let it cool down.
- The engine oil level has dropped significantly.
- Brake system problems.
- There is a problem with the battery, it may simply be low.
The letter “E” may also appear on the screen. She talks about the firmware crashing.
Dashboard indicator symbols
When starting up, almost all the icons on the dashboard light up - this way the operation of the light bulbs is checked. Some drivers believe that these are messages about malfunctions of some Lada Priora systems.
| No. on the diagram | Indicator designations |
| 1 | Tachometer. The device measures the engine crankshaft frequency (revolutions per minute). If the arrow goes beyond the red value, it means that the Lada Priora engine is operating in a dangerous mode; |
| 2 | Brake force distributor indicator. Reports defects in the operation of this node; |
| 3 | Battery charge. If the lamp lights up while the engine is running, the battery is discharged; |
| 4 | Left turn signal. The sign flashes when there is an alarm or the left indicator is on; |
| 5 | Speedometer. The device reports the speed at which your Lada Priora is currently moving; |
| 6 | Emergency lubricant pressure in the engine. If the sign lights up during operation of the power plant, it means the pressure in the system is low; it is highly not recommended to operate the engine in this condition; |
| 7 | Right turn signal (see No. 4); |
| 8 | Handbrake indicator. Lights up yellow if the Lada Priora is in the handbrake; |
| 9 | Antifreeze temperature in the cooling system. The operating temperature of the motor starts from 90° and above to the red mark. If overheating occurs, turn off the engine; |
| 10 | Gasoline level in the tank. If the fuel level approaches the minimum, the fuel pump may break; |
| 11 | Reserve gasoline level. The indicator lights up when there are less than 10 liters left; |
| 12 | Key for resetting the daily mileage and switching between display modes; |
| 13 | Alarm. If you have triggered the emergency lights, the lamp will flash along with the turn signal arrows; |
| 14 | Malfunctions in the electric amplifier. If defects appear in the EUR, the lamp will light up while the engine is running; |
| 15 | High beam designation. An active indicator indicates that you have switched to distant; |
| 16 | Outdoor Lighting. The system notifies the driver about the operation of the headlights or low beams; |
| 17 | Airbag malfunctions. If the lamp lights up after starting, then there is a high probability that the airbags will not deploy in a collision; |
| 18 | Immobilizer. An audible signal and flashing indicate that the immobilizer system is faulty; |
| 19 | Computer screen. Here you can view information from the bookmaker, as well as find out the total and daily mileage; |
| 20 | Indication of unfastened seat belts. The buzzer will signal a violation for 90 seconds; |
| 21 | The brake system is in disrepair. Most often these are worn pads or insufficient fluid in the system; |
| 22 | Disabling a specific airbag; |
| 23 | Indicator of defects in ASB operation, the braking system is operating normally; |
| 24 | Check Engine – there is a breakdown in the engines; diagnostics and subsequent repairs are urgently required. |
Central lock Lada Priora
To lock (unlock) the locks of all doors outside the car, turn the key in the driver's door lock cylinder clockwise (counterclockwise). When you turn the key in the lock cylinder of the front passenger door, the lock of only this door is locked (unlocked). You can also lock and unlock all doors using the operating key remote control. From inside the vehicle, all door locks can be locked by pushing down the driver's door lock button or pressing the door lock button located in the switch block on the driver's door armrest. When the lock is locked, the door cannot be opened using either the outside or inside handle. To unlock the locks of all doors, press the lock button in the switch block again. The front doors can only be locked or unlocked when the doors are closed. When the exterior lighting is turned on, the switch keys are illuminated green. Driver's door: 1 — door lock button; 2 — armrest; 3 - switch block; 4 — internal handle; 5 - external lock
Switch block on the driver's door armrest: 1 - key for locking and unlocking all doors; 2 — power window switch key for the left rear door*; 3 — driver's door power window switch key; 4 — regulator of electric drive of external mirrors; 5 — switch button for adjusting the right mirror; 6 — switch button for adjusting the left mirror; 7 — power window switch key for the front passenger door; 8 — power window switch key for the rear right door*; 9 — rear door power window lock switch*
* Connected to the vehicle's electrical equipment only if rear door power windows are installed. Rear door: 1 — external lock; 2 — internal handle; 3 — door lock button; 4 — window lifter handle; 5 - plug (power window switch key - for cars in a variant version) Additional rear door locking
The rear door lock can be locked by pushing down the lock button on both the open and closed doors. At the ends of the rear doors (near the locks) there are latches for additional locking, which can be used when traveling with children or in other cases to prevent the doors from opening from the inside. To additionally lock the rear door lock, press the latch down and close the door. In this case, the rear door can only be opened from the outside when the lock button is raised.
Instrument cluster
First, let's look at the description and pinout designation of the icons of the new instrument panel on the Lada Priora car.
So, the shield includes the following elements:
- A tachometer device designed to demonstrate engine speed. Red arrows on the combination indicate speeds that are not recommended to be exceeded. Lada Priora allows you to accelerate the engine to six thousand revolutions.
- Pinout icons for light alarms or turn signals. A green arrow pointing to the left lights up on the dashboard when the left turn is engaged. It not only lights up, but also blinks, the same applies to the right turn signal. In addition to the fact that the icon turns on, at this moment the sound signal also works; its shield turns on along with the turn signal.
- The speedometer shows the speed level at which you are traveling.
- Refrigerant temperature level sensor in the system. If, as a result of any malfunctions, the coolant temperature increases to 115 degrees, an audible signal will tell the car owner about this. This will happen for five seconds until the temperature drops to 110 degrees. To prevent the engine from overheating, you should turn it off and get rid of the problem of antifreeze boiling.
- The designation of the arrow for the level of gasoline in the tank is known to everyone. If the arrow on the Lada Priora instrument cluster has approached the red zone, this indicates that the tank needs to be refilled as quickly as possible, since there are about five liters left in it. Please note that sediments present in the fuel collect at the bottom of the gas tank, so it is not recommended to use gasoline completely.
- A pinout icon indicating that the gasoline reserve is turned on; this symbol is made in the form of a gas station. When it lights up orange and stays on continuously, it means refueling is needed.
- There is a button on the speedometer designed to reset the daily mileage; when you press it, the daily mileage will be reset to zero.
- Alarm. When this function works, red icons are activated on the Lada Priora instrument cluster. The vehicle's parking lights begin to flash, indicating a breakdown.
- An icon indicating the operation of the electric power steering. When the ignition is turned on, this icon works and passes the test, but after the engine starts, the backlight disappears.
- Icon with blue highlight. On the Lada Priora combination diagram, when you turn on the high beam headlights, you will be able to see the corresponding icon with a blue backlight, but it will be practically invisible during the day.
- Handbrake icon that illuminates when the lever is activated. The backlight of this element lights up in red; it also disappears when the engine starts, after the test.
- Symbol for turning on external lighting, that is, side lights or low beam. The icon turns on with a green backlight.
- The symbol of working airbags on the Lada Priora combination diagram turns on for 3-4 seconds after turning on the ignition, during the test, it lights up in orange.
- Engine fluid pressure emergency icon. There is also this icon on the navigation diagram for the driver; it always lights up in red when the ignition is on and goes out after the engine starts, that is, the test. The driver must always use the navigation panel of the Lada Priora and monitor the operation of this indicator. If it does not light up when igniting, this may indicate a sensor malfunction. If the fluid pressure level is below the required level, an audible signal will tell the driver about this within five seconds. It is not recommended to operate the car when the fluid level is low, as this will harm the engine.
- Immobilizer icon. On the navigation diagram you can see a symbol with orange backlight - the immobilizer icon. The element demonstrates to the driver whether the Lada Priora vehicle protection system is turned on or not.
- The computer is another symbol that shows the full mileage of the Lada Priora per day, with indicators of the main functions located in the middle.
- The seat belts disconnected symbol lights up red during the test; if the seat belts are not fastened, the system will sound a corresponding buzzer.
- Battery symbol. Another indicator that is tested when the ignition is turned on is the battery symbol. When you turn the key, it passes the test and lights up, the indicator goes out after the engine starts. It should be noted that the operation of this component of the Lada Priora instrument cluster must always be monitored. If it does not turn on, then there is a possibility that the battery is not ready for use or the sensor has failed. If the indicator functions while the engine is running, this may indicate a low battery charge. There is also a possibility that the timing belt is loose or broken, or the generator is not working correctly (the brushes are worn out).
- The brake system status regulator is also located on the Priora dashboard. This symbol on the combination lights up in red when the ignition is on, like other sensors, it stops working after the engine starts. If the brake system does not pass the test, then using the Lada Priora is not recommended.
- The Check Engine regulator on the Lada Priora combination indicates the condition of the engine. When the ignition is turned on, it passes the test and turns off when the engine starts. If the symbol continues to light while the engine is running, this indicates a malfunction of the unit; it is recommended to carry out computer diagnostics of the engine. This is the only way to obtain the most accurate data about possible breakdowns that need to be eliminated in the near future.
- The ABS system icon lights up continuously when it fails.
- Airbag disabled icon. The driver's navigation control panel also has this icon, in particular those located on the front passenger seat.
- Symbol of failure of the electronic brake force distribution system (video author - Automotive Diagnostics).
Car keys, immobilizer and remote control system for electrical accessories Lada Priora
Keys for the ignition switch: 1 - a key with a red insert at the end of the head (learning key); 2 — key with remote control (working key); 3 - tag A set of keys is included with the car - two keys for the ignition switch and two keys for opening (closing) the locks of the front doors and the trunk lid. The key with remote control combines the functions of the ignition key, the remote control system for the electrical accessories, and the working immobilizer key and is intended for everyday use. To unlock the engine start and remote control operation, the key must be activated (trained) using a code key with a red insert at the end of the head. The key with the red insert is a training key and a spare key at the same time. It is designed to start the engine, as well as to activate (learn and relearn) the immobilizer and the remote control system for the electrical accessories. A transponder (electronic key) is built into the head of the key, the code of which is stored in the memory of the immobilizer control unit. The procedures for activating the immobilizer and training the remote control must be performed at car pre-sale preparation points or at certified services in the presence of the car owner. The training key (with the red insert) must be stored separately and not kept on the same ring as the working key. It is recommended to use the training key as the ignition key only if the working key is lost. The code number for making a new key to replace the lost one is printed on a metal tag. To open (close) the locks of the front doors and trunk lid of a car in the absence of a working key (with the remote control system for the electrical accessories), you can use…
one of two identical keys (the code number for restoring a lost key is printed on the tag). The car is equipped with an anti-theft system - an immobilizer and a remote control system for electrical accessories. The immobilizer blocks the engine from unauthorized starting (if the key code has not been read). The immobilizer includes: – a control unit combined with a controller for the remote control system for electrical accessories, located under the instrument panel; – immobilizer status indicator in the instrument cluster; – buzzer in the remote control system controller; – communication coil built into the ignition switch; – a working key, which is also a remote control system for the electrical package; – training key; – the corresponding part of the engine control system controller software. The remote control system for electrical accessories is used for: – remote (from the key remote control) locking (unlocking) of all door locks with simultaneous arming (disarming) of the vehicle security mode; – remote unlocking of the trunk lid lock; – locking all doors by turning the key in the driver’s door lock; – locking (unlocking) the locks of all doors using a button from inside the car; – activation of the alarm mode in case of violation of vehicle security zones; – turning off the alarm mode remotely or when turning on the ignition with a working or training key; – raising (lowering) the windows of the front and, in a variant, rear doors. When replacing a faulty remote control system controller or engine management system controller, using a learning key, you can restore the functionality of the systems.
The exclamation mark is on - what to do?
We have noticed that new topics often appear on car forums where drivers ask about the exclamation marks that are displayed on the Lada Priora panel. They rarely specify where it is lit and what is depicted on the icon. In this section we have collected a small FAQ Below are all the exclamation marks that can light up on the instrument panel of a VAZ 2170 car. The designations of these icons are as follows:
- The red exclamation mark in the circle (bottom) is lit. The indicator indicates that there is a problem with the vehicle's brake system. This is usually a low brake fluid level. Add it to the tank and, most likely, the sign will stop lighting. If this does not happen, then it is worth checking the system for damaged components. When igniting, the indicator lights up for 4 seconds and then goes off.
- The red exclamation mark in the triangle/circle (above) is lit. Modern versions use a triangle instead of a circle. The indicator tells us about defects in the operation of the brake force distributor. Use extreme caution if the light comes on while driving.
- Exclamation mark next to the steering wheel icon. When illuminated for a long time, it indicates a malfunction in the electric power steering (EPS). Like other icons, it lights up when ignited and goes out after a few seconds if the system is working properly.
If the red triangle lights up while the engine is running, then you should diagnose the brake force distributor
Sometimes the indication is caused by faults in the electronics. Terminals are coming off, contacts are oxidized, defects in the on-board computer are a few reasons for the random appearance of icons. To avoid damaging one of the systems, check the electronics first. To do this, it is enough to dismantle the device on the Lada Priora and see if the terminals are securely seated in the sockets. If the brake system indicator lights up, first check the fluid level in the reservoir, and only then fill in new antifreeze.
Lada Priora seats
The front seats are equipped with head restraints and are equipped with mechanisms for moving the seat longitudinally and changing the tilt of the backrest. To adjust the position of the front seat in the longitudinal direction, pull up the lock lever located under the seat.
While holding the lever, move the seat forward or backward, release the lever and make sure that the seat is securely fixed.
To change the tilt of the seat back, rotate the handle.
It is prohibited to adjust the position of the driver's seat while driving, as this may lead to loss of control of the vehicle. The headrests of all seats are height adjustable. To raise or lower the front seat headrest, pull it up or lower it to one of four fixed positions.
To remove the headrest, with a sharp upward movement we remove its posts from the holes in the back of the seat. In order to adjust the position of the rear seat headrest... press the latch on the right headrest post and move the headrest to one of two fixed positions. To remove the headrest, press the post lock and move the headrest up until its posts come out of the holes in the seat back.
For what other reasons might the lights on the dashboard start to light up?
According to experts, faults in electronics can also cause indexing. Icons may appear involuntarily on the dashboard due to the following breakdowns:
- if the contacts succumb to the oxidation process;
- if the terminals change their location;
- if breakdowns occur in the on-board car computer.
Taking into account the advice of experts, and in order not to harm one of the car systems, you need to check the functionality of electronic components. To do this, you will need to diagnose the electronic part, which is done quite easily - remove the dashboard and check the location of the terminals in the so-called sockets. And if the brake fluid level indicator lights up, then first of all the fluid level in a special tank is checked, and only after that new brake fluid is filled in to the recommended level.
Understanding why the light on the dashboard lights up and finding out what kind of breakdown this or that sign indicates is quite simple if you familiarize yourself with each element located on the instrument panel.
Tachometer, speedometer, on-board computer indicators, light bulbs - all these components are located on the Lada instrument panel. The “tidy” is designed to display the current state of various Lada Priora systems. An experienced motorist will immediately notice that one of the components requires repair; a certain icon will inform him about this. If you are a novice driver, then it will be useful for you to study the Lada Priora dashboard. This material provides a detailed description of each element of the tidy.
Trunk lid Lada Priora
From outside the vehicle, the trunk lid can be opened using the key or the remote control button on the working key. When opening with the key...
insert the key into the lock cylinder and turn it counterclockwise until the lock engages. We take out the key and open the lid.
While inside the car, the trunk lid can be opened
by pressing button 1 located on the floor tunnel lining. When the lid is open and the side lights are on, the luggage compartment lamp turns on. In the open position, the trunk lid is held in place by hinge springs. The tension of the springs can be adjusted by rearranging them in the brackets. When closing, lower the trunk lid, overcoming the resistance of two springs, and then press it until the lock engages
In what cases is it necessary to remove the instrument panel?
Dismantling the Priora tidy is required for tuning or replacing burnt out lamps. The VAZ 2170 is a modern model, so there are not many fastenings on the panel. To disassemble you will need a set of screwdrivers. Don't forget to turn off the negative battery.
- The process begins with removing the mounting block.
To do this, you need to turn the latches on the fuse cover and then remove it; Turn the marked latches to remove the cover. - It is not necessary to remove the steering wheel, just lower the steering column down. Using a Phillips screwdriver, unscrew the screws of the lining;
- Using the same tool, we unscrew the screws of the instrument cluster.
Tilt the top towards you and then remove the combination from the slots. Now you can turn the lock; Pull the cover out to remove it from the groove - After disconnecting the wires, the Lada tidy can be completely removed.
Power windows for Lada Priora doors
The car is equipped with electric windows for the front doors, and in a variant version it can be equipped with electric windows for the rear doors. The power windows on all doors can be controlled using switches located in the switch block under the driver's door armrest. The power windows of each passenger door can also be controlled using a switch located in the armrest of that door. Controlling the power windows of the doors using the switch keys is only possible when the ignition is on (the ignition key is in position “I”), as well as within 30 seconds after the ignition is turned off, if none of the car doors were opened. To lower the window, press the edge of the corresponding switch key and hold it until the glass takes the desired position (the windows of the front and rear doors do not lower completely). In order to raise the glass completely or to a certain height, we pry up the switch button and hold it until the glass reaches the desired position.
When using power windows, do not allow items of clothing or body parts to get into the gap between the glass and the door frame. Do not allow small children to operate the power window switches or remote control. Location of the power window switch in the passenger door armrest. In order to disable the control of the rear door power windows from the switch keys located on the armrests of the rear doors (for example, when there are children in the back seat), press the rear door power window lock button located in the driver's door switch block. In this case, the symbol in the lock switch key will be highlighted in orange. When you press the lock button again, the backlight in it goes out and the ability to control the power windows of the rear doors from the switches located in the armrests of these doors resumes. When the ignition is turned off, the electric window lifters of all doors can be controlled using the buttons on the remote control system.
Panel malfunctions: signs and causes
What malfunctions can occur in the operation of the control panel:
- The backlight does not light up. There may be several reasons - damage to the device’s power supply circuit, a short circuit in the system, failure of the control panel. But one of the most common reasons in this case is the burnout of the safety device. The marking fuse F10 is located in the mounting block; it must be checked first.
- The sensors do not work - the arrows on the speedometer and tachometer do not rise. The reason may be a bad signal coming from the speed sensor or crankshaft sensor to the dashboard. It is necessary to check the electrical circuit for breaks. Much less often the problem lies in a failed sensor.
- The controller for the volume of gasoline in the tank and the engine temperature do not work. As in the previous case, the cause of the malfunction may lie directly in the sensors themselves. The fuel volume controller is located in the tank with the fuel pump, and the coolant sensor is located in the cylinder head. Before replacing, we recommend checking the quality of the connection and contacts - perhaps they are simply damaged or oxidized, as a result of which the sensors do not work. The reason may also be a damaged electrical circuit; in this case, you will need to check the wiring.
- It happens that the dashboard as a whole works correctly, but the controllers transmit incorrect information. The reason may lie in the performance of the processor or a short circuit in the wiring. Sometimes the problem lies in bad mass.
- The backlight is partially not working. Most likely, the reason lies in the burnout of the lighting sources; they will need to be replaced.
Lamp lamp Lada Priora
The interior light is located in the front part of the headliner. Interior lamp operating mode switch
The operating mode of the interior lamp depends on the position of the switch. When the switch is in the middle position, the lamp is off. When the ignition is turned off and the switch is in the extreme left position, the interior lamp lights up if any of the car doors is open. After closing all the doors, the lamp continues to light for about 15 seconds, and then gradually goes out. When the ignition is turned on, the interior lamp lights up when any door is opened and begins to go out smoothly immediately after it is closed. When the switch is moved to the extreme right position, the interior lamp lights up continuously.
REQUIRED
The Itelma instrument panel with navigation can be of two types (externally they are no different):
- 2170-3801010-50 without CAN bus;
- 2170-3801010-60 from CAN bus.
They are not interchangeable, so before purchasing, you should determine whether your vehicle uses a CAN bus or not.
For Priora:
- until 06.2012, cars were produced without a CAN bus;
- remove the instrument cluster and look at the article number or at the block with wires (see pinout of connectors below).
For Kalina (VAZ 1117, 1118, 1119) - all cars without a CAN bus.
Additionally you will need:
- Right steering column switch with joystick (catalog number: 1118-3709340-20);
- Antenna (for roof installation): 1118-7903074.
You can also buy ready-made kits (device + antenna + switch):
- for Lada Priora - 2170-3801010-55;
- for Lada Kalina 1 - 1118-3801010-55.
Hood Lada Priora
To open the hood in the car interior, pull the hood lock drive handle, located under the instrument panel on the left, next to the side trim.
Through the gap formed between the hood and the radiator lining, we lift the foot of the safety hook (shown on the open hood for clarity).
Lifting the hood, remove the stop from the plastic holder and insert it into the socket in the right wing.
To close the hood, lift it slightly and, removing the stop from its socket, insert the stop into the plastic holder on the hood.
Having lowered the hood to a height of 250–300 mm from the radiator trim, release the hood so that it closes under its own weight. Make sure the hood is securely closed.
INSTALLATION
Replacing the old instrument panel without CAN with a dashboard with navigation without CAN (2170-3801010-50) is carried out without modifications. We remove the old panel and install a new one in its place, insert the connector with wires, connect the antenna (we fix it on the roof) and, if necessary, change the right steering column switch.
If the old instrument cluster without navigation, but with CAN, and instead of it it is planned to install a new dashboard with navigation with CAN (2170-3801010-60), then you need to rearrange contacts 10-11 to 28-29 (if after connecting it still does not work, change 28 and 29 places). See the pinout of the instrument cluster (it was posted earlier).
After installing the new instrument panel, the mileage will be reset to zero.
Navigation in the instrument panel runs on Windows CE 6.0 along with Navitel software. It is possible to update the software and download navigation maps from a USB card via a special USB input. Operating the car will become much more pleasant, the only drawback is the high price.
Seat belts Lada Priora
The driver, front passenger and outboard rear seat passengers are equipped with three-point seat belts with inertia reels, so the belts do not require length adjustment. To fasten the belt, smoothly pull it out of the spool, avoiding twisting of the tapes, and insert the belt buckle tongue into the lock until it clicks.
To unfasten the belt, press the lock button and carefully move the belt back to its original state. If necessary, you can adjust the height of the top point of the front seat belt. For this
We press the decorative overlay of the belt to the stand and, moving it up or down, select one of five fixed positions of the upper point of the belt attachment. Outboard passengers in the rear seat are fastened with seat belts in the same way as in the front seats, but the position of the top point of the belt is not adjustable.
If, when pulled sharply, the belt becomes blocked, it must be released until it is completely wound onto the inertial reel, and then pulled out again. The middle rear seat passenger is provided with a two-point lap belt.
If any tears, abrasions or other damage is found on the belt, the belt must be replaced. A belt that has been subjected to critical load in a traffic accident must also be replaced.
Instructions for replacing the tidy yourself
The procedure for removing, disassembling and replacing the control panel can be carried out on your own; there is nothing complicated about it.
- First of all, turn off the ignition, and then disconnect the battery from the power supply.
- For greater convenience, you should remove the steering column cover, and also dismantle the steering wheel itself.
- After this, using a screwdriver, you need to unscrew the two screws that secure the upper part of the tidy.
- Next, two more screws are unscrewed, only now from the bottom.
- There are two more screws on the sides of the control panel; they also need to be unscrewed.
- After this, you can pull the tidy towards you, but do not remove it completely. Since wires are connected to the device, you need to disconnect the connectors on the back side, and then release the latch.
- The PP is removed and replaced with a new one. Assembly steps are carried out in reverse order.
Lada Priora fuel filler cap
To access the fuel tank filler cap, open the hatch located on the right rear fender and unscrew the cap counterclockwise. The plug is protected from falling by a flexible leash connected to the body.
The plug contains inlet and outlet valves. We screw the plug clockwise until it clicks and snap the hatch cover into place.
Ideas for tuning and modifying the shield
How to tune the shield:
- Instead of a standard shield, install a more advanced one, with a navigator. In such devices, the arrangement of indicators and sensors will be different - the sensors are located on the right and left, and in the middle there is a navigator display. This tuning option is considered one of the most expensive.
- Install ready-made or develop your own scales for sensors. To implement this idea, you will need to completely remove the tidy and disassemble it, as well as disconnect the arrows from the sensors. The scales are installed on existing sensors and are securely fixed.
- Use of LEDs in lighting. The device will also have to be disassembled, but here the method is simpler. You don’t have to remove the arrows, you just need to turn off the light bulbs on the device and dismantle them, and then replace them with new ones. If the base of the light sources does not match, the lamps will have to be soldered. Alternatively, instead of light bulbs, you can solder an LED strip.
- Paint the dials and gauges of the instrument panel with fluorescent paint, but for greater effect, again, you will need to install diode lamps. With this combination, the tidy will glow brightly, but keep in mind that the implementation of this method requires care and painstakingness from the car owner.
Tuning and replacement of the instrument panel
If you want to tune or replace the instrument panel, then you will probably find the instructions for removing and disassembling the panel useful. The tuning procedure involves removing and disassembling the shield, we will discuss this in detail below.
Tuned tidy of a Priora car
So, to tune and replace the device, follow these steps:
- First of all, to carry out replacement or tuning, it is necessary to dismantle the tidy, having first removed the lining and disconnected all the fasteners. You also need to disconnect all wiring harnesses. If you are installing a new dashboard, then simply replace it.
- To carry out tuning, you need to remove the arrows, first disassembling the device. To prevent the panel from scratching, place thin cardboard or a plastic card under the arrows.
- The next stage of tuning will be to dismantle the panel cover; to do this, it needs to be separated from the glass base.
- So, let's proceed directly to tuning. If you want to tune the backlight, then the green coating must be removed; for this, use a stationery knife. Then you can take a plastic bag of any color, cut a small piece out of it and place it on the back of the trim. For proper tuning, cellophane must be glued.
- Simple lamps are not suitable for good illumination; it is better to use LED indicators. If you decide to install tape, then it should be glued along the entire perimeter of the scale. The pieces glued to the instrument cluster must be connected to each other with thin wires, after which the power wire is removed.
- Another step is to disassemble the display. It is necessary to remove the light filter from this element or replace it with another one. The filter can be of absolutely any color, depending on what kind of tidy light you want to get.
- The final stage will be the installation of all arrows and components on the control panel with further connection to all the necessary wires.
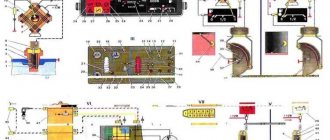
Pinout of the instrument panel of a Priora car
The panel pinout looks quite complicated, but there is a more simplified diagram that will help you figure out the wires connected inside:
The decoding is as follows:
- EUR
- "emergency light"
- Engine oil
- Handbrake
- Immobilizer
- Airbags
- Headlights and dimensions
- Right turn signal
- Left turn signal
- Electronic control unit
- Pad wear sensor
- Seat belts (closing sensor)
- ABS
- Reset button
- Brake system, brake fluid
- ABS
- High beam headlights
- Torpedo shield lighting
- "Weight"
- Thirtieth terminal
- Fifteenth terminal
- Fuel consumption
- Forward key
- Back key
- Ambient temperature sensor (minus)
- Ambient temperature sensor (plus)
- Fuel level
- Speed sensors
- Coolant temperature
- Odometer
- Diagnostics of the shield (service)
- Generator regulator
Control unit for heating and ventilation system Lada Priora
The heating and ventilation system control unit is located on the instrument panel console.
Heating and ventilation system control unit: 1 — air flow distribution regulator; 2 — air temperature regulator; 3 — fan operating mode switch The intensity of the air supply into the cabin is regulated by turning the handle of the fan operating mode switch. This turns on one of four fan speeds. By turning the switch handle clockwise, we increase the fan rotation speed.
To increase the air temperature, turn the regulator handle to the red sector of the scale, and to decrease the air temperature, to the blue sector. The directions and intensity of air flows through the side and central deflectors of the heating and ventilation system are regulated by corresponding rotation of the guide vanes and changing the position of the deflector flaps until they are completely closed.
How to enable self-diagnosis of the instrument panel
Using the panel you can “dig into the brains” of the Priora:
- Hold the button under the fuel gauge and turn on the ignition. The display should indicate the start of the test.
- Press the button again. The display should show the operating system version.
- Click again. The system should show error codes:
- (2) – High voltage level;
- (3) – DT malfunction;
- (4) – DTOZH malfunction;
- (5) – DTV malfunction;
- (6) – Motor overheating;
- (7) – Low oil level;
- (8) – Malfunction of the brake system;
- (9) – Battery discharge;
- E – Brain error, EEPROM.
- If necessary, reset the error: hold the button for three seconds.
- Release the button. Click again. All indicators should light up.
- Leave all the buttons. After 30 seconds, the self-test will automatically complete.

