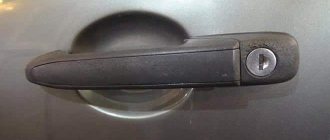
Door handle play
Good day.
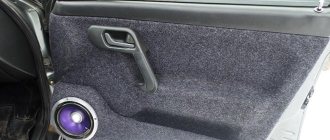
Probably many owners of the grant were tormented by the backlash of the door handles, so this misfortune befell me, although trouble is a strong word. The first step is to remove the door card, it is held on by 5 bolts. After we have removed all the bolts, we begin to pull off the door card. I started bending from bottom to top. Don't forget to remove the door lock.
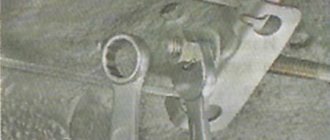
Now you need to find the bolt that holds the place of the handle that is dangling.
For me, as for many, the hardest part was removing this bolt, because... You can't get to it directly. In the end, I unscrew it through another hole.
The next stage is removing and bending the culprit of this play - the hook!))
We bend the handle and pull it out, take the pliers and squeeze it just a little.
The place where the handle scratches the door can be lubricated with grease or Movml or something else.
Now we insert it back into the handle and screw it through the same hole through which we unscrewed it.
Well, we tighten everything in reverse order).
Maybe my post will help someone. Thank you for your attention)))
Source
Remove sagging doors using washers
You will need to prepare several washers with an outer diameter of 20mm and a hole diameter of 10mm. The washers should be of different thicknesses; the thicker the washer, the more sagging of the door it will eliminate. For a heavily sagging door, a washer with a thickness of 1.5 mm may be suitable, and for a slightly sagging door, about 1 mm.
To place the washer you will need to place a block under the door, and then:
- Unscrew the lower door mounting bolt. Please note that to unscrew this bolt you will need to use an impact screwdriver or a large lever.
- Pull the door towards you a little, and then slide the washer under the hinge.
- Install the bolt and tighten it back.
The problem of non-functioning external door handles of LADA GRANTA has been SOLVED!
Good afternoon Dedicated to all car enthusiasts and owners of LADA GRANTA. Father-in-law has owned a car since 2015 and, like all owners of this vehicle, he experienced the inconvenience of the doors from the outside of the car constantly not opening. The handle twitches, but the door does not open. The whole problem is in the opening mechanism (the handle rod constantly flies out of the lock groove). I thought and experimented for a long time, glued it, tightened the opening rod with a tourniquet, all to no avail. And one day the muse visited me. So I remove the rear right handle (many have a description of how to remove it in the description), remove the rod from the handle, go to the auto store, buy an M5x0.8mm die, cut a thread on the rod, select nuts.
I start assembling in reverse order. First, I screwed a thicker nut onto the rod; it is necessary in order to apply less force to the handle when opening, i.e. reduce its free play, but do not overdo it, otherwise it will open from every bump or the slightest touch of the handle. Afterwards, I inserted the rod into the lock (for convenience, on the rear doors it is better to unscrew the window lift guide), tightened another nut from the bottom and doused the rod with dismantling thread glue (so that it does not unwind from vibration).
Result: Gentlemen! The problem is forgotten, the doors open like in a foreign car. Happy to help
Price issue: 1) Die - 80 rubles 2) glue I don’t remember how much the price was 3) Gold handles 4) Nuts found in the garage)
Source
How to tighten door handles on a grant
Tool:
Notes:
Remove the inner handle to replace it, as well as when removing the glass, window regulator, or door lock. The steps to remove the interior handle are shown on the driver's door. The interior handle on the front passenger door is removed in the same way.
1. Remove the front door trim as described in this article.
2. Using a Phillips screwdriver, unscrew the screw securing the base of the handle to the inner door panel.
3. Remove the bent end of the rod from the hole in the lever of the inner handle (there remains a tightening rubber clamp on the rod, shown by the arrow) and remove the handle.
4. Install the inside door handle in reverse order.
Note:
When installing, the front tab of the handle base should extend beyond the edge of the service hole in the inner door panel.
The article is missing:
Door adjustment on the Lada Granta is necessary in almost every car in the interior. This problem also occurs in new Lada Kalina 2 cars, so the adjustment has already been perfected by real masters. They will tell us how to approach the problem comprehensively.
This is how poorly the Grant's rear doors open for almost every second owner.
Those who encounter this problem first try to solve it by lubricating the lock. This helps, but only for a short time. The following are methods that can completely eliminate the rear door problem.
Adjusting the rear door locks of the Lada Granta.
1. First of all, you need to loosen the 3 bolts of the rear door lock and the middle one. An impact screwdriver will help us with this.
2. Now we need to move the bracket in the direction we need.
3. Then tighten the bolt so that the bushing can rotate (we lubricate it first).
Refinement of the Lada Granta door lock.
1. Insert a stopper into the lock so that it does not close.
2. File off, slightly rounding the sharp ends of the lock teeth (without fanaticism).
Do-it-yourself Lada Granta door adjustment
Why are the doors on the Grant difficult to open? The reason is the different radius of curvature of the upper frame of the door. If you study it in detail, you will notice that with the same adjustment of the locks, the rear doors do not touch the upper part of the sealing rubber equally, and when closed, the tight door compresses it much more strongly.
Adjustment of Grant doors can be done in several ways:
1. Roll a tight tube out of paper and slide it exactly between the top of the window frame, lowering the glass. Then, gently and firmly pressing, close the door. We repeat this procedure several times, using our hands to help bend the frame with the door closed.
disassemble door trim ford fusion
2. The second way to adjust the doors on Grant: First you need to lower the glass and latch the door with the first click so that a gap remains. Then we take hold of the upper part of the door on the left and right with our hands, and pull with force towards ourselves, but do not overdo it, so as not to break it. We repeat the procedure several times.
As a result of an integrated approach to solving the problem, the rear doors of the Grant open perfectly.
Let us recall that in the previous article we looked at disassembling the Lada Granta headlight. This procedure is needed to install lenses or paint a mask in a matte color.
The process of replacing the inner door lever
The inner handle will have to be removed not only if the part breaks. Dismantling is necessary when replacing the casing, installing additional sound insulation, or repairing a window regulator. To completely replace the outer handle trim and internal operating mechanism, you will need to remove the trim from the door. Step by step procedure for replacing parts:
- Disconnect the negative terminals from the battery.
- Unscrew the 3 trim screws located at the bottom.
- Remove the plastic plug by prying it off with a screwdriver.
- Unscrew the screw located in the middle part of the door trim.
- Remove the screws located in the armrest niche and the two that hold the handle fasteners.
- Insert a flat-head screwdriver wrapped in a rag or a plastic wedge from a special tool kit between the trim and metal door frame.
- Carefully pulling back the screwdriver or wedge, unfasten all the clips securing the casing.
- Move the panel slightly away from the frame and disconnect the block with wires from the locking lever. Disconnect the power window wires.
- Remove the door trim.
- Using a Phillips screwdriver, unscrew the screw securing the base to the inner door panel and pull the bent end of the rod out of the hole in the inner handle lever.
- Remove the inner handle.
You can install the new handle in the reverse order, taking into account that the front tab of the base of the part should go beyond the edge of the technological hole in the inner panel.
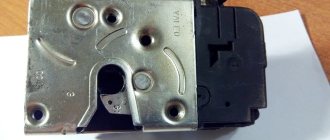
Removing the front door outside handle
We remove the outer handle with the cylinder lock mechanism for replacement. Set the glass to the top position. Remove the front door trim (see “Removing the front door trim”). We remove the power window mechanism (see “Removing the front door power window mechanism”).
Using a 8mm head, unscrew the bolt securing the outer handle to the end of the door.
Using an “8” socket with an extension, through the technological hole in the inner door panel, unscrew the nut securing the outer handle. Further operations for removing the rods of the outer door handle are shown for clarity on the removed door lock.
Using a screwdriver, press the rod of the outer handle lever out of the metal spring clamp.
At the end of the rod there are knurled turns. These threads are required to ensure proper assembly: after the lock and outside handle are secured to the body; When the rod is connected to the spring clamp, the rod will automatically take the desired position.
Having pressed the plastic clamp and turned it around its axis...
...we remove the rod of the lock cylinder mechanism from the hole in the lock lever.
Location of the outer handle rods:
1 – rod of the lever of the external handle; 2 – rod of the lock cylinder mechanism.
Moving the handle forward, remove the outer handle with two rods, removing them through the hole in the outer door panel. Install the front door outside handle in the reverse order.
Source
Adjusting the Grant's handbrake
Adjusting the parking brake of a VAZ 2190 is no more difficult than on a classic or “chisels”. Let's look at the step-by-step principle , starting with inventory.
Necessary tool for tightening the handbrake
What you will need for work :
- Inspection pit, overpass, lift;
- Keys: open-end and ratchet with long head 13;
- Socket wrench or ratchet with a 10mm head;
- Possibly WD-40.
Parking brake adjustment principle
So, the car is on a pit/lift, the tool is in your hands - the handbrake is loose. What to do?
Step 1 : find a resonator under the bottom. We remove its mount, located closer to the front of the car. Then, using a socket wrench or a ratchet with a 10mm socket, unscrew the 4 bolts securing the heat shield.
This way we get the opportunity to move the screen forward without removing it. Underneath there is access to the parking brake adjustment mechanism.
Step 2 : slide the screen forward to access cable adjustment.
Remove the cushion mount 1, unscrew the bolts 2. Move the screen 3.
Step 3 : holding the adjusting nut (open-end wrench size 13), loosen the lock nut (head size 13).
Step 4 : Rotating the adjusting nut clockwise, tighten the cables. Periodically check from the inside how the handbrake is holding.
As soon as the parking brake lever reaches 3-4 clicks, tighten the locknut.
1-lock nut. 2-adjusting nut. For convenience, you can loosen the locknut and rotate them both clockwise with a long head of 13.
Step 5 : return the heat shield to its place, fix the fastening screws and the rubber suspension of the resonator.
Checking work:
- the rear axle is suspended, the parking brake is removed - the rear wheels rotate freely;
- the rear axle is suspended, the brake lever is raised (to maximum tension - 3-4 clicks) - the rear wheels do not rotate even with force.
How to tighten your grip on a grant
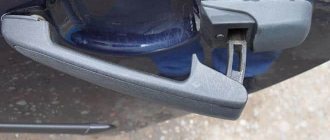
Good day. Probably many owners of the grant were tormented by the backlash of the door handles, so this misfortune befell me, although trouble is a strong word. The first step is to remove the door card, it is held on by 5 bolts.
After we have removed all the bolts, we begin to pull off the door card. I started bending from bottom to top. Don't forget to remove the door lock.
Now you need to find the bolt that holds the place of the handle that is dangling.
The next stage is removing and bending the culprit of this play - the hook!))
We bend the handle and pull it out, take the pliers and squeeze it just a little.
The place where the handle scratches the door can be lubricated with grease or Movml or something else.
Now we insert it back into the handle and screw it through the same hole through which we unscrewed it.
Well, we tighten everything in reverse order).
Maybe my post will help someone. Thank you for your attention)))
The door handle on Kalina is loose! How to repair the Kalina door handle , what should I do to prevent it from swaying? Thank you.
The handle begins to wobble due to the fact that the metal petal with the “groove” unbends during operation. This is the peculiarity of the mechanism.
To fix this, to repair Kalina’s door handle, you need to remove the door trim, and then tighten the screw with a Phillips screwdriver and then try to bend the shaped petal.
It happens that the thread on the handle breaks off (if you overtighten the nut). To fix it, you need to remove the handle and grind off the screw head, then drill out the remaining parts from the petal into a cone. Next, you need to select a suitable countersunk screw and solder it.
Car : Lada Kalina. Asks : Smirnov Vladimir. The essence of the question : Why are the rear doors of the Lada Kalina difficult to open?
Good afternoon, please tell me why the rear doors of the Lada Kalina are difficult to open?
Rear doors don't open well
Be it Lada Kalina or Lada Granta - both of these cars are now very popular among Russian car enthusiasts. However, on some models during operation, a malfunction such as rear doors that are difficult to open is observed.
And this happens because the doors or locks were poorly adjusted at the factory. This deficiency can be eliminated by contacting an official dealer, or you can fix everything yourself.
Door adjustment process
While adjusting the door
Before you start work, first inspect all the gaps for the correct geometry of the body, on the sides, top and bottom, and depending on where the inaccuracy is found, you should start working.
Read more: Connecting a rear view monitor
Tools required: Impact screwdriver and socket set
Adjusting the bottom of the door
Adjusting a door with a large gap at the top
Door lock adjustment
Door locking mechanism (shackle adjustment)
Three door lock bolts
The main points about door locks are discussed in this video
As a result of performing such work, the doors should have the same gaps, not be exposed outside the body and not fall into it; if you have problems with the front doors, we adjust them in the same way.
Please note that when making adjustments yourself, the most important thing is not to overdo it and not to dent the doors or damage the paintwork. If you have any doubts about doing the work yourself, it is best to contact a dealer or a specialized auto repair shop.
How the back door on a Lada Kalina should work correctly (video)
Many owners of Lada Kalina cars are faced with the problem of opening the rear doors. This occurs on both old and brand new cars, and this defect can be attributed to a manufacturing defect. But, apparently, no one at the factory thought of modifying the handle mechanism. Moreover, there is no such problem with the front handles, it only exists with the rear ones.
profile of the door to the bathroom
Recently, on my Kalina, due to constant excessive force when opening, the rear door handle broke off. Since repair kits for this part could not be found, I had to buy a new one assembled. Its price is 330 rubles. To replace you will need the following tool:
Removing and installing the outer rear door handle on Kalina
So, before starting this repair, you will need to perform a procedure such as removing the door trim. After this you need to do the following:
What exactly breaks down in the mechanism?
In this case, the metal tongue that moves the lock rod was broken off, thereby opening it. This breakdown looks like this:
Read more: Mercedes Benz Vito cargo
If you had repair kits, you could easily replace the broken part and that’s it, but I personally couldn’t find one.
I had to change the handle assembly, about which there will be a detailed report below in the video.
Repair methods
Straightening dents is carried out not only from the inside, although this seems the most logical, but also from the outside. The technology of work largely depends on the area of damage and its location.
Firecrackers
This is what tinsmiths call dents that are large (up to several square decimeters) in area, but small (no more than a centimeter) in depth, with very gentle slopes. The metal in them has hardly changed in thickness. They got their name because straightening is accompanied by a clap.
The larger the area of the cracker, the easier it is to straighten. Although this can be explained simply: the lever arm of the force - the distance from the center of the dent to the edge - is large. Sometimes it is enough to press it from the inside with your palm. Often it is a combined damage - at the point of application of force there remains a hole, which will have to be straightened separately.
Fixing from the inside is the main way to repair such dents. To do this, you will have to remove the ceiling or door trim - the usual place for firecrackers to appear. If it does not lend itself to hand force, then, for example, a volleyball chamber can be placed in the technological cavity. A pressure of a couple of atmospheres will be quite enough. Small - you can still touch the metal with your hand - heating the edges will help speed up the process.
Medium dents
It is often not possible to straighten such a problem from the inside. For example, on a wing, the cavity of which is blocked by spars. If it is flat, without a break, then heating and hammering it through a trowel will help fix it.
- Heat the edges of the dent so that your hand feels noticeably hot when touched.
- Apply the trowel, making sure that it lies flat and does not touch any part of the body's relief with its edge. Tap the dent in a circle with light blows.
- Constantly control the heating (cooling is no better than overheating), don’t rush anywhere and persistently hammer the dent in a tapering spiral.
The construction trowel successfully replaces the professional tool “trowel”. Its handle is raised up, does not move around the body and does not interfere with the work of the hammer. It should be made of stainless steel, and the lower, working surface should be polished so as not to scratch the paint. During work, you must constantly wipe it with a cloth so that not the slightest speck remains on it, and degrease it.
There is a very exotic straightening method based on the use of temperature contrast. For it you need to prepare a can of carbon dioxide. These are used, for example, to charge airsoft weapons.
- Heat the dent in a spiral from the edges to the center.
- You spray carbon dioxide using the same principle.
- As the frost disappears, the metal straightens, subject to deformation forces arising from temperature changes.
Leveling in this manner may damage the paintwork. And the older the car, the higher the likelihood of such an outcome.
Small dents
Damage with a diameter of up to 1.5 centimeters can only be pulled out, since they are smaller than the hammer head and aiming along the edge is very problematic. Pulling is carried out with a bolt or screw with a head of suitable diameter and shape. It needs to be sanded to the desired configuration and polished.
The work area is degreased (as is the bolt head), after which the glue gun is used. After gluing the bolt, add glue on top, for reliability. The thread will help secure something like a handle or eyelet. The bolt is pulled behind them with whatever is available. But this must be done carefully, in several stages, constantly monitoring the process. The bolt may come off. Remove the adhesive with a solvent and repeat the process until the dent is straightened.
For such work, there is a professional tool - a set of polymer fungi of different sizes and shapes, as well as strikers. The firing pin consists of two parts - something like a bolt, the lower part of which hooks onto the figured protrusion of the fungus, and a massive bushing that slides along the stem. At the end of the striker there is a wide protrusion against which the bushing strikes.
Straightening a car body is an art. The master must feel the material and be able to predict its behavior. The skill is formed by long hours of training. Don't be afraid to put your hands in, though. The value of having such a skill will pay for all the costs. We advise you to initially practice on some car frame.
During the operation of the car, scratches, chips and dents appear on the body. The reason for their appearance can be both negative environmental factors and careless driving. Chips and scratches are painted over. Repairing and pulling out dents on a car is carried out using various methods and devices that allow you to eliminate metal jams.
Instructions for removing the trim from the front and rear doors of Lada Granta
Before we get started, let's collect everything we need.
Tools and materials
The process of properly removing trim from the front door of a Granta
The trim on the Granta front door handle can be removed manually
The screws from under the door handle of the Lada Granta are unscrewed with a Phillips screwdriver
Two self-tapping screws from the upper recess of the Grant door are unscrewed with a Phillips screwdriver
The lower part of the door trim of the Lada Granta is held on by two screws
The lock button on the Grant is unscrewed manually
Door seals hinge arms Grants are removed manually
Granta's front door trim gently moves back towards itself
Access to power supply wires for Lada Granta windows is now available
Window lifters of Lada Grants are disconnected from the control unit
Rules for rear doors Grants
The door latch on the Granta handle is pryed off with a screwdriver
The Granta window lifter handle moves to the left and is removed
The Lada Granta window lifter handle socket is removed manually
The rear door lock button of the Lada Granta is unscrewed manually
The Granta rear door handle trim is pryed off with a spatula and removed
The fastening screws from under the cover on the Grant handle are unscrewed with a Phillips screwdriver
The rear door trim of the Lada Granta is pryed from below with a spatula and removed manually
How to remove door trim from LADA Granta - video
Replacing the outer handle
To understand how to remove the door handle on a Grant, just study our instructions. From the inventory you will need: a Phillips screwdriver, a socket wrench and a knife. Step-by-step work:
- Decorative trims are dismantled. The plastic latches are removed, then the edge of the casing is picked up using a knife.
- The handle is secured with a nut and bolt on the inside and outside. First, the fastening element is unscrewed in front, then in the back.
- The thrust rods and seals are removed from the closing mechanism.
- The product is removed. To do this you will have to pull the handle a little.
- Before installation, the mounting location is inspected and dirt and dust are removed.
Review of spare parts prices
| Name/article | Price, rub.) |
| 00001003833121 Bolt M5x10 with serrated shoulder | From 100 |
| 00001003831801 M5 nut with serrated shoulder | From 100 |
| 00001002624101 Washer 5 mm | From 50 |
| 00001003275901 Screw M6x10 | From 50 |
| 00001002605371 Lock washer 6 mm | From 50 |
| 21230610542000 Lock cylinder | From 550 |
| 11180610515000 External front right handle | From 650 |
| 11180610515100 External front left handle | From 650 |
| 21900610518000 Inner front right handle assembly | From 950 |
| 21900610518100 Inner front left handle assembly | From 950 |
*prices are current as of November 27, 2018.
Recommendations for choosing and replacing door handles
When choosing spare parts, always give preference to original ones. Good, high-quality parts are always 10 - 15% more expensive than analogues. At the same time, by purchasing a factory part, you can count on a long service life of the mechanism.
A cheap counterfeit does not provide even a third of the required resource. The final choice is up to the owner of the technical device. The deciding factor is the budget.
Repair kit
Repair kits for the Lada Granta car have the following articles and prices:
External:
- rear right DAAZ – 1118-6205150, price – 450 rubles.
- rear left DAAZ - 1118-6205151, price - 450 rubles.
- front left DAAZ – 1118-6105151, price – 505 rub.
- front right DAAZ - 1118-6105150, price - 505 rub.
Internal:
- rear left LADA – 2190-6205181, price – 145 rubles.
- rear right LADA – 2190-6205180, price – 145 rubles.
In addition to original repair kits, you can use spare parts from similar models of the VAZ line, caps, levers, fasteners, clamps, rods, lock cylinders.
Advice from car enthusiasts and recommendations from experts
I have already removed the card several times myself, laid out the wiring, no complaints. The fit is tight, the first time I broke one pin, I installed a new one. No complaints.
Michael
https://remont-avtovaz.ru/snyat-obshivku-s-dverej-na-lade-grante-liftbek/
The car is not even six months old, but I have already removed the cards twice and sealed the joints. You can hear knocking and vibrations on the paving stones. Additionally, I pasted over the noise reduction. I can't recommend the quality.
Ivan
https://remont-avtovaz.ru/snyat-obshivku-s-dverej-na-lade-grante-liftbek/
Now the clips on the doors are different. cone with latch. When removed, all the clips came off without breaking (I removed the trim on all 4 doors). And these black brushes keep the cover in the trunk, after removing them I had to throw them away (they didn’t fit back tightly and the petals were partially covered) and buy them from foreign cars.
Alex
https://club-lada.rf/granta-remont/181-snyatie-obivok-dverey-granta.html
On my new Grant, the handle mount was not like on the nines and classics; you need to bend the ring from the round washer and pull the locking ring in the direction opposite to the direction of the handle.
Alexander
https://ladakalinablog.ru/snyatie-obshivki-zadnej-dveri/
I haven’t yet met people who have had difficulty removing door trim from Granta’s doors.
Zhenya
https://1ladagranta.ru/remont/snyat-obshivku-dveri.html
The process of removing the trim from the front and rear doors of the Lada Granta is simple, so even an inexperienced motorist can cope with it. In order to deal with one door, it is enough to spend 10–20 minutes, it all depends on your qualifications.
Refinement of the base and mechanisms
The best way out is to purchase a silent lock, in which the parts in contact with each other are made of plastic. You can modify the mechanism yourself, as a result the door will close even quieter and softer.
- Dismantle the outer part of the old lock without removing the casing.
- Remove the small retainer latch spring. Insert the large spring into place.
- Cut or remove the shaped rubber seal. The part often comes out of its seat because the block is skewed against its base, which prevents the door from closing normally.
- Slightly grind and adjust the nose of the locking ratchet, which, when closed, engages with the latch on the stand.
- Glue a rubber gasket or any vibration-absorbing material to the base of the door where the lock will be attached.
- Lubricate and install the new modified mechanism in the place where the old one stood.
Reviews
| № | Positive |
| 1. | Gennady: Grant has been a year and a half since purchase, no special comments. But the sound insulation is weak, and the vibration insulation is also poor. On the advice of my comrades, I additionally covered it with Visalis. Fortunately, the process is not complicated, I first read the instructions. |
| 2. | Vasily: the car is two years old, I’m happy with the assembly, after the showroom I immediately ordered additional sound insulation. There are no complaints about the body. I systematically carry out inspections at service stations, buy original consumables, and treat equipment with care. |
| 3. | Alexey: despite the fact that the car is in the budget segment, the assembly is decent, the quality is above average. Of course, there are breakdowns, but they are minor and can be easily fixed on your own. |
| 4. | Kirill: during the year of active operation of the machine, there were no comments; I made no capital investments, with the exception of the purchase of consumables for maintenance. Additionally, I sealed the perimeter of the card with a sealant, since it was knocking on the paving stones. Factory vibration isolation. |
| 5. | Dmitry: I’m happy with the car; finally, a domestic manufacturer has learned to make high-quality models. Of course, problems happen, but they can be easily fixed on your own, without going to a workshop. |
| 6. | Vasily: my positive review of the Lada Granta. The quality of workmanship, assembly of parts is above average, spare parts are available, prices are moderate. |
| 7. | Alexander: two years of active use of the car, no own garage, the car sleeps in the open air. There were no major damages, the plastic was not deformed, the fit was tight. |
| Negative | |
| 1. | Victor: the map began to creak already at 350,000 km. I didn’t contact the service department, I applied the sealant myself. At the 65,000 km mark, I replaced the plastic on the right side, it was deformed. |
| 2. | Gennady: after several times the car was idle under the sun, the plastic began to squeak and squeak. I ordered a bulkhead from the service station and additional sound insulation. |
| 3. | Ivan: problems with the car began after purchasing it: knocking, creaking plastic, depressurization of the interior. There are many shortcomings that need to be quickly eliminated. |
entrance door lock company
Replacing the contact group of the VAZ ignition switch
- Replacing the ignition lock cylinder
- When is it necessary to replace the ignition switch cylinder?
- Materials for replacing the ignition lock cylinder
- How to replace the ignition switch cylinder yourself?
Worn parts (namely pins) of the cylinder in combination with the wear of the ignition key are quite often the cause of a jammed ignition switch. If for a domestic car it is easier/cheaper to replace the ignition switch assembly, then with a foreign-made car everything is somewhat more complicated - the cost of the ignition switch is steep, and there is not much chance that the ignition switch will be available.
Buying a used lock is also not a great solution - the lock has worked for about the same amount of time as yours, and the chances that it will last much longer are not very many. Not always, but in most cases the solution to the problem is to replace the ignition switch cylinder. As a rule, the larva does the bulk of the work in the lock, and, accordingly, also wears out the fastest.
Is it necessary to remove the ignition switch to replace the cylinder? Usually, replacing the cylinder does not require dismantling the ignition switch.
However, on some car models (for example, the Mercedes family, the ignition switches of Mercedes cars have fairly good protection against hacking, there is no way to do without removing the lock) it is not possible to replace the ignition switch cylinder without dismantling the lock.
When is it necessary to replace the ignition switch cylinder?
1. Attempted theft by breaking the ignition switch.
2. Loss of all duplicate keys.
3. Failure of the contact group.
4. Due to the poor quality of the metal, grinding of the internal elements occurred, so the key does not cause the pins to move.
5. The key broke right inside the lock, and it is impossible to remove it.
6. Poor contact in the lock prevents the engine from starting normally.
How to remove the rear door trim on a Lada Granta
The procedure is slightly different from removing the front passenger door trim, but the removal process is even easier.
The work must be performed in the following sequence:
Video with step-by-step instructions:
On the rear doors you will not have to deal with the power window control unit, since this element is not provided at the rear. The wires may be present if there are speakers connected. There are also no rearview mirrors, eliminating one plug. When reassembling the doors, you should make sure that there are no gaps, which over time can cause breakdowns due to the presence of condensation, moisture and dust. These include mechanical and electronic problems, including corrosion.
Autopsy with inside
To open the door from the inside you need a screwdriver, wire, and patience. The algorithm is as follows:
unscrew the casing with a screwdriver, remove the handles, disconnect the electronics, put it aside so as not to interfere; to ensure maximum access, raise the glass up; Having bent the wire in the form of a hook, we try to get to the lock from the inside and pull the hook to open it. We definitely use a lighting device, it could be a mobile phone, a flashlight, etc. It is strictly forbidden to use open flame sources for lighting, as there is a high risk of ignition; assembly occurs in reverse order.
As a rule, the above methods are effective for any vehicle, but different situations happen in life. Therefore, in the first case, you already know what to do if the car door does not open from the inside and outside. To avoid such situations, lubricate the door locks in a timely manner, inspect the fastening mechanisms, replace the hinges, it is strictly forbidden to hang on the doors, and do not deform the body through overload or mechanical damage. Remember that slight misalignment can cause door locks to jam.
Operations for removing the internal door handle of a Lada Granta
1. Remove the trim from the front door (see article “Removing and installing the front door trim of a Lada Granta”)2. Remove the fastening screw...
3. ...and move the handle away from the door panel.
4. Remove the drive rod from the holder on the panel.
5. Disconnect the rod end from the handle lever and remove the handle.
6. Install the inside front door handle in the reverse order of removal.
If we look at the body of the Lada Priora, there are no special differences from its successor. As for the car doors, they are completely identical and have the same catalog number. In today’s article we will look at a video review of replacing a door on a Priora with our own hands, made using the example of 2110. But, as mentioned above, apart from the internal lining, there is absolutely no difference.
Let's proceed to the second stage: dismantling the side view mirror
- Using a screwdriver, unscrew the three screws that secure the mirror frame to the body.
- Using pliers, remove the locking bracket.
- We remove the mirror and remove the hinges through the diagnostic hole.
- Using an “8” socket, unscrew the bolt that secures the outer handle to the end of the door.
- In the inner tunnel, unscrew the second bolt holding the handle.
- Using a screwdriver, carefully pry up and remove the rods from the lock.
- We remove the handle from its seat, turning it slightly from side to side.
Front door lock device of Lada Granta
In conclusion, we carry out troubleshooting, inspect adjacent parts and mechanisms, and replace them with new ones as necessary. Replacing the front door handle on the Lada Grant is completed.
General principles of lock operation and reasons for blocking doors
Since the handles are located at a great distance from the lock, they are connected to it using rigid wire rods or cables. The parts to which these pull rods or cables fit are often made of plastic, so they break or wear out easily. Accordingly, if the handle itself breaks, to open the door in an emergency, you need to use a cable or rod to operate the lock. If the tongue on the side of the lock breaks off, you need to move what is left of it.
Design of a standard car door lock
The second reason why the door is locked is that the lock is faulty. It could be:
Most often, drivers become hostages of the door locking function to prevent children from accidentally opening them. When the latch is moved, it slams shut and to open it, you need a working outer handle, which is what broke.
Opening a door with a broken lock is much more difficult than when the inside and outside door handles are broken at the same time. However, this does not happen often and in any of these cases it is necessary to remove the door card for further work with the mechanism. Therefore, first we will look at how you can open the door or how to remove the trim when the door is closed, and then how to unlock the lock.
Initially, I didn’t really like the way the doors on my Grant closed. The sound when closing was somewhat sharp and unpleasant. Having been spoiled in recent years by driving foreign cars, I acutely felt this contrast when slamming the doors. Of course, this most likely relates to comfort and does not affect the reliability of the car, but still, when working in a taxi, you would not want to constantly listen to this clanging sound.
Often I heard from the clients themselves: “Oh, I didn’t want it that much. Sorry. " Imagine, even clients get scared when the doors are closed! And I had to feel awkward about it every time.
The solution to the problem turned out to be simple. It turns out that in order for the doors on the Grant to close more softly, you need to install a vertical rubber seal RKI-19. Well, let's install it.
Having stopped at one of the LADA spare parts stores, I purchased the desired “noise damper” and scheduled a time when I would do the installation. At the same time, I also purchased another seal - to protect the thresholds (RGI-135), which, in addition to its main function of protecting the inside of the thresholds from dirt, slightly muffles the sharp sound when closing the doors. But more on that a little later. First, let's figure out how to install the RKI-19 vertical seal. The photo shows the RKI-19 seal, which was available in the store.
Possible problems and ways to solve them
You can, of course, buy Lada door closers and door stops and make repairs in accordance with the instructions. But this operation can be performed in a more productive way. To carry it out you need:
- rubber tubes;
- screwdriver;
- Silicone Grease.
A common symptom of a broken lock is that a loud sound appears before the door opens/closes. The design of the front door lock is made in such a way that the metal can sometimes rattle. In order to eliminate this problem, you need to remove the lock itself and put rubber tubes of the required size on the levers. Immediately all sounds coming from ahead will disappear. When closing the doors, only a bang will be heard, and all sharp and loud sounds will be a thing of the past.
If the car has a universal body, then you should also adjust the lock on the trunk door. The locking tongue itself fits into the bracket. You need to find it and check the tightening of the screws. Then the lock must be lubricated with silicone grease, and then the door must be checked by opening it. If the lock does not work properly, you need to screw on the rubber stops, but they should not be over-tightened. Then check the drive rod of the Lada Granta door lock.
If jamming and play are observed, they should be eliminated. Moreover, all this must be done at once. You can also buy limiters for the trunk lock. Before purchasing Lada door closers or door stops, you should first consult with a specialist. Having received the necessary and important information, you can choose the highest quality limiters. Problems with the operation of the lock can be solved by making a quality adjustment. To do this, certain actions must be taken.
Most often, the reason for poor lock performance is the difference in the radius of curvature of the upper door frame. If you look at it in detail, you can see that when simultaneously adjusting the locks at the rear of the car, they always touch the top of the sealing rubber differently. Tight opening compresses it much more in the closed position. To adjust the locks, you can use the following method.
You need to twist a thick paper tube and insert it into the upper part of the window frame, while slightly lowering the glass. Then press in. This procedure must be done several times, using your hands to bend the frame when closed. By following these tips, you can handle the repair yourself. The only thing is that you need to have Lada Granta door stops in stock. But you should not refuse help or advice from a specialist, since sometimes the repair scheme can be very complex.
Way out
What to do if the car door does not open from the inside or outside? In fact, there are not so many solutions.
- Call a qualified service technician to open the door or lock. Considering current prices, just one call will cost the owner half the average salary. So it's not fun for everyone. This service can only be used in extreme situations;
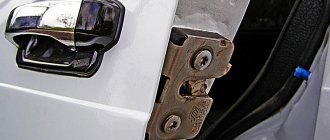
- Remove the door hinges and unscrew the lock fastening: this option is more suitable when the front doors are jammed. The bottom line is this: if the door cannot be opened either from the outside or from the inside, then you need to use a Phillips screwdriver to unscrew the two hinges of the rear door that follows the “problem” door. In this way we will provide access to the rear wall of the lock mount. Here it’s a matter of chance, you can unscrew two bolts the first time, or spend 10-15 minutes doing this. After unscrewing the bolts, disconnect the rear wall of the door lock from the body. All that remains is to make an effort to pull back the door, and everything is ready;
- Next, it is necessary to remove the mechanism itself and do diagnostics, look for the cause, but this is “a completely different story”;
Unscrew the rubber seals and get to the lock hook: the solution to the situation is very good, both for the domestic and foreign automobile industry
No matter which door is jammed, you need to remove the upper rubber seal between the glass and the outside of the door. We will face a space one centimeter wide, which must be used with maximum efficiency.
The idea is to find a piece of wire, bend it at the end, creating a kind of small hook.