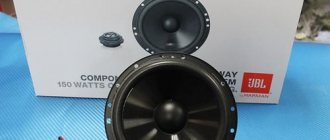
If the owner of a Lada Granta sets out to achieve high-quality sound in the interior of his “iron horse,” then he will need to install 16 cm speakers in the front doors. For these purposes, you will need to purchase products with a diameter of 160 mm. They will provide an increase in sound quality and volume compared to the existing 13-centimeter loudspeakers.
Self-installation of 16 cm speakers directly into the front doors is quite simple and does not require the owner of a Lada Grant to have particularly secret skills or a large number of additional materials.
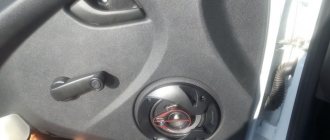
Acoustics in the front doors
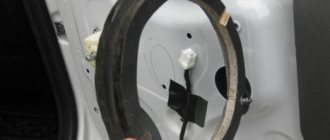
To figure out how to install a speaker on a Lada Granta in the front doors, it’s worth studying a brief algorithm of actions. First, the door card is dismantled, the cladding and soundproofing material are removed. Then the electrical wires are disconnected and a niche for the speaker is prepared. Only after the fasteners securely fix the column is reassembly possible. At the same time, inserting acoustics allows you to:
- improve sound insulation;
- replace facing fabric;
- lubricate the parts with silicone;
- clean the inner surface of dirt;
- adjust electrical wiring and closing mechanism.
Over time, the door begins to creak or rattle while driving. Disassembling the rear or front door element allows you to find the cause, tighten the bolts, and replace broken clips.
Sealing is a guarantee of high-quality sound
In order to achieve a tight fit of all components when installing speakers in a domestic Lada Granta car, it is necessary to carry out intermediate sealing measures. Once the ring is attached, gaps may be found between it and the door panel caused by the installation of spacers. To eliminate this negative point, you will need to glue the outer side of the ring with a special product - “Vizomat 10”. Now the outer side is free of cracks, and the space between the ring and the door can be filled with polyurethane foam. Without allowing the foam to completely harden, we remove all protrusions that could cause interference when installing the speaker.
Preparatory work
First, it is determined what diameter of the speakers will be installed on the Lada Granta liftback or other type of hatchback. Then a set of equipment and fasteners is prepared. Installation will require the following tools:
- screwdrivers;
- jigsaw;
- sharp knife;
- rags;
- metal files;
- wooden spacer;
- chalk to mark the diameter of the stand.
Speaker size 13 is the norm. The internal design of the door allows you to install such a column without additional manipulations. In this case, installation and cutting of the metal base is not required.
How to improve the sound from your speakers
When the owner of a decent-sounding home audio system spends a lot of time behind the wheel, sooner or later he pays attention to the standard audio in his car. And he comes to the conclusion that the automaker was lying, promising him a good sound, and sometimes even seasoning the promise with some famous nameplate. The standard question that arises is “What can be done to make the headphone sound normal?”
The concept “sounds normal” usually means something different to everyone. For some, it is enough to simply increase the reserve of undistorted volume, while others are trying to get closer to the home High End (the “dolbit normalno” options, sorry, I don’t want to consider). However, home principles still don’t work in a car. At least because the acoustic properties of a car interior are completely different from those of a room. And there are no speakers as such, but the speakers are scattered according to the principle “where there is room, they put it there.” There is nothing to say about the acoustic design for them - its role is played by the design elements of the car. In general, it has nothing to do with “homework”.
For some reason, marketers often associate the quality of an audio system with the number of speakers in it.
Hence, by the way, the assertion that exists among evil tongues that a high-end car is absurd, and it is impossible in principle to build a high-end audio system in a car. Personally, I don’t really like this approach; well, I don’t like spending two or three hours a day in the car, stuck in city traffic jams, listening only to the radio. And I think I'm not the only one. This means we will look for other solutions, not homemade ones. And, as practice shows, such solutions exist.
It would probably be wrong to lump everything into one article. Explaining all the nuances of sound in a car in one go is something from the realm of “Quantum physics in a nutshell.” But choosing the right direction to take the right first step towards good sound is, perhaps, half the success. Let's start with this.
I wouldn't go so far as to say that all stock systems sound bad. There are a lot of interesting ones that sound really great. But, unfortunately, with one big drawback - the monstrous cost
The first thing we need to decide is what we actually need. If you want to make a truly high-class system, then in any case you cannot do it with simple means; you will have to approach the issue comprehensively and prepare for decent financial investments. If the goal is not to match the sound quality of multi-kilobuck home systems, then you can approach it step by step. But at what stage to stop is everyone’s business. Let's start with something simple.
Speaker installation
Many sedans are purchased in a classic configuration, without a radio and sound system. To install these fragments, it is important to follow the step-by-step instructions:
- The casing is removed. To do this, unscrew the handle, which is held on by two bolts, disconnect the latches and pull out the panel covered with fabric. Sound insulation is removed.
- The electrical wiring is disconnected, the old speaker is removed (if equipped).
- A hole is created in the cladding for musical equipment. An iron niche has already been created for size 13 acoustics. This is where the back of the speakers is inserted. Sometimes a little filing with a jigsaw is required.
- The equipment is fastened with self-tapping screws. The wiring is being connected.
- The facing card is returned to its place and secured with clips. They often break during removal, so it is worth purchasing an additional set of clamps. At the end the handle is screwed on.
General information about music in Grant
In this section, we will consider general non-professional points about music in the Lada Granta.
Installing music
If you have a VAZ 2190 in the basic configuration (or Norma) with audio preparation, then installing music will entail the following steps:
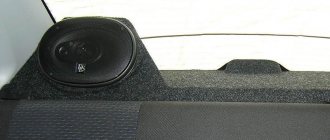
- Removing the radio cover - on the back side there are ISO connectors for power and speaker wires. You will have to run the wires to the rear speakers yourself if you plan to install an acoustic shelf, since from the factory the wires are routed only to the doors;
- Installation of a 1- DIN radio (for 2-DIN you will have to farm, cutting out a jumper in the panel and looking for a suitable frame);
- Finding and connecting the plug of the pre-installed antenna - often the antenna wire on the roof is lost under the ceiling trim and it turns out to be easier to install the antenna separately than to find the factory cable;
- Pulling wires into the trunk to connect an amplifier, subwoofer and speakers installed in an acoustic shelf.
- To install the amplifier, you will also need a separate power cable from the engine compartment directly from the battery terminal through a fuse.
How to machine a cylindrical hole
16 cm speakers will require enlarging the hole in the metal structure. This diameter is preferable because it creates more sonorous acoustics. For cutting you will need a metal jigsaw and steel files. Chalk outlines the place of the cut, which is measured in advance. When the niche is ready, it should be cleaned with sandpaper, and also make sure that the speaker fits tightly into the hole. If it dangles, it will create extraneous noise in the cabin.
A wooden podium is additionally prepared from wood, which is attached to the inside of the speakers.
How to make spacer rings for speakers
You will need : plywood, drill, jigsaw, sealant, varnish.
The thickness, width and other dimensions of spacers for columns are calculated individually in each case, so there are no universal sizes of spacers. The diagrams presented above can act as a template, which will be modified locally.
The total thickness of the spacer is determined individually. Approximately, for a speaker mounting depth of 52 cm, spacer rings 16 mm thick should be suitable.
Procedure:
- Determine the outer and inner diameter of the rings (using a sample or speaker).
- Cut out the spacer slides with a jigsaw, having previously drilled holes for installing the jigsaw blade.
- Fasten all parts of the spacer (if they are composite) using glue or self-tapping screws.
- Try on the door spacers and modify them if necessary. Make sure that the spacers fit tightly to the surface, nothing interferes with the correct positioning of the speaker, and the door trim is installed without problems (modify locally).
- Coat the rings with several layers of varnish.
When installing spacers, make sure that it and the speaker are secured as tightly as possible (stick vibration isolator strips under the ring), this will eliminate the occurrence of vibrations and rattling. Seal all cracks using caulk. It is recommended to combine the installation of spacers with sound insulation of doors.
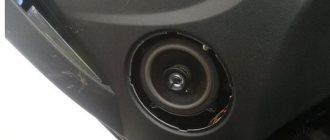
How to install 16 cm speakers with spacers
You can install 16-cm speakers without enlarging the hole, but then, due to the spacer, the speaker will stick out from the door. It is more advisable to carry out a standard cutting. Instructions:
- After the handle and facing panel are removed, the wires are disconnected. Sound insulation is removed. Use a jigsaw to enlarge the standard hole in the door.
- A pre-created podium is attached to the back and securely fixed with self-tapping screws.
- The cable is removed, the electronics are connected, and the structure is assembled in the reverse order.
Before putting the door back together, it is important to check the sound of the speakers. Incorrect operation may be due to incorrect wiring connections. If you hear wheezing or knocking, it means the speaker is not securely fixed.
Algorithm of actions
- First you need to remove the door trim (details in this article).
- We take measurements and estimate certain dimensions. The most convenient way is to pre-make a layout from cardboard.
- Based on the layout, we figure it out on the spot and see if the column fits into the door niche. We are trying to understand whether the glove compartment can open with this column, since the column may interfere with it.
- We cut out spacers, if necessary; below we will consider options for columns for which it is not necessary to make spacers.
- We cut out a decorative plug for the column on the door trim.
Kalina's stated ground clearance
The “bottoms” of all bulky units are collected under the bottom of the car. Some are visible to us from under the hood or from the side of the wheels. But the lower part does not go away; the manufacturer must move it as far as possible from the road surface. Under the car are concentrated hanging parts of the engine compartment, levers, a beam, a suspension stabilizer, as well as bulky structures of the exhaust system with its muffler and catalyst.
From the outside we only see the opening of the fuel tank. And this 50-liter Kalina tank also needs to be rationally placed, because its shape is important for the correct operation of the power system. In addition, the space for placing the tank is limited. Don't forget about the spare tire, which is attached to the bottom of the trunk.
AvtoVAZ indicates several points from which the ground clearance of the Lada Kalina is measured. The manual for a regular Kalina prescribes in the section “Basic parameters and characteristics of a car with a hatchback body (station wagon)” (pages 133–136), two clearance values:
- from the road surface to the bottom of the engine crankcase;
- to the gearbox housing.
It should be borne in mind that these parameters were measured at the moment when the car receives full load. We also calculate the full load value specifically for your Lada Kalina from the instructions. It is necessary to subtract the curb (empty) weight from the maximum permitted weight. The column with this indicator is located above the clearance column.
Depending on the type of engine and configuration of the Lada, the weights vary slightly. On average, the full load of Kalina is 450–500 kg. Therefore, the distance from the road to the engine crankcase/gearbox will be specified if there is an additional weight of 500 kg on board your car.
For both Lada Kalina 2 bodies, the ground clearance for the internal combustion engine is 160 mm. To the bottom point of the manual transmission - 160 mm, automatic transmission - 145 mm. The numbers for the off-road version of Kalina Cross are much higher. The passport data from the 2022 operating manual states that the clearance to the engine crankcase is at least 182 mm, and to the gearbox - at least 187 mm. This value is for all engines and both transmission options, manual and robotic.
Increasing the ground clearance of a car with CROSS20 suspension
The SS20 company brings to your attention the CROSS20 suspension kit, which increases the ground clearance of your car by 30-50 mm. The CROSS20 suspension is installed on front-wheel drive cars VAZ 2108-2110, LADA Kalina, LADA Priora, LADA Granta.
Share with your friends
Applicability
- VAZ 2108
- VAZ 2110
- VAZ 2170-72 (LADA Priora)
- VAZ 1117-19 (LADA Kalina)
- VAZ 2190 (LADA Granta)
Advantages of the CROSS20 suspension
- increased geometric cross-country ability and high seating position;
- wide track;
- increased smoothness;
- improved driving properties;
- optimal ratio of the stiffness of the front and rear anti-roll bars.
- Description
- Buy
One of the important characteristics of a car suspension is ground clearance. Vehicle clearance is the distance from the lowest parts of the vehicle, such as gearboxes, exhaust system elements or unit protection, to the road surface. The amount of ground clearance or, as it is often called, ground clearance largely determines the versatility of the car. In fact, the increased ground clearance allows you to park anywhere without worrying about the bumpers and bottom of the car, confidently drive over speed bumps, drive out of town onto country roads and move normally on snow and ruts in the winter season. It is important that the high ground clearance allows for increased visibility, which increases traffic safety both in heavy traffic and on a country highway.
If you decide that your car should have increased ground clearance, then you can choose between full-frame SUVs, crossovers, or modifications of regular cars with increased ground clearance (for example, Renault Sandero Stepway). Each of these options has its pros and cons, and the large price difference between SUVs, crossovers and versions with increased ground clearance makes the latter quite a good buy.
What prompted us to create an off-road suspension for VAZ cars?
The appearance of crossovers with a single drive (pseudo-crossovers) on the car market is caused by the need to adapt popular car brands to more difficult road conditions in Russia. A pseudo-crossover - a car with increased ground clearance and wheel diameter, as well as reinforced suspension - is more suitable for our roads and winter road conditions. Creating a crossover with a significant improvement in driving properties based on the Kalina was the goal of creating the CROSS20 suspension.
If you decide to radically transform your car, significantly improving its handling, stability, comfort, reliability and cross-country ability, then the SS20 company offers you the CROSS20 suspension kit, in which changes have affected the following elements:
- front shock absorbers,
- rear shock absorbers,
- drives,
- lower arm,
- front stabilizer,
- steering gear,
- silent blocks,
- a rear stabilizer appeared.
As a result of these changes, when installing the CROSS20 suspension you get the following benefits:
- Increased cross-country ability and high seating position, typical of crossovers, are ensured by increasing the ground clearance to 50 mm.
- The track widened by 30mm gives greater stability to the vehicle.
- The smoothness of the ride increases by changing the settings of the shock absorbers and the rigidity of the silent blocks.
- The driving properties of the car are improved.
- The optimal ratio of the stiffness of the front and rear anti-roll bars reduces body roll when turning and maneuvering; This ensures reliable traction between the wheels and the road.
An increase in ground clearance of 30 mm is ensured by the design of front and rear shock absorbers with an elongated body and special settings of the valve system. An additional increase in ground clearance by 20 mm is achieved by replacing the standard 175/65 R14 tire and R14 rim with a 185/65 R15 tire and R15 rim.
Thanks to the modified design of the front arms and mounting brackets, the track is widened by 30 mm.
A strut-mounted front stabilizer is more effective; it increases vehicle stability on the road and reduces roll when cornering. To further counteract roll, the CROSS20 suspension includes a rear anti-roll bar, which is not included in the car's factory equipment.
The modified design of silent blocks in the front and rear suspension with changed rigidity and geometric dimensions somewhat improves the kinematics of the suspension and is also aimed at increasing comfort during the trip.
Currently, the CROSS20 suspension, which increases ground clearance, is manufactured for the following cars:
- VAZ 2108,
- VAZ 2110,
- VAZ 2170-72 (Priora),
- VAZ 1117-19 (Kalina),
- VAZ 2190 (Grant).
The warranty for the CROSS20 suspension is 1 year without mileage limitation. Warranty service is provided regardless of whether the ground clearance system was installed independently or at a service center.
ISO 9001:2015
The quality management system of NPP Sistema Technologies LLC complies with the requirements of GOST R ISO 9001-2015 (ISO 9001:2015)
News & Events
The quality management system of NPP Sistema Technologies LLC complies with the requirements of GOST R ISO 9001-2015 (ISO 9001:2015)
Disadvantages of spacers
But, of course, there is a fly in the ointment in this barrel of honey. The question “to put it or not?” would not have arisen if spacers had only advantages.
The following factors may serve as arguments for rejecting this idea:
- , which was provided by the manufacturer, shifts Because of this, some extraneous processes occur during operation, which one day may result in serious problems with the car.
- Stability and maneuverability deteriorate significantly, and control problems appear: problems with turns. This is partly due to the shift in the center of gravity.
- High percentage of incorrect alignment or camber . This leads to inevitably rapid wear of the tires on the wheels and the tires themselves, and sometimes even ensures the death of the car without wheels - it depends only on the “zeal” of the installers. More about wear – the tires will begin to wear unevenly, which often causes the thought “I’ll replace them if they’re completely damaged.” But wear continues precisely at the point of first manifestation.
- Installing spacers is a direct waiver of the warranty on shock absorbers and an agreement to be ready to replace them at any time.
- Reviews from car owners who have undergone this procedure say that after installing the enlargers, the components of the car's chassis wear out significantly .
- There is always the possibility of going overboard . With self-modification, there is a high percentage of cases when the ground clearance is increased too much, the car becomes even more unstable and uncontrollable.
What is it for?
There are two reasons for raising the vehicle's ground clearance:
- off-road driving;
- sagging of springs over time.
To restore the spring to its original position, special spacers are used. The ideal option would be to replace old springs with new ones at a service station; however, car owners widely practice installing spacers to increase ground clearance with their own hands. If previously, increasing ground clearance was achieved by introducing tennis balls into the springs, now car dealerships sell special spacers of various thicknesses.
What is it about
Before you figure out what spacers are to increase ground clearance, you need to figure out what ground clearance is. clearance, in other words ground clearance , is the distance between the lowest point of the car body and the road.
Actually, why does a motorist need to increase the ground clearance? As already mentioned, various situations can lead to the fact that the ground clearance is reduced (damage to springs and fasteners, for example), or the factory one was not high enough. A car is, first and foremost, a means of transportation. A vehicle that sits tightly to the ground will not be able to drive without damaging the underbody. This can have a serious impact and make the car unsuitable for driving, which is why the question arises of increasing the distance to the road. Also, increasing the ground clearance is of interest to people who like to drive off-road.
So, increasing ground clearance is often done using special spacers. This is especially common in the case of subsidence of “native” springs. These spacers are spring mechanisms or additional fasteners. They cope with the task of increasing the clearance very well. Moreover, the procedure for attaching such magnifiers is the most accessible, since they themselves are not expensive - one spacer can be purchased for a price of 1000 rubles .
Air cylinders also cope just as well as spacers . It turns out even cheaper, and a “healthy” car with working springs does not suffer.
However, to decide whether such a modification is necessary, risk factors must also be taken into account. Of course, this idea has plenty of advantages, but it is not without its disadvantages - one way or another, any change in the “native” design always lies on the conscience of the motorist, and no one gives guarantees for its effectiveness. Before deciding to modify to increase ground clearance, weigh the pros and cons.
What ground clearance did the manufacturer claim for Kalina?
Any manufacturer faces the difficult task of keeping the components located along the bottom “line” of the Lada Kalina car body away from the road surface as much as possible in order to protect them from damage. These are not only suspension components, but also unit trays, exhaust pipes, etc. The issue of “hiding” the fuel tank is especially pressing, since it is no secret that the consequences of its damage will occur.
The manufacturer indicates the clearance value, indicating several control points from which the measurement was made. So in the manual, or more precisely in its section on “main parameters and characteristics” (pp. 133-136), two clearance values are clearly indicated, measured as follows:
- from the road surface to the lowest point of the engine crankcase;
- from a similar point of the transmission unit to a flat road surface.
These values were measured after the weight load on the Lada Kalina car was increased to the regulatory maximum. This parameter can be easily calculated: it is necessary to subtract the curb weight from the total weight value. The load size is affected by the type of motor and level of equipment. On average, this parameter reaches a value of 450-500 kg. The ground clearance value shown in the manual will only indicate its value if the vehicle is loaded with a 500 kg load.
For both body versions of the hatchback and station wagon of the Lada Kalina model in the second generation, the ground clearance is as follows:
- from the lowest point of the motor – 160 mm;
- from the same point of the mechanical transmission – 160 mm;
- from an automatic unit - 145 mm.
If we touch on the Kalina Cross variation, then its ground clearance differs favorably in a larger direction. Here the regulatory values state that this value from the engine crankcase to the road surface is 182 mm, and from the transmission unit - 187 mm. This value is valid for all versions of engines and gearboxes.
The problem of insufficient clearance
A lot of owners of passenger cars during operation are faced with one problem - the low ground clearance of the car, which is why, when overcoming bumps, the car clings to the bottom until it hangs on its belly. This is especially true in winter.
Moreover, the problem with insufficient ground clearance can arise both with new cars, which are structurally designed with low ground clearance (such cars are popularly called “puzoterki”), and with models with ground clearance that is, in general, quite acceptable, but due to shriveled springs suspension, there was a decrease in it.
And anyway, what driver doesn’t want to bring his car at least a little closer to crossovers and SUVs in cross-country ability.
And the easiest way is to increase the ground clearance.
Features of the preparatory process before installing speakers
Gearbox Lada Granta
Before installing speakers in your car in the front doors, you should ask yourself about ensuring a sufficient dispersion effect of sound waves. This suggests the need to stick an additional layer of Bitoplast 10 over the existing Vizomat MP-2. This action is not mandatory, but will significantly reduce the degree of reflection of sound waves from the door surface.
Why Bitoplast 10 and not traditional foam rubber? Let us note the peculiarity of the properties of these materials, which consists in the ability to absorb moisture to varying degrees. Foam rubber is capable of absorbing water like a sponge, which will subsequently lead to the appearance of pockets of corrosion inside the LADA Granta door card, which cannot be said about the recommended material.
Spacers can serve as additional means. You can purchase them at any specialized retail outlet. Is it possible to independently manufacture the indicated spacers (rings)? Such an event is quite possible and requires the presence of an electric jigsaw, the ability to use it and a sheet of high-quality plywood or wood. The thickness of the material affects the placement of the device inside the door panel.
If you neglect to install the ring and use only plastic spacers, this will not allow the side door window of the LADA Granta to fully lower in the future. To ensure correct placement of the speaker inside the door panel and full functioning of the window regulator, you will also need to install plastic spacers under the previously designated ring. It is necessary to place smaller elements under the upper points of the accessory, and, on the contrary, larger ones under the lower points (i.e., remove the gap).
We fix the ring made in this way in the standard hole of the door card. At the same time, we place the indicated spacers.
Installation Rules
To properly make spacers for springs with your own hands, you need to take into account some nuances:
- Setting the ground clearance above 30 mm leads to wheel alignment problems.
- It is not recommended to install metal products that have not been pre-treated against corrosion.
- It is recommended to raise the front of the body by no more than 20 mm.
- The rear compartment of the body is raised by no more than 30 mm.
- If the shock absorber is not located next to the spring, spacers should be mounted under the springs and shock absorbers to balance the structure.
Level one. Noise insulation
Yes, yes, this is the very first point for any upgrade of a standard audio system. If you want to listen to music, first of all get rid of unnecessary sounds. By the way, we are talking not so much about outside noise as about body noise. Look at the home speaker. Durable body, devoid of overtones. Sound emits only what should emit sound, and what should not be held monolithically. Now take a look at where and how any car speaker is installed and what the housing is for it. Most often it is mounted on some kind of metal panel, and in the worst case, even on plastic upholstery. And the body of such a “column” is a door or some kind of body niche. Tough, and that's all. By the way, in the literal sense of the word.
The easiest way to improve the acoustic operating conditions of speakers and get rid of unnecessary resonances and other metallic sounds is to use vibration-damping materials. They are usually made from bitumen or rubber, often with some additives. Their main feature is high internal viscosity. Basically, these are just sheet materials that are cut right on site and carefully rolled onto the metal. But sometimes such materials come in the form of mastics.
Treatment with vibration-damping materials eliminates metallic sounds and improves the operating conditions of installed speakers
Vibration-damping materials are heavier and more rigid, more effective, but they are also harder to work with, so not all craftsmen like them. Thinner and lighter ones are easier to work with, but their effect is not so high. The optimum is usually somewhere in the middle.
Various kinds of lightweight foam and fibrous materials can be considered only optionally; they work somewhat differently and do not have much effect on the absorption of metal vibrations.
Lada Kalina Universal › Logbook › Spacers for rear pillars
I noticed that when fully loaded, the towbar socket touches the ground (in some cases), the wheels touch the arches. The car sank. I'm thinking of changing the rear springs or installing spacers.
And so on June 9, 2022 I installed spacers. I put 4 cm on the second hole. I also changed the anthers 0 rub. (taken from work), bumpers and bagels 447 rubles. I checked the condition of the “autobuffers” installed since 2014. The anthers are all torn, the bump stops have deteriorated a little.
I bought spacers for 190 rubles.
After the work was done, the car lifted, I forgot to measure it before and after. It all took 2 hours, a broken key for 6. My wife drove her Kia to the store and bought 2 keys for 6.) I changed it in the evening, and stores are open until 20.00.
Parameters of Priora bodies
In any Priora body, the properties of its wheels and wheelbases will be similar, and therefore it makes no sense to indicate them separately everywhere. These are the same characteristics:
- Wheelbase (distance between the centers of the front and rear wheels) - 2492 mm.
- The front wheel track (the distance between the tire tread marks on the front axle) is 1410 mm.
- The rear wheel track (the distance between the treads of the rear axle tires) is 1380 mm.
These dimensions are valid for all bodies except the coupe. Hatchback characteristics:
- The distance from the rear to the front of the car is 4210 mm.
- The front overhang of the machine is 770 mm.
- The rear overhang of the car is 660 mm.
Station wagon and car characteristics:
- The distance from the rear to the front point of the machine is 4350 mm.
- The front overhang of the car is 740 mm.
- The rear overhang of the car is 830 mm.
- The distance from the rear to the front suspension of the car is 440 mm.
- The wheelbase of the car is 2492 mm.
Let's sum it up
Now the installation of 16 cm speakers in the door panels of the Lada Granta can be considered complete. After this, only the final assembly of all door components will be required. The installation procedure considered will allow the owner to be guaranteed to enjoy excellent sound. As you can see, installing speakers in a car in the front doors is not a complicated procedure.
Sources
- https://Vaz-Lada-Granta.com/elektrika-tormoza/ustanovka-kolonok.html
- https://InfoKuzov.ru/remont/perednij-zvuk-na-grantu
- https://car-fact.ru/marki-i-modeli/otechestvennye/lada-granta/dinamiki-v-grantu.html
- https://avtozvuk-info.ru/shemy-podklyucheniya-akusticheskoj-sistemy/podklyuchenie-kolonok/ustanovka-akustiki-v-lada-granta-386
[collapse]