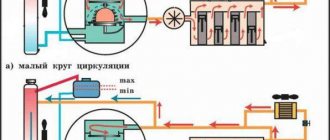
Structurally, all carburetors of the Solex family are equipped with a heating unit. It is attached to the rear of the carburetor body. The heating unit is part of a small circle of the engine cooling system, which warms up immediately after the engine starts.
Purpose of the Solex carburetor heating unit
The heating unit is necessary to ensure the operation of the carburetor at low air temperatures. Due to the rapid increase in carburetor temperature after starting the engine, the formation of ice plugs in the HDS diffusers, idle channels and transition systems, and icing of the throttle valves during warm-up mode are prevented.
Operating principle of the Solex carburetor heating unit
The heating unit is connected by two pipes to the engine cooling system (pump supply pipe and intake manifold). After starting the engine, coolant begins to circulate through it, passing in a small circle and accordingly quickly heating up. This increases the temperature of the carburetor, preventing the formation of ice plugs in it, and the evaporation of the fuel improves, which improves mixture formation.
Malfunctions of the carburetor heating unit
If the heating unit is clogged or disconnected from the carburetor, proper heating does not occur after starting the engine (so-called carburetor icing). In winter conditions, this is fraught with a narrowing of the clearance of the carburetor diffusers and the subsequent over-enrichment of the fuel mixture (the carburetor is overfilled, the spark plugs are flooded). Also, condensate may freeze and ice plugs may form in the idle and transition systems channels. This leads to interruptions and stopping of the car engine when idling. Possible black smoke from the muffler. The malfunction can appear either immediately after starting the engine or after a short period of time after it starts working. In some cases, restarting the engine helps.
— A faulty or incorrectly set engine air filter housing thermostat (does not supply hot air to the carburetor) and the use of low-quality gasoline (water admixture) can aggravate the problem of engine warming up at low temperatures, even with a working carburetor heating unit.
More articles on the design of the Solex carburetor
Antifreeze heater - what is it and how does it work?
Starting the engine in the cold season is the most difficult test for a power plant. The fact is that cold parts have a high coefficient of friction, which also occurs when the viscosity of the oil increases. Starting the engine this way instantly increases the engine life by about 10 kilometers. To make starting easier and safer for the engine, automobile designers came up with a simple device - an antifreeze heater. In this article you will learn what it is, what it is used for, its types, as well as installation instructions.
How to remove an air lock from the engine cooling system on VAZ 2108, 2109, 21099 cars
After replacing the coolant on VAZ 2108, 2109, 21099 cars, an air lock or even several air locks almost always appear in the engine cooling system. If, after replacing the coolant, the heater begins to heat poorly or the engine begins to constantly overheat, it makes sense to remove the air lock from the system.
Ways to eliminate air lock
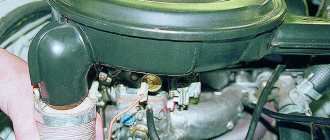
When carrying out work, you need to know that air usually accumulates at the highest points of the system. On VAZ 2108, 2109, 21099 cars this is a heating unit for the carburetor throttle valve area (two hoses go to it) or a throttle pipe on an injection engine (two hoses also go to it). The place where an air lock appears can also be the heater radiator - “stove”.
Warm up the engine to operating temperature. We're jamming it. Let it sit for five minutes. Remove one of the hoses from the carburetor heating unit or throttle pipe. We start the engine or simply crank it with the starter. As soon as coolant flows from the hose, put it back on the fitting. Care should be taken when carrying out work, as the coolant is hot.
More radical. Suitable for airing the stove.
We drive the car with its front wheels onto a slope so that the nose is lifted up and slightly higher than the stern. We start the engine and warm it up to operating temperature. We're jamming it. Remove one of the hoses to the carburetor heating block or throttle pipe. We start the engine or crank it with the starter. When coolant appears from the hose, put it on the fitting.
In particularly advanced cases, you can repeat the operation to remove the air plug several times. It is most convenient to carry out the work with an assistant, but if he is not present, you should place a container under the removed hose to collect the liquid.
Notes and additions
If you follow a few simple rules when replacing coolant, you can avoid problems with air locks.
— Fill the liquid slowly, in small portions.
— During filling, compress the pipes to the radiator and thermostat, pumping liquid.
— Before adding coolant, remove one of the hoses on the carburetor heating block or on the throttle pipe on an injection engine. This is where the air will be forced out.
This is all clear, but what is it really like?
In fact, driving without heating the remote control is not advisable, and in winter, turning off the throttle valve can lead to freezing of the remote control. Due to high air humidity and negative temperatures, freezing of the damper, as well as channels, including idle channels, occurs.
How about summer? In the summer, heating the remote control has virtually no effect on the temperature of the air that passes through the throttle valve, since the powerful air flow (approximately 40 l/sec and 2400 l/min) simply does not have time to warm up in such a short period of time passing through the throttle assembly. In addition, the coolant temperature is regulated by the cooling system regardless of the season and ambient temperature.
If the above arguments do not seem convincing enough to you, you can personally check whether it makes sense to turn off the heating of the throttle assembly. How to do it right?
Determining the cause
Video: Second car with a problem: the stove does not heat - there is air in the system!
The main indicator of the appearance of an air lock is that the stove is not working or is not working well. But this can also happen due to the fault of the same thermostat. If it gets stuck in the open position (the antifreeze constantly moves in a large circle), then the engine simply will not reach operating temperature and the stove will not heat up.
Therefore, if you decide to fix problems with the cooling system, first check the operation of the thermostat. This is easy to do; let’s look at the steps using the VAZ-2109 as an example.
Start checking with the engine cooled down. We start the engine, open the hood, find the upper large pipe going to the radiator - it is a supply pipe and comes from the thermostat, we test its temperature with our hands. If the thermostat is working properly, the pipe remains cold until the engine warms up to operating temperature. As the engine reaches temperature and the thermostat opens, the pipe will begin to heat up.
If the thermostat is functioning normally, but the heating system is not working, there is likely an air lock in the system that needs to be expelled. But before that, eliminate the cause of its appearance. To do this, carefully inspect the connections of the system pipelines to see if there are any leaks.
Inspect the water pump and motor where the cylinder block meets the head. Traces of antifreeze leakage indicate damage to the gaskets. Eliminate the cause of the air lock, and only then solve the issue of airing.
A common cause of a plug is a violation of the technology for replacing and adding antifreeze; the problem with a non-heating stove is associated with it.
Video: How to avoid air in the cooling system when filling with antifreeze.
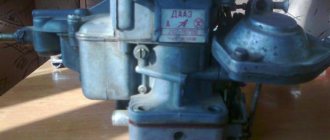
Solex
Immediately after the DAAZ, without retreating a step, comes the Solex model. This is one of the heaviest carburetors in terms of installation. Removing this device from the engine is not a problem, but installing it on the 2107 engine requires a lot of work.
The Solex circuit is the same as the others, but its design is somewhat different. To install it on a car, you will need to purchase some additional parts: a throttle cable from a VAZ 2108, a return tee, a longer fuel hose and a return valve from the G8. Design features of the Solex included 2 chambers with increased volume. This enabled the engine to perform better, namely: increase acceleration speed, rated speed and power. Of course, with such an improvement in performance, there was one drawback - increased fuel consumption. Therefore, the Solex was considered more amateur than for everyday use. Just like Ozone, it had modifications 1107010 and 1107010 - 20. It can be installed on both the VAZ 2107 and 2105.
Carburetor overheating. Causes and solutions
Now let's talk specifically about carburetor engines installed on the VAZ 2109. The reasons for its overheating are different. For each of them, appropriate action should be taken.
Switch
Cause
Your actions
Low coolant level
Try adding coolant to the required level first. If its quantity is rapidly decreasing, you will have to check the condition of all elements of the system for leaks
Damage to the radiator fan switch sensor, electric motor or electrical circuit
First, check the functionality of the elements by short-circuiting the sensor terminals. If the fan starts working, the sensor has failed. If the fan does not spin when the contacts are closed, the fan itself has failed or there has been a break in the electrical circuit.
Thermostat failure
Check if the thermostat is working. To do this, warm up the engine to operating temperature at idle and touch the lower radiator pipe. Gradually, parallel to the heating of the engine, the pipe should warm up and eventually it becomes very hot. If this does not happen, the thermostat needs to be replaced
Air lock formation
When an air lock appears in the cooling system, the coolant stops circulating properly. A popular reason for its formation is the replacement of cooling elements, during which the coolant was drained and refilled. Place the car at an angle with the front end up. So the heater radiator will not be the highest point of the cooling system. Turn on the engine and let it run in a raised position for about 15 minutes. This should get rid of the traffic jam.
External contamination of the radiator
Why is aeration dangerous?
- An air lock present in the stove and cooling system of the VAZ-2109 will cause you a lot of trouble. Since the motor will warm up unevenly and there is a high probability of overheating due to poor cooling. The presence of air in the circuit prevents the coolant from circulating, which interferes with the heat extraction of antifreeze from the engine. An air lock also prevents the coolant from penetrating into the radiator, thereby causing the engine to overheat.
- Airing can also occur due to a car's heater not working for a long time. In this case, the antifreeze does not penetrate the heater radiator and remains cool, and the air does not heat up either.
Product added to bookmarks!
- Description
- Reviews
APPLICABILITY: VAZ 2108, 2109, 21099, VAZ 2115 with carburetor engine.
Reinforced silicone heater and cooling system hoses, blue.
Three-layer hoses, wall thickness 4.5 mm.
Advantages:
— the silicone used in production makes the product resistant to wear and prevents the appearance of microcracks;
— thanks to the reinforcement of the Dacron cord (3-layer reinforcement), they can withstand operating pressures of up to 0.2 MPa;
— tensile strength and other impacts are 5 times higher compared to rubber pipes;
— silicone pipes retain elasticity at low temperatures (up to -40°C) and can be used at high temperatures (up to +180°C);
— silicone pipes fit perfectly into the seats of heating and cooling systems, without requiring modification.
Includes: 1 front heater inlet hose, 1 front heater outlet hose, 1 rear heater inlet hose, 1 rear heater outlet hose, 1 hose from the expansion tank to the thermostat, 2 thermostat connecting hoses, 1 water pump pipe hose.
Installation
- Remove the negative terminal of the battery.
- Remove the steering column trim.
- Touch any unpainted metal part of the vehicle to remove excess static electricity.
- Unclip the airbag module and then disconnect the airbag connector. The airbag should be stored and transported with the trigger side facing up.
- Align the wheels by placing the steering wheel in the center position.
- Loosen the steering wheel nut. The nut must be completely unscrewed after the steering wheel has been removed from its seat.
- Spread and remove the old steering wheel trim.
We install heating
The kit for installing a heated steering wheel must include slip rings that connect the parts of the carbon heating tape. It is necessary to cut recesses in the rim for the slip rings. The most convenient way to do this is with a cutting disc and an engraving machine. Cut the same grooves for laying wires in the rim and steering wheel spokes.
Installing a thermostat is necessary to open the heating circuit when the set temperature is reached. Don’t forget that the temperature sensor also comes with wires, for the exit of which you need to cut grooves in the spoke. If you assembled the installation kit yourself, we recommend using normally closed thermal relays with an operating temperature of 45º.
vote
Article rating
How can you remove air from the system?
There are several simple and effective ways to remove air from the heating system of a VAZ-2109, which are also suitable for other cars.
There are three most popular methods; they are based on the principle: oxygen molecules are lighter than water molecules and, therefore, they accumulate at the top, where they are removed.
It is important to fully open the heater valve to maximum air temperature before starting work.
- The first method is universal for cars in which you can unhook the hose, which heats up the throttle assembly or carburetor. These steps can be done on most VAZ cars.
Here the carburetor is the highest point of the engine cooling system. Therefore, this place is most suitable for removing air.
- Remove both protective covers and anything that prevents access to the heater.
- Unscrew the heating hose clamp and remove it from the fitting.
- Unscrew the cap of the expansion tank and pump air into it until coolant flows out of the throttle body or pipe.
- The moment liquid appears from the hose or fitting, quickly put the hose back in place and screw everything back as it was.
The above-described manipulations will allow you to get rid of the airlock by 99%.
- The second method is implemented by removing the pipes that heat the throttle assembly. It is a little similar to the one described above, but it does not require blowing out the tank.
- Similar to the first method, you need to remove the protective covers and warm up the engine to operating temperature and turn it off.
- Leave the cap on the expansion tank, but remove the hose from the fitting.
- When the cooling starts, put all the pipes in their places and put everything back together.
- One attempt may not be enough and the procedure may not give a positive result; it may need to be repeated a second time.
Important! Remember self-safety measures. The coolant in the circuit may be under pressure and its temperature may be above 85 degrees. If it gets on your skin, it may cause a burn. Try to protect your hands using at least improvised methods. For example, wear cloth gloves with rubber gloves on top.
- The third method is the simplest; it does not require disassembling the system. But unfortunately, this method is not as effective as the previous 2.
- Drive the car uphill so that the top is raised and the radiator cap is the highest point.
- Remove the cap from the expansion tank and radiator.
- Turn on the ignition and warm up the engine to operating temperature.
- Antifreeze will gradually enter the system. It will be necessary to add it from time to time to maintain the desired level.
- To increase coolant flow, increase engine speed. In this case, the antifreeze level may drop sharply and should be added urgently. The procedure should be continued until bubbles from the return line stop appearing.
A hot stream from the stove air ducts is a sign that the air has disappeared.
Recommended Method
Level control technology includes a number of stages:
- We dismantle the housing of the air filter element. To do this, unscrew the fastening nut of the housing cover, unclip the latches, remove the cover, take out the filter and tighten the 4 nuts that secure the housing to the carburetor.
- Raise the body and disconnect the rubber pipes. We move the body to the side.
- Loosen the clamps securing the fuel pipes going to the carburetor and disconnect them.
- Remove the wire suitable for the idle speed solenoid valve;
- Disconnect the drive cable of the air damper (the “choke” handle);
- Unscrew the 5 screws securing the carburetor cover;
- Having removed the cover, we immediately determine the fuel level in the chambers by lowering a ruler or caliper into one of them until it stops (using its depth gauge). If the measurement shows a level of 25-26 mm, it corresponds to the norm and no adjustment is required;
Alternative way
There is a simpler method for determining the correct position of the floats, which does not require measurements. Place the carburetor cover on a flat table and look at the stampings made on the side surfaces. When the floats are in a normally adjusted position, these strips are parallel to the lid.
Then we lift the floats up and look at their bottom, which after lifting should be parallel to the surface of the lid. If necessary, adjust the position of the floats by bending the tongue.
After adjustment work, we assemble the carburetor.
Setting up the “nine” carburetor
In addition to adjusting the crankshaft speed (when the power unit is operating without load, that is, in idle mode), on the VAZ 2109 you can independently adjust the fuel level in the float chambers. Adjustment procedures are used as needed in the following cases:
- when the engine begins to “float” at idle speed;
- the engine starts reluctantly, many attempts are required;
- when you press the gas sharply, the acceleration dynamics do not meet expectations;
- During acceleration of the WTO, failures in the operation of the motor are observed.
Each of the above symptoms indicates that the problem most likely lies in abnormal carburetor operation. In approximately half of the cases, it is due to a fuel level violation.
Consequences
The consequences can be different, from fairly insignificant to such that the engine can be safely sent to a landfill.
The severity of the consequences of engine overheating directly depends on the actions of the driver himself. The sooner he takes action, the cheaper it will be to eliminate the consequences.
- If the engine runs for less than 10 minutes under extreme loads and conditions, nothing bad should happen. Domestic units are reliable enough to withstand this. In the worst case, the piston surfaces will melt slightly.
- If the engine runs in this mode for more than 20 minutes, more serious consequences should be expected. Most often, cracks form in the cylinder head, it becomes bent, the gasket burns out, the seals are damaged, the inter-ring partitions are deformed, and so on.
- If overheating is completely ignored, the consequences will be tantamount to disaster. First, the combustion chamber will fail, the engine will stop responding altogether, and the piston system will melt.
- When the oil overheats, it loses its lubricating properties, and therefore active friction of moving parts begins.
The most dangerous thing is a connecting rod breaking through the cylinder block wall. If this situation happens, your engine is finished. Look for a new one.
Always check that the coolant reservoir is full
Reasons for failure of the VAZ 2109 carburetor
The Solex carburetor is a very sensitive device, which contains a large number of small channels. When a huge amount of low-quality fuel passes through them, you may encounter the fact that they become clogged with impurities and stop functioning.
The first thing that may immediately become noticeable is a decrease in idle speed. In the future, the car does not start well and needs carburetor adjustment.
This procedure is divided into several stages:
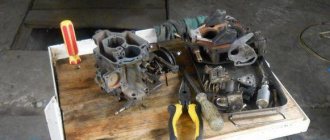
- Removing the unit
- Disassembly and cleaning
- Assembly and installation
- Carb idle adjustment
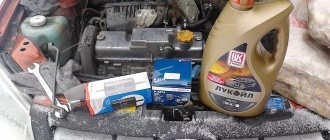
The air filter was first removed along with the housing to get to the carburetor. We will remove it completely, then clean it, blow it out, install it back, and then we will adjust the VAZ 2109 carburetor.
Loosen the clamps on the gasoline supply hoses and remove the direct and return pipelines. It is advisable to place a piece of rag under the fittings, as it is possible that a little gasoline will spill from the hoses.
We give back the throttle cables and the air damper control drive. And we also remove the power supply from the idle air valve and the vacuum hose going to the distributor and the crankcase ventilation hose.
There is no need to remove the hoses from the coolant heating tee; simply unscrew the tee fastener from the carburetor body.
Then we give away the four nuts securing the carburetor, do not forget to remove the washers and carefully remove it from the seat. We cover the space on the intake manifold under the carburetor with a clean rag to eliminate possible foreign objects from entering the engine.
Let's immediately talk about the gasket under the carburetor. As a rule, the gasket is already compressed from long use and can suck in air, so it is recommended to replace it with a new one.
In our case, the reason for removing the carburetor was the impossibility of dismantling the quality screw needle on site. As you can see in the video, look at the end of the article, after the screw was taken out, its O-ring simply corroded and there was practically nothing left of it.
There was no seal, which was the reason for the unstable operation of the engine due to the incorrect composition of the fuel mixture.
Advice on renovation progress
When cleaning the carburetor, try to leave the original factory needles, as well as jets, both air and fuel, since their calibration exactly corresponds to the manufacturer’s parameters. Store-bought jets, as a rule, do not correspond to the data printed on their body, plus they have rough processing.
The factory jets just need to be rinsed well, blown out and reinstalled. This does not apply to cases where the jets are either heavily acidified or have mechanical damage, for example, when the slots for a screwdriver are broken.
It is also worth drawing your attention to such a common carburetor malfunction as a bend in the seat flange. In our case, this can be determined visually, and for clarity, you can also attach a steel ruler with its end, where the gap between it and the flange is clearly visible.
Dismantling of collectors
Now comes the turn to remove the intake and exhaust manifolds. Having dismantled them, you can understand whether it is possible to get by with replacing the gasket, or whether the collectors themselves will need to be completely replaced.
The gasket is a consumable item, the purchase of which will literally cost you 50-250 rubles, depending on the manufacturer and region. Services for replacing the gasket at a service station cost more than 1,500 rubles. Add to this the cost of a high-quality gasket and you will get quite a lot of money. Such costs can be avoided if you do everything yourself.
Dismantled unit
Intake manifold
By removing the air filter and carburetor, you will gain access to the intake manifold.
To dismantle it you will need a certain set of tools:
- Ratchet with 10mm head;
- Collar;
- Ratchet;
- Deep head 13;
- Regular head 13;
- Open-end wrench 13.
When everything is ready, you can start working.
- Unscrew a couple of mounting nuts to bend back the platform located under the carburetor.
- Disconnect the hoses that are connected to the intake manifold.
- Remove the six mounting nuts located on the intake manifold.
- Remove the manifold itself from the studs. To do this, simply rock the knot to the sides. It often sticks to the gasket, which causes problems with removal.
- Inspect the condition of the unit. If there is damage, the collector must be replaced.
- If the problem is only with the gasket, put the intake manifold aside for now and start removing the outlet.