Handbrake failure is a problem that owners of VAZ 2110 cars often have to face. This problem can be solved by replacing the cables on your own, but not every car enthusiast knows this. We will tell you how to replace the handbrake cable with your own hands in this article.
- 5.1 Video: how to change the handbrake cable mechanism on a ten
Causes of malfunction
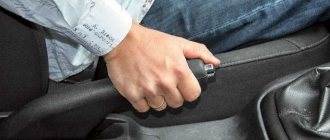
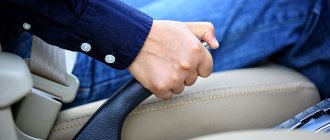
Handbrake lever VAZ 2110 in a leather case
Let's consider the principle of operation of the parking brake (handbrake) on a VAZ 2110 car.
It's pretty simple. One of its main elements is a special cable. When the driver pulls the parking brake handle, this cable is tensioned, which evenly distributes its effect on the brake pads of each wheel of the car. During operation, the rear brake pad linings wear out, the cable stretches, and as a result, there is a need to adjust or repair the handbrake. Also, very often drivers, especially beginners, drive with the handbrake raised, which leads to premature wear of the handbrake cable. If the driver does not carry out preventive maintenance or repair of this mechanism in a timely manner, the car may independently start moving from a standstill or will slow down, even stopping, on an uphill slope.
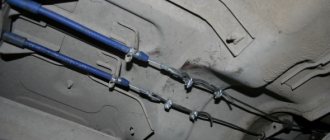
External view of the parking brake cable on a VAZ 2110 car
You can adjust the handbrake not only in a car service center, but also with your own hands at home. But first you need to familiarize yourself with the manual parking brake diagram in order to know its main elements for setting up this system.
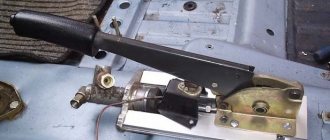
Handbrake diagram for VAZ 2110
In this diagram the following elements are indicated by numbers:
1 - button that fixes the handbrake lever; 2 — hand brake lever; 3 — protective cover; 4 — handbrake rod; 5 — cable equalizer; 6 — adjusting nut; 7 - lock nut; 8 - cable; 9 — protective sheath of the cable
Main causes of failure
The main reason why such an important device may break and need to be replaced is mechanical wear of the handbrake. As you know, the basis of the system is a small cable that transmits forces from the lever to the mechanism. It actually turns on this node.
The operating conditions of the cable are quite complex - the constant load from the force that the driver transmits through the handbrake lever to the system, sooner or later, can damage the device.
Before you begin replacing the cable, it is strongly recommended that you understand the brake system:
However, the cable breaks extremely rarely - most often, the cables simply jump off. Or the tips fixed in the drum are ground with very long wheel bolts. Needs renovation. Also, the parking brake may not work due to wear on the rear drum brakes (as well as abrasion of the pads, depending on the design).
As a result, the unit ceases to perform the functions assigned to it - the handbrake simply does not hold. The parking brake needs to be replaced and subsequently adjusted. But not everything is so simple - in some cases, the device can be damaged during emergency braking of the car - as a result, it will require repair or replacement.
Often the metal is not completely ground, but the steel fibers are stretched and moving in the shell is very difficult. But it doesn’t matter what the reason for the parking brake failure is, why it doesn’t hold. The purpose of our article is to figure out how to solve the problem.
This material has been created to accurately determine whether the link is malfunctioning:
First adjustment steps
To begin adjusting the handbrake, you need to make sure that one of three elements is present and accessible: a lift, an inspection hole or an overpass.
An overpass is a type of engineering structure that is intended to lay a road or communications above the ground.
Homemade overpass for adjusting the handbrake on a VAZ 2110
At home, most often only the inspection hole is accessible. If you cannot take advantage of any of the above conditions, then you can make do with a kind of support trestles, which are a rigid structure installed under the rear part of the body after it has been lifted with a jack. In addition, you need to prepare two wrenches size “13”, as well as pliers.
Now you need:
- lower the parking brake lever to its lowest position;
One of the adjustment stages is to lower the handbrake lever
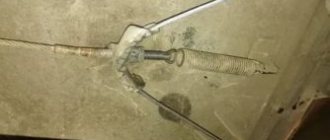
- using one key set to “13” you need to loosen the lock nut, while holding the adjusting nut with the second key;
Loosen the locknut and loosen the adjusting nut
- start tightening the adjusting nut and continue until the handbrake cable tightens or loosens slightly if it is too tight;
- While tightening the adjusting nut, you need to hold the rod in the handbrake mechanism with pliers.
That's not all, as there are a few steps left to complete the complete handbrake setup.
Important points
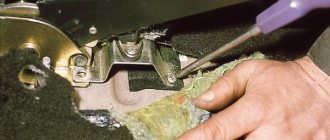
- It is best to use two people to disconnect the tip from the brake pads. One person should carefully press the brake rocker with a large screwdriver (or a thin pry bar), the second at this moment will be able to freely loosen the lock nut, after which the cable can be pulled out of the holder without risking injury to your hands.
- As soon as the cable is removed, its attachment points should be thoroughly cleaned of rust and dirt. The best way to do this is with a wire brush. Those places in the brake shield where the cable passes must be wiped with solvent.
- If too much rust has accumulated in the through passages of the cable, you should use concentrated acetic acid, as it corrodes rust well. You only need to work with it wearing gloves to avoid chemical burns.
- Before installing the brake drum, be sure to check the condition of the pads. If the spacers on the pads are very worn (and most likely this will be the case), they need to be replaced with new ones. A set of such strips can be purchased at any auto store.
Video: how to change the handbrake cable mechanism on a ten
Final Setup Steps
- continue rotating the adjusting nut until we are sure that the brake lever has a full stroke of approximately 3 clicks (this operation is convenient to perform with two people - one person rotates the nut, and the second checks the handbrake);
- after checking the working stroke, you need to tighten the locknut while holding the adjusting nut with a wrench;
- now you need to check whether the handbrake cable is not too tight: the parking brake lever goes down, the rear wheels are jacked up and turned by hand - they should rotate evenly, without delays;
- if the lever travel is still large, then we continue to tighten the adjusting nut (or unscrew it if the cable is too tight) and regularly check the handbrake travel until it reaches 3 clicks and the brake pads do not interfere with the rotation of the wheels.
After adjusting the system, you should check its operation. To do this, the driver needs to place his car on a section of the road with a slope of 23% and raise the parking brake lever. If the car is securely fixed on the road and does not move, this means that the work was carried out correctly.
Signs of a malfunction of the VAZ 2110 hand brake
There are a number of signs that indicate a malfunction of the parking brake system. We list the main ones:
- When the handbrake is pulled on, the rear wheels spin and the car rolls down the hill. The cable is probably loose and needs to be tightened.
- When the handbrake is weakened, the rear wheels jam. This indicates frozen (in winter) or worn out pads. There is also a high probability of a faulty return spring.
- When driving, you can hear squeaks from the rear wheel drums. As in the previous case, the pads jam.
- One of the wheels is blocked and does not rotate (goes skidding). In this case, a spring malfunction is excluded - the problem is inside the drum in one of the wheels.
In most cases, it is enough to adjust the brakes, since the cable tends to stretch and sag. It is also not uncommon to encounter a malfunction inside the drums themselves due to their vulnerability to external factors.
Repair manual
To quickly carry out repairs, you will need the help of a partner. This will significantly save time that will have to be spent on repairs.
Further point by point:
- Step one - remove the VAZ 2110 from the parking brake (we lower the handbrake all the way to the floor - the system for holding the car in place must be turned off);
- Step two - remove the wheel brake drum;
- Step three. Getting to the equalizer is quite difficult. The technician will need to remove the muffler from the suspension cushion and remove the resonator from the rear cushion. We lower the exhaust pipe downwards;
- Step four. To do this, you will have to crawl under the VAZ 2110 - the adjusting nut and locknut are located here. We unscrew them and remove the equalizer from the rod;
- Step five. Remove the cable end from the control;
- Step six. On the body of the VAZ 2110 there is a bracket where the tip of the cable sheath is installed;
- Step seven. The manufacturer secured the cable with brackets - they need to be bent to the sides;
- Step eight. Remove the rear brake pad and disconnect the end of the handbrake cable;
- Step nine. We move on to the rear axle beam and loosen the nuts with which the manufacturer secured the handbrake. Remove the cable from the device holder.
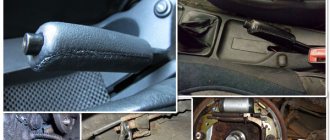
Replacing hand brake cables on a VAZ 2110
Cables tend to stretch, unravel, rust and get stuck in places where they come into contact with other elements. If such a situation occurs, then they need to be replaced. Replacing the hand brake cable of a VAZ 2110 is a procedure that will take you several hours of time, since to complete the work you need to remove the rear wheels and disassemble the drums. So let's get started:
- Before installation, lubricate the new cables with transmission or any other oil.
- Unscrew the adjusting and locking nuts, thereby disconnecting the distributor.
- Remove the rear wheels, then remove the brake drums.
- Remove the cables from the brake housing.
Install the parking brake cables in reverse order.
Aspects indicating the need to adjust the handbrake
There are several ways that will help any car owner, without exception, to help with the question of whether it is advisable to adjust the handbrake. It is worth noting that there is no need to check the handbrake every day; it is important to pay attention to this detail every 30 thousand kilometers.
To find out whether the handbrake needs to be adjusted, you need to park your car on a slight slope, then leave the car on the handbrake and put the gear in neutral. If the vehicle slowly but surely begins to move down an incline, then the vehicle's parking brake may not be working properly.
Of course, this problem can be solved by replacing the VAZ-2110 handbrake rod, however, as practice shows, it is quite enough to make a very simple adjustment of this part.
- The travel of a properly adjusted handbrake lever should not exceed 8 clicks. The optimal lever stroke is 6-7 clicks (this number varies depending on the car model; details for a specific VAZ model can be found in the operating instructions supplied with the car).
- After installing the new cable, the rear wheels of the car should be jacked up and try to spin them by hand. Rotation must be free.
- Now the brakes should be checked while driving. You need to drive 30-40 meters, then slow down using the parking brake. After braking, you need to get out of the car and touch the rear brake drum. It should not be hot, its temperature should not exceed the ambient temperature. If the drum gets so hot that it burns your hand, this means that the brake cable is too tight and should be loosened.
- To loosen the cable, you should put the car back on the inspection hole, unscrew the lock nut on the outer tip with a 13mm wrench, and then loosen the main fastening nut. After this, the locknut is tightened again.
- If the brake cable is too slack, it needs to be tightened. All steps are listed above, with one exception: the main nut on the tip should be tightened, not unscrewed.
- To independently check the reliability of the parking brake, you should find a slope with a ratio of 1:5 (that is, 1 meter high and 5 meters long), drive the car onto it, turn off the engine, put the car on the parking brake and squeeze the clutch. After these actions, the machine should remain in place and not roll downhill. If the car does roll, you should tighten the brake cable a little more.
As you can see from our article, there is nothing complicated about replacing a brake cable, and even a novice car enthusiast can do this task. The main thing you should pay attention to in this case is compliance with safety regulations. When changing a cable, it is very easy to get injured or get a chemical burn, so it is better not to carry out this operation alone, but to work together with an experienced auto mechanic.
Replacing the cable
For work you will need a 10mm open end wrench, WD-40 lubricant, a set of screwdrivers, a 13mm open end wrench and a socket wrench. An inspection hole and a jack must be present in the garage or box. Replacing the cable is carried out as follows:
- The VAZ 2110 must be removed from the parking brake - to do this, lower the handbrake all the way to the floor. It is necessary to ensure that the restraint system of the VAZ 2110 is activated;
How to tighten and adjust the handbrake on a Ford Fusion video, photo
Many Ford Fusion owners have encountered a situation where the handbrake does not hold the car securely enough on an uneven surface. Of course, many played it safe and additionally set the vehicle to speed. But a working handbrake is a guarantee of safety not only for the car, but also for other road users.
Video about adjusting the handbrake on a Ford Fusion:
The video material will help you understand the correct process of adjusting the handbrake, and will also tell you about some of the nuances and subtleties of the work being carried out.
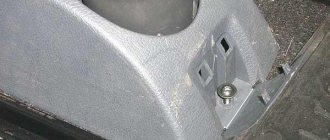
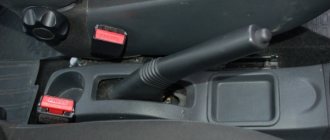
The process of tightening the handbrake on a Ford Fusion
Removed console for tightening the handbrake.
In a situation where the parking brake is weakened, many motorists do not know what to do and go to a car service center, where they undergo repairs for considerable sums. This operation can be performed at home or in the garage in 10-15 minutes. Even a novice motorist can easily do this procedure on his own.
Tools
What will be needed for the operation? Simple knowledge of automotive design or the instructions described below, an extended socket head of 10, in extreme cases, an open-end wrench, but it will be difficult to get to the right place and tools to pry off the plastic. You will also need a tool to lift the rear of the car.
Work algorithm
Now that all the tools have been collected, we gather our strength and get to work:
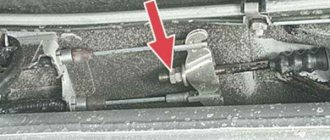
First you need to place the car on a flat surface. Set the gearbox to neutral speed. It is best to have anti-roll bars under the front wheels. We dismantle the center console under the handbrake. To do this, you need to carefully pry up the plastic and unscrew one screw from the back that secures the plastic to the base. As practice shows, most motorists simply break off the front mounting ears, and this leads to the fact that they have to be glued with super glue, so you should be prepared for such a turn of events. We dismantle the console to adjust the handbrake. Raise the rear of the car onto supports. This is to ensure that the parking brake is properly tightened and adjusted. Location of the handbrake adjusting nut. Now, you need to unscrew the fixing washer. We find the adjusting nut for tightening the handbrake. Lower the handbrake all the way down and unscrew the tension nut. Now you need to bleed the brakes several times. We start the car and pump the brake pedal 5-7 times to bring the brakes into working position. Now it’s time to tighten the brake adjustment tension nut. Tightening is carried out until the number of clicks of the handbrake becomes 5-7 times. If the result is achieved, it means that it was done correctly. A collar like this would be perfect. With the parking lever lowered, check how the rear wheels rotate. If you hear extraneous sounds from the brake drum or the wheel turns hard, then you should loosen the tension nut
Please note: the wheels should turn easily after tightening. We install the fixing washer in place. Fixing nut (stopper)
We assemble the plastic and lower the car. It is worth checking the parking brake on a slight slope, as well as when driving
Fixing nut (stop). We assemble the plastic and lower the car. It is worth checking the parking brake on a slight slope, as well as while driving.
Adjustment Tips
As practice shows, during assembly the locking washer is often pulled out of its seat after the vehicle has traveled several thousand kilometers or has been parked for a long time on the handbrake.
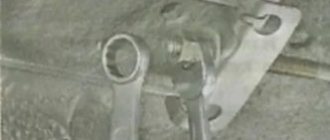
Correct installation of the nut on the handbrake.
That is why many car enthusiasts who have already gone through this stage recommend installing a lock nut to the tension nut. This will help strengthen the structure and allow the structure to be better secured.
You can adjust and tighten the parking brake on a Ford Fusion without the participation of a car service center and unnecessary investment. This will require 10-15 minutes of time and a minimum amount of tools.
If the adjustment does not help
There are not many cases when adjusting the parking brake did not have any effect. However, this is no reason to despair.
Device diagram
There are several situations in which it is necessary to replace the parking brake cable:
- The cable broke;
- The tips gave way;
- The cable threads have stretches, which over time can turn into a full-fledged rupture;
- The cable is difficult to move inside the sheath even after abundant lubrication.
Handbrake on rear disc brakes
In order to pay more attention to the adjustment process and not go into the intricacies of the operating principle of a mechanically driven parking brake on disc brakes, we will list only the main types of device.
- The brake disc is held by an additional pad, which, when the handbrake is raised, is pressed against the working surface of the disc by means of a rocker arm.
- The brake disc design allows individual brake pads to be placed in the internal cavity. The operating principle is similar to that of drum brakes.
- Design with mechanical support of the working piston. In the cavity of the brake piston there is a ratchet (for automatically bringing the pads together), into which a pin with a trapezoidal thread rests. The curved rod drives the pin by turning the shaft with a concentric groove.
Adjustment
In the case of the most common drum type of design, the handbrake can be adjusted by rotating the adjusting pawl. The regulator itself can be located on the side or bottom of the brake mechanism. Access to it is through a technological hole in the shield, which must be covered with a plug.
In some types of construction, the regulator may be locked by a spring element, so it will have to be bent to release and rotate the “pawl”. The handbrake design on the rear disc brakes and the adjustment mechanism are perfectly shown in the video.
One of the elements of the braking system of a car is the parking brake; in motorist circles it is called the handbrake. The mechanism is needed to ensure that the car remains in place while parked (especially on slopes). Every self-respecting motorist simply must know how to tighten the handbrake.
Purpose and location of the parking brake
The location of the handbrake is known to every VAZ 2110 driver - there is a lever installed between the front row seats, when pressed, braking occurs. The metal cable is a mechanical drive in this unit. By lowering the lever, the driver provides tension on the cable, which presses the rear brake pads to the wheel discs. Breakage of the lever is extremely rare, since the main load falls on the metal cable, as a result, after some time it loses the required tension.
The operation and maintenance manual for the VAZ 2110 states that at least once every six months it is necessary to carry out diagnostics of the brake system, including the parking brake. The traffic regulations have requirements for this unit - it must hold the car at a slope of 25 degrees. If the metal cable is not damaged, and the adjustment does not bring results, then the problem is in the rear brakes - this requires a full diagnosis from specialists.