If the handbrake on a VAZ-2112 becomes difficult to hold, then you should not change it immediately, since the cable can be adjusted. If the mileage on the car is high, the rear pads on the car may wear out. This may reduce the effectiveness of the handbrake and the entire braking system. In this case, the handbrake cable will need to be tightened.
Changing the parking brake cable on a VAZ-2110 with your own hands
To carry out the test, follow a few simple steps:
- Find a slope that has about 25 degrees;
- Turn the handbrake to the required position;
- If the car starts to roll, the handbrake does not hold, adjustment is required;
- If there is no such slope nearby, the check is carried out in a garage;
- Place the car on a flat surface, raise the handbrake handle all the way;
- Approach from behind and try to push the car with maximum force;
- If the car begins to move, the RT requires adjustment;
- Check the operation of the handbrake at 2 clicks on newer versions of the VAZ 2109 and not reaching 5 clicks on versions before 1995. If the handbrake is working at full strength, the cable will be tightened. It will also need to be adjusted.
Operating a car with a tightened PT cable is also dangerous, as this leads to overheating and wear of the rear brake pads.
Adjustment
To adjust the PT cable you will need a pit, overpass or lift. Next we proceed according to the following algorithm.
- Raise the handbrake handle 2-3 clicks from the passenger compartment.
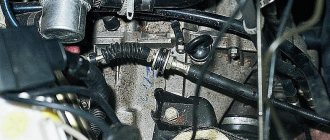
- Get under the car and loosen the locking nut of the parking brake cable equalizer. Before doing this, it is better to treat the nut with a wire brush to remove all dirt.
- Then act according to the circumstances. If the cable is overtightened, it must be loosened by appropriate manipulation of the nut. If the cable holds too weakly, the nut must be tightened more tightly.
- If tensioning the cable does not produce any result, then the element is already at the limit of its capabilities. Therefore, the only solution to this situation is replacement.
- When adjusting the degree of tension, be sure to evaluate the adjustment of the cable along the PT lever. As you remember, normally it is 3-8 clicks for more recent versions of the VAZ 2109, or 5-7 clicks for nines that were produced before 1995.
- Check the freedom of rotation of the rear wheels. If you overtighten the cable, the wheels will spin with difficulty and not as freely as they should.
- After making the adjustment, tighten the locking nut back and check the operation of the handbrake again by driving up a slope or pushing the machine with the PT on.
If the adjustment did not give a positive result, the cable turned out to be worn out, overtightened and does not allow adjusting the operation of the RT, you will have to change it, thereby repairing the handbrake.
Replacement
In some cases, heavy movement of the cable in the sheath is due to lack of lubrication. To eliminate this defect, fill the shell with transmission or engine oil. Pour until grease flows out of the opposite end of the cable casing. Remember to move the cable while adding lubricant.
Cable replacement procedure
But lubrication is more of a temporary measure. If signs of cable wear are detected, it is better to replace it with a new one. This is done as follows.
- Loosen the tension on the PT cable locking nut.
- Unscrew the equalizer adjusting nut, which will loosen the handbrake drive cables.
- Raise the rear of your VAZ 2109 using a jack, then remove the brake drum and brake pad.
- Unscrew the drive cable end from the drive arm.
- Disconnect the fastening nut, and then remove the PT cable holder on the rear suspension beam of the vehicle.
- Remove the shell bushing from the hole in the brake shield.
- Pass the end of the PT cable through the hole in the brake shield.
- Remove the PT cable from all holders on the body of your car.
- Disconnect the end of the PT cable from the equalizer.
- Push the cable end out of the bracket to remove the cable.
- Install a new, tested cable, proceeding in the reverse order.
- Do not forget to adjust the cable tension and the performance of the restored RT at the final stage of assembling the unit.
Where to start replacing
Replacing the handbrake of a VAZ 2110
First of all, replacing the cable begins with the following operations:
- lowering the handbrake lever all the way down;
- removing the brake disc of the wheel on which the replacement is being made;
- removing the muffler from the suspension cushions, and the resonator from the rear suspension;
- lowering the exhaust system;
- unscrewing the locknut and adjusting nut;
- removing the equalizer from the rod.
- remove the end of the cable being replaced from the equalizer;
- remove the tip of its shell from the bracket located on the car body;
- bend the cable fastening brackets;
- remove the rear brake pad and disconnect the cable end from the lever;
- loosen the nut that secures the cable holder to the rear axle;
- remove the cable first from the holder, then from the bracket, and finally from the brake cleat.
The work ends with the new cable being installed in place in the reverse order to its removal. In this case, it is worth paying attention to the location of the cables in the bracket - it should be crosswise. After installing the part, be sure to adjust the handbrake. Now, knowing how to adjust the handbrake of his car and replace its cable with his own hands, the car enthusiast can avoid contacting a service station, and thus save his money, since the cost of repairs is not low. If instructions for performing all this work are not enough, it is quite easy to find on the Internet both photos and videos showing these processes in great detail.
Replacing the handbrake cable on VAZ 2109 and 2110. We can do without a service station
Rolling down a hill or replacing the handbrake cable on a VAZ 2109 and 2110 in a garage. The topic is quite relevant in view of the fact that the degree of fixation of the handbrake has always been of interest to every driver. Whatever one may say, this is an additional guarantee of safety both on the highway and in the parking lot. In some cases, emergency situations occur due to the fact that most drivers neglect the rules for using the handbrake, or deliberately bring it to a faulty state. Let's look at how to use it correctly and what is needed for this below.
Operating principle and replacement algorithm
Replacing the handbrake cable on a VAZ 2109 and 2110 can be done on your own within half an hour, unless of course you are lazy and go to a car service center for repairs. To do this we need the following equipment and tools:
Provided that we have all this ready, we can begin the repairs. So,
It is necessary to have an overpass or inspection hole, since without them we will not be able to get under the bottom of the car;
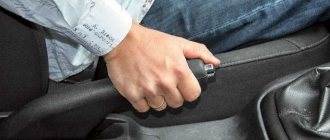
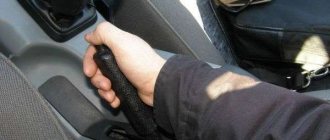
For those who do not fully understand, the handbrake in all cars is located between the two front seats
It can be covered with various drawers - glove compartments, but this is not important. The main purpose is to fix the parking of a car without assistance, even when the neutral is turned on and the road is downhill under the wheels, which is a ratio of no more than 1/4
Parking brake system drive
The mechanically actuated parking brake system acts on the brake mechanisms of the rear wheels. The parking brake drive consists of lever 2, adjusting rod 4, equalizer 5, cable 8, lever 10 (see Fig. Rear wheel brake mechanism), manual pad drive and expansion bar 8.
1 – protective cap; 2 – sensor housing; 3 – sensor base; 4 – sealing ring; 5 – clamping ring; 6 – reflector; 7 – pusher; 8 – bushing; 9 – float; 10 – fixed contacts; 11 – moving contact
Mechanical brake fluid emergency level sensor. The sensor body 2 with a seal 4 and the base 3 with a reflector 6 are pressed by a clamping ring 5 to the end of the tank neck.
A pusher 7 passes through the hole in the base, connected to the float 9 by means of a sleeve 8. There is a moving contact 11 on the pusher, and fixed contacts 10 are located on the sensor body. The contact cavity is sealed with a protective cap 1. When the level of brake fluid in the reservoir drops to the maximum permissible, the moveable the contact moves down onto the fixed contacts and closes the circuit of the hazard warning lamp on the instrument panel.
Source
How to tighten the handbrake on a Prior? The auto industry breaks down as always - Fix the Car!
If the handbrake on a VAZ-2112 becomes difficult to hold, then you should not change it immediately, since the cable can be adjusted. If the mileage on the car is high, the rear pads on the car may wear out. This may reduce the effectiveness of the handbrake and the entire braking system. In this case, the handbrake cable will need to be tightened.
Handbrake diagram for VAZ-2112
For clarity, here is a diagram of a hand brake
1 - button that fixes the handbrake lever; 2 — hand brake lever; 3 — protective cover; 4 — handbrake rod; 5 — cable equalizer; 6 — adjusting nut; 7 - lock nut; 8 - cable; 9 — protective sheath of the cable.
In this scheme we need element number 6. It is he, and only him!
What is required for adjustment?
In order to adjust the handbrake you need a platform or lift. If there are no such devices, then you can simply hang the rear wheels on the “goats”. They can be installed under the car using a jack. It’s also worth taking two “13” keys and pliers.
Start:
- The car is installed on an overpass or “goats”. Hanging out your butt
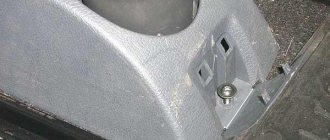
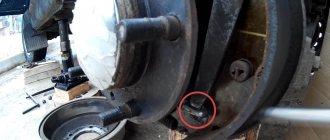
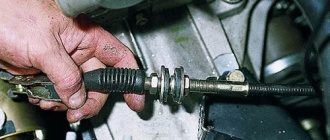
- The lever position is set to the lowest possible position. We put the handbrake at the very bottom. Do not pay attention to the scuffs of the console; we conducted an experiment with non-standard armrests. The iron fastenings of the armrest are visible. The photo shows the editorial car
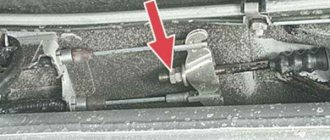
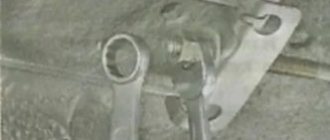
- Use a wrench to loosen the locknut. Adjusting nut
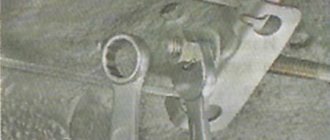
- The second wrench holds the adjusting nut.
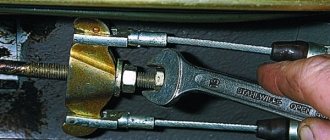
- The adjusting nut should be tightened until the cable is tensioned. It must be remembered that the rod should be held with pliers when tensioning the cable. Tighten the adjusting nut
- After this, you should make sure that the full stroke of the handbrake lever is no more than 4 and no less than 2 clicks.
- When the stroke check is completed, the locknut is tightened. The adjustment is held with another key.
- If necessary, change the mechanism to a new one. Everything is rusty, we changed the adjustment mechanism
- After releasing the adjusted lever down, you should spin the rear wheels. When the lever is in its lowest position, the wheels should spin freely.
THIS IS INTERESTING: Chevrolet Cruze stove repair
If you cannot tighten the cable, then it should be replaced with a new one.
Adjusting the handbrake after tensioning
After adjusting the brakes, you need to check them again. To do this, the car should be placed on a road with a slope of at least 23%. The car should be in neutral gear in this area and with the handbrake pulled up. If the handbrake brakes hold the car in this area, then the handbrake is adjusted correctly.
What to do when adjustment does not work
There are also cases when the above actions are not enough to adjust the handbrake. This can happen, for example, when the handbrake cable is broken. This happens on the VAZ-2112, although rarely. In such situations, the cable must be replaced. The cable also needs to be replaced when:
- The tips are loose.
- The cable itself begins to stretch, which will lead to its breakage during operation. HAIKU! The old cable is very worn out! For comparison, old and new handbrake cables
- Physical wear (scuffs and cracks) of the handbrake cables. Heavy wear on the handbrake cable
- It is quite difficult for the cable to move in the casing even after lubrication.
This replacement procedure does not require contacting a service station. Although this will require some time and skills from the driver, such work can be done independently.
It should also be remembered that when replacing the cable, certain conditions must be observed. To do this, the driver will need an assistant who will pull the cable.
Why do you tighten the handbrake?
The cable acts here as a drive. If the driver pulls the handbrake lever, then at the same time he uses the cable, which spreads the pads in the rear wheel.
If the handbrake is faulty, you just need to tighten the cable or replace it with a new one. On a VAZ-2112 it’s quite easy to do this with your own hands.
Need for adjustment
You can determine that the parking brake needs adjustment when checking. It is recommended to do it every 30,000 kilometers. This procedure should be done even if the handbrake seems to be working well.
The device must also be checked in cases where it does not work. For example, a car moves when the brake lever is applied.
Adjustment
Tightening a cable is much easier than replacing it. The VAZ 2110 must be placed on a jack. The handbrake must be locked, after which you should find the adjusting bolt and nut - the work is done using two “13” keys.
Twist the nut until the cable is taut
The nut must be tightened until the rear wheelset stops moving. Next, you need to tighten the locknut. After this, you need to return the car to its original position, unlock it and check its operation.
How to remove the parking brake lever of a VAZ 2110
Removing the parking brake lever on a VAZ 2110 car is performed to disassemble it and repair failed elements or replace them with new ones, as well as when carrying out various works in which the presence of the lever will interfere with the progress of their implementation. Prepare a standard set of tools, drive the car into a viewing hole or overpass, turn off the power (disconnecting the minus terminal from the battery) and perform the following sequence of actions:
In the car interior, remove the decorative upper and lower panels of the floor tunnel lining.
- Next, we move under the car and remove the equalizer bar for the handbrake cables by unscrewing the lock nut and the adjusting nut.
- We take out the protective cover from the hole in the floor and remove it from the rod.
We move into the interior again and use a Phillips screwdriver to unscrew the screw securing the parking light switch bracket
Also note that this screw secures the ground wire. Next, unscrew the four bolts securing the parking brake lever
- We put the bracket with the lamp switch aside.
- By removing the rod from the hole in the floor.
- To replace the rod, unbend the antennae of the locking pin and remove it, then the washer and the rod itself. If necessary, if signs of severe wear or damage are detected, replace the plastic bushing.
- Reassemble and install in the reverse order.
Related materials:
- Other
- Engine
- Steering
- Electrical equipment
- Transmission
- Brake system
- Suspension
- Tuning
- VAZ 2110 Other
- Engine
- Steering
- Electrical equipment
- Transmission
- Brake system
- Suspension
- Tuning
VAZ 2114
- Electrical equipment
Engine Brake system Other Steering Transmission Suspension Tuning Lada Priora
- Steering
Engine Suspension Electrical equipment Tuning Brake system Transmission
- Video publications
- VAZ tuning photo stream
- Operation and repair manuals
What to do next if adjustment does not help?
There are situations when a car owner knows how to tighten the handbrake on a VAZ-2110 and strictly follows the algorithm, however, the manipulations he has carried out do not change the situation and the handbrake also works poorly. Most often, this problem occurs when the parking brake lever cable breaks. As practice shows, owners of old VAZ-2110 cars find themselves in this situation more often than others. You should not assume that under intense load the cable will function for too long even on newer domestic models.
The cable in a VAZ-2110 car should be changed if the tips are significantly weakened, its threads are strongly stretched and this part is difficult to move in its shell. It is worth noting that the car owner can do the work of replacing the cable on his own; you just need to have an assistant and some free time. It is very difficult to replace the cable alone.
Handbrake on rear disc brakes
In order to pay more attention to the adjustment process and not go into the intricacies of the operating principle of a mechanically driven parking brake on disc brakes, we will list only the main types of device.
- The brake disc is held by an additional pad, which, when the handbrake is raised, is pressed against the working surface of the disc by means of a rocker arm.
- The brake disc design allows individual brake pads to be placed in the internal cavity. The operating principle is similar to that of drum brakes.
- Design with mechanical support of the working piston. In the cavity of the brake piston there is a ratchet (for automatically bringing the pads together), into which a pin with a trapezoidal thread rests. The curved rod drives the pin by turning the shaft with a concentric groove.
Adjustment
In the case of the most common drum type of design, the handbrake can be adjusted by rotating the adjusting pawl. The regulator itself can be located on the side or bottom of the brake mechanism. Access to it is through a technological hole in the shield, which must be covered with a plug.
In some types of construction, the regulator may be locked by a spring element, so it will have to be bent to release and rotate the “pawl”. The handbrake design on the rear disc brakes and the adjustment mechanism are perfectly shown in the video.
One of the elements of the braking system of a car is the parking brake; in motorist circles it is called the handbrake. The mechanism is needed to ensure that the car remains in place while parked (especially on slopes). Every self-respecting motorist simply must know how to tighten the handbrake.
Pressure regulator
1 – pressure regulator housing;
2 – piston; 3 – protective cap; 4, 8 – retaining rings; 5 – piston sleeve; 6 – piston spring; 7 – body bushing; 9, 22 – support washers; 10 – sealing rings of the pusher; 11 – support plate; 12 – pusher bushing spring; 13 – valve seat sealing ring; 14 – valve seat; 15 – sealing gasket; 16 – plug; 17 – valve spring; 18 – valve; 19 – pusher bushing; 20 – pusher; 21 – piston head seal; 23 – piston rod seal; 24 – plug; A, D – chambers connected to the main cylinder; B, C – chambers connected to the wheel cylinders of the rear brakes; K, M, N – clearances The pressure regulator regulates the pressure in the hydraulic drive of the brake mechanisms of the rear wheels depending on the load on the rear axle of the car. It is included in both circuits of the brake system and through it brake fluid flows to both rear brake mechanisms.
How to tighten and adjust the handbrake on a Ford Fusion video, photo
Many Ford Fusion owners have encountered a situation where the handbrake does not hold the car securely enough on an uneven surface. Of course, many played it safe and additionally set the vehicle to speed. But a working handbrake is a guarantee of safety not only for the car, but also for other road users.
Video about adjusting the handbrake on a Ford Fusion:
The video material will help you understand the correct process of adjusting the handbrake, and will also tell you about some of the nuances and subtleties of the work being carried out.
The process of tightening the handbrake on a Ford Fusion
Removed console for tightening the handbrake.
In a situation where the parking brake is weakened, many motorists do not know what to do and go to a car service center, where they undergo repairs for considerable sums. This operation can be performed at home or in the garage in 10-15 minutes. Even a novice motorist can easily do this procedure on his own.
Tools
What will be needed for the operation? Simple knowledge of automotive design or the instructions described below, an extended socket head of 10, in extreme cases, an open-end wrench, but it will be difficult to get to the right place and tools to pry off the plastic. You will also need a tool to lift the rear of the car.
Work algorithm
Now that all the tools have been collected, we gather our strength and get to work:
First you need to place the car on a flat surface. Set the gearbox to neutral speed. It is best to have anti-roll bars under the front wheels. We dismantle the center console under the handbrake. To do this, you need to carefully pry up the plastic and unscrew one screw from the back that secures the plastic to the base. As practice shows, most motorists simply break off the front mounting ears, and this leads to the fact that they have to be glued with super glue, so you should be prepared for such a turn of events. We dismantle the console to adjust the handbrake. Raise the rear of the car onto supports. This is to ensure that the parking brake is properly tightened and adjusted. Location of the handbrake adjusting nut. Now, you need to unscrew the fixing washer. We find the adjusting nut for tightening the handbrake. Lower the handbrake all the way down and unscrew the tension nut. Now you need to bleed the brakes several times. We start the car and pump the brake pedal 5-7 times to bring the brakes into working position. Now it’s time to tighten the brake adjustment tension nut. Tightening is carried out until the number of clicks of the handbrake becomes 5-7 times. If the result is achieved, it means that it was done correctly. A collar like this would be perfect. With the parking lever lowered, check how the rear wheels rotate. If you hear extraneous sounds from the brake drum or the wheel turns hard, then you should loosen the tension nut
Please note: the wheels should turn easily after tightening. We install the fixing washer in place. Fixing nut (stopper)
We assemble the plastic and lower the car. It is worth checking the parking brake on a slight slope, as well as when driving
Fixing nut (stop). We assemble the plastic and lower the car. It is worth checking the parking brake on a slight slope, as well as while driving.
Adjustment Tips
As practice shows, during assembly the locking washer is often pulled out of its seat after the vehicle has traveled several thousand kilometers or has been parked for a long time on the handbrake.
Correct installation of the nut on the handbrake.
That is why many car enthusiasts who have already gone through this stage recommend installing a lock nut to the tension nut. This will help strengthen the structure and allow the structure to be better secured.
You can adjust and tighten the parking brake on a Ford Fusion without the participation of a car service center and unnecessary investment. This will require 10-15 minutes of time and a minimum amount of tools.
Final Setup Steps
- continue rotating the adjusting nut until we are sure that the brake lever has a full stroke of approximately 3 clicks (this operation is convenient to perform with two people - one person rotates the nut, and the second checks the handbrake);
- after checking the working stroke, you need to tighten the locknut while holding the adjusting nut with a wrench;
- now you need to check whether the handbrake cable is not too tight: the parking brake lever goes down, the rear wheels are jacked up and turned by hand - they should rotate evenly, without delays;
- if the lever travel is still large, then we continue to tighten the adjusting nut (or unscrew it if the cable is too tight) and regularly check the handbrake travel until it reaches 3 clicks and the brake pads do not interfere with the rotation of the wheels.
After adjusting the system, you should check its operation. To do this, the driver needs to place his car on a section of the road with a slope of 23% and raise the parking brake lever. If the car is securely fixed on the road and does not move, this means that the work was carried out correctly.
The principle of operation of the VAZ 2110 hand brake
Mazda tribute Fixation of the brake drums and wheels of the car occurs as a result of pressing the brake pads against them. They are driven by a lever through a system of cables, brackets and springs.
The tension of the cables (8) is set by a lever (2), and its fixation at a certain tension is set by a ratchet (11). You can remove the cable from the working position by pressing the button (1), disengaging the pawl (10) from the ratchet and lowering the lever to its lowest position.
Since the cable adjustment mechanism is located under the bottom of the car, a rubber seal (3) is installed on the rod (4), which prevents dirt and dust from entering the passenger compartment from the outside. For the same reason, the cables themselves are in a protective braid (9).
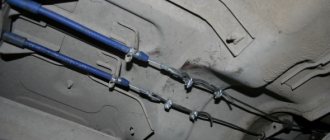
The tension of the cables (to the left and right wheels) of the hand brake is carried out simultaneously by moving the divider (5) along the rod (4) by tightening the nut (6) and fixing it with the lock nut (7).
At its core, the design of the parking brake system of the VAZ 2110 is quite simple. This is the secret of its reliability. The weak link in the system is considered to be the brake cables or, more precisely, their weakening. There are several reasons for this:
- brake pad wear;
- pulling the cable over time;
- weakening of fastening points.
The simplest solution and elimination of this problem is tightening the cables. Due to its simplicity and low labor costs, it is rare that a service will refuse to help a car enthusiast with this problem.
The asking price is from 250 to 500 rubles. We will consider the option with the minimum cost. That is, we will tighten the cable with our own hands.
Preparing for the process of tightening brake cables
Place:
- Garage with a pit;
- Overpass with free access to the bottom of the car;
- Lift.
Tool:
- Two open-end wrenches for 13. The presence of a head with a ratchet will help to significantly facilitate the work;
- Backlight (if necessary);
- Means for resuscitation of threaded connections (WD-40 or similar);
- Pliers;
- Metal brush;
- Grease (Litol, grease or the like);
- Rags, gloves.
Free time:
Minimum 30 minutes.
Vacuum booster
1 – vacuum booster housing;
2 – amplifier housing cup; 3 – rod; 4 – adjusting bolt; 5 – rod seal; 6 – sealing ring of the master cylinder flange; 7 – diaphragm return spring; 8 – amplifier pin; 9 – tip mounting flange; 10 – valve; 11 – hose tip; 12 – diaphragm; 13 – amplifier housing cover; 14 – sealing cover; 15 – piston; 16 – protective cover of the valve body; 17 – air filter; 18 – pusher; 19 – pusher return spring; 20 – valve spring; 21 – valve; 22 – valve body bushing; 23 – rod buffer; 24 – valve body; A – vacuum chamber; B – atmospheric chamber; C, D – channels The rubber diaphragm 12 together with the valve body 24 divides the cavity of the vacuum amplifier into two chambers: vacuum A and atmospheric B. Chamber A is connected to the engine inlet pipe through the check valve of the tip 11 and a hose.
The 24 valve body is plastic. At the exit from the cover, it is sealed with a corrugated protective cover 16. The valve body contains the main cylinder drive rod 3 with a support sleeve, rod buffer 23, valve body piston 15, valve assembly 21, pusher and valve return springs 19 and 20, air filter 17 , pusher 18.
When you press the pedal, the pusher 18, the piston 15, and after them the valve 21 move until it stops against the seat of the valve body. In this case, cameras A and B are separated. As the piston moves further, its seat moves away from the valve and through the resulting gap, chamber B is connected to the atmosphere. The air entering through filter 17, the gap between the piston and the valve and channel D creates pressure on the diaphragm 12. Due to the difference in pressure in chambers A and B, the valve body moves along with the rod 3, which acts on the piston of the main cylinder.
When the pedal is released, valve 21 moves away from the body seat and through the resulting gap and channel C of chambers A and B communicate with each other.
Hydraulics or mechanics
It is worth noting that at the moment not all rear brakes are cable or mechanical; now there are quite a large number of handbrake brakes that operate hydraulically, this is especially true for rear disc brakes rather than drum brakes. Hydraulics duplicate the operation of the main braking system.
That is, when you lift the handle, a special piston creates pressure on the rear discs and they are blocked. If the handbrake does not work in such a system, then the reasons are significantly different from its mechanical counterpart.