The more functions of the car are turned on automatically, the safer and more comfortable it is. The equipment will work faster than a person, and he will not need to be distracted from controlling and monitoring the situation on the road. The sense organs of automation are sensors. One of them appeared in the car relatively recently, it was a rain sensor (RD).
Why do you need a rain sensor in your car?
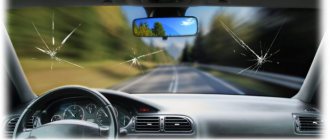
The first drops of rain may appear suddenly on the windshield, immediately reducing visibility. In this case, the refraction of light in water occurs according to different laws; the picture will be so distorted that you may not notice the dangerous development of the situation. This is especially dangerous at high speed.
The condition of the road surface or the traffic situation may change, and the driver will not have time to react, being busy trying to see through the windshield that has lost clarity, while also trying to quickly activate the windshield wipers. Which also won’t immediately put things in order with visibility, so every fraction of a second is important.
The wipers must be turned on as soon as the first drops fall. To do this, you will need a device that can recognize the appearance of water, and not other interference.
On the subject: What kind of DTVV sensor is this, where is it located and how does it work?
We had to tinker with the development of a reliably triggered sensor. The first copies were expensive and were installed only on the most premium cars and as an option. Now this is a large-scale product and there is nothing special about such equipment, even for a budget car.
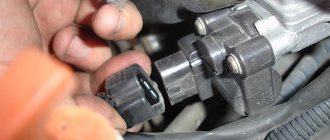
Location
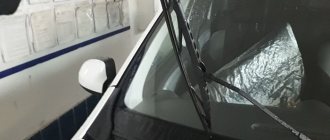
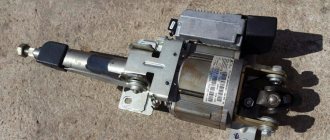
For obvious reasons, the sensor is placed on the windshield, which it is designed to protect from water drops. In order not to interfere with the view, it is located in its upper part, in the area where the interior rear-view mirror is located.
For this purpose, there is a special platform, free from tinting, heating and other interference in the work.
Sensor Description
The leakage and rain sensor in Arduino projects allows you to detect the appearance of drops of moisture and respond to this in time, for example, by turning on an alert. Such systems are actively used in the agricultural industry, in the automotive industry, and in other everyday areas of our lives. In this article we will look at working with a ready-made module, which can be easily purchased in any specialized online stores.
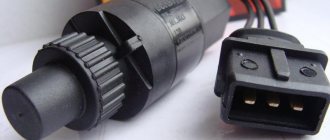
The sensor module consists of two parts:
- "Sensory" drop detection board. It monitors the amount of moisture that has reached it. Essentially, the sensor is a simple variable resistor that is connected by water in different places, causing the resistance to change.
- The second part of the sensor is a dual comparator (usually LM393, but LM293 and LM193 are possible options). Its main task is to convert the value from the sensor into an analog signal from 0 to 5 volts.
There are sensor options on the market with both the sensor and comparator separated, and those combined on one panel.
The sensor is powered by a voltage of 5 V, which can be easily powered from any Arduino board. Typically, the sensor module has two outputs available:
- Analog. The value received by the controller will vary from 0 to 1023. Where 0 – everything is flooded or there is rain, the sensor is very wet, 1023 – dry weather, the sensor is dry (in some sensors there are opposite values, 1023 – maximum humidity, 0 – maximum dryness) .
- Digital. Produces high (5V) or low voltage if a certain threshold is exceeded. The level of the response threshold is adjusted using a trimming resistor.
Principle of operation
Any transition between substances in contact forms an optical boundary. All types of electromagnetic radiation are refracted on it, that is, they change the angle of propagation and energy properties. Part of the beam passes through the boundary, while the other is reflected and returned to an optically denser substance.
For example, fiber-optic communication lines operate on this principle, where at a certain angle light cannot escape the glass and spreads over long distances without loss.
The most suitable frequency range turned out to be infrared (IR) radiation. Its spectrum lies below the limit of visible light. Such radiation is felt only as heat, and therefore is considered thermal; the eye does not notice it. However, this is a wave with properties close to light, and therefore works according to optical laws.
Project diagram
The connection diagram of the rain sensor to the Arduino Uno board is shown in the following figure. The operation of this circuit was simulated in the Proteus simulator.
In the diagram shown, the rain detection board is connected to the control board. The VCC pin of the control board is connected to a 5V voltage source. The control board ground is connected to circuit ground. The output pin of the sensor can be connected to any digital pin of the Arduino board, however, as a result of our experiments, we found out that the circuit works more stably if it is connected to the analog pin of the Arduino board. The buzzer is connected to pin D5 of the Arduino board.
Note : there is a small error in the diagram drawn, the output pin of the rain sensor should not be connected to the Reset pin, but to the analog pin A0 of the Arduino board.
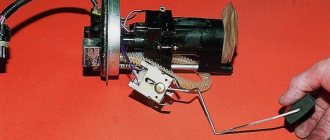
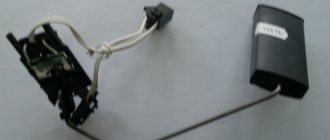
Device
A DD built according to this principle includes:
- infrared light sources, their role is played by IR LEDs;
- photodetectors configured for the same IR range;
- prismatic light guides that form a directed beam flow;
- a printed circuit board with electronic elements that create and process signals;
- a housing with fittings that ensure fastening to glass and an electrical connector.
With dry glass, the angle of placement of LEDs and photodetectors with optics is selected in such a way that there is complete internal reflection of the rays from the outer surface of the windshield. Just like the fiber optic lines mentioned above. The maximum amount of energy is supplied to the photodiode.
When a drop of water, even of the smallest size, appears in the sensor’s tracking zone, the refractive conditions at the interface between glass and atmosphere change. It is no longer possible to return all the energy of the beam to the glass body; part of it will go into the water. The signal at the receiver output will instantly respond to this and will decrease.
Further evaluation and decision is made by the electronics. The sensor controller will determine if there is enough water to operate the windshield wipers. The algorithm for their operation can be set in different ways. For example, if the glass is heavily soiled and water is poorly removed, the brushes will work longer and more intensely. You can decide to turn on the washer.
The devices are configured to exclude abnormal operations. They should not react to dry glass contamination, although this function can be added as a useful addition, but with a washer.
Thanks to the infrared range, the sensor works equally both day and night, visible light does not affect it in any way. And it’s easy to deal with other interference using modulated radiation.
This is interesting: How to check the speed sensor, 3 simple ways
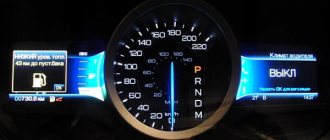
Considering the intellectual level of a modern car, where all systems are connected via a computer data bus, it is not difficult to assume that the activation of the DD will be noticed by other devices.
The brake control reacts, preparing the pads for emergency operation and clearing water, additional lighting turns on, and the operating mode of the climate control and information screens changes. The machine will automatically adjust to changing conditions.
How it works
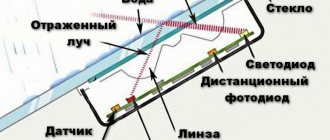
The operating principle of the rain sensor is based on the elementary laws of physics. Any glass is a translucent mirror and partially reflects the incident light. Moreover, the angle of incidence is equal to the angle of reflection (remember school textbooks). The beam is reflected from both the internal and external surfaces. The device is installed in such a way that only light reflected from the outer boundary is used. If the windshield is clear, the reflected light reaches its maximum intensity. As water becomes dirty or drops appear, the intensity of the reflected light decreases.
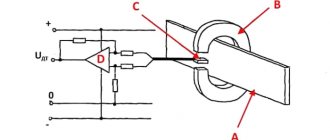
Let's look at the illustrations with the operation diagram
The device includes an LED and a photodiode. A reflector is installed on the inside of the windshield, parallel to it. The focused radiation is adjusted in such a way as to travel the longest possible path with several refractions and reach the photodiode. Under ideal clean conditions, the device is calibrated to minimum sensitivity. The photodiode produces a signal about the maximum possible brightness of light in this mode.
For reference: To prevent the light from the emitter from disturbing the driver and oncoming cars, an infrared LED is installed as a source. That is, the operation of the sensor does not create additional danger.
When drops of rain or dirt hit the glass, part of the emitted light is refracted on the outer surface, and the photodiode receives a weakened signal.
Its intensity is assessed by the control module, which decides whether to turn on the windshield wipers.
How to improve accuracy
If the beam path is set to a single drop, the sensor does not work effectively: to trigger, the drop needs to hit exactly the point where the light is reflected. Therefore, the refraction path on the car should be as long as possible. This solution works not only on “on.” and "off". The sensor can determine the intensity of rain (pollution), and, if necessary, change the speed of the wipers. In some advanced systems, the control unit can turn on the washer.
The light sensor is even simpler
A simple photodiode is enough and no complex beam refraction systems are needed. The device is installed in the most illuminated place inside the car (so as not to be exposed to contamination). Most often, this is the so-called “torpedo” above the dashboard, immediately below the windshield.
Important! For normal operation of the light sensor, the glass must be clean.
The photodiode detects the light level, and when the lower limit is reached, it gives a command to turn on the external lighting devices. In fact, the function of the low beam switch is duplicated.
- For normal and safe operation of the system, a deactivation function is required. The driver must decide for himself: to control the lighting manually, or to entrust this work to automation. The same goes for the rain sensor. Otherwise, when driving into a portal-type automatic car wash, the windshield wipers may be damaged.
Now you know what a rain and light sensor is. How can you find out if this device is installed on your machine? You can look at the instructions or the package. Or determine the presence of the device by the functions on the controls. The windshield wiper and light control switch should be in the "AUTO" position.
How to install a rain sensor yourself
Ready-made kits are produced for equipping cars where the DD option is not provided. It is only necessary to fix the sensor on the glass, ensuring the transparency necessary for its operation, that is, remove the tint, if there is any in this place.
It is better to choose a kit specifically for this model, then there will be no difficulties with its integration into the electrical equipment of the car.
Rain detection. Code for Arduino
Once the circuit is assembled, upload the following sketch to your Arduino board.
Now place the rain sensor in a location where precipitation can fall directly onto the sensor, possibly onto the roof. To facilitate water drainage, tilt it slightly (~20°).
Please note that the electronics module is not waterproof, so when installing, be careful to ensure that only the touchpad is in contact with water.
// pins connected to the sensor #define sensorPower 7 #define sensorPin 8 void setup() { pinMode(sensorPower, OUTPUT); // initially keep the sensor turned off digitalWrite(sensorPower, LOW); Serial.begin(9600); } void loop() { // get readings from the function below and print them int val = readSensor(); Serial.print("Digital Output: "); Serial.println(val); // determine the rain status if (val) { // no rain Serial.println("Status: Clear"); } else { // it's raining Serial.println("Status: It's raining"); } // take readings every second delay(1000); Serial.println(); } // this function returns the sensor output value int readSensor() { digitalWrite(sensorPower, HIGH); // enable sensor delay(10); // give time for the power to settle int val = digitalRead(sensorPin); // read the sensor output digitalWrite(sensorPower, LOW); // turn off the sensor return val; // return value }
Once the sketch is uploaded, open the serial port monitor window to see the Arduino output. In clear weather you should see a high logic level on the digital output. To see how water is detected, you can spray some water on the touchpad.
Figure 7 – Arduino output in the serial port monitor when working with a rain sensor
Code Explanation
The sketch begins by declaring the Arduino pins to which the VCC and DO pins of the sensor are connected.
#define sensorPower 7 #define sensorPin 8
Now, in the setup() function, we first declare the sensor power connection pin as an output and then set it to a low logic level so that no power is supplied to the sensor initially. We also configure the serial port.
pinMode(sensorPower, OUTPUT); digitalWrite(sensorPower, LOW); Serial.begin(9600);
In the loop function, we periodically (at one second interval) call the readSensor() function and print the return value along with the status.
int val = readSensor(); Serial.print("Digital Output: "); Serial.println(val); if (val) { Serial.println("Status: Clear"); } else { Serial.println("Status: It's raining"); } delay(1000);
The readSensor() function is used to get the current state of the sensor's digital output. It turns on the sensor, waits 10 milliseconds, reads a digital value from the sensor, turns off the sensor, and then returns the result.
int readSensor() { digitalWrite(sensorPower, HIGH); delay(10); int val = digitalRead(sensorPin); digitalWrite(sensorPower, LOW); return val; }
Original article:
- How Rain Sensor Works and Interface it with Arduino
Disadvantages of the device
The main problems are related to setting the sensitivity threshold. Too fine a setting leads to numerous false alarms due to the slightest contamination of the glass.
Artificial hardening causes long delays in switching on. Even when checking, you have to wait ten seconds before turning it on, which nullifies all the benefits of the automatic response to rain.
Inconveniences appear and, if necessary, replace the windshield. The sensor has to be re-glued, which requires certain qualifications, and then initiated and configured. But qualified specialists are trained in this and can confidently cope with this, and glass is produced in all versions, including those prepared for DD.
Summarizing
The rain and leakage sensor can be used in Arduino to create devices that respond to the appearance of moisture in the form of drops. Among the advantages of the module considered are its simplicity, convenience and low cost. The sensor is connected very easily - using analog or digital outputs. To get the value in the sketch, use the standard function analogRead (or digitalRead for a digital pin). Using the obtained values, you can turn on the alarm or other external devices using a relay.