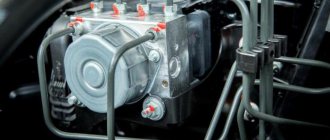
Replacing the clutch pedal position sensor
On Lada Vesta and XRAY cars, removal and installation of the sensor is performed in the same way. It is located in the area of the clutch pedal, next to the steering shaft: Procedure :
- Disconnect the block with wires (green) by pressing the latch.
- Remove the sensor by turning it counterclockwise 90°.
Installation is carried out in the reverse order, with the brake pedal in its highest position.
Checking the clutch pedal position sensor
Vesta and XRAY got the sensor from Renault (article 253250007R). To check it, you will need a multimeter (in ohmmeter mode). Procedure :
- Move the rod lock to the right position using a flat-head screwdriver.
- Connect the multimeter probes to sensor terminals No. 3 and No. 4.
- When the rod is in the free position, the circuit should be open (the resistance value approaches infinity).
- When you press the rod, the circuit should close (the resistance value is close to zero).
We replace the faulty sensor with a new one. Let us remind you that we previously talked about the brake pedal position sensor and the electronic gas pedal. Categories of products that may be of interest to you based on the article “Replacing and checking the clutch pedal position sensor on Lada Vesta and XRAY”: Products from the Dustershop77 range on the topic of the article:
| Name | Manufacturer | Price | Availability | Add to cart |
| intro iso ant-1 | Antenna adapter Intro iso ant-1 | INTRO | 500 / 350 rub. Discount: 300 rub. | 2 |
| DC307-ASAM.30587 | Silent bolt (silent lock) ASAM 30587 | ASAM | 700 / 500 rub. Discount: 350 rub. | >10 |
| OBD-BT01 | Bluetooth OBDII - adapter for diagnostics | China | 1500 / 1000 rub. Discount: 900 rub. | 2 |
| DC1167 | Large shock absorber support cup cover | Analogue | 1000 / 700 rub. Discount: 600 rub. | 8 |
| multi-vc731 | On-board computer Multitronics vc731 | Multitronics | 8500 / 7900 rub. Discount: 7600 rub. | 1 |
| DC909 | Oil filter cup puller | Analogue | 500 / 450 rub. Discount: 400 rub. | 7 |
| multi-c590 | On-board computer Multitronics C590 | Multitronics | 7500 / 6600 rub. Discount: 6200 rub. | 1 |
| DC303 | 8mm L-shaped key for Renault oil plug | RF | 200 / 100 rub. Discount: 70 rub. | >10 |
| multi-cl590 |
Why does the clutch pedal click on a Lada Vesta - the degree of danger and the design of the assembly module
Design
The situation when the box clicks when releasing the clutch on a Lada Vesta or pressing it is typical for the products of both companies. Experts assure that extraneous clicks are considered a defect. But apart from acoustic discomfort, they will not bring serious problems such as, for example, bent valves due to premature replacement of the timing belt on the Lada Vesta engine.
Clutch
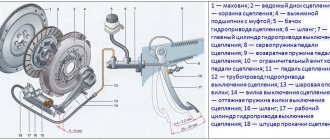
The block diagram of a node connects the work of several structural units:
- Garbage bin.
- Clutch disc with friction lining.
- Hydraulic drive.
The basket consists of a pressure plate with a friction insert and a diaphragm spring attached to its body. The latter is screwed to the engine flywheel in the amount of six pieces. The driven part is located between the pressure plate and the flywheel. When the pedal is released, the discs engage and transmit torque from the engine to the gearbox.
Drive part
The hydraulic transmission includes the following elements:
- Main cylinder.
- Pipeline.
- Working cylinder.
- Expansion tank.
Interestingly, the design does not include forks. The working cylinder and release bearing are connected in the housing and form one unit with its own article number:
- 21810160118001 — manual transmission VAZ.
- 306201586R — Renault gearbox.
For your information . You can find out the manufacturer of the gearbox by the VIN number.
Reviews
| № | Positive |
| 1. | Semyon (www.zr.ru): mileage 70,000 km, clutch is normal. |
| 2. | Andrey (autobann.su): the pedal travel is natural, not increased. I noticed that in severe frosts the PS becomes a little tight. |
| 3. | Georgy (lada-vesta.net): there are no comments on the DS, it works as usual. |
| 4. | Stepan (otzovik.com): standard pedal travel, 68,000 km of active drive without maintenance and repairs. |
| 5. | Vladimir (www.zr.ru): positive review, no comments. |
| 6. | Alexander (autobann.su): I have a pre-installed DS with a stock from Renault Logan, I heard that the quality of the French is better than the domestic one. |
| 7. | Mikhalych (https://forumvesta.ru): all standard units and components are working properly, without any violations. |
| 8. | Vitaly (lada-vesta.net): Lada Vesta is assembled with high quality, I have no complaints. |
| 9. | Timofey (otzovik.com): in four years of operation, I replaced the sensor once, I don’t consider it a defect or defect. |
| 10. | Stanislav (www.zr.ru): I use Lada myself and recommend it to others. |
| 11. | Gennady (autobann.su): mileage 85,000 km without repairs or equipment replacement. |
| 12. | Alexey (https://forumvesta.ru): soon 100,000 km, the condition of the car is a solid “4”. Much depends on the driver, how he observes the technical inspection deadlines. |
| Negative | |
| 13. | Konstantin (www.zr.ru): the Russian sensor served for two years, after which the rod failed. Replaced it with a French one from Renault Logan. |
| 14. | Vitaly (otzovik.com): the DS is not tightly fixed, periodically it turns out of the grooves. |
| 15. | Grigory (autobann.su): after a year of using the car, the DS flew. Fortunately, it was under warranty and was replaced free of charge. |
| 16. | Kirill (lada-vesta.net): I pumped the system several times, but to no avail. |
Total
If it clicks when releasing or tightening the Lada Vesta clutch in the cabin, the reason may be the limit switch, pedal holder or hydraulic cylinder design. More serious knocking noises in the engine compartment - less often the dealer will refuse to find out the cause, as this may indicate a malfunction of important parts: springs, release bearings, working cylinder.
As a temporary solution to the problem of heavy knocking, drivers use the accelerator. You need to adapt to this: when the clutch is released, the driver gives more gas and the knock disappears. Typically, such actions indicate defects in the media release manual.
Lada Vesta became the new flagship of AvtoVAZ in 2015. The appearance, interior and equipment are radically different from all previous models. For the first time in many years, the new product was able to compete with the most popular foreign cars from Europe and Asia. In addition, Vesta is not inferior to them in quality and in some cases can give them an advantage.
Analogs
The manufacturers themselves recommend 826818 VALEO 2180 for Vesta. Owners note that when using the model, the pedal becomes noticeably softer and the car starts easily. The note applies to the original set; fakes are often found. The spare part costs four thousand eight hundred rubles.
The original part of the Lada Vesta is not suitable for the 21129 engine in terms of power; it is designed for lower speeds, for example, such as 2112. For 106 horsepower and above, TS-00001321 would not be a bad match. Price – five thousand six hundred rubles.
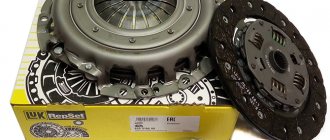
Clutch device
The Lada Vesta, as well as all its modifications, including the X-RAY and Crossover versions, is equipped with a standard unit with a disk. Contact between the friction disc and the drive disc occurs under the action of a spring. The main difference between the Vesta clutch and other AvtoVAZ models is the drive.
The mechanics have a hydraulic drive, the robot has an electromechanical drive.
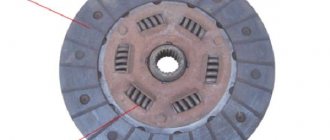
Structurally, the Vesta clutch is designed according to the standard type and consists of pressure and driven disks interacting with each other. The basket has a pressure plate installed, the basket itself is a steel body. The pressure plate in the basket is pressed using a special device in the form of a spring. The clutch basket is mounted directly on the transmission flywheel and is rigidly bolted.
A friction disc is located between the flywheel and the drive disk. The clutch disc is also called a friction disc due to special linings attached on both sides. A shock absorber with springs is installed in the center of the hole, designed to eliminate vibrations when the clutch is engaged. The friction disc is pushed through the hub onto the engine input shaft.
Features of the Vesta clutch hydraulic drive
The hydraulic drive consists of pipelines and two cylinders (working and main). From the master cylinder, pressure in the rod is transmitted to the operator. Which, in turn, acts on the shut-off device through the pipes. The slave cylinder is a module that also houses the release bearing. All this is housed in the clutch housing.
Brake fluid acts as a working fluid. To ensure the reliability and performance of the hydraulic drive, it is necessary to promptly change the working fluid in accordance with the regulations. Malfunctions in hydraulic transmissions are often caused by air in the system. In advanced cases, it will simply be impossible to change the speed of the car.
Features of the electric clutch drive on Vesta
The electric drive, unlike the hydraulic one, has a slightly different design; it acts directly on the clutch fork. As the fork rotates, the force puts pressure on the release bearing and, in turn, on the lobes of the pressure plate spring. The release bearing is reinforced and is constantly in operation, and the spring is always pressed against the clutch to ensure there is no play.
The thrust bearing does not require periodic maintenance, i.e. does not require lubrication, the manufacturer also took care of this. The bearing lasts a long time and in case of failure is simply replaced. You can recognize this by the characteristic noise. The release switch also needs to be replaced when replacing the driven or pressure plate, regardless of whether the bearing can be repaired or not.
Malfunctions in the operation of the hydraulic drive can be easily eliminated with your own hands; often it is enough to bleed the system and blow out the air. But with an electromechanical drive, troubleshooting is much more difficult. A similar procedure at automated and robotic checkpoints is called adaptation and is impossible without knowledge, skills and equipment. In these cases, the only correct decision is to contact an official dealer.
Today, the AvtoVAZ plant is actively introducing modern technologies into its cars, including clutches. Nowadays, building elements that meet international quality standards are used for this. Friction linings and springs are much more reliable and durable.
The introduction of modern technologies and materials allows for a smooth start and makes gear shifting clearer and smoother.
How to adapt AMT
- Turn on the ignition and connect to the car using the ELM327 adapter and DDT4ALL software.
- Select in the upper left window XGA-XRAY - AT - BVR_On_CAN_x52_J53_v2.4
- In the middle window BVR_On_CAN_x52_J53_v2.4
- In the lower left After sales - Learning Procedures
- Press the button with the image of a “face”
- Carry out the learning procedure by clicking on the appropriate button.
- Turn on the ignition, but do not start the engine. Carry out training of the
clutch actuator end positions. Execution time is about 5-6 seconds. (you will hear the actuator moving). - After the operation, press the “STOP” button and turn off/on the ignition.
- We wait 5-10 seconds and start the gearbox learning
. We do not turn off the ignition. Execution time is about 1 minute. - After the operation, press the “STOP” button and turn off/on the ignition.
- Start the engine and wait 15-20 seconds, then start learning the clutch touch point
. Execution time 5-10 seconds. - After the operation, press the “STOP” button and turn off the ignition. Wait for the main relay to turn off (about 4 minutes)
- We start the engine and check.
If after AMT adaptation the engine does not start
. It is possible that the last learning procedure was completed incorrectly and an error was stored in the memory of the electronic unit. It is necessary to perform diagnostics, reset errors, and perform adaptation again.
You can also perform AMT adaptation using OpenDiag Pro or Scanmatic software (see an example of such adaptation). Both programs are paid.
Have you ever had to adapt the AMT on a LADA yourself?
Let's remember that we previously told you how using ELM327 and DDT4ALL you can:
Share
AvtoVAZ offered Lada Vesta buyers a cheap automated transmission, but forgot to talk about the prices for the further maintenance of the notorious AMT “robot”. But the world needs to know how much it actually costs to replace the actuators that are responsible for shifting gears.
If you were looking for the cheapest, but most understandable (and not Chinese) car with automatic gear shifting, then you should go straight to the official AvtoVAZ dealers for the new Lada Vesta. Not only does the Russian budget sedan itself cost less than popular models like Solaris, Rio and Polo, but also the surcharge for the two-pedal version of the Togliatti car is half that of its competitors - only 25 thousand rubles!
The secret of adequate cost is in the AMT robotic gearbox of AvtoVAZ’s own production, which was based on the modernized cable “mechanics” with the index 2180. The AMT 2182 unit was first tested on the Priora. German electric actuators manufactured by ZF are used here as the selection actuator. They are located in place of the conventional gear shift mechanism and on the outer end of the clutch fork. Essentially, this is the same 5-speed “mechanics”, and even the assembly of two transmissions is carried out on the same line. Hence the low cost of AMT. And the “robot” is only an insignificant 5 kg heavier than a manual transmission.
Clutch faults
In Vesta, depending on the type of transmission, the drive may differ. As a result, their problems may be different.
Problems with the hydraulic clutch
Brake fluid enters the working cylinder from the master cylinder through pipes. These two main parts of the mechanism have the following faults:
- excessive wear of rubber cuffs in cylinders;
- loss of brake fluid (lack of tightness at pipe joints);
- damage to cylinders, pipelines, etc. with the formation of cracks.
The hydraulic drive is very reliable, but can fail if air gets into the system. The main sign of ventilation is incomplete disengagement of the clutch. For this reason, broadcasts will be turned on with great difficulty or will be almost impossible to do. Typically, air enters the system when the level of brake fluid in the master cylinder reservoir is critically low, or due to a leak. To eliminate the malfunction, it is enough to purge the system; a special fitting is provided for this.
There is no need to adjust the hydraulic clutch transmission while the vehicle is moving.
The service life of the system depends on the driving style and operating conditions of the owner. A working clutch does not slip and completely transmits torque from the engine to the gearbox when the pedal is released. When pressing the pedal, the transmission must be completely disconnected from the control panel.
You can check for yourself the functionality of the Lada Vesta manual transmission hydraulic drive, which operates according to a specific algorithm.
If after performing all these steps no problems are found, the clutch can be considered working. The service life of the unit is reduced not only due to incomplete stopping or skidding, but also when driving off-road, with a maximum load, when driving with a trailer or tow, or an aggressive driving style. And even in the case of a seemingly harmless action, such as pressing the clutch pedal while the engine is running.
Malfunctions and methods for diagnosing them on AMT
The robotic gearbox of Lada Vesta, as well as Kalina, Grants, X-ray and others cannot be called ideal. Many car enthusiasts may have problems getting the robot used to working. The most common breakdowns are jolts, howls, squeaks, impacts, and jolts when shifting gears.
A worn release bearing can also be a source of noise. When replacing disks, they must also be replaced regardless of their condition. Repairing a clutch on an AMT is actually not easy, and the procedure is called "fitting in." Although this is carried out by specialists using appropriate computer programs, faults can be diagnosed independently.
To do this, follow these steps:
- Turn on the ignition and make sure that the robotic transmission is working. Press the brake pedal and move the gearshift lever to any position. In this case, you need to ensure that all relevant icons are displayed on the toolbar screen. If the symbols appear, the gearshift lever is in neutral.
- Start the engine, there should be no sounds from the gearbox. A characteristic howl may indicate an urgent replacement of the launch pad. Similar sounds can occur when transmission elements wear out.
- Press the brake pedal and use the lever to move the selector to all positions. Broadcasts should turn on clearly, without creaking, knocking or howling. There may be several options here. A whine when engaging the clutch indicates wear on the release bearing. If the sounds disappear when the clutch is disengaged, it means the gearbox bearings are worn out. Jolts and clicks during gear changes indicate that the clutch is not fully disengaged. The cause may be, among other things, a malfunction of the electromechanical transmission clutch. In this case, it is necessary to check the transmission control unit for errors. And for this you will need special software, which can be purchased from an official dealer.
- Place the gear shift lever in neutral with the brake pedal depressed. If you release the pedal, the car should not move.
- Then you can run diagnostics on the go. Move the selector to the forward position, while gently pressing the accelerator pedal. The clutch should engage smoothly. When driving with sudden acceleration and braking, you should ensure that the gears rise and fall smoothly, without jerking or extraneous sounds.
- Activate the manual transmission control mode and follow the steps described in the previous paragraph again. The gearbox should operate normally, without any extraneous sounds.
- Stop the car and move the selector lever to the reverse position. When you press the accelerator pedal while releasing the brake pedal, the car should move in reverse. Cretins and idiots are unacceptable. Otherwise, this indicates damage to the clutch discs and friction shock absorber. If gears shift incorrectly or operate erratically, check the transmission control module for errors.
If it is not possible to restore the functionality of the AMT, you should try to switch the robot to manual control. This is especially true in the absence of spare parts. To do this, it is necessary to remove the gear shift mechanism and the electromechanical clutch drive. You will also need to disconnect the drive cable. The fact that the clutch is faulty is also indicated by the burning smell of the friction linings, as well as the lack of dynamics during acceleration. A variety of squeaks and other unusual noises may indicate a problem with the drive.
The creaking of the Lada Vesta clutch drive is considered the most common reason for contacting an official dealer.
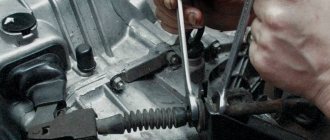
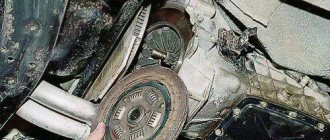
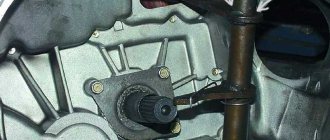
Sensor location and dismantling process
On the Lada Vesta, the sensor is located near the steering shaft, next to the pedal. If jerking or jerking occurs when changing gear, the car owner should check and adjust it.
To dismantle an element, you need:
- press the latch and carefully disconnect the block with wires;
- Rotate the component counterclockwise ninety degrees and remove it.
When installing the part in place, you need to make sure that the brake pedal is in the upper position; the actions are performed in the reverse order.
After installation, the pedal is carefully lowered, after which the block with wires is connected.
Replacing the clutch on Lada Vesta
This type of work is not easy, regardless of the type of transmission installed. The further operation of the car will depend on the quality of the operations performed, so it is better to entrust it to qualified specialists. The cost of such work is quite high and, depending on the complexity and type of transmission, can range from 3,500 to 15,000 rubles. Of course, replacing the clutch of a Lada Vesta robot, and even more so on a manual one, is quite possible. But this requires a lot of experience and skills, and in the case of a robotic gearbox, also special software, without which it is impossible to configure the transmission (adaptation).
Replacing the clutch on an AMT
To change it to a Vesta with a robotic gearbox, you will have to completely disassemble the gearbox. The further algorithm of actions is as follows.
- If replacing the pressure plate is not included in the plans, then its position relative to the basket should be marked with paint so that there are no problems during assembly.
- Using a size 8 wrench, unscrew the bolts securing the basket to the flywheel of the control unit, remove the pressure plate and clutch disc.
- Remove the thrust bearing along with the transmission.
- All failed elements must be replaced, after which they are assembled in the reverse order of disassembly. To install the basket you will also need a centering rod with a friction disc.
In order not to carry out the painstaking process of disassembling the clutch several times, it is recommended to immediately change all assembled parts.
Adjustment will require special equipment and knowledge. You definitely can’t do without specialists here.
Replacing the clutch on a manual transmission
Structurally, this manual unit is no different from an automatic transmission, with the exception of some nuances. The replacement process is identical, however, in the case of a hydraulic drive, a procedure will be required to clear the air from the system. This work is carried out as follows.
- Remove the battery, battery compartment and engine dust cover.
- Unscrew the brake pump reservoir cap and add brake fluid to the maximum level.
- Remove the protective cap from the fitting and place a suitable size tube (preferably transparent) on top. The other end of the tube is discharged into a container with working fluid.
- Move the tip of the nipple tube by lifting the latch.
- Wait until air stops flowing along with the brake fluid through the hose, then release the clamp and remove the hose through the fitting.
- Add fluid to the reservoir to the optimal level.
Even a novice can diagnose a clutch failure on a Vesta, be it a manual or robotic transmission, if all instructions are followed. Another thing is to change the clutch. This can be done not only by a beginner, but also by many experienced car enthusiasts. The fact is that in addition to the tool, you will need special equipment and a lot of experience.
It’s easier to save time and nerves with professionals. In addition, for such work you can receive a quality guarantee, which means you can be confident in further operations without any problems.
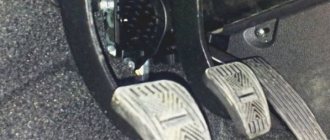
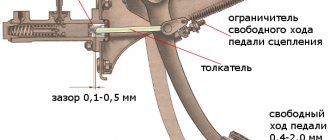
During the operation of the car, some owners notice the appearance of jolts, jerks or jerks when switching to 1st, 2nd or 3rd gear. The cause of this problem may be the clutch pedal travel sensor, which can be adjusted manually in a couple of minutes.
Attention! The clutch pedal travel sensor may differ depending on the vehicle configuration. Next we are talking about the Renault 253250007R sensor with a rectangular rod, which poses certain risks).
How to remove the clutch sensor:
- Disconnect the clutch pedal switch connector.
- Turn the clutch pedal switch 1/4 turn counterclockwise.
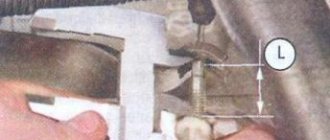
The rod can only move during the X dimension adjustment. The clutch pedal travel sensor must be replaced if the rod has separated from the sensor or if more than three X dimension adjustments are required for adjustment.
To adjust the clutch sensor:
- Measure the X dimension of the stem protrusion. If X is less than 17mm, adjust by gently pulling the end of the rod.
- Dimension X must be between 17 mm (no less) and 18 mm (no more).
Install the clutch sensor in reverse order. Depress the clutch pedal by hand. Install the sensor on the pedal assembly. Lock the sensor by turning it 1/4 turn clockwise. When returning the clutch pedal to its original position, support it with your hand. Insert the connector.
Note. The clutch pedal travel sensor is adjusted automatically according to the pedal position. During automatic adjustment, transitional clicks are heard through fixed positions.
Read the owners' reviews in the comments.
ps On the Lada XRAY the clutch travel sensor is not adjustable.
Remember that if the clutch pedal position sensor is faulty, engine operation may be unstable (floating speed, clicking when releasing gas), and error P0830 will appear. Before replacing the sensor, it is recommended to check it with a multimeter.
Related posts:
- Autostart turns on the ignition but does not turn the starter
- The upper arm of the VAZ 2107 is loose
- VAZ 2115 does not respond to the ignition key
- Placing timing belt marks
| Stop the engine and press the clutch pedal two or three times. | The drive mechanism should not hear jamming, squeaks, impacts and other extraneous sounds. |
| Start the engine. | If you hear a whine from the manual transmission, which becomes more pronounced when you press the pedal, then the pad is very worn and needs to be replaced. |
| With the engine running, press the clutch pedal and enter any speed. | At the same time, there should be no crunching, knocking, or squeaking noises. Otherwise, extraneous sounds indicate incomplete disengagement of the clutch. This usually means putting the system on the air. If there is no air, then there is a malfunction of the master or working cylinder, or a break in the diaphragm spring. |
| With the engine running, increase the speed and carefully release the clutch pedal. | By the time the car starts moving there should be no shocks or extraneous noise. Otherwise, the cause of failure could be damage to the discs, shock absorber or oil on the discs. |
| While driving, you need to press the accelerator pedal sharply. | If the revs have increased and the car has just accelerated, the clutch slips. Slipping is easy to understand by the characteristic burning smell from the friction linings of the discs in the cabin. The problem is solved by replacing the disks. |
Jerks when starting off
If you notice that the movement is accompanied by twitching, this is a serious reason to seek help from specialists. The Lada Vesta can shake for various reasons (for example, ignition failures), but if it is the clutch mechanism that gives the effect, we are talking about scrap parts. Obsolescence will never be accompanied by jerks, but destruction, the breaking off of pieces of metal, manifests itself this way. The presence of freely moving debris can cause great damage to other Vesta nodes. It is recommended to carry out repairs immediately.
Messages 13
1 Topic from Andre-y 2016-09-04 12:43:27
Topic: Vesta clutch adjustment
I’ve driven the West for 1000 km and I can’t get used to the clutch, just when I’m moving off, well, the clutch grabs at the very end, so you still have to release it very slowly and for a long time in order to start normally and not stall the engine, and keep the speed at least 1500-1700. Is it so hard for everyone to start moving and is it possible to adjust the clutch? Before this I had a Priora, even if I let go of the clutch more frequently, I still pulled away confidently, but in the West the engine stalled.
2 Reply from Fan 2016-09-04 19:07:49
- Fan
- Moderator
- Inactive
- From: Smolensk region
- Messages: 1,017
- Thank you: 204
Re: Vesta clutch adjustment
I got into the Vesta in the cabin and immediately took off and drove off. You probably don’t have enough experience; you need to feel when the engine is choke. And don’t forget that Vesta, unlike Priora, has a hydraulic clutch, not a cable.
3 Reply from Andre-y 2016-09-04 19:42:03
Instructions, recommendations from experts
Often Lada Vesta owners complain about knocking and jamming when moving from first to second gear. Shocks are less common when turning on third speed. The reason for this behavior of the transmission is wear of the clutch sensor, violation of the gaps, and an increase in the free play of the pedal.
It is quite possible to adjust the unit with your own hands; there is no need to go to a workshop. The exception is the current factory warranty for the technical product.
Connecting cruise control keys
To connect the cruise control keys, follow the procedure.
Connecting the buttons on the steering wheel begins with completing the wired cruise control system with the radio wiring. Connect the wiring to the multimedia device into the blue connector. To avoid mistakes, study the wiring diagrams.
If a new radio was installed during operation, you will need an adapter for the specific type of audio system.
- switching music files;
- Instant volume mute.
Cost of steering wheel with buttons
The price for the model with buttons depends on the store. Most Lada Vesta car owners purchase products with keys in virtual stores. The order is placed for article number 8450006832. The cost ranges from 5000 to 7000. If the vehicle owner needs an airbag, the price increases by another 1000-15000. For leather covering you will have to pay another 2000-2500 rubles.
To save money, you can use an overlay with keys on a standard steering wheel. This option is more difficult to connect and difficult to find, since it is not popular.
Bleeding the hydraulic drive
Required tools and consumables:
- capacity 0.5 l;
- thin hose;
- bottle of brake fluid;
- slotted screwdriver.
The procedure is as follows:
- Fill the hydraulic reservoir with brake fluid to the Max mark.
- Remove the protective cap from the bleeder fitting.
- Place the hose onto the fitting. Place the second end of the hose into a jar filled 1-2 cm with brake fluid so that it is immersed in the liquid.
- Use a slotted screwdriver to pry the spring clamp of the supply tube and lift it 1 click.
- Pull the tube tip back 1 click.
- Wait until air bubbles stop coming out of the tube. To speed up the process, you can press the clutch pedal several times.
- Return the tube tip and spring clip to their original state.
- Install the engine splash guard, battery and battery shelf.