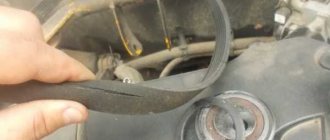
The car's clutch is subjected to heavy load - constant use during operation of the car, engine vibration, too much load on the engine. The latter fact of wear is usually accompanied by the characteristic smell of a burnt clutch.
The first signs include a feeling of incomplete clutch operation, extraneous sounds, and even crunching sounds. The clutch pedal may also sag, which also indicates that it is necessary to replace the clutch on the Lada Priora as soon as possible.
However, inexperienced car owners often have a logical question: how to replace the clutch with your own hands? There is nothing complicated in this process, but it is necessary to stock up on tools and some knowledge.
How to replace a Lada Priora clutch
The car's clutch is subjected to heavy load - constant use during operation of the car, engine vibration, too much load on the engine.
The latter fact of wear is usually accompanied by the characteristic smell of a burnt clutch. The first signs include a feeling of incomplete clutch operation, extraneous sounds, and even crunching sounds. The clutch pedal may also sag, which also indicates that it is necessary to replace the clutch on the Lada Priora as soon as possible. However, inexperienced car owners often have a logical question: how to replace the clutch with your own hands? There is nothing complicated in this process, but it is necessary to stock up on tools and some knowledge.
Preparation
There are 2 ways to replace the clutch. One method involves completely removing the gearbox, the other does not. In any case, the following available tools are needed:
- jack;
- an overpass, without which it will be problematic to replace the clutch;
- logs or bricks;
- a set of keys and sockets of sizes from 8 to 19, you may need a 15 socket, which is rarely required;
- extension cords for keys will not be superfluous, since sometimes a situation arises in which it will be impossible to reach the part by hand;
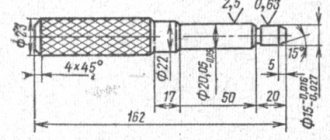
- a 10-12 cm mandrel for centering the driven disk.
- Drive the car onto the overpass.
- Remove the battery.
- Disconnect the cable going to the speedometer.
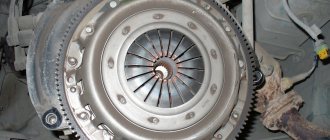
- Now you have to remove the gearbox. Moreover, if you put back the old pressure plate, you need to note the relative position of the flywheel and the casing of the above-mentioned disc to maintain balance.
- Next, insert the mandrel into the hole in the disk. You can do without this procedure, but then you need to hold the driven disk, otherwise it will fall out.
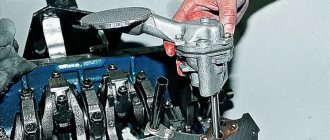
- While holding the flywheel, unscrew all 6 mounting bolts. In this case, this must be done gradually, one turn from each bolt, so that the disk does not warp.
- Now you can remove the casing that will contain the pressure plate.
- Next, the driven disk with the mandrel is removed.
- Now comes one of the crucial moments in the entire replacement process, namely the inspection of the driven disk. It is necessary to check it for wear, check the surface of the friction linings and the reliability of the damper springs in the hub sockets.
- We must not forget about checking for its “beating”. In other words, how smooth its surface is.
- If there are any signs of wear, the necessary parts must be replaced.
- If there are obvious signs of wear on the pressure plate, it should be replaced completely as an assembly.
- Before installing the clutch, it doesn’t hurt to check the parts for ease of interaction. Any nicks or defects should also be addressed.
- When installing the driven disk into the housing, the protruding part of the hub must be in contact with the spring.
- Next, assembling the clutch proceeds in the reverse order.
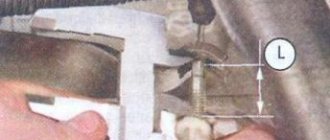
It is noteworthy that when installing new parts, the length of the lower threaded part of the cable tip is usually not enough to restore its original position.
Therefore, it is necessary to restore the wear compensation mechanism to its original position. To do this, size L must be installed between the leash and the clutch release fork lever.
The clutch pedal should be raised all the way up. Then the spring will automatically return the slider to its original position. After this, all that remains is to check the result of the work and, if necessary, adjust the clutch.
Mechanics
Mechanically, the clutch operation process is extremely simple.
Let's analyze it from the moment the movement begins. After starting the engine, the car is in neutral gear (starting the engine in gear is bad manners). The clutch is depressed all the way - this means that it is turned off, the driven and pressure plates have separated, that is, a moment is created to change gear. The gearshift lever is moved to position 1, and first gear is engaged. The pedal is smoothly released (the clutch is engaged), at this moment the most important thing happens: the distance between the pressure plate and the driven one is constantly decreasing, and the force transmitted by the engine has already set one disk in motion, which makes the moment of “collision” of the two disks become difficult. If the pedal is released abruptly, they will quickly touch, which means that the disc will stop (imagine that you are walking and tripping on a stone - much the same thing happens to the engine)
The engine may stall, or in the best case, the car will simply “bite.” At such moments, the “petals” on the driven disk suffer greatly - the more “flattened” they become, the closer the time for replacing the “hitch” is. If the discs come into contact smoothly and the driven disc is slowly set in motion, the car starts from a standstill.
Replacement without removing the gearbox
This process is not too different from the first, as it seems at first glance.
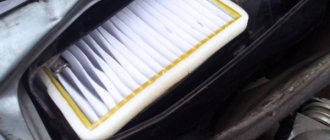
The preparation and tools are the same. However, in this case there is one big advantage - there is no need to move the rather heavy gearbox. This is especially true if one person is responsible for replacing the clutch. In this case, the analysis should begin by removing the left wheel and placing the car on a jack. It is best to do this in a box where there is an inspection hole. In addition to the first points indicated in the first case, it is necessary to remove the air filter, unscrew the corrugation, disconnect the DMVR, and loosen the starter fastenings.
You will have to unscrew the gearbox, but there is no need to touch the CV joints. Since in the process of disconnecting all of the above, the bolts holding the engine will be loosened, you need to place bricks under it so as not to break the hoses. Likewise, you will have to move the gearbox slightly onto the brick stand.
Now the clutch can be changed as described above. As you can see, there is nothing complicated about this.
Source
What is this element?
The clutch is externally a metal disc. However, in reality it is a very complex system hidden under the shell. Hidden inside are the following components:
- Pressure diaphragm spring.
- Pressure disk.
- Connecting plate.
- Balancing weights and much more.
Read more: Roof rack x trail The main task of this unit is to connect and disconnect the engine with the gearbox . It all works as follows. When the driver turns the key in the ignition, the starter begins to spin, which in turn transmits rotation to the flywheel. After this, he begins to spin the crankshaft, and with it the camshaft. This way the engine starts.
But the car will not move if only one engine is spinning. In order for the wheels to start rotating, it is necessary to somehow connect them to the power unit. The solution is the gearbox.
Replacing the clutch of Lada Priora
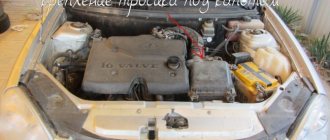
Lada Priora is perhaps the most popular model in the Russian automobile industry, which, according to statistics, experiences constant clutch problems. Replacing it is a rather painstaking procedure, especially if you do it yourself. Let's try to understand this issue in more detail using a complete guide to replacing the clutch.
Sharp gear changes and increased engine speed without increasing speed are a sure sign of a worn and slipping clutch.
Replacing the Lada Priora clutch with your own hands can be completed at home using car racks for lifting the car and a trolley jack. It is highly recommended to use a clutch alignment tool, otherwise you may spend too much time aligning the clutch plate and input shaft spline. The procedure itself will take about 5-6 hours.
Step by step guide
What you will need
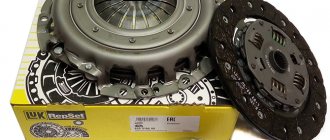
- Replacement clutch
- Clutch Alignment Tool
- Brake fluid
- Various screwdrivers
- Ratchet
- Switch rod
- Trolley jack
- Stands or ramps
- Wheel chocks
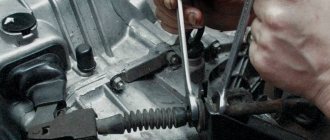
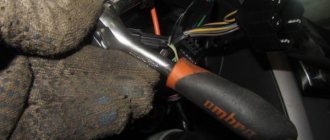
Step 1 - replacing the cable and clutch pedal of Lada Priora
Disconnect the battery, unscrew the interior shift lever (two bolts), and with the car off the ground, disconnect the clutch cable from the fork lever in the dust boot. The cable and clutch pedal must be loosened by reducing the pressure of the adjusting nuts on the firewall in the engine compartment.
Replacing a Priora clutch without removing the box
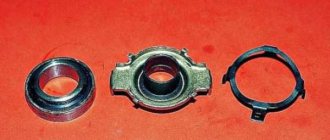
The Prior release bearing is an integral element of the clutch system, which is involved in the gear shifting process. The part is involved in the process of pressing the clutch pedal and changing gear, and is responsible for disconnecting the clutch discs.
If we talk about the service life of the bearing, in most cases it is quite long and amounts to at least 100 thousand kilometers of the vehicle. However, during operation in difficult conditions (off-road, constant switching in traffic jams, lack of lubrication), faults are diagnosed even after 15 thousand mileage.
Main malfunctions of the Priora clutch and their symptoms
The weakest point of the clutch system is the driven disc lining. They just wear out. You can fight this tension in the drive cable for some time, but not for long. The rest of the failures are purely mechanical. This is a breakdown of the basket springs, cracks in the housing, wear of the release bearing, and abrasion of the drive disk. True, we must admit that the latter malfunction is very rare. All these breakdowns in any case require removal of the entire mechanism. Even if only one of the parts needs to be changed.
Symptoms of a problem
The first and most important sign of disk wear (requires replacement) and breakage of the pressure springs is difficulty shifting gears on and off. That is, the clutch does not respond. Other breakdowns, as a rule, reveal themselves as atypical noises in the area of the flywheel housing. The release button “buzzes” when you press the clutch pedal, the basket - when the gear is off.
Important! Previously, they tried to repair failed parts. At present, only replacement with new ones is necessary, since there is no shortage of them in trade.
Diagnostics of the release bearing on a Priora
There are no special devices or tools for troubleshooting. The main signs of possible defects or malfunctions:
- extraneous noise when changing gears (knocking, crunching, specific howling, creaking);
- Difficulty when switching.
If any of the listed symptoms appears when switching, pressing the clutch pedal and changing speed, it is recommended to dismantle the box and inspect, and in case of malfunction, replace the Priora release bearing
It is important to note that it is not always necessary to replace the product with a new, similar one. Sometimes the cause of extraneous noise from the gearbox and incorrect operation of the release unit is contamination, insufficient lubrication of the product and (or) the guide bushing along which constant, working rotation of the bearing occurs. Therefore, sometimes it is enough to clean or thoroughly lubricate the bushing and the part itself. Obvious signs indicating a malfunction are:
- significant play of the part;
- physical deformations (cracks, abrasions, chips);
- uneven or difficult rotation.
When diagnosing breakdowns or damage, dismantling and installation of a new part will be required.
Mechanics
Mechanically, the clutch operation process is extremely simple. Let's analyze it from the moment the movement begins. After starting the engine, the car is in neutral gear (starting the engine in gear is bad manners). The clutch is depressed all the way - this means that it is turned off, the driven and pressure plates have separated, that is, a moment is created to change gear. The gearshift lever is moved to position 1, and first gear is engaged.
The pedal is smoothly released (the clutch is engaged), at this moment the most important thing happens: the distance between the pressure plate and the driven one is constantly decreasing, and the force transmitted by the engine has already set one disk in motion, which makes the moment of “collision” of the two disks become difficult. If the pedal is released abruptly, they will quickly touch, which means that the disc will stop (imagine that you are walking and tripping on a stone - much the same thing happens to the engine)
The engine may stall, or in the best case, the car will simply “bite.” At such moments, the “petals” on the driven disk suffer greatly - the more “flattened” they become, the closer the time for replacing the “hitch” is. If the discs come into contact smoothly and the driven disc is slowly set in motion, the car starts from a standstill.
Replacing the release bearing of Priora
In order to change the part, you will have to remove the gearbox. You can find detailed instructions for removing the gearbox here (link to page).
After removing the box, you need the following:
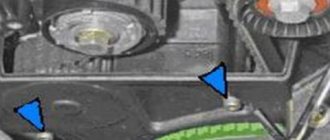
- The first step to removing the bearing is to find the antennae of a special spring retainer. Next, remove the two ends of the antennae from the bearing holder. To do this, you need to apply a little force and pull the antennae out of the two holes.
- Now the bearing together with the holder can be easily removed from the guide sleeve.
- In order to inspect or replace the part itself, you will need to remove it directly from the holder. To do this, use a flat-head screwdriver to press out the four metal tabs in several places on the case.
- Now the part can be removed and replaced with a new one.
- When installing a new bearing, pay attention to its visual condition (there should be no defects or cracks). After installation and lubrication, spin the part while checking its operation for any extraneous noise. In addition, no noticeable backlash should be recorded.
- Reinstalling the gearbox.
Now you know how to change the release bearing on a Priora!
Important points
Please note that there are counterfeit auto parts on sale today. Please note that most new, original release valves contain light-colored factory-applied lubricant. In addition to the above, we recommend that you purchase release levers that are made only of metal. In addition to the presence of a metal body, make sure that in the places of fastenings, the so-called lugs (clamps), the metal coating is of a uniform color without signs of hardening at high temperatures. Pay special attention to checking the part for the so-called backlash (should be absent or minimal). Rotate the product, listen to see if there is any noise when it rotates.
In order to choose a Priora clutch release bearing, you need to know what clutch system you have installed (which manufacturer). For example, Valeo also has its own, original bearings that are not interchangeable. And on the contrary, it guarantees full compatibility and correct operation with various clutch systems on Kalina and Priora cars. Plus, there are good reviews about the quality and long service life.
What determines the reliability of a car?
Every driver knows that a car includes three main components:
There is no point in selecting the most significant position from this list. The most important element of the transmission is the clutch. In terms of reliability, this unit is not inferior to all others. And the mean time between failures is, on average, 100 thousand km. After such a mileage, it is recommended to adjust it or replace worn parts. Many years of practice have proven that it is preferable to replace the entire clutch basket. The fact is that the wear of the entire mechanism occurs evenly. And when a new part appears in it, it will last longer. This fact is clear and does not give rise to objections. However, it must be taken into account that old parts will fail earlier. As a result, after a short period of time you will have to do repairs again.
Any component in a car wears out gradually. The sensor, which signals the occurrence of a malfunction, informs the driver that repairs can no longer be postponed. As a rule, the clutch requires adjustment or complete replacement. The driver should not ignore the following phenomena:
In each case there is a malfunction that arose due to improper operation or excessive loads. According to statistics, cars driven by young drivers require repairs and unscheduled maintenance more often. The fact is that an unconfident driver unconsciously keeps his foot on the clutch pedal. In this half-on position, the driven disk slips and wears out quickly. Exactly the same as the release bearing. And when the sensor on the panel lights up, it means that some clutch parts need to be adjusted or replaced.
The sensor, which is installed in the basket, signals the position of the clutch - whether it is engaged or not. If it is faulty, the control system receives a false signal. As a result, the engine runs at high speeds while the gearshift lever is in neutral. Even novice drivers notice this feature. In this case, timely replacement of the faulty sensor is required.
When there is an urgent need to repair the clutch, you often have to do this work yourself. To do this, you need to prepare the tools, buy a sensor and carefully study the instructions for removing the gearbox. Replacement of any part or the clutch as a whole is carried out only after removing the gearbox.
Sources
- https://for-priora.ru/?cat=18
- https://sovetyavto.ru/zamena-scepleniya-lada-priora/
- https://autodont.ru/transmission/cohesion/zamena-detalej-na-prioru
Companies producing clutch kits for Priora
The most famous and popular manufacturers of these products are three iconic companies.
Each owner of a Priora, of course, chooses what to install on his car. But it’s worth just, just in case, to consider what kind of companies they are and what kind of product they have.
Luke. Well-known German company. Its regular customers are major European automobile concerns. BMW, Audi, Volvo, Fiat do not refuse to initially equip their cars with clutches from this manufacturer.
Valeo. This company, well known to Russian car enthusiasts, mainly works for brand names in the South Asian region, although European auto giants do not hesitate to use its production. Produces a full line of transmission repair products. Most popular among Russian consumers.
Sachs. And finally, Sachs. This company, like Luke, is more focused on manufacturers of European and American cars. The peculiarity of Sachs is that this company has experience in producing transmission parts for sports cars. For example, Ferrari uses a clutch from Sachs for its Formula 1 cars.
Replacing the release bearing Kalina 2, 1118, Cross, Sport
To make a replacement you will need to put your car on a pit or a lift. Repairs are also possible if you have reliable supports and a jack. It is worth noting that without a pit or lift, the replacement method without removing the box, which is described at the end of the article, is suitable.
Important to know: For work, it is best to use a set of sockets with a ratchet. When directly dismantling the manual transmission, ask someone to help you “pull” it off. To replace the VP without removing the box, you will need two studs with a diameter of 10 mm and a length of 30-35 mm.
How to remove the gearbox and release bearing on Kalina 2 (1.4-1.6 8kl) with your own hands
Replacing the release bearing on a Lada Kalina begins with dismantling the gearbox; this process is described in detail in step-by-step instructions with photos/videos. Perform the operations in order.
- Open the hood of the car and immediately remove the battery.
- Next, remove the air filter by unscrewing the clamp and disconnecting the fastenings to the body.
- The clutch cable is located behind the battery; you need to unscrew the nut and disconnect the cable from the fastener.
- Now disconnect the plug of the speed sensor wire, it is located behind the “engine”, in the area of the pipes.
- Next, find the upper bolts securing the gearbox to the engine and unscrew them.
- The last operations on top of the gearbox are unscrewing the starter and its terminals, as well as disconnecting the clutch cable and electrical wiring.
- Remove the front wheels and tighten the hub nuts. We disconnect the protection (mud flaps) under the wing.
- Immediately disconnect the terminal of the reversing lights wire.
- Nearby there is a suspension beam, first twist the rear nut with a 24mm wrench.
- Now we move on to the ball joints, loosen the nuts and remove them on both sides.
- On the same side of the manual transmission we find the oil drain plug, unscrew it and drain it into any container.
- Between the manual transmission and the engine there is a clutch protective cover. To remove it, unscrew the nuts around the perimeter.
- Let's move on to dismantling the gearshift mechanism. First, unscrew the two bolts and remove the cover.
- Then unscrew the screw that secures the linkage connection.
- The next step is to remove the wheel drive shafts from the gearbox on both sides.