Most Lada Priora cars were equipped with electric power steering from the factory, produced by Avtoelektronika Kaluga. It is these EURs that are considered quite reliable and rarely fail. For comparison, problems with amplifiers produced in Makhachkala are much more common.
If for any reason you need to replace the EUR or simply remove it from the car, you can perform this repair yourself. For this procedure we will need a tool such as:
- 8 and 13 mm head - preferably deep
- ratchet or wrench
- extension
- hammer
- chisel
How to remove the EUR on a Priora with your own hands
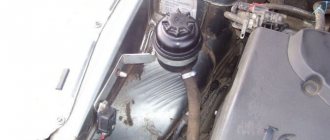
In fact, the electric power steering can be removed without any problems, you just have to remove quite a lot of parts first. Namely, you will need to do the following:
- Remove the steering column cover
- Remove the ignition switch
- Remove the steering wheel with airbag
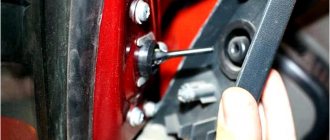
After that, using an 8 mm socket and a ratchet, unscrew and remove the contact group.
We remove it from the shaft completely so that it does not interfere.
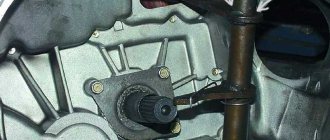
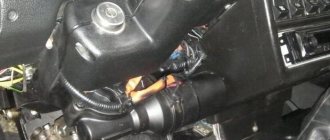
Now you need to disconnect all the power wires from the power steering control unit, which are clearly shown in the photo below.
Each of the plugs has its own lock, so be sure to first look at the design of the lock so as not to damage it when removing it. When you have dealt with the wires, you need to unscrew the coupling bolt at the fastening of the driveshaft with the steering rack.
Using a chisel and a hammer, we slightly expand the coupling “collar” of the cardan shaft. Then you can begin to unscrew the nuts securing the EUR to the body. Two nuts are located at the front.
And two from the bottom.
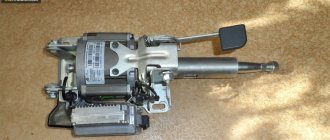
Of course, when unscrewing the last fastening nuts, it is necessary to hold the EUR so that it does not fall. Next, we pull it off the steering rack shaft and remove it completely. If necessary, we replace it with a new one. This mechanism is installed in the reverse order and we connect all the necessary wires to their places.
Fuse box location
If you suspect that a fuse has blown and you want to check it, then the question arises: where is the Priora electric power steering fuse located? The control mounting block is located to the left of the steering wheel. Its opening scheme is simple. All you need to do is turn the three latches 90˚ and remove the cover, as shown in the photo, and you get to the brain stuffing of the car.
Here you can check and replace the failed fuse, then close the lid by pressing it tightly and snapping the three latches back 90˚ in the opposite direction.
You can carry out diagnostics and minor repairs to the Priora's electric power steering with your own hands. To do this, it is enough to determine what caused the failure and fix the problem, following our advice. It is better to entrust a complete replacement of the electric amplifier to professionals.
Removing the electric power steering VAZ 2170
- Unscrew the 4 screws using a Phillips screwdriver and remove the bottom panel trim.
- Disconnect the connectors with wires from the steering column switches and the slip ring.
- Loosen the tightening bolt using a 8mm spanner. Disconnect the connectors from the wires from the ignition switch.
- Squeeze the clips and disconnect the wiring harness from the steering column.
- Squeeze the clips and disconnect the wiring harness at the bottom of the steering column.
- Release the clamps and disconnect the 2 connectors with wires from the electric power steering.
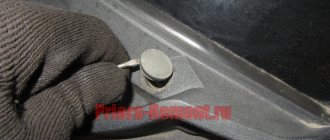
- Remove the decorative curtain from the steering column mounting stud.
- Loosen the steering column lower mounting nuts using a 13mm socket wrench. Unscrew them a few turns.
- Unscrew the coupling bolt nut using a 13mm wrench (it connects the universal joints of the intermediate shaft).
- Remove the bolt.
- Unscrew the left nut of the upper steering column mounting using a 13mm socket wrench.
- Unscrew the right nut of the upper steering column mounting using a 13mm socket wrench.
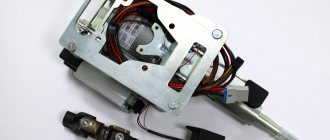
- Remove the Priora steering column assembly.
- Unscrew the nut of the coupling bolt of the lower universal joint flange and the steering shaft using a 13mm wrench.
- Remove the bolt and the universal joint from the splined steering shaft.
When driving a car, the steering mechanism and braking system play a huge role in safety. Therefore, it is important to monitor the proper operation of these elements.
Draining oil from power steering
Using a jack, we raise the front part of the car, having previously installed stops for the rear wheels. Then open the hood and pump out the oil from the power steering reservoir. The easiest way to do this is with a bulb or syringe. For convenience, use an extension hose for the syringe. After the oil has been completely pumped out of the tank, you need to turn the steering wheel several times until it stops, alternately left and right, so that a new portion of liquid appears in the tank. We pump it out again. Again we repeat a similar procedure with rotating the steering wheel and pumping out the oil.
When the liquid is completely removed from the system, using pliers we loosen the hose clamp that goes from the passenger compartment to the tank. Remove the hose and insert it into a container to drain the liquid. Turn the steering wheel alternately left and right until it stops to drain out any remaining oil.
Complete failure of the electric amplifier
There are not so many malfunctions that arise with the EUR on the Priora. The first thing that happens is the amplifier stops working completely. Often, turning off the amplifier is accompanied by a corresponding code, which is displayed on the display of the on-board computer, although there are also cases when its shutdown can only be detected experimentally.
- Several turns of the steering wheel in different directions with the engine not running.
- Then you need to carry out the same operation, but with the car running.
- If the force required to apply to the steering wheel has not changed, this means that the power steering is not working.
There are times when the amplifier on a Priora turns off along with the speedometer. The culprit is the speed sensor. The fact is that these three elements are interconnected. This scheme allows you to regulate the operation of the electric power steering depending on the speed limit. Repair in this case comes down to checking the functionality of the speed sensor and the wiring going to it, the speedometer and the power steering. If commutation breaks are detected, it must be restored. And when the fault is in the sensor itself, it is simply replaced.
Severe contamination of the contact group of the torque sensor installed on the amplifier can also cause a shutdown. Moreover, the on-board computer, conducting self-diagnosis of the system and identifying problems with the operation of the torque sensor due to contamination, can itself deliberately turn off the amplifier. Repair in this case comes down to removing the EUR from the car, disassembling and thoroughly cleaning the contact group. But since the operations to restore the functionality of the electric booster are complex and incorrect assembly and installation of it on the car can affect the correct operation of the steering mechanism, it is advisable to contact specialists to restore the power steering.
Lada Priora: history of faulty power steering
The story with the loose electric booster on the editorial Lada Priora continues. About the reaction to the article in Togliatti and the trip to.
LADA > Priora
Of course, one cannot evaluate the work of such huge teams by the machines they rivet.
Let me remind you of the essence of the problem: our electric booster broke down, spontaneously turning the wheels into the oncoming lane. AVTOVAZ replaced the defective unit. It turned out that the amplifier supplier, Kaluga, installed its own instead of an expensive German control module. According to representatives of Avtoelektronika, it took almost two years to replace imports with a domestic unit, and Togliatti knew about this work. Problems arose only when connecting the new module to the common controller board - the soldering was not good enough, which resulted in a large wave of problems. From December 2010 to February 2011, 1,938 EURs had to be replaced under warranty. With a norm of no more than three defective products per thousand pieces, during that period there was a collapse - 21.3 per thousand!
However, at AVTOVAZ they didn’t see anything bad. From the press response.
However, the defect manifested itself differently for everyone: some managed to drive no more than 400 km, mine broke down after driving 22,692 km! Perhaps someone's ESD simply hasn't fired yet. Nothing terrible happened, and according to the developers: “Sudden transitions of EMURU 2172-345008-02 from the “compensation” mode to the “failure” mode at various speeds and driving modes do not lead to a decrease in the driving safety of the Lada-2170.
Unpredictable operation of the electric amplifier
If such a malfunction occurs, it is absolutely prohibited to continue driving, otherwise, due to this breakdown, you can get into a traffic accident or fly off the road. To continue further movement, just turn off the amplifier. To do this, you need to remove the fuse responsible for power supply to the electric power steering, after which you can continue driving without the amplifier.
To eliminate the breakdown, most likely, you will have to completely replace the electric amplifier. It is not recommended to carry out replacement in a garage environment. To do this, it is better to contact a specialized service station. After replacing the electric booster, it is advisable to perform adjustment work on all components of the steering mechanism.
Thanks to everyone who left comments, I’ll write about the EUR for the 8-valve Priora, maybe someone will be interested.
Tired of turning the heavy steering wheel in yards and parks, I decided to install an EUR. I began to collect information about him. There are myths about the EUR that: - firstly, it is not reliable, it constantly breaks down - this is not true, none of my friends have broken down, I asked the sellers of spare parts, the Priorov EUR is bought very rarely, the spare part is not in demand, I only found it in stock in one place, in the rest on order. - he can turn it himself - the malfunctions were not encountered in the EUR Lada Kalina produced in Makhachkala, I didn’t hear this on the Prior. A similar malfunction in the Priora is described in the magazine Behind the Wheel.
The Priora uses an ESD without a gear type; when the ESD is turned off, it does not provide resistance to the rotation of the steering wheel.
For installation you will need - 21700-3450008-01 Electromechanical amplifier assembly (you can get it at a disassembly for 8 thousand) - 21700-3424092-00 Cardan shaft with a joint (the lower half was bought in a store for 700 rubles) - the signal block was picked up at a disassembly from a foreign car radio , 4 mm2 wire, fuse.
Purpose of the unit
Due to the operation of the ESD, the load and force on the steering wheel are reduced when making a turn. The unit greatly facilitates driving, and at high speed it does not allow dangerous maneuvers.
The unit includes the following components:
- Steering wheel;
- Column;
- Shaft;
- Electric motor;
- Steering mechanism;
- Electronic control unit (ECU);
- Torque sensor.
When turning, the electric power steering is activated. The torque is provided by an electric motor, which is present in the EUR design. The torque sensor measures the indicator and sends it to the ECU. Depending on the angle of rotation, the block calculates how much power needs to be given to the motor. The switch located under the steering wheel contains a device that determines the angle of rotation. The torque and rotation sensors transmit data to the ECU, which “determines” whether the electric motor is running at the desired speed.
On previous generations of VAZ cars, a hydraulic booster was installed; it gave almost the same force in all rotation ranges. As for the electric power steering, the degree of force depends on many factors - the speed of rotation of the steering wheel and its angle, the speed of the power plant, the speed of movement.
Installation and arrangement of electric power steering for Lada Priora
1. Electric power steering for Lada Priora
Many questions arise about power steering and electric power steering. But it turns out there is also an EGUR
.
Electro-hydraulic power steering systems
, sometimes abbreviated as
EPS
, and also sometimes called "hybrid" systems, use the same auxiliary hydraulic technology as a standard system, but their hydraulic pressure is provided by a pump driven by an electric motor, instead of a belt drive from the engine.
The belt is removed, and the pump drive rotates the electric motor, which is controlled by the controller.
Electrohydraulic systems can be found in some Ford, Volkswagen, Audi, Peugeot, Citroen, Skoda, Suzuki, Opel, MINI, Toyota, Honda, and Mazda vehicles.
Electro-hydraulic power steering operates depending on the speed of rotation of the steering wheel and vehicle speed. The power steering pump unit consists of a gear pump and an electric motor.
Instead of a vane pump (in conventional power steering), the electrohydraulic power steering pump unit uses a gear pump. This pump is driven not by the car engine, but by an electric motor built into the pump unit. The electric motor operates only when the ignition is on and the car engine is running.
Typically a pumping unit
made in the form of a single block. The pump unit bracket is bolted to the side member between the front bumper and the wheel well. The pump unit is suspended from the bracket by means of elastic rubber elements.
Electronic amplifier control unit
For the pump to operate, the following signals are required: 1. Vehicle engine speed. 2. Vehicle speed. 3. Steering wheel rotation speed. Basic functions The unit controls the gear pump drive depending on the steering wheel speed and vehicle speed. Additional functions Protection of the power steering from overheating. Protection against restarting in case of malfunction. On-board diagnostics The control unit recognizes faults that arise during operation and registers them in ROM.
If you enter a quick search, then the owners suffer with it: Ford Focus 2, Peugeot 307, Skoda Fabia, Opel Vectra and Astra, Skoda Roomster.
Installing EUR on Priora
I’ll say right away that first of all it’s better to disconnect the battery and the steering wheel with cushion, and it’s better to remove it together with the steering column switches (more precisely, with what the switches are held on).
It’s difficult to find an EUR, a new one is expensive, and they don’t hang on Avito for a long time. There was an EUR for sale not far from me; it cost 7500 including the driveshaft. I had to buy the wires separately; they cost 1300.
We remove the dashboard and connect the speed sensor, tachometer and warning lamp to the necessary wires. You also need to connect one wire to the ignition, and the black one to ground. There are diagrams on the internet. But the colors there may not match the colors on the purchased wires, this happened to me. I found the wiring and connection more difficult than the installation itself.
Adjusting the uneven steering wheel position in Lada Priora
The steering rack was repaired. After installing the rack back, to get the bolt into the steering wheel mounting slots
Source
Malfunctions and their symptoms
Undoubtedly, the electric booster is a more reliable unit than a device running on hydraulics, but malfunctions also appear in the power steering. If they are detected, repairs must be carried out immediately, since the safety of the driver, his companions and other road users depends on the operation of the amplifier.
Complete failure of the EUR
As practice shows, this unit does not have many faults; breakdowns occur in the same parts. The first thing worth considering is the complete failure of the ESD. When you turn off the amplifier, you need to check the on-board computer screen; most likely, you will see a code there indicating a malfunction in the unit. But sometimes it is possible to determine when an amplifier is turned off only in practice.
Chip errors
When a situation is observed that the wheels turn on their own, the reason is the electronic filling of the Priora electric power steering control unit. As mentioned above, quality was sacrificed for the sake of economy. Now the situation with this seems to have improved and everything has been finalized, but if suddenly you feel that the steering wheel is starting to move by itself, go for repairs.
If, along with the electric power steering, the speedometer also fails, then you need to look at the speed sensor. It was either simply dirty or broken. The same applies to the torque sensor installed on the amplifier. Clean them well and check their functionality.
Replacing the EUR
So, you need to replace the electric booster on the Priora or simply check the condition of its contacts. In any case, repair involves complete removal of the unit. Prepare the necessary tools:
- Chisel and hammer.
- Deep head for 8 and 13.
- Extension and ratchet, alternatively you can use a wrench.
It’s quite easy to remove the amplifier itself with your own hands, but in order to get to its mounts and the control unit, you will need to remove many parts of the dashboard: the steering wheel along with the airbag, the casing and the ignition switch. Once these components are removed, repairs to the amplifier can begin.
Step-by-step instruction
- We take the “eighth” head, put on the ratchet and remove the contact group, as shown in the photo below;
Now you can study the contacts in detail and, if necessary, make repairs. If you know that the main components (control unit, motor) have failed, then you need to replace them. Installation of a new device occurs in the reverse order. The DIY repair is complete.
Repair
It is not always possible or even the desire to spend money on buying a new device. Regardless of the reasons, it is quite possible to try to solve the problem of a failed or poorly functioning idle speed sensor using a repair method.
- Try cleaning the old sensor.
- To do this, you should dismantle it and thoroughly clean all contacts using a cotton swab soaked in carburetor cleaner.
- Next, the rod, needle and spring are generously treated with cleaner.
- A toothbrush can easily clean areas smeared with carburetor cleaner.
- Rinse the device again and then return it to its place.
- Not infrequently, such events made it possible to achieve excellent results; idle speed began to work again as before.
But this is the simplest repair option, which is not always worth counting on. There is a more complex, but at the same time more effective option for self-repairing a failed idle air control:
Remove the sensor, clean its external elements, as indicated in the previous repair method; Remove the three pins securing the sensor housing; Remove the regulator housing as carefully as possible
Really slow and careful not to damage the contacts; After disassembly, you may notice the presence of broken solder. In this situation, the wire is soldered in place, and the soldering area is treated with a special anti-corrosion varnish; If there are gaps in the body of the gap adjuster, they are eliminated using sealant
This will prevent air from being sucked in through the valve.
If, when disassembling the device, problems are discovered on the winding or the needle is worn out, repair will not help. You will have to change the IAC completely.
The issue of malfunctioning idle air control is quite common in the case of the VAZ 2114. This element cannot be called the weak point of the car, but no one wants to face such a breakdown. As, indeed, with any other malfunction. But where can you get away from them?!
Didn't find the information you are looking for? on our forum.
We recommend reading:
VAZ 2109 coolant circulation
VAZ 21074 injector does not start reasons
The oil pressure light on a VAZ 2114 does not come on when the ignition is on, how to repair it
VAZ 2114 gearbox device diagram
VAZ 2107 injector, idle speed floats, reasons
VAZ 2115 the stove does not heat up
Installing the ignition button on a VAZ
Valve guides for vases