The VAZ 2114 has 2 external and 2 internal CV joints. First you need to determine which one is knocking. The optimal test would be on a suspension diagnostic stand. If this is not possible, diagnosis by ear is possible.
Two signs indicate a grenade malfunction in a VAZ 2114:
- the sound resembles a crunch;
- It usually appears when turning.
The simplest and most accurate way to do a garage check is as follows:
- Place the car on a flat surface;
- Turn the wheels to one side (to the middle position or a little further);
- Drive off with medium speed. It is worth remembering that starting too smoothly may not reveal a crunch due to insufficient load on the CV joint, and starting too abruptly may lead to the drive flying out of the wheel.
- Repeat the operation by turning the steering wheel in the other direction. The appearance of a crunch indicates a malfunction of the outer CV joint on the side in which the steering wheel is turned.
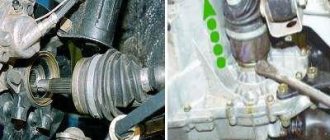
Visual detection of ruptured anthers will also be a sign of a CV joint failure. If you discover a damaged protection for any grenade, it must be immediately removed, disassembled and cleaned. If there is enough grease and there is no significant wear on the hinges yet, it is enough to replace the boot and fill it with new grease. If the wear of the balls is obvious, it is better to change the grenade.
CV joint boot VAZ 2114 with a defect
It is more difficult to diagnose a malfunction of the internal grenade on a VAZ 2114. If it malfunctions, it crunches when starting off in a straight direction, and not when turning. But the same symptoms, for example, include play in the steering rack or wear on the engine mounts.
Sometimes the problem can be diagnosed from the pit by tugging on the drive from the gearbox side: strong play or the appearance of extraneous sounds indicate that the internal CV joint should be replaced.
Replacement
It is better to change a grenade yourself with an assistant.
- remove the wheel, remove the wheel bolts and the hub nut washer;
- unscrew the ball from the steering knuckle;
- pull out the splined end of the outer CV joint;
- pull out the drive with the internal CV joint from the gearbox;
- if you plan to remove both drives, remove the internal grenade from the drive and insert it into the gearbox so that the differential does not move after removing the second drive;
- remove or cut off the anthers, thoroughly clean all hinges with a special liquid or just gasoline;
- when filling the CV joint, use a special lubricant suitable for these purposes; ordinary lithol does not have the required temperature characteristics;
- the retaining rings of each CV joint and the hub nut must be replaced;
- The inner CV joints are inserted into the gearbox until they are completely fixed; when adjusting, you can use a hammer with a wooden spacer.
Let's sum it up
Taking into account the design of the CV joint and its purpose, it becomes clear that the grenade boot plays a vital role. This seemingly simple element protects the CV joint from water and dirt. In turn, damage to the integrity or slipping of the boot will cause the sand to act like an abrasive, and water will lead to corrosion, leaching of lubricant, etc.
The result is crunching, rapid wear and the need for premature replacement of the outer or inner grenade. Of course, in order for this element to serve as long as possible, the condition of the grenade anthers must be monitored at every maintenance. Even the slightest defects in the form of cracks, breaks, deformation, etc. are not allowed.
As a final note, we note that it is better to select a CV joint from a well-known brand and manufacturer. In other words, it is better to take a more expensive part than a cheap analogue from little-known manufacturers. In practice, there have been cases when a new and absolutely correctly installed CV joint did not last even 20 thousand km. The reason is the low quality of the part, cheap materials that are not wear-resistant.
To avoid such problems, it is recommended to purchase original spare parts (CV joints for VAZ) or analogues that are not inferior or even superior to the original in quality. At the same time, it is better to immediately refuse to buy cheaper options, since not only comfort, but also safety when driving a car directly depends on the reliability of CV joints.
In what cases is it necessary to replace the inner CV joint?
Replacing the internal CV joint on front-wheel drive VAZ vehicles is required if the following symptoms are present:
- Crunching and knocking noises when driving and accelerating in a straight line;
- Vibration and shock when changing gears;
- Significant play when testing by hand;
- If the “grenade” fails completely, the vehicle cannot move further.
» alt=»»> The main reason for the malfunction of the VAZ “grenade” is the entry of water and dirt through the hole in the torn boot. The second possible cause of failure is a sharp press on the gas with the wheels fully turned, although in this case you risk killing the external rather than the internal grenade.
In addition to the above, replacing the internal CV joint on VAZ-2110 and other models may be necessary if the quality of the previously installed joint is poor.
Causes and symptoms of CV joint failure on a VAZ 2115
The most common reasons:
- low quality CV joints, installation of fakes or defective spare parts;
- lack or poor quality of lubricants;
- damage to the boot and entry of abrasive debris or water into the mechanism;
- aggressive driving style and disgusting condition of the road surface.
One of the signs of replacing a VAZ 2114 CV joint is the appearance of a characteristic “crunch” . This sound can only be produced by balls that roll along grooves, because... have too much output. Working in close contact under constant load inevitably leads to changes in the properties of rubbing parts, their sizes, and the formation of wear.
Where there is no close contact of these elements and extraneous noise appears. The sound can appear at any time, but usually it occurs when turning, sharp acceleration, or overcoming obstacles. There are other signs indicating a hinge failure :
- slight jerks when starting the car or changing dynamics;
- play of the shaft located between the CV joints when trying to move it in different planes.
Replacing the inner CV joint with your own hands
» alt=»»> The procedure for replacing a “grenade” is the same for the entire front-wheel drive VAZ line, starting with 2108 and ending with VAZ-2115, “Kalina”, “Priora”, “Grant”. Before removing the inner CV joint, the oil is drained from the gearbox. Then proceed according to the following algorithm:
- Unlock and unscrew the hub nut. To make the work easier, a piece of pipe about 1 meter long should be put on the key.
- The desired side of the car is hung on a jack or lift.
- Remove the wheel.
- Remove the washer located under the hub nut installation site.
- Disconnect the steering tip.
- The CV joint is removed from the hub.
- Using a pry bar, remove the drive and internal joint from the gearbox.
Note: when removing both drives at the same time, a suitable mandrel should be installed in their place.
How to change the “grenade” with the drive removed? To do this, clamp the shaft in a vice, loosen the clamps and remove the boot. After this, the hinge is knocked off the splines with hammer blows.
The new CV joint should be hammered by applying light blows to its end with a hammer. For this it is better to use a wooden mallet. The “grenade” is first filled with a special lubricant.
How to remove a vaz shruz
Having determined that it is the external grenade that is broken, we begin to remove it.
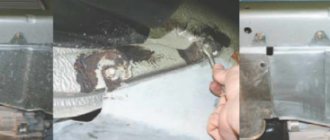
How to unscrew the hub nut on a VAZ?
First of all, unscrew the hub nut. To do this, take a 30mm head and a lever, the larger the better. We put bricks under the wheels to prevent the car from rolling (simply putting it in gear is not an option, the wheel will spin) and begin to unscrew the hub nut.
In this matter, the more you weigh, the better, since I very often lacked my weight and leverage of about one and a half meters. I got out of the situation in the following way: I stood completely on the lever, as close to the edge as possible, thereby giving maximum tension to the nut, and hit the lever with a hammer. Usually this method helped me unscrew even the most soured wheel nuts.
One more nuance: if the outer walls of the head come into contact with the walls of the hub, it is better to lubricate the head with mining or lithol, or, in extreme cases, with silicone grease. Thanks to this trick, the head will not bite in the hub.
How to remove a grenade?
The hub nut is unscrewed, now we remove the wheel, unscrew the two bolts that hold the ball joint, disconnect the suspension arm and the hub, move it to the side of the car while lightly tapping the grenade, remove it from the hub. At this point there are two options:
- The grenade is already broken.
- Replacing the grenade due to its crunching sound.
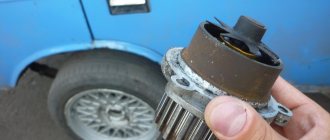
In the first case, you simply remove the outer part of the CV joint from the shaft, then the retaining ring from the drive shaft and knock off the cage with a hammer.
In the second case, removing the CV joint becomes more difficult. You need to deflect the grenade relative to the shaft at the maximum angle so that the bearing balls and their cage are visible.
Now use a hammer to break the jumpers of the cage between the bearing balls and take out the balls one by one. When you take out the last ball, you can remove the body of the grenade, and then its inner part sitting on the shaft, after first removing the locking ring from the shaft.
Of course, you can simply try to knock the grenade off the shaft, but due to the locking ring this will be problematic.
That's it, the CV joint is completely removed. Now let's start installing the new part.
Boot replacement and repair
The boot can be changed without removing the grenade if you have special equipment. His work is demonstrated on video. » alt=»»> If you do not have such a device, to remove and replace it, you must perform the above-described procedure for removing the drive and dismantling the hinge. The procedure is necessary if there is even minor through damage on the boot.
Temporary repairs to the CV joint boot can be made without removing it from the vehicle. To do this, you need to thoroughly clean and degrease the damage, then seal it with a piece of rubber and cyanoacrylate-based glue (superglue).
An alternative repair method is to seal the holes with silicone caulk. It should be remembered that it takes a day to completely polymerize.
Note: express repair is a temporary measure. Replacing the inner joint boot may be delayed for a short time, but not completely cancelled. Typically, these types of repair methods are used to get to the point of repair.
CV joint repair
As mentioned above, the hinge cannot be repaired. Conventionally, one of the repair measures includes washing the “grenade” after driving with a damaged boot.
Washing is carried out at the same time when the damaged boot on the pomegranate is replaced. The hinge is carefully knocked off the shaft, inspected for damage and thoroughly washed to remove any dirt and grease in gasoline or kerosene.
After washing, the assembly is filled with lubricant and mounted in place, having previously installed the boot. The procedure makes sense only if there are no obvious signs of a joint malfunction.
A crunchy or knocking part definitely needs to be replaced, since wear forms on the working surfaces of the inner race, and it is no longer possible to stop the destruction. Continued operation of the vehicle may be dangerous for the driver and other road users.
A grenade or CV joint is a car part that transmits torque from the engine and gearbox to the car's wheels. Replacing this element on a VAZ-2114 is a rather complicated procedure and requires certain skills and abilities. This article will tell you how to properly replace a CV joint on a car, as well as how to select the necessary spare part.
Video on replacement on the front-wheel drive VAZ 2113-2114-2115 family
The video will tell you how to replace a grenade on a car, and also tell you about the features and nuances.
Signs of failure of the outer grenade (CV joint).
There are two options here:
- signs that your grenade has already broken
- signs that the grenade will soon come out and break .
How to understand that a grenade will soon break.
Of course, the first sign of a malfunction of the external grenade is a crackling sound . If you hear a crackling noise while driving with the steering wheel turned, it is definitely a CV joint. The greater the angle of rotation of the wheel and the harder you press on the gas, the louder the clicks. Another sign that does not always appear is vibration on the steering wheel at speeds greater than 80 km/h. The vibration is only slightly similar to the vibration from an unbalanced wheel. It usually manifests itself as a slight twitching of the steering wheel.
How to understand that the outer CV joint has broken.
If the CV joint breaks, the car will stop moving. In any gear engaged, press the gas, the speed increases, but the car does not move.
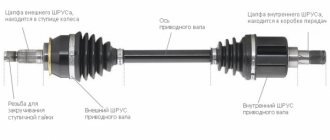
How to understand that it is the outer CV joint that has broken, and not the internal one or the clutch in general (the first signs of failure are similar to the signs of a clutch failure)? First of all, start the car and put it in any gear. Next, open the hood and look in turn at each of the shafts going from the box to the wheels (one short, the other long). If any shaft is spinning, it means that the CV joint has broken on this side.
I recommend not just visually looking at the shaft, but touching it with some long, hard object, such as a stick. The main thing is that there is nothing on it that could wrap around the shaft . When you touch the shaft with a stick, if it is spinning, you will feel a slight vibration. This is usually done in the dark, because it is difficult to understand whether a cylindrical object is spinning, especially in the dark.
The grenade replacement process in detail
To begin with, before starting the replacement procedure itself, you need to decide on the tools. So, what will be needed when replacing the internal grenade: knobs and heads 13-17, as well as 30; keys 17 and 19; jack; lamp; pliers; CV joint lubrication; wheel wrench; and the spare part itself.