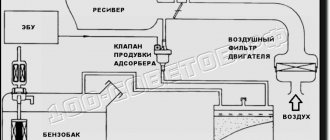
Let's start with the fact that by increasing the amount of air entering the inlet, the power of the power unit can be increased. So, when tuning an engine, zero-resistance air filters are designed to increase the air volume without major modifications. Among ordinary car enthusiasts, this solution is better known as a filter - zero filter, zero air filter, or simply zero filter.
Taking into account the fact that such an air filter is not difficult to integrate, many car owners began to install zero-resistance filters on ordinary cars with naturally aspirated and turbo engines, counting on certain benefits after such tuning. At the same time, not every car owner knows that the decision to install a zero filter instead of a standard air filter has both advantages and a number of disadvantages.
In other words, you need to clearly understand what the nulevik does, how it affects the engine, resource, power and efficiency of the internal combustion engine, as well as why this filter element is necessary in some cases, and in others it is better not to install it on the car. Let's figure it out.
Why do you need a filter in the engine?
It’s very simple to catch all the nasty stuff that flies in our air - fluff, leaves, midges, but especially dust. This whole thing adversely affects the engine inside, since dust is the smallest particles of sand that will simply melt at high temperatures. And they will settle inside on everything and everyone, some smart person calculated that without an air filter, the service life of the engine decreases by 10 times! So it is needed in any case - that is, it is not discussed, it is an axiom, if you like.
Replacing the air filter on a VAZ 2101-VAZ 2107
Note! To replace the air filter, you only need one “10” wrench and it is advisable to stock up on a clean rag in order to wipe the dirt off the inside of the air filter housing!
- Replacing the air filter
- Additional video clip
Where is the air filter located?
Immediately after opening the hood of the car, of course, you will not be able to find the air filter, but why? Yes, because it is located inside the case, which you see in the photo below. To clearly see the filter, you will first have to remove the cover of this housing and only then remove it. (For information about the procedure for removing the cover and replacing the filter, read in the same article just below)
When should you change the air filter?
- Firstly, as a rule, there is no such frequency for replacing the air filter! And all because it must be replaced if it is heavily soiled or if it is severely deformed.
- Your memory will help you understand when you need to check the filter status, but why do you ask? Yes, because if the filter is heavily contaminated, the car’s consumption increases by “0.5-1” liters, and since the classics do not have an on-board computer that measures consumption, in this case, use only your memory.
Note! Well, you still look into the engine from time to time to check the condition of the filter and replace it if necessary!
How to replace the air filter on a VAZ 2101-VAZ 2107?
Removal: 1) First, unscrew all the nuts that secure the air filter cover.
2) Then remove the cover from the air filter.
3) Next, remove the air filter from the housing.
4) And then cover the carburetor neck with a clean rag to prevent dirt from getting into it.
5) Next, wipe the inner air filter housing and covers with a rag.
Installation: 1) Install the new air filter in the reverse order of removal.
Important! 1) Make sure that no dirt gets into the carburetor neck when replacing the filter!
2) On some cars there are marks on the air filter cover, according to which the cover must be aligned:
- When the outside temperature is +5 and above, the red mark (indicated by the letter “A”) should be located near the warm air supply pipe, which is indicated by the letter “G”.
- When the outside temperature is -5 and below, the red mark should be located near the air intake pipe, which is indicated by the letter “B”.
Note! 1
If there are no such marks on the filter cover, then pay attention to the fixed damper with a seal, it replaces the red mark! (For information about where the damper with seal is located, see the very bottom of the article, in the “For Beginners!” section)
2. If there is no sealing flap on the air filter cover, then install the air filter cover as you wish!
For newbies! Question: Where is the air filter cover seal located? Answer:
Additional video: In order for you to better understand how to properly replace the air filter on a classic car, watch the added video below, after watching it you will understand everything clearly and clearly.
Vaz-Russia.ru
Why is the regular one so bad?
Again, everything is simple - as you and I know, an internal combustion unit has only 4 strokes, these are intake, compression, ignition, and exhaust gases. The engine, on the intake stroke, sucks the air-fuel mixture into the engine cylinders; if gasoline flows through its own line, then air is sucked in from the environment. If there were no filter, it would be sucked in with everything that came across (midges, dust, etc.), but the filter protects against this - however, it is a kind of plug that prevents the air from passing through normally, that is, resistance is encountered.
The standard filter element has a significant resistance coefficient, often taking away 5 - 7% from the engine power. This is understandable, it practically does not allow dust particles to pass through, and is made of special paper.
This element is far from ideal, it seems like everything is simple, but damn there is no solution and that’s it! Or is there?
But there is a point
There is a common misconception that by removing the filter and housing you can significantly increase engine power. This is completely untrue.
It is important to take into account that when developing an engine, a careful calculation of the valve timing is made, which takes into account errors and losses on the filter. And if dust starts to enter the engine, it will definitely not be able to work for a long time. Here it is necessary to have a fence that will prevent the penetration of contaminants. Resistance can be reduced by widening the passage holes. But then the quality of filtration will decrease.
Before looking for a product code and buying a zero for your motorcycle or car, remember one simple truth. For cars without a powerful sports engine, the cost of purchasing such a filter will be absolutely pointless. You will only waste several thousand rubles. The only thing you will get is a slightly changed engine sound.
Nuleviks are only suitable for sports cars and cars with powerful power plants. The use of such a filter on serial engines is allowed only in cases where a comprehensive modification is carried out. That is, boring is done in the cylinders, an enlarged throttle valve is mounted, sports camshafts are installed, etc. You can also put a zero in the kit with them.
Zero resistance
Of course, there are - filters of zero resistance have long been created, which practically do not delay the air supply, that is, they allow the engine to “breathe deeply”, they simply give 5 - 7% of the power stolen by standard elements, and this indirectly affects both consumption and dynamics acceleration and maximum speed - such a budget tuning.
The principle of such a filter element is a specially selected material from which it is made. How it is assured that these are large pores and a minimum of paper in the structure. Typically, several layers of cotton fabric are used, which is placed on a special aluminum screen.
However, “nuleviki” are not the same; there can be two types.
WHAT MAKES NOTHING FROM
The vast majority in two ways. Some use high-quality surgical gauze as a filter element, others use porous (foamed) polyurethane. The first gauze filters appeared almost 40 years ago in the USA, since then the concept of their production has hardly changed. Porous polyurethane began to be used a little later, about 30 years ago. It is believed that this material is less demanding in maintenance and more durable. However, in the end it all depends on the operating conditions. There is also a third option, also positioned as gauze, but in fact it is a kind of artificial material, very similar to pressed padding polyester. It is quite simple to distinguish it from “medical fabric”; it does not have a pronounced mesh structure inherent in noble fabric. The actual service life of such products is short, and the quality of filtration... But we will talk about the quality of filtration in the next issues. Here we will only touch on the impregnation procedure.
Types of zero resistance filters
At the moment there are two buildings:
- Without impregnation or dry - as assured, not as effective. It somewhat resembles a regular standard filter element, but the materials used are completely different. Gives a power increase of up to 5%.
- With impregnation. The most effective one is made from fabrics (several layers) and impregnated with a special oily composition. Dust enters it and settles on the “oil” (lubricant) and remains there. Power increase up to 7%.
It is the second type, which is “impregnated”, that has become widespread, because we are fighting for power, and 2% (of the first type) is significant. However, it has many more disadvantages, for example, every three thousand kilometers it needs to be washed, dried, then soaked again - otherwise the dust and other deposits that it retains will clog it tightly, productivity and air flow will drop many times, that is, it will become even worse, than the standard filter. In this regard, the first option is much more effective - it needs to be changed every 10 - 15,000 kilometers, in principle, like a regular filter element.
Service
To carry out maintenance you will need a special composition (oil). The service order is as follows:
- Remove the filter and clean it with a soft brush to remove external and large contaminants. You cannot use compressed air, gasoline, or kerosene for these purposes - this can damage the filter elements.
- Treat the filter with a special compound, wait about 10 minutes for the oil to soak in. To service large models, it is more convenient to use a container of appropriate size filled with a special composition. The filter must be rotated while immersing it in the solution. This gives the greatest coverage of all sections of the element for processing.
- Next, you need to rinse under running water.
- After the “water procedure”, you need to remove excess water and dry the filter at room temperature. It is prohibited to use any heaters for these purposes.
- Carry out an external inspection. If light spots are detected, impregnation must be repeated.
- Install the filter on the car.
In a regular place or not?
Often, those who think about installing such “nuleviks” have a choice - to install them in the standard place of the air filter or to install them separately, that is, bypassing the standard box. Often, many companies make a separate one, it certainly looks impressive, but is its installation justified? Let's look at each situation:
- Separate . That is, without regular placement. According to the manufacturer, these options are the most productive, that is, they are capable of delivering up to 7% of power. YES and they look impressive under the hood. However, there are many controversial issues here, the whole point is that a heated engine has a high temperature, and this element sucks air, so to speak, right on top of the engine, where it is approximately 50 (and in the summer, up to 60) degrees Celsius. The point here is this - the density of hot air is much lower than cold air, so such a filter even loses power, because it supplied hot air - its density at 50 degrees Celsius is 1.109 kg/cm3 . Whereas air at 20 degrees has a density of 1.204 kg/cm3 . The difference is almost 10%, that’s your increase in power, you will lose even more and the effect of such an element will be negative than positive.
- In a regular place . Now they are sold for almost every car, that is, you can throw out the standard one and put a “zero” in your car - square, in general, as we are used to. However, as the manufacturers assure, its performance is lower, that is, it can provide up to 5% of the power. But such a zero-resistance filter has its advantages, namely - the standard air intake system, as a rule, is located either next to the wing or under the engine, where the air is much cooler. Thus, we increase its density (that is, we suck hot from below), rather than from above. It turns out that this is precisely the effect of a 5% increase in power.
That is, the second type, in a regular place, wins in almost all respects.
Installation methods
There are two options for installing the element:
- standard, using the factory box;
- separately.
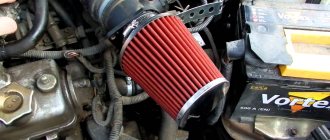
A separate air filter is produced in the shape of a cone and is installed instead of the standard element. The part is secured with a clamp on the inlet pipe, and the unit is attached to the body through a metal bracket. Most manufacturers recommend purchasing filters that have a separate installation, promising a power increase of up to 7%.
Drivers note that practically, after installing the “nulevik” in a separate place, the car’s power does not increase. This is due to the fact that the filter takes air from the engine compartment, where it has a low density due to heating from the running engine. The hot air that enters the “nulevik” contains 39% less oxygen than the air that enters the filter installed in its original location.
“Nulevik” for installation in a regular place
Standard installation involves replacing the factory filter with cellulose screens with a new one, without changing the insertion location. The standard factory element has the shape of a box; air is taken from below the engine or near the wing, where the temperature is 3 times lower than above the internal combustion engine.
Replacing a standard part with an improved one allows you to increase engine power, but not by 5-7%, as manufacturers claim, but by 2-3% after checking the car on a dynamometer stand.
Advantages and disadvantages
Needless to say, there seem to be only advantages:
- Increases power.
- Due to the passage of a large amount of air, the consumption decreases, because the engine is not overstressed.
- Can be installed in a standard place, that is, for almost any car, nothing needs to be altered.
- It can also be changed after 10 - 15,000 kilometers, like standard options.
However, there are also disadvantages:
- It is expensive, if you take branded ones, the price can reach up to $150 (about 10,000 rubles), while a standard one, even a branded one, costs only about 1,500 rubles (maximum), and analogues can be bought for 200 - 300 rubles. To be fair, there are zero resistance filters that cost less - about 1500 - 2000 rubles, but compared to analogues this is ten times more.
- If you install a separate one, then you not only may not feel the increase in power, but you may also lose it due to hot air being sucked in from above the engine.
- If you take the option with impregnation, it needs constant care, every 2000 - 3000 kilometers - be sure to wash it, clean it and lubricate it again, otherwise you will not only gain power, but vice versa - it will drop. Very uncomfortable.
- There are still debates about the effect of these filters, some say that they give absolutely nothing, others on the contrary - but where is the truth? I don’t really want to shell out 2,000 rubles (let alone $150) for whatever reason.
The truth about the “zeros”
Well, now we come to the most interesting thing, namely, whether they are of any use at all. After all, you can talk for hours about how wonderful they are, but if there is zero effect, then everything is in vain.
One of the most honest tests is a dyno test, when they drive a car and measure its power before installation, with a regular element or “stock”, as they say now. Then install a zero-resistance filter and run it again - according to theory, the power should increase by 5 - 7% from stock! BUT tests have shown that this is not at all true, that is, there is either no effect from them at all, or there is, but insignificant, at a level of 1 - 2% which you will not notice at all.
I will say this - I also thought about installing such a filter for myself in order to increase the power, but it turned out that it was all bullshit, just a marketing ploy or a “show off” like tuners. But I don’t really want to overpay for who knows what.
Of course, you may not believe me now, but watch this video and fully test and run the “nuleviks” - I think your head will become a little clearer.
I’ll finish here, I think my article was really useful to you, pay only for what works. Sincerely yours, AUTOBLOGGER.
Similar news
- EVA mats. My honest review! Which ones are better to choose for the car?
- How to reupholster a steering wheel with leather yourself? Detailed instructions, photos and...
- Lightweight piston. Why install? And is it possible to make your own...
Add a comment Cancel reply
Excellent radar detector for the money SoundQuest 420
Ceramic car coating, pros and cons
The SoundQuest 420 radar detector is suitable for car enthusiasts looking for an inexpensive and reliable device. At a cost of approximately $50, this radar detector has all the necessary characteristics:
- detects all ranges of radar systems in Russia and the CIS countries: X, Ka, K, short-pulse signals Ultra-X and K, as well as the POR range; the laser receiver detects light rays in a complete circle;
- a new system for filtering false alarms and impulses in the Ka range is preinstalled - Smart-Filter;
- protection from detection by VG-2 radar detectors.
The miniature body will not clutter up the interior, much less block the view of the road; the device is attached using suction cups and a bracket to the windshield, or glued to the front dashboard with double-sided adhesive tape. Even a novice driver can install and connect. The device operates from the car's network, the connection is made to the cigarette lighter, a 12-15 Volt adapter is included. If something is unclear, you can use the self-learning function; the radar detector will demonstrate the basic principles of operation. The kit includes detailed instructions in Russian.
Having detected a pulse from a police radar, the device will issue an individual signal corresponding to the frequency of the received wave, and an icon corresponding to the range will light up on the LED screen. As you approach the traffic police post, the intensity of the beepper will increase. If desired, you can set the signal muting mode or adjust the comfortable volume level. There are also 4 levels of display brightness.
When starting the engine, you do not have to turn on and configure the radar detector every time; all previously entered settings are saved in memory. When driving outside the city, the sensitivity level is adjusted by simply switching between City/Highway modes.
There are few reviews about the SoundQuest 420 radar detector. The advantages include a good reception range, especially outside the city. There are also a lot of disadvantages, and they are all standard: increased sensitivity to extraneous impulses, frequent malfunctions, cannot be left in the car overnight in winter - it will turn on at least half an hour after starting the engine.
ravid.ru