Device, principle of operation
Most often the front door lock on the VAZ 2109 breaks down. The operating principle is contained in a mechanism that is located not only inside the structure, but also outside. The device is a cylinder, inside of which the teeth fall into grooves during movement. When they close, a closing occurs; when they open, an opening occurs. On the vases there are standard products with a larva. If you periodically carry out lubrication, they will last a long time. To replace or repair the device, it is necessary to remove the interior trim, disassemble the steel block, and remove the core.
The larva's device is not sophisticated, but reliable. The teeth are located on both sides. They start moving with the help of a key on which there are notches. Manufacturers lubricate the internal elements well during assembly of the device, so the mechanism works properly for a long time. Inside the larva there is a latch that controls the operation of the pins and a rod that connects the chain of elements. If a tooth breaks, the case is damaged, or the groove is blocked, the mechanism will cease to perform its functions.
The VAZ 2108 door lock is sold in any car store. Average price – 1500 rub.
Detailed instructions for repairing the lock
1200 rub. for the photo report
We pay for photo reports on car repairs. Earnings from 10,000 rubles/month.
Write:
One of the weak points of VAZ cars in general, and the VAZ 2109 in particular, are the doors and their contents (locks, door handles, window regulators). In the cold, door handles, which are made of plastic, become fragile and break. We have to replace them with new domestic ones or “European” pens.
Over time, the doors on the “nine” tend to change the gaps, creating poor sealing of the car interior and causing noise. The rear trunk door is especially successful in this: creaks and spontaneous openings when moving, it closes poorly or not tightly enough, sometimes the “tooth” on the lock breaks, which goes inside the platform when closing.
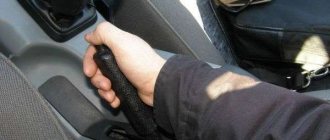
It is much worse when the door lock suddenly fails, as a result of which you cannot open the door, either from the outside or from the inside, and then remove the lock. Some folk “craftsmen” advise sawing the door lock with a grinder or tearing it out with the meat using a wheelbrace, screwdriver and pliers. There is no need to do this under any circumstances; it is enough to know the structure of the door lock.
It is necessary to pry off the intermediate lever “7” with a screwdriver and pull the rod of the internal drive “6” of the door handle “4”. See photo 6.
Main types of breakdowns
The first warning for the driver is an extraneous sound when turning the key. Jamming, difficult movement or blocking of the key inside the cylinder will indicate that something is wrong with the device. Variations of breakdowns:
- the pin broke;
- the groove or internal parts are rusty;
- mechanical damage to the door;
- water appeared and froze inside the castle;
- the retaining ring has failed;
- the latch broke;
- the thrust cap collapsed;
- the opening element broke, leaving part of the key inside the device;
- temporary wear of parts.
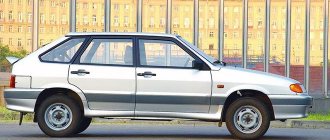
"Nine" and the door lock device
Theoretically, the lock mechanism can be divided into 3 parts: a handle with a cylinder and a button, the main mechanism, and the inner door handle. All nodes and connections between them are shown in the diagram.
The node labeled “2” looks like this.
4 rods fit to it, that is, to this node. Two of them are connected to the external handle, and in order to dismantle it, the rods are disconnected.
If there is no electrical wiring inside the door, you do not need to disconnect the battery before performing repairs.
In other cases, that is, when power windows or locks are installed, the battery must be disconnected. To do this, as many people know, it is enough to remove the “negative” terminal. This means that before repairing locks, the hood is opened first, not the doors. Anyone who violates such a requirement will, at best, have to change burnt fuses.
Repair
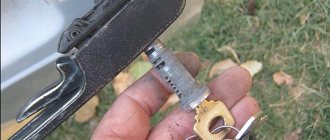
In order for the outer right front door lock on 2108 or any other part to work again without flaws, the cause of the breakdown must be established. After disassembling the lock block, access to the cylinder will be gained. Having pulled out the core, inspection will reveal the type of damage and further actions. For this you will need:
- screwdrivers;
- pliers;
- socket wrench 8;
- Silicone Grease;
- knife.
Additionally, it is necessary to purchase spare parts that will be replaced, a cylinder or a whole lock. Experts recommend replacing the core immediately. Repairing individual fragments is a temporary measure.
repair of door locks for VAZ 2108, VAZ 2109, VAZ 21099
The door locks are non-removable and cannot be repaired.
If the door locks are broken, replace them. The design of the front door locks of all cars and the rear doors of VAZ 2109 and VAZ 21099 cars is fundamentally the same, the main difference between the locks is that lock switch cylinders are installed in the outer handles of the front doors, therefore this subsection shows the process of repairing the front door lock as more complex. 1. Press out the bottom seal and remove the three spring clips securing the protective film at the top and one more at the bottom. Remove the protective film from the door.
2. Disconnect the outer handle rods and the lock switch from the inner lock.
3. Remove the two screws securing the door lock. Since the threads of the screws are sealed, we recommend using an impact screwdriver when unscrewing.
4. Remove the outside door lock.
5. Remove the two screws securing the inside door lock handle.
6. Push the inside handle inside the door.
7. Remove the internal lock with internal handle from the door.
8. Remove the rubber holder from the end of the rod. Remove the strap handle by turning it.
9. Remove the locking bracket from the lever pin and disconnect the inner handle rod from the inner lock lever.
10. Rotate the plastic holder and remove the end of the locking rod from the lever.
11. Unscrew the two nuts securing the outer lock handle.
12. Remove the outer lock door handle with rods.
13. Remove the pin and plastic rod end from the door lock cylinder.
14. Remove the locking spring by removing its ends from the slots on the cylinder and on the lock handle.
15. Insert the key into the lock cylinder and remove the lock from the handle. 16. Install a new door lock on a VAZ 2108, VAZ 2109, VAZ 21099 car in the reverse order of removal, having first lubricated all rubbing parts with grease. Check the ease of opening and the reliability of closing the door lock. If necessary, adjust the door lock.
17. To adjust the door lock, loosen the fastening screws and move the lock: a) outward, if the door closes tightly; b) inside, if the door does not close tightly; c) down, if the door rises when closing. After adjusting the door lock, tighten the screws. Use an impact driver to loosen and tighten screws.
HELPFUL ADVICE If you need to remove the retainer, first trace its outline on the body pillar. This will help maintain the door lock alignment during installation.
Replacing the rear door lock
The process begins with unwinding the door card trim. Following are the instructions:
- Dismantling the plugs, the internal handle: the latches are unfastened, the screws are unscrewed.
- The decorative panel opens, but not all the way. After the electrical wiring is disconnected, the facing fragment can be removed completely.
- The rod is detached from the closing device.
- The bracket, retainer, and left internal screw are removed.
- The lock washer is removed and the liftback is turned off.
When the cylinder is untwisted, it will become clear: lubrication, replacement of parts, the core or the entire lock is required. After removal, the driver can install a new part. To change the lock completely, the retaining bolts are unscrewed. Installation of another mechanism is carried out in a similar manner.
If desired, you can remake the device. For example, to assemble one new one from two old ones.
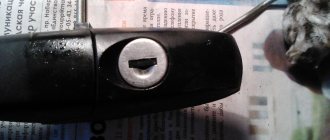
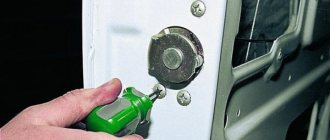
Replacing the door lock cylinder
To gain access to the locking mechanism, you need to remove the trim. On the “Nine” it is quite simple to remove it - the casing is held in place by plastic pistons. These pistons are located around the perimeter; they are simply pressed out and, if necessary, replaced with new ones.
Performing dismantling of the main part
First, as is easy to understand, you need to dismantle three elements: the side handle, the window lifter handle, the socket of the inner handle of the lock. The “dog” must be pulled up, but it is better to remove the seal that protects the glass during the dismantling of the casing.
Removing the rubber seal
Removing and disassembling the door handle
When the door trim is missing, you can freely disconnect the two rods that go from the door handle to the lock. The following shows exactly what elements we are talking about.
Wire rods “handle-lock”
By squeezing the plastic tab with a screwdriver, the rod is disengaged. We will assume that all of the above actions have been completed. Then, you can move on to the next stage.
The outer handle is attached to the metal using two nuts. One of them is located under the trim, the second is on the back side of the door. Both nuts need to be unscrewed.
Attaching the outer handle assembly
After dismantling the specified unit, it will be easy to remove the cylinder. This is done like this:
- Push out the pin holding the outer plastic cap;
- Dismantle the mounting spring (see figure);
- By installing the key and turning it, the cylinder is pulled out.
The appearance of the spring holding the cylinder and the handle together is shown below.
The round spring is completely dismantled
It is important to know that the knot itself, called the “larva,” needs careful handling.
Experience shows that it will be easy to lose the metal pins that ensure secrecy. The cylinder is secured inside the handle body and the pins remain in place. But if you pull the cylinder out, each pin is “free.”
We replace the lock cylinder ourselves
The result of all the efforts discussed above is shown in the following figure:
Door handle VAZ-2109
You need to carefully pull the cylinder out using a standard wrench. And having installed a new part, the assembly is performed in the reverse order to that considered so far. The lock parts can be lubricated with machine oil, and it is recommended to fill the cylinder with a special product:
- Graphite lubricant (litol + graphite);
- Using WD-40;
- Silicone-based compounds;
- And so on.
It is acceptable to use one or the other.
The bravest ones can decide to dismantle the main unit. The fact is that unscrewing the two screws securing the external overhead mechanism will not be so easy. You will need an impact driver. If you don’t have one in your arsenal, use a regular one (cross). This is what the result should be:
The external mechanism is difficult to dismantle
Having done everything as indicated, you can try to remove the main lock mechanism. It is allowed to disconnect the two remaining rods last.
The main unit is removed with rods
It is recommended not to repair the assembly shown in the last figure, but to replace it as an assembly.
Trying to carry out repairs will be counterproductive - the connections are made with rivets. They do not allow analysis. However, we will leave the choice to the discretion of the owner. The rivets can be drilled out and then threaded connections can be used. But such a solution should be considered temporary.
Please note that the special products listed above are only suitable for lubricating the larvae. They are not a substitute for machine oil. It is unlikely that there will be a “craftsman” who decides to treat mechanical parts with WD-40. The result will be predictable - a mixture based on mineral oils will finally “finish off” all the locks.
One last thing to note here. Special chemicals, unless we are talking about machine oil, must be packaged in an aerosol. In addition, a spray tube must be present:
WD-40 in different packages
If you neglect the last advice, it is unlikely that you will be able to process the cylinders. By the way, WD-40 is not the best option of all those listed. Make your own choice.
Replacing the front door lock
If the mechanism malfunctions, partial repair of fragments or full replacement of the device is practiced. Algorithm of actions:
- The plug and the inner handle are removed.
- The casing is dismantled - the clips snap off.
- The front trigger glass position switch is removed along with the wiring harness block. The nuts are unscrewed with a wrench.
- Traction is turned off. To do this, remove the pin from the tip and the return spring.
- The screws holding the lock box are unscrewed.
- Internal elements are lubricated.
- A new device is inserted.
- The rod, retainer, and spring are returned to their place.
- The bolts are tightened.
- The functionality of the device is checked.
Why, after replacing the lock, the door of the VAZ 2109 does not open?
Perhaps you forgot to snap the rods onto the lock, or you need to adjust the lock rod (unscrew it, lengthening the rod).
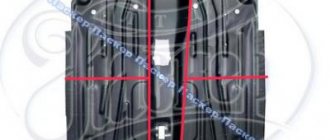
Rice. Front right door lock: 1 — key guide; 2 — lock switch lever; 3 — shutdown rod; 4 — external drive rod; 5 - key; 6 — button to turn off the lock; 7 — shutdown button rod; 8 and 17 — shutdown levers; 9 — outer handle; 10 — bracket for the internal handle; 11 — internal door handle; 12 — lining of the inner handle; 13 — internal drive rod; 14 — internal lock body; 15 - external drive lever; 16 — intermediate lever; 18 - External lock body; 19 — lock drive finger; 20 - dog; 21 - lock retainer; 22 - ratchet; 23 — lock fastening screw
Rice. Door lock fastening: 1- lock fastening screw; 2 — nut for fastening the outer door handle; 3 — button to turn off the lock; 4 — external door lock; 5 - reflector
Rice. Tailgate lock 1 — retainer mounting bolt; 2 — rear cross member; 3 - clamp; 4 — hook spring; 5 - hook; 6 — lock body; 7 - lock drive cylinder assembly; 8 — tailgate; 9 - door seal
Gorobinsky S.V.
The door lock on a VAZ 2109 is jammed - how to fix it
Incorrect operation is caused by various situations: prolonged wear, moisture, broken metal parts or rust. To correct the situation, disassembling the mechanism will be required. Next steps:
- Visual inspection.
- Removing dirt, cleaning corrosion.
- Replacement of metal parts.
- Lubrication.
- Assembly.
Replacing pins, retaining rings or retainers is a fine job. Not every driver without proper experience is able to do this.
VAZ 2109 - door lock repair
Periodically during operation, it is necessary to carry out a routine inspection and, if necessary, repair the door locks on a VAZ 2109 car. In most cases, if the parts of the lock are severely worn, it cannot be repaired and must be replaced. Of course, you can try to bring it into good condition, but as a rule this will not last long.
The locks installed on the front and rear doors are no different in design. Prepare a standard set of tools and you can begin work, the order of which is as follows:
This completes the process of removing the lock mechanism. Rinse it thoroughly in kerosene, then check for mechanical damage. Deformation of levers, weak rivet joints, etc. are not allowed. If the mechanism is working properly, then before installing it, thoroughly lubricate it with grease.
At this point, the repair work on removing the door locks on the VAZ 2109 car has been completed. Repair them and replace failed elements, then reassemble them in the reverse order.
Related materials:
How to install a silent lock
Silent mechanisms are installed on foreign-made vehicles, but no one forbids installing this device on a domestic car. These locks are considered more reliable and of higher quality. Removal and installation is carried out from the outside. Installation instructions:
- The screws are unscrewed. The handle is removed.
- The latch is released.
- The old product is replaced with a new one.
- The bolts are tightened. This must be done with effort.
- Adjustment is in progress. A functionality check is being performed.
If the key is difficult to turn, you can loosen the bolts holding the lock. To extend the service life, a special gasket is additionally inserted next to the screws.
Rear door of VAZ 2109
In order to remove the rear door on a VAZ 2109, follow these steps:
Open the door and remove the two bolts securing the limiter bracket to the B-pillar
Unscrew the two bolts securing the upper and lower door hinges to the B-pillar and remove the door. Installation of the VAZ 2109 rear door is performed in the reverse order of removal. Before final tightening the bolts securing the hinges to the B-pillar, close the door and position it so that the gaps in the openings around the entire perimeter are the same. Then carefully open the door and finally tighten the fastening bolts.
Replacing the window regulator and glass on a VAZ 2109
In order to install the rear door glass on a VAZ 2109 or replace the window regulator, follow these steps:
Lower the window all the way down and remove the rear door trim in the same way as removing the front door trim. The photo shows the location of the rear door trim mounting pins
Remove the inner lower glass seal
Remove the three holders, two on top and one on the bottom, using a screwdriver. Remove the rear protective film from the door
Unscrew the two bolts securing the glass frame to the window lifter slide, holding the glass. Carefully lower the glass down
Unscrew the two lower and one upper nuts securing the window lifter guide
Unscrew the three nuts securing the window lift mechanism
Remove the window regulator from the door
Remove the outer lower glass seal
Remove the upper seal of the rear door of the VAZ 2109
Turn the glass back and remove it from the door
Check the tightness of the glass in the frame. If the clip does not fit tightly, replace the glass along with the clip. Installing the rear door glass of a VAZ 2109 with a window lifter is performed in the reverse order of removal.
Replacing the rear door lock of a VAZ 2109
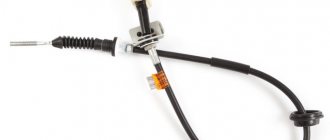
Diagram of the lock mechanism and door handle of the VAZ 2109: 1 – external handle rod, 2 – external handle, 3 – intermediate locking rod lever, 4 – locking rod, 5 – internal lock, 6 – internal handle rod, 7 – internal handle.
Unscrew the two screws securing the outer door lock and remove it. The threads of the screws are sealed with sealant, so we recommend using an impact screwdriver when unscrewing.
Unscrew the two screws securing the internal handle of the VAZ 2109
Unscrew the nut securing the intermediate locking rod arm
Push the lock rod inside the door
Disconnect the outer handle rod from the inner lock
Push the inside handle inside and remove the lock from the door
Remove the locking clips to disconnect the rods from the lock levers
Unscrew the two nuts and remove the outer handle of the rear door of the VAZ 2109. Installation of the VAZ 2109 door lock with drives is performed in the reverse order of removal, having first lubricated all rubbing parts with grease. Check the ease of opening and the reliability of closing the door lock. Adjust the lock if necessary.