Door lock VAZ 2107
The VAZ 2107 door lock is a part that rarely fails. However, over time, this mechanism may need to be repaired, replaced, or adjusted.
Working principle of the door lock
The “seven” door lock consists of a locking mechanism, a key cylinder, external and internal handles that allow you to unlock the door from the outside and from the passenger compartment, as well as buttons for locking the car from the inside. The lock is controlled by transmitting force using rods. The main element of the lock is a rotor with a slot. When the door is locked, it goes behind the opening bracket. When the door closes, the bracket presses on the latch, as a result of which the ratchet is activated and the rotor rotates. When part of the bracket enters the rotor slot, thanks to the springs it returns to its original position, thereby pressing the door.
When the door needs to be opened, the latch flag is pressed, which causes the rotor to rotate through the ratchet and the bracket to release. When you lock the door using a key or a button from the interior, the latch is blocked. As a result, it becomes impossible to open the door. Since there is a rigid connection between the latch and the lock control handles through rods, they also do not work.
Door lock adjustment
If the car doors do not close well and there is a gap between the body elements, then first adjust the door, and then the lock itself. To carry out the procedure you will need the following list of tools:
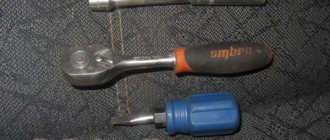
- 10mm wrench or socket with crank;
- marker;
- lubricant
The adjustment process is performed as follows:
- Using a marker, outline the outline of the retainer on the body pillar.
- When closing the door with great force, unscrew the fastener and move it outward.
- If the door closes normally, but a gap remains, move the lock inside the body.
- When the lock is activated, the door should not move vertically. If it rises, we lower the latch, otherwise we perform the opposite actions.
Video: adjusting door locks on a “classic”
Sometimes situations arise when the locking mechanism does not work well when unlocking from the passenger compartment, despite the fact that the door opens without difficulty from the outside. To resolve this problem, you will need to adjust the position of the inside door release handle. To do this, loosen the screws securing the handle and move it to a position (selected experimentally) in which the door will close without problems. Afterwards all that remains is to tighten the fasteners.
The door does not lock
With the locking element of the doors on a VAZ 2107, such a nuisance can happen when the door does not lock. There are not many reasons for this and they usually lie in the breakdown of one of the elements of the lock (for example, a spring). In addition, water may enter and freeze inside the mechanism during the winter. If a frozen lock can be thawed, then the failed part will have to be replaced or a new locking mechanism installed.
How to remove a door lock
To dismantle the door lock on the “seven”, use the same tools as when disassembling the door. The process itself consists of the following steps:
- Remove the door trim.
- Use a flat-head screwdriver to disconnect the lock power button rod.
Door lock repair
If there is a need to repair a “seven” door lock, the procedure usually boils down to lubricating the rubbing parts, adjusting the locking mechanism, and possibly replacing a broken spring or lock cylinder.
Replacing the larva
If difficulties arise with locking/unlocking the door using a key on a Zhiguli of the seventh model, you have to replace the lock cylinder. To do this, you will need to remove the decorative door trim, and then follow the step-by-step steps:
- Using a flat screwdriver, pry up the lock rod and remove it.
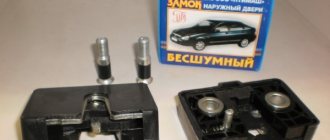
Design of silent locks
Silent devices, unlike factory models, have a different operating principle. They have a latch installed, the same as in foreign cars. Closing is quiet and locking the door is effortless. The kit consists of two elements: one is fixed into the door frame, and the second is bolted to the post. When the door closes, the two halves create a single mechanism and interlock.
Reliability is ensured by a plastic coating. This is what allows the device to operate silently. The device consists of a cylinder, a rod, and a locking button. The lock is designed in such a way that no additional adjustment or cleaning is required. The fixation of individual parts is reliable, so even over time they do not become loose.
Typical constipation problems and solutions
The key is inserted with difficulty and not completely
Defect of the cylinder or lever mechanism. Here you can’t do without a specialist and the appropriate tool. Most likely, you will have to remove the lock (secret).
Well contamination
It needs to be washed. It is better to use a “liquid key” (WD-40), which is injected into the lock. Options include machine or vegetable oil, kerosene. This is done several times, and after each filling of the lock with liquid, a key is inserted into it and attempts are made to push it deeper. At the same time, it turns as far as possible until it stops. As a rule, two or three “series” of such operations are enough to clean the canal. In some cases, a needle or wire helps, which can be used to pull out individual fragments.
Stuck debris
This happens when trying to hack. If an attacker is scared off by someone, he will try to hide traces of his presence. And so he breaks the master key and leaves. If this is the reason the lock is jammed, then a piece of metal can easily be pushed out from the back side. But only if someone is at home and can open the front door from the inside. It is better not to try to fix this problem yourself from the outside.
The key won't come out
As a rule, this indicates that the lock on the door is broken. You should try to remove the key from the well using the recommended lubricants. To prevent this from happening again, you should immediately replace either the entire mechanism or its cylinder.
Difficulty turning the key
It is necessary to determine in what cases this is observed.
- If the mechanism jams in any position of the sash, it should be cleaned; This is the result of dirt.
- When jamming occurs only when the door is closed, there is deformation of the block or leaf. The problem can be solved by sampling material in the area of the castle, but only if the structure is wooden. As a rule, distortions in the metal frame cannot be eliminated; they will have to be replaced.
Latch stuck
This is often an obstacle to opening the door, even if the key is turned all the way. The problem can be solved with the help of any thin and hard object - a knife blade, a metal ruler. Alternatively, for lack of a better option, a plastic card.
The door leaf needs to be pulled a little away from the jamb by inserting a chisel, large screwdriver or ax into the gap - whatever you can fit. This will make it easier to access the tongue that the selected “tool” clings to. After several attempts, you can press it into the lock, and the sash will swing open. But even in this case, you will have to disassemble the locking device and determine the defect. The most likely cause is a weakened or broken spring mechanism.
Lock malfunction
If all of the above methods do not produce results, and the inspection does not reveal any defects in the door and frame itself, then there is only one diagnosis - the locking device is broken.
Wiring
As practice shows, due to the lack of contact, you can often observe a situation where the central lock does not close the doors using the key fob. The system seems to be working, but when I press the button nothing happens.
It's all because of the wiring. It is necessary to carefully check all connections that are related to the alarm system, as well as to the central locking. Even if the contact moves away just a little, this can already cause malfunctions. Do not forget that one of the connections is inside the door - you will have to remove the trim. You should first check the condition of the wire that goes to the motor - it can “stick” to ground.
There are a lot of questions and discussions related to the operation of the central lock on numerous forums. Sometimes the central locking only closes the driver's door - this is a typical malfunction, the cause of which lies in the wiring and contacts. The fact is that a special activator is installed in the driver's door. It has not two, but five contacts. The activator controls the operation of all locks in the remaining doors. The microswitch inside the activator may also fail.
If the wiring is connected incorrectly, then this is the answer to the question about the poor operation of the central locking. It is enough to open one control contact, and the system will not work as it should.
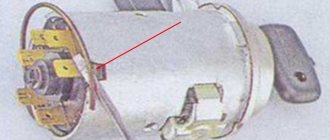
Working principle of the door lock
The VAZ 2107 door lock has internal teeth; turning the key sets them in motion. When closing, the pins move in such a way that they fall into the grooves and the device is locked. If jamming occurs or difficulty opening/closing the blade occurs, it means that the pins have not completed their path completely. When opening, a decoupling displacement occurs. The teeth during movement create a kind of coding when the key makes a revolution. Failure is most often associated with faulty pins, ice getting into the core of the device or a broken pin.
If the driver hears a creaking sound when turning the key or jamming, then disassembling the device is required. If the key does not fully enter the keyhole or if the mechanism is damaged, replacement of the cylinder or the entire mechanism is indicated. Wear of internal elements is the most common reason for repairs. To carry out this procedure, you need to purchase a new cylinder or lock, prepare a set of tools and lubricant. After disassembling the device and visually, installing a new element is not always required. Sometimes it is enough to lubricate the pins with silicone.
Refinement of the base and mechanisms
It is not enough to replace the larva; you need to make sure that the core is working. To do this, you should set up the mechanism before the door structure is assembled. Recommendations:
- A key is inserted to check the operation of the larva. The lock opens and closes several times. If movement is difficult, the pins may need to be lubricated or adjusted.
- Special spacers are fixed, which prevent the teeth from deforming or moving to the side.
- Sometimes it is necessary to change the spring, which hinders the operation of the system.
Adjusting the gap and hinges
Adjusting door locks is within the capabilities of anyone who is able to hold a socket and open-end wrench in their hands, although this procedure requires some time. To begin with, they diagnose the operation of the lock mechanism and inspect the condition of the gaps between body panels, front fenders, pillars and door frames. Unfortunately, those three millimeters of gap, which should be evenly distributed along the entire perimeter of the door, on the VAZ 2107 exist only in the drawings at the design bureau in Tolyatti. In fact, the gap can be from three to seven or more millimeters. Regardless of its size, the main thing is uniformity. If even with the lock removed it is not possible to establish a stable gap, you will have to adjust the hinges.
This will make the task even more difficult, but there is no other way out. In some cases you have to adjust the loops in pairs, and in some only one, it all depends on the direction of the skew
When adjusting the gap, you should pay attention to the condition of the seals, since they, as a rule, can greatly influence the location of the door in the opening. When the gaps are set, you need to pay attention to the door contact planes
In this case, you will also have to play with both the hinges and the seals. Only after this, after lubricating the hinges and eliminating the backlash, can you begin to adjust the lock mechanism itself.
Final door adjustment
Adjusting a door after replacing pins or hinges is about aligning the locks to the normal level for precise closure of the catch
If you plan to replace them, then it is better to focus on the so-called silent locks. They cost slightly more, but allow the closing mechanism itself to not wear out so quickly
When installing them, you can select any level. They work on the principle of a classic latch. At the moment of closing, they do not create additional resistance, so the door will close even with a slight push. The lock will no longer be able to open while moving.
If yes, you can start adjusting. It is best to do this from a clamp. Everything with it is quite simple - we move it a little higher and towards the cabin. You can do this a few millimeters at a time until the closing force is minimal.
Before replacing pins or hinges, you should determine exactly what is causing the doors to be beveled. It may be enough to just make an adjustment, or maybe you will have to completely change the fasteners.
Lada 2107 Murena › Logbook › Is the door sagging? Jack, and no washers...
Even on New Year's Eve, the service center tried to level the sagging door for me by traditionally placing washers under the bottom screws, but in the end I was not satisfied with the result. Firstly, the door was blocked: the top went deep into the interior, the bottom stuck out. Secondly, from inside the cabin from the driver’s seat, through the gap between the front of the door and the pillar, white fluffy New Year’s snow was visible! To lift the door, they had to put two washers with a total thickness of about 2 mm, maybe a little more, plus the blockage of the door and, as a result, a gap! Then, for the winter, I temporarily glued a seal to the edge of the door and firmly decided to redo this mess myself in the summer...
After looking through a bunch of Internet pages, I came to the conclusion that if there is no play in the hinges (my case), basically everyone uses this collective farm method with washers, and only a few times I came across notes that people jacked up the door... I didn’t see any real explanations anywhere, but still I decided to do this procedure... On a fine sunny day I prepared the tool, took a 3-ton jack from work and started repairing...
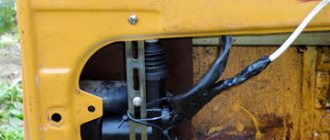
I took out the door opening limiter pin... be careful, our door now opens all the way with the edge on the wing, why scratch the paint again?! Of the five screws, only three were able to be unscrewed; two had to be drilled out... I used a tetrahedral file with a key to remove the drilled screws... The wire in the photo in one of the holes is in case of a rotten cracker frame... Otherwise, I’ve read a lot of horror stories about people’s crackers falling down, they say then you have to cut half the car to get it out...)) But everything turned out to be okay with the breadcrumbs...
I went through the seats with zinc...
The bottom of the door inspired a little sadness...
But on the other hand, for an 11-year-old door, the condition is still quite decent... But the protracted struggle with rust is in another topic, so I’ll continue... For ease of adjustment, I placed the front of the door through a wooden block onto a jack...
Attention! For those who are planning to repeat the procedure... When adjusting, one screw at the top and one at the bottom has to be periodically tightened and loosened so that it is possible to move the door on the crackers relative to the body... So, do not pull the screws too hard during these manipulations! They are disposable, the cap is wide, it fits tightly into the opening on the hinge... I twisted it a little harder to tighten it, and it came back with the splines breaking off! So I threw out one screw... After aligning the door, we move on to the most interesting part... For convenience, I removed the lock retainer body, only, pay attention, there is also a cracker there!)) Jack under the rear corner of the door through a block and carefully begin to pump...
My sag was about 4 - 5 mm, I did 3 approaches, let the door hang for 10 minutes in a jacked state... The last time the upper front corner of the door almost came into contact with the wing... It was very scary, I could hear the howling of metal...)))
In the end, I managed to get the door exactly in line with the back door... The latch is in place, we adjust the closure, and voila!
Practice, we change it ourselves
Logically, the first thing you need to do is remove the door from the car; this can be done using an impact screwdriver or a semi-automatic machine. After dismantling the door, it is necessary to place it on a previously prepared, flat surface covered with fabric. This will help you avoid scratches, since repairing a canopy involves the use of an angle grinder and welding, do not forget to cover the visible painted surface and be sure to! glass!
The patient is placed, protected, it’s time to start :) The first thing you need to do is try to pull/knock out the finger from the canopy, and if that doesn’t work, then cut through all 3 parts of the canopy with a thin grinder circle (1.6mm, I think), as in the photo.
We cut it with a grinder like this if we can’t knock out a finger
This thread will make it possible to loosen the fit of the finger in the loops, and even if there is significant wear in the loops, it will make it possible to compress the loop to the required size. After cutting through the canopy, you can try to knock out the finger using a tool. If you still fail to do this, then you need to take a thin chisel and slightly widen the groove by hitting the chisel into the groove. Now we should try to knock it out, we succeeded.
Next we need something that has practically nothing to do with the body - a valve from the engine. For what? And then, the diameter of the rod is ideal for the role of a canopy finger. Here we try it on:
Now you need to press the canopy onto the valve stem using a hammer. Here you need to do everything in moderation, you shouldn’t tighten the canopy too much, the rod should move with slight pinching, you need to leave a small gap for welding. Once you achieve the required pinch, you can cut the rod to the required length and weld the thread.
As for welding, here it is necessary to weld on a lower current; it is very important not to weld the canopy with the rod in a heap. That’s why I cooked on a low current, the semi-automatic was slightly “greasy”, but the main thing was not the beauty of the seam, but that it held the thread reliably. Excess metal can be sanded with a grinder.
Thanks for subscribing!
Also an important note about the finger. In the factory version, there are two grooves on both sides of the pin, which are designed to improve lubrication and self-removal of sand.
I don’t have the polished version, since in this case it doesn’t matter at all.
Please don't look at the quality of the seam, I was training
It's almost ready.
Don’t care about the seam, as in the previous version)))
Source
Removal and installation of components in the door
Euro handles for a VAZ 2107 model car, prepared and painted in the desired color, are assembled and tested for functionality. Preparatory work includes the following operations:
- Removing door trim.
- Removing the handles, locking mechanism and counter part of the lock installed on the rack.
- If the car is equipped with central locking, then it is better to remove the solenoids.
Before installing a new locking mechanism, it is necessary to grind off the plastic housing evenly from the inside. The thickness of the part should be reduced by approximately 5 - 7 mm so that it does not cling to the rack. The work of installing the lock and handle is performed in the following order:
- Place the body of the locking device vertically from the outside and mark the attachment points.
- Drill holes for the bolts according to the marks.
- We combine the parts and connect them together with screws.
- We close the doors and check whether there is sufficient clearance between the lock and the pillar. Using chalk, mark the position of the mate.
- On the body, according to the mark applied, we install a bolt, for which a through hole is drilled through both walls.
At the end of this stage of work, we check the functionality of the lock by opening and closing the door several times. Seizing or hitting of parts against each other is not allowed; adjustments are made if necessary.
Replacing pins in hinges
So, if the repair only involves replacing the fingers, then the first thing you will need to do is remove the door to gain access to the hinges (3-4 fasteners are simply unscrewed, depending on the model). Next, the fingers are knocked out. If they do not come out due to corrosion or deformation, then you should first thoroughly fill everything with WD-40 to remove the rust and repeat the operation. If this fails, you will have to drill out the pins or replace the hinges completely.
When installing new pins, be sure to lubricate them with grease or oil, and after installation, adjust the door (lower or raise it a few millimeters through a tightening rod). The door should fit accurately into the catch when closing without additional physical effort. Otherwise, the wear and tear on both doors and hinges will be much higher. After 1-2 years of such operation, you will have to completely replace the door along with the hinges.
The main difficulty in repairing VAZ door hinges is to correctly knock out the pins (the same fingers). It’s most convenient to just rivet it and then straighten the loop if necessary. The most aesthetic method is to drill out each end of the finger, after which its edges are ground off or simply squeezed. The drill is immediately taken to the minimum size, then gradually increases literally by millimeter. This will take quite a lot of time, but the loop will not be damaged.
If the finger has other deformations, it may be necessary to make a through hole through the pins. This will not prevent the use of new fingers in the future. For this purpose, either an impact screwdriver or a powerful drill with a high-quality drill bit (carbon steel is ideal) will be useful.
Replacing the door handle of a VAZ 2107
Knock out the limiter fastening pin 3 (Figure 1) and disconnect the limiter from the car body pillar.
While holding the door in the open position, use an impact screwdriver to remove 2 screws 1 securing hinges 4 of the door to the body pillar.
The door installation must be done in reverse order. Before final tightening the hinge screws, adjust the gaps between the door and the car body.
Disassembling the front doors
Door disassembly is required in case of replacement of parts and assemblies.
To remove the door trim, you must first remove the decorative plug 2 from the handle attached to the armrest. Under the plug there is a screw that needs to be removed. After this we dismantle the handle.
Vehicle inspection and preparation for work
Incorrect position of the front door, as well as the rear door, can cause it to not be locked correctly. The adjustment begins with a thorough inspection of the car, which is performed in the following order:
entrance door reflect with mirror
Door adjustment involves correcting identified deficiencies by slightly shifting the part in the hinges and aligning the lock and its receiving plate. To perform this operation, you will need an impact and regular Phillips screwdriver, a hammer and a “10” open-end wrench.
Principle of operation
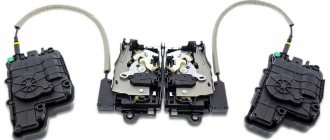
How is the central locking system controlled on the VAZ-2114? The operation algorithm of the central locking system is that a control pulse arrives at a certain point, as a result of which one relay with power contacts is activated. In one case the car is locked, in the other - vice versa. Central locking activators are connected to relay contact 30, and through closed contact 87, ground acts on both outputs of the activator. If one or another relay is triggered, then contact 30 will be connected to the positive, and as a result, temporary voltage will be supplied to the activator, which will set the rod in motion, which will either open or close the door.
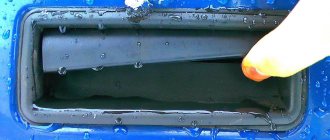
Step-by-step installation
The installation of silent locks on the VAZ-2107 is carried out in several stages. Using a grinder, remove the flag from the door. Next, the old locking mechanism and rods are removed. However, it is too early to throw away the old lock.
Using a drill, the lower hole (the one on the left) is drilled out so that the upper bushing of the new mechanism can be placed into it. To do this, a new element is applied from the inside and the approximate diameter is marked with a pencil. After drilling, the irregularities are removed with a file.
Then the entire mechanism is assembled and put in its original place. If the door does not close, use a round file to enlarge the hole on the right. As a result, the outer part will “sink” and will not rest against the rack. The door will close freely.
Then the outer part is removed from the lock and the two bushings on it are ground off using the same file. The bushings are located on the side of the mechanism that presses against the door. But you shouldn't remove them completely.
Using the same file, they grind down the corner on the lock and the caps on the connectors, thanks to which the entire structure is connected. The hats are ground flush. Then the structure is reassembled, and the rods are connected to the door handles. So that the car door can open freely, the place where the rod is attached is turned in the other direction. The rods are also connected on all other doors. Next, all that remains is to check the functionality of the mechanism.
What you will need to complete the work
To carry out work on changing handles, you need to stock up on a standard set of tools. The changeover procedure is not particularly difficult, but it will take a lot of time. After all, in order to carry out the replacement work, you will need to remove the door trim, and after that begin the dismantling process.
In addition to the standard set of tools, you will also need to purchase new mechanisms and cylinders to replace the front door locking device. Let’s take a closer look at what the procedure for removing and installing them on the “seven” is.
Changing the external handle on a VAZ 2107
Removing the external door handle on the “seven” is carried out by performing the following manipulations:
- First, you need to dismantle the door trim from the door on which you need to change the mechanism.
- Once access to the inside of the door is gained, you will need to disconnect all the rods and drives of the mechanism inside.
- Now you need to unscrew the two nuts with a 10mm wrench, which secure the device from the inside.
- After the nuts are unscrewed, you can dismantle the device. In a similar way, both the front and rear mechanisms for opening doors on the VAZ 2107 are removed.
- After the door handles on the outside are removed, new ones can be installed. Installation is carried out in the reverse order of removal, so there will be no problems.
When installing new products, we also recommend changing the rubber seal, which should be supplied with the new devices. This seal prevents water from penetrating inside the door.
Features of replacing the internal handle on the seven
Now let’s pay attention to the issue of replacing the interior handle on a VAZ 2107. We change the interior door handle on the “seven” in cases where it jams and does not work to open, but more often than not, it simply breaks. The removal process looks like this:
The removal process looks like this:
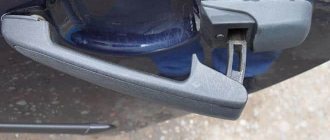
Iron (eternal) door handle
- Initially, the upholstery is dismantled.
- To remove the product located inside, you need to use a Phillips screwdriver to unscrew the two mounting screws.
- After unscrewing the bolts, the product should be taken inside.
- A rod is attached to the product, which can be removed only after the handle is removed from the inside of the door.
- After removing the rod, you must put it on the new device in the same way. For this purpose there is a special fixing rubber insert.
- A new product with a fixed rod is inserted from the inside, after which it is fixed with the same two screws.
- Finally, you should install the casing in place and enjoy the work done.
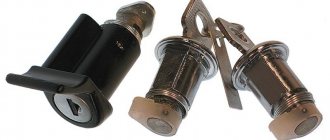
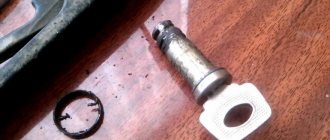
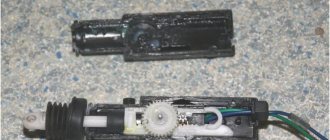
Replacing the larva
There is another important element in the front door, which is called the lock cylinder. This is a device through which it is possible to lock the door from the outside with a key, which prevents it from being opened by third parties. The cylinder requires replacement only when it fails or gets stuck when opening, and it is not possible to lock the car.
On the VAZ 2106 and VAZ 2109 car models, the cylinders are built into the handles themselves, while on the “seven” this product is located below the door opening mechanism, so its replacement is carried out separately.
To dismantle and change the larva, you will need to perform the following manipulations:
- The upholstery and other elements from inside the car door are removed.
- It is necessary to disconnect the rod from the cylinder, through which the lock is blocked when the key is turned.
- Using pliers you need to remove the locking bracket.
- The mechanism itself is removed, together with the seal ring.
Installation of a new device is carried out in the reverse order of removal. All VAZ-2107 handles are changed in a similar way, and after the change process it is necessary to check their performance.
The serviceability of the devices in question on a VAZ 2107 car is very important. If the products are faulty, it is quite problematic to get into or out of the car (if the mechanism is jammed from the inside). Many owners know how unreliable the mechanisms in question are in domestic cars. At the first sign of a malfunction, it is necessary to immediately carry out diagnostics and, if necessary, lubricate or replace the part. Often it is not possible to repair (both internal and external) the device, so it is better to immediately buy new ones. As an option, you can install euro handles.
Door hinge repair options
Failure or severely deformed hinges are repaired using the following methods:
- Complete door replacement. It is complicated by the fact that it is not always possible to find new VAZs for old ones. You have to buy old elements that are partially worn out.
Replacing door hinges, as well as fingers, is the most rational option in this case. It's inexpensive and relatively easy to do. If necessary, additional equipment can always be rented at a service center or automotive supply store. The cost of the hinges themselves for the VAZ 2110 and similar models is only about 300-500 rubles. You can also find old, used ones for sale. You will have to pay less for them. But new VAZ 2110 doors will cost several thousand rubles. And they are sold, as a rule, without glass and cladding. Their installation is an additional waste of money.
Doors VAZ 2107
VAZ 2107 doors are a car part that is designed for entering and exiting the vehicle. In addition, this hinged body element ensures the safety of the driver and passengers by preventing them from falling out while driving. "Seven" is equipped with four doors - two on each side.
How to remove a door
Sometimes it becomes necessary to dismantle the door on a VAZ 2107, for example, for repair or replacement. At first glance, it may seem that there should be no difficulties in this event, but in fact the situation is somewhat different. The fact is that it is almost impossible to unscrew the fastener with a regular screwdriver. Therefore, you have to use an impact screwdriver.
The list of tools may differ and depend on the method of dismantling. The main tools include:
- impact screwdriver with a bit to fit the screw;
- hammer.
Having prepared everything you need, you can start working:
- Remove the door stop.
- Using an impact screwdriver, we tear off and unscrew the fasteners.
If you cannot unscrew the fastener using an impact screwdriver, you can try to drill out the head of the screw with a drill of a suitable diameter (6–8 mm), and then use narrow-nose pliers to unscrew the fastener. Another option is possible: a bolt is welded to the head of the screw and using a wrench they try to rip the screw off.
How to adjust the door
The door on the VAZ 2107 must be installed level and without distortion relative to the doorway. The gap between the body and the door element should be the same on all sides. However, over time, the door begins to sag, i.e., a misalignment occurs, which is due to wear and tear on the door hinges. If there is play or the gap is set incorrectly, the problem must be corrected by adjustment. Otherwise, the door will close with great force. To carry out adjustment work, you will need the same tools as when dismantling the door.
Door adjustment consists of two stages:
- hinge adjustments;
- lock adjustment.
To adjust the position of the door element, perform the following steps:
- Break off the fastenings of the door hinges with an impact screwdriver.
- The door position is set (lowered or raised) in order to correctly adjust the gap between the body and the adjustable part.
- Tighten the fasteners.
- Check the position of the door.
- If necessary, the adjustment is repeated.
Video: door adjustment using the example of a VAZ 2106
Disassembling the door
There are situations when it is necessary to disassemble the door of the “seven”, for example, if the sliding glass, the body is damaged, or if the door itself is repaired. To do this you will need the following tools:
- screwdrivers (flat, Phillips);
- key to 10.
The disassembly process itself boils down to the following steps:
- We take out the decorative plugs on the armrest handle, unscrew the fastening screws and remove the handle.
Door stop
The door stop of the VAZ 2107 plays the role of a latch, i.e., it prevents it from opening excessively. Over time, the limiter may fail, requiring replacement. For this you will need:
To dismantle the lock, first remove the door trim. Then perform the following steps:
- Using a hammer and a punch, knock out the door stop pin.
This is a restoration of a VAZ door hinge
Restoration of play in car door hinges.
How to properly and quickly restore a car door hinge. And what
better? Replace. Or will it be limited to replacing the hinge pin? We will find out this question by watching two options (video):
Replacing the hinge. to carry out such work, first you need. Tool,
- Semi-automatic welding.
- Bulgarian.
- Thin circle on metal.
- grinding wheel.
- screwdriver.
- socket wrench, 17x19.) or 13x14)
We remove the trim, before removing the trim, first unscrew the door handle, for this
use a shaped screwdriver). And then we remove the door trim, the next thing we remove is the wiring. And anything that might interfere with access to replace the hinge.
And then we take a key to unscrew the bolts that fit in size,
or a screwdriver) why might a question arise? Well, for example, the Lada vases have hinges that are attached to a jack screwdriver.
Having carefully removed the door, use a grinder to cut off the hinges.
And we also brew new ones. This is a risky and expensive process.
Let's sum it up
Since the problem is quite common, we hope that the material will be more useful for Lada Kalina owners. Now we realized that the rear door handles of the car we reviewed should be handled especially carefully so that the rear door handle does not need to be replaced.
We will show you how to replace the outside door handle on Lada Kalina and Lada Granta cars. I think many owners have encountered this problem: the front doors open from the outside without any problems, but to open the rear doors, you have to put in at least twice as much effort to get the lock to work. You have to pull the handle very hard, as a result the mechanism does not hold up and the metal tongue breaks off on the inside. In such cases, the entire handle assembly is usually replaced.
In our case, after removing the door card, the following detail was found:
This is the same metal “tongue” that sets the door lock rod in motion. From the inside, unscrew one nut 8:
Now the handle can be removed from the outside, one part of it can be removed without problems, but the second part will require a little fiddling. A new pen costs around 300 rubles, which is not so expensive that you have to bother with repairing the old one.
When the new handle sits in place, but is not secured. it is necessary to move it as far as possible towards the rear of the car, i.e. back so that the tongue, which was broken off, would engage with the door lock mechanism. In this position, you need to check how the door opens; if everything is fine, screw the handle.
Replacing the larva
Once the core is removed from the metal box, it is important to ensure that there is no contamination or deformation inside. If this is the case, then the lock will have to be replaced completely. A new core is inserted, and then reassembled:
- The spring is put in place.
- Traction is connected. The nuts are tightened with a wrench.
- Electronics are being connected: power windows, side view mirror.
- The door card is returned to its place and secured with clips.
- The handle is screwed on and the plug is installed.
It is important to ensure that the front shutter position switch along with the wiring harness connector is connected correctly.
External handles and solving problems with them
If there is no external damage, then you will have to disassemble the element. To work you will need a number 20 screwdriver. Step by step instructions:
- The plug is removed. It is pryed off with the edge of a screwdriver.
- The screw is unscrewed. It is located at a depth of 6 cm. It is important to make no more than four turns clockwise.
- Carefully remove the handle, behind which the latch wire is pulled.
- The part is disconnected from the wiring. They are attached to each other by a plug.
After disassembly, the internal parts are cleaned and, if necessary, individual elements are replaced. Collection occurs in reverse order.
Sources:
https://7vaz.ru/nastrojka/regulirovka-dverej.html https://provaz07.ru/salon-i-kuzov/regulirovka-zamkov-dverej-vaz-2107.html https://semerkavaz.ru/raznoe/ regulirovka-dverejj-vaz-2107/ https://ladaautos.ru/vaz-2107/kak-provoditsya-regulirovka-dverej-vaz-2107-svoimi-rukami.html https://infokuzov.ru/remont/regulirovka-dverej -2107
Door opening method
If the VAZ-2109 door does not open from any side, then the cause of the breakdown is difficult to determine, since there is absolutely no access to the lock mechanism.
A somewhat simplified version of the breakdown occurs when the door does not slam shut completely and gets stuck in that position. Then it is possible to reach the latch from the outside with a sharp object.
To open a jammed door, you must first perform the following steps:
When simple means do not produce results, the door will have to be opened from inside the cabin, which will require removing its trim.
In practice, this is not easy to do, because the casing is pressed by the sash and it is difficult to pull it out without damage. But there is still no other way out: it is better to damage the inner panel than to mutilate the door itself.
To dismantle the decorative panel, you need to unscrew the armrest handle with a screwdriver, and then the storage shelf located at the bottom of the door card. Then the button that secures the lock from above is unscrewed and removed.
Lastly, the window lifter handle and the opening handle frame are removed. Now you need to carefully separate the lining from the body using a pair of flathead screwdrivers and another suitable tool.
You may be able to remove the trim without visible damage.
When the decorative panel is removed, access to the lock mechanism from the inside opens, although getting to it is inconvenient. Immediately check whether the rod running from the handle to the lock has fallen off. This is a fairly common malfunction that can be fixed with little effort. Put the rod in place and open the door.
If there are no visible reasons for the breakdown, simply try to open the door from the inside by working on the mechanism with various tools. If necessary, enlist the services of an assistant who will press or pull the door from the outside. Experience shows that such procedures for opening jammed doors can take a lot of time, so you will have to be patient.
How to lubricate ball joints before installation
Causes of malfunctions
There are several types of malfunctions that prevent the doors of a VAZ-2109 from opening from the outside or from both sides:
The latter malfunction sometimes occurs due to the fault of the car owner himself, who has decided to change or repair the door lock. Having put it in place and not fully tightened the screws, the owner of the VAZ-2109 accidentally slams the door, after which it will not be possible to open it with the handle.
Troubleshooting
If a key or silumin rod breaks, you should not immediately buy a new block with a handle. On sale you can find special repair kits for VAZ 2108-099 door handles, which contain these parts in 2 copies.
This way you will save money and easily change the key yourself by removing the handle using the following sequence of actions:
- Remove the decorative panel.
- Disconnect the rod connecting it to the locking device from the handle mechanism.
- With the glass fully up, unscrew the 2 fastenings of the handle to the door card.
- Remove the handle, replace the parts and put it back.
If the rod is disconnected, then you need to remove the inner lining and put it in place, as described above. Using the moment when the facing panel is removed, check what caused the disconnection of this rod so that history does not repeat itself when the door is slammed.
Malfunctions of the locking mechanism can only be eliminated by removing it. In a situation where the device has a lot of wear, as happens on the driver and front passenger doors, it is recommended to replace the lock with a new one.
After installing it in place, adjustment will be required to ensure precise alignment of the locking parts. To adjust, the lock will have to be fixed in different positions, achieving the optimal one.
Removing the VAZ 21054 trim
A little introduction.
Lada 21054 has been produced since 2005. An injection engine is already being installed in the car, which delights many car enthusiasts)) There are also changes in the interior trim)) They are installing seats from the VAZ 2107 and door cards from the VAZ 2106 and 2107 cars)) There are also other innovations)) It will be discussed about the door trims of the VAZ 21054))) Quite often, due to problems with the locks and the closing mechanism of the front doors, you have to remove the trim. In fact, this work is very easy to do and will take a maximum of 5 minutes to complete. The main thing is not to rush and not to break the rivets that are located on the door trim) For this we need only 2 screwdrivers: a Phillips and a flathead (preferably a longer one). 1) It is necessary to use a flat screwdriver to pry off the plastic insert, which is a decorative plug for the internal door opening handle, after which we remove it completely, since in the future it will interfere with removal: 2) Then it is necessary to remove the window lifter control handle, having first freed it from the plastic retainer ( the lock is visible in the photo), removing the lock may cause a little difficulty, but knowing what it looks like you won’t have any problems
3) Next, unscrew the three bolts securing the door handle, which are clearly shown in the picture. In the upper part of the handle, in order to unscrew the bolt, you need to free yourself from the plug (it is usually round). Using a screwdriver, remove it and the plug has 2 latches on top and bottom.
4) Now all that remains is to carefully pry the door trim from any angle with a thin screwdriver, and carefully, overcoming the resistance of the clamps, remove the trim - tear it off the clips. We read carefully. The clips are located on the top right at the edge from the inside of the casing and on the top left and in the middle at the edge from the inside of the casing,
The door trim has been removed. As you can see, this procedure on VAZ 2105-2107 cars is performed quite simply and does not require much effort. Installation is carried out in reverse order. If anyone is interested in the price of new trims, then a set for all doors costs about 300 rubles
What problems arise with doors
When might it be necessary to adjust the doors of a VAZ 2107? This happens in cases where the locking mechanism refuses to function. The inoperability of the locking mechanism is manifested by jamming of the doors, while they cannot be either closed or opened.
It is important to know! Reviews from owners of "Sevens" show that the most common disease of VAZs is door misalignment (sagging). When skewed, they close very poorly and are difficult to open, so it is urgent to take appropriate action to eliminate the malfunction
There are also cases when faulty locks allow doors to open while the car is moving. Over time, any parts wear out, and with frequent and careless use, the locks can fail at any moment. To correct the situation, it is necessary to periodically diagnose the door locks on the “seven”. Diagnostics consists of checking, lubricating and adjusting the locks of all devices on a VAZ 2107 car
Let’s find out in more detail how to adjust, as well as what details you should pay attention to.
Features of adjusting the gap and hinges
Adjustment does not require special knowledge, but it will require enough time to accurately set the locks, hinges and gaps
Initially, you should pay attention to the lock mechanisms, as well as diagnose the condition of the gaps between body panels, front fenders, as well as racks and frames. We also recommend that before starting work with the adjustment, thoroughly clean and lubricate the lock mechanism and the mating part; sometimes this solves the problem of poor closing and further work becomes unnecessary
The gaps on the VAZ-2107 car sometimes reach 7 mm, which, by the way, is not a rare occurrence. If you cannot set a stable gap (no more than 3 mm), then there is nothing to do, you should proceed to the stage of adjusting the hinges.
In order to adjust the hinges on the VAZ-2107, you need to use a Phillips impact screwdriver. The hinges are adjustable either in pairs or only one, which depends on where the door is skewed
When adjusting them, you need to pay attention to the condition of the seals; if they no longer perform their functions, they need to be replaced. When adjusting the hinges, it is recommended to lubricate them and also eliminate any play.
Features of lock adjustment
It is necessary to begin adjusting the door locks of the VAZ-2107 with troubleshooting. To do this, you should initially inspect the mechanism, and then lubricate the crossbars. There are two options for adjusting the locks on the “seven”. Let's consider both options:
- Option #1. Before adjusting the doors, you need to make sure that the parts of the product do not have critical wear. The front and rear locks have a similar design, so the adjustments are identical for them. It is necessary to begin work by unscrewing the three bolts that secure the mating part of the lock located on the rack. Once the bolts are loosened, you can proceed. To do this, the mating part should be visually positioned so as to obtain the optimal position. Afterwards, it should be slightly tightened and checked; if the door does not close, then it is necessary to slightly lower or raise the position of the counter part. If the closed door protrudes, we move the counter part inside the car; if it falls inside, we push it out. It is necessary to adjust little by little, until the most optimal moment.
- Option #2. How to adjust the door lock on a VAZ 2107? To do this, you need to slightly loosen the three bolts that secure the mating part. After loosening them, you need to close the door and lightly press on it. After this, the product must be opened and the bolts tightened. We repeat the closing again, and if necessary, the mating part is shifted again.
- If, after prolonged manipulation, it ends with the impossibility of adjusting the door lock, then you may have to replace the hinges. In most cases, problems arise with the hinges, which wear out and sag over time.
Before carrying out work, you can use a pencil to outline the contour of the mating part. The original location of the product should be used as a starting point when carrying out adjustment work using any of the options described above.
Adjustment is not particularly difficult, but requires special precision, so be patient and get to work. If you still cannot adjust the locks on your car acceptable, go to the nearest auto body repair shop and they will help you.
Features of adjusting the handle and lock
The mechanism will be permanently blocked if there is a problem with the lock or hand-held device. Main symptoms and solution to the problem:
- The key does not insert well, does not turn, and gets stuck. This fault leads to poor closing, resulting in an incorrect closing. Replacement of the larva is indicated.
- The mechanism is blocked. A new lock needs to be installed.
- The handle does not open the door the first time. Provision is made for disassembling the device and replacing the latch or fasteners.
- Closing occurs with a dull thud. In this case, the locking mechanism of the handle moves towards the lock, the adjustment is shown.
Materials for upholstery
When choosing fabric, you need to take into account quality, wear resistance, price, and color. The fibrous structure should stretch, this will allow the fabric to be securely fixed to the panel. Possible varieties:
- Genuine Leather. It looks beautiful, but is expensive. Creates sound insulation and withstands humid and harsh climates. The ease of care is dictated by the fact that the fabric does not absorb dirt and does not deteriorate when using aggressive detergents.
- Eco-leather or substitute. It has high wear resistance and is durable. The characteristics are identical to the natural base, only the substitute does not tolerate the effects of chemical detergents. With improper care, microcracks appear, which are then filled with dirt.
- Alcantra. Consists of thin and viscous fibers. The material has a high rate of moisture rejection, so it does not shrink. After the Alcantura is stretched on the panel, it will take the shape of the structure and will not sag over time. There is only one minus - the low level of sound insulation.
- Vinyl and leatherette. They provide strength and durability, and they are also very convenient for reupholstering. The material transmits sound well, so you will need to install an additional layer of insulation.
- Carpet. This is an artificial automotive fabric. This lining will last for many years. It withstands temperature changes, repels dirt, cleans quickly, and blocks the growth of fungus.