Adjusting the float mechanism of the carburetor VAZ "OKA" 1111 1988-2008
Adjusting the float mechanism is one of the most important carburetor maintenance operations. If this mechanism does not work smoothly or does not provide the optimal fuel level in the float chamber, it will not be possible to achieve normal operation of the remaining carburetor systems even if they are in full working order.
The fuel level in the float chamber affects the parameters of all carburetor systems. Exceeding the optimal level increases fuel consumption, impairs the starting and operation of a warm engine. If the level is too low, engine power is reduced, cold starting is difficult and jerks appear when accelerating the car.
Adjust the fuel level with the carburetor cover installed on the car removed.
You will need: two screwdrivers (flat-blade and Phillips-blade), an 8-point wrench, a caliper with a depth gauge shank.
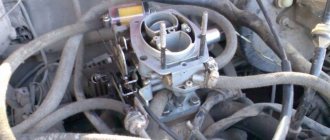
1. If the work is being performed as part of vehicle maintenance, remove the air filter (see "Removing and installing the air filter").
2. Using the pull rod of the manual pumping lever of the fuel pump, fill the float chamber with gasoline until the fuel valve closes and the level stabilizes (at this moment the force on the manual pumping rod will sharply decrease).
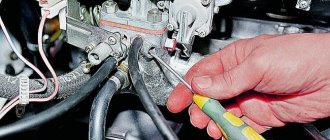
3. Loosen the fuel supply hose clamp and remove the hose from the carburetor fitting.
Cover the end of the hose with a large rag, since the gasoline in it is under pressure and will splash heavily when the hose is removed.
4. Disconnect the choke rod from the carburetor (see “Replacing the choke rod”).
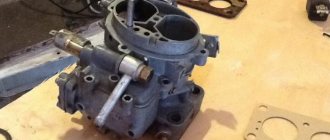
5. Remove the five screws securing the carburetor cover and remove the cover.
Be careful not to lose the screws; they fall out easily when you turn the cover over.
6. Carefully remove the cover gasket.
7. Using the shank of a caliper, measure the distance from the fuel level to the upper plane of the float chamber. It should be 22–23 mm.
8. If the level is higher than normal, use a screwdriver to carefully bend the tongue of the float bracket upward, holding the float.
9. If the level is below normal, bend the tab down. To check the newly established level, pump out some of the gasoline from the float chamber with a rubber bulb, replace the carburetor cover, connect the fuel supply hose and refill the float chamber with gasoline using the pull rod of the manual pump lever. Remove the carburetor cap again and measure the fuel level.
Settings
The carburetor on an OKA car is a slightly modified and modified mechanism from the “classic”, which is designed specifically for placement in the VAZ 11113 engine, and also has a solenoid valve and jets adapted for small displacement.
The carburetor under the hood is located transversely, not as is customary in other cars, so when making a quick left turn, fuel can escape from the jets, which leads to failures in the engine.
The carburetor setting is designed to solve this problem, the main task of which is to regulate the level of gasoline in the chambers. To do this, you need to set a distance of 2.2 cm from the gasket at the top of the carburetor, as this value is recommended by the manufacturer. It is impossible to carry out such an operation without removing that very cover.
Setting up the Oka carburetor
Special attention should be paid to this issue on an OKA car, since too much fuel will lead to “flooding” with gasoline. The fuel should be slightly lower than the economizer tube. Otherwise, an enriched mixture will constantly occur, the spark plugs will flood, and the engine will sooner or later fail. In order to prevent unpleasant situations with turns, a special economizer is used.
Adjusting the carburetor is primarily about adjusting the operation of the jets. This procedure must be carried out only on a fully running engine, otherwise its effect is reduced. It is necessary to adjust the carburetor so that a level of 1.5 turns is ensured from the moment of greatest depletion of the emulsion. On an OKA car this is done by twisting the quality screw. Further, depending on the speed, adjustments are made.
It is also necessary to adjust the amount of fuel supplied using a special screw. This device must be turned until the moment when stable and smooth operation of the engine occurs on OKE.
Low speeds are set so that the carburetor works smoothly and does not stall. In this case, you must first turn on all electrical equipment. Correctly setting the carburetor allows you to achieve gasoline consumption of up to 6 liters in the city in an OKA car.
Features of the VAZ-11113 carburetor, design and adjustment
If the carburetor floods, the cause of the problem is most likely not related to the adjustment, but to a loose fit of the locking needle to the seat, and in this case the locking mechanism in the PC will need to be replaced. P Anticipating, I can briefly answer the following: Average summer consumption, with an average load of about 60 kg except for the driver, on summer road tires, using AI-92 gasoline, in the city, when 40 times the tachometer rarely drops below 3000 rpm, 30 - phlegmatically driving in general traffic, 30 waiting for this damn traffic jam to clear up, with a rack permanently screwed to the roof, 80 in the daytime, with an average non-stop distance of 5-10 km, it ranges from 5.2 to 6.5 liters per 100 km.
Overfills the carburetor
Often on the Oka a situation arises when the carburetor floods; with such a malfunction it is usually very difficult to start the car, and in other cases the engine does not start at all. There may be several reasons for the problem:
- does not hold the needle valve;
- the fuel pump creates too much fuel pressure (if a return line is not installed);
- the level in the PC is set incorrectly (more than normal);
- The float is not sealed.
Finding the cause of the defect usually begins with inspecting the parts of the float chamber, and if there is significant overflow and smells of gasoline, first of all you should pay attention to the locking mechanism.
Design. Device repair
| Tuning the carburetor oka So it turns out that in summer the consumption is 5.5 liters, and in winter apparently 6.5 liters, which is not so little and becomes comparable to a carburetor tuned chisel. Self-repair of a carburetor device requires a clear identification of the malfunction, the ability to properly dismantle the mechanism and wash it. |
| Adjusting the Oka 11113 carburetor with my own hands. For example, I use the well-known method, first I use the quality screw to achieve maximum XX speed, then I use the quantity screw to set it to 1100 rpm, again I use the quality screw to achieve the maximum, again I slightly adjust the quantity screw to 1100 rpm, the repeated adjustment is associated with a feature of the system is XX carbs like quot; Solex quot;, carbs like quot; Ozone quot; They have a completely autonomous idle system, where the number of idle revolutions is regulated not by opening the throttle, but by the amount of mixture of the idle system; after that, depleting the mixture with a quality screw, I set it to 1000 rpm. However, if the car owner has experience in independently servicing his car, then it is allowed to clean the carburetor from carbon deposits with his own hands. |
Adjusting the gasoline level Oka 11113 • Inspect the float and its mounting parts.
How to remove
The removal procedure is quite simple, but it is recommended to follow a clear action plan so as not to damage the internal components of the carburetor during the dismantling process. To successfully carry out the work, you will need only three tools:
open-end wrench 8;
open-end wrench 13;
Before starting work, you must disconnect the wire from the negative terminal of the battery. This action will protect you from possible electric shock.
The procedure for dismantling the DAAZ-1111 carburetor is as follows:
It will be necessary to remove the air filter box. It is located in such a way that it prevents free access to the carburetor.
After this, you will need to loosen the bolted connection securing the damper drive rod to the lever. You will also have to slightly unscrew the bolt that secures the damper drive to the bracket.
After loosening, the bolts can be easily unscrewed - you need to disconnect the drive rod from all connections.
Using a screwdriver, disconnect the intermediate rod end from the lever.
Next, you need to disconnect the crankcase ventilation hose, which is connected to the fitting.
Afterwards, you can safely remove the wiring from the economizer valve.
The next step is to disconnect the vacuum regulator hose.
Next, you will need to loosen the clamp on the fuel supply pipe and remove the hose. Some fuel may spill out.
After which you can begin the procedure of removing the carburetor body. To do this, you will need to unscrew the forced idle economizer valve; behind them there are two nuts that need to be unscrewed.
After removing the filter element bracket, you can unscrew the two nuts that are located on the front side of the carburetor.
The device is carefully removed from the studs.
The main thing is to follow the exact procedure
Immediately after dismantling the carburetor, it is recommended to block the resulting hole in the intake manifold with a lint-free cloth. This measure is necessary to ensure that dust and dirt do not get inside.
Cleaning carburetor elements from carbon deposits and dirt
It is advisable to have the carburetor cleaned both outside and inside at a service station. However, if the car owner has experience in independently servicing his car, then it is allowed to clean the carburetor from carbon deposits with his own hands. However, you should be as careful as possible, since some parts of the mechanism require special care.
How to clean jets
The fuel or air jets of the DAAZ-1111 carburetor are calibrated, that is, they have holes of a strictly adjusted diameter. That is, if the integrity of the surface is damaged, the normal supply of fuel or air may be disrupted.
Cleaning of jets is carried out every 50 thousand kilometers, since due to their structure and functions they are most susceptible to soot adhesion.
The jet body usually consists of a malleable metal alloy that is easily damaged. Therefore, it is not recommended to remove carbon deposits and dirt using wire. It is advisable to use a toothpick, which will gently remove soot from the part. To improve the result, you can blow out the nozzle from a can of compressed air or under the pressure of a stream from a conventional tire pump.
Small parts in the form of plugs
Cleaning the throttle valve
It is necessary to clean the throttle valve only if there are obvious reasons that indicate the formation of carbon deposits. For example, the engine began to start intermittently, operate unstably, at idle the speed begins to “float”, etc.
On Oka cars, it is recommended to clean the throttle valve no more often than every 80–100 thousand kilometers. For a successful operation, it is recommended to remove the part from the carburetor. To remove carbon deposits, you can only use soft, lint-free cloths and special cleaners for carburetor engines. You will need to lightly wipe all surfaces of the damper with cleaner, then wipe it with a clean, dry cloth.
Cleaning the float chamber from carbon deposits
It is recommended to clean the float chamber every 80 thousand kilometers. To remove carbon deposits efficiently, you will need to completely disassemble the device without removing the float. Carburetor cleaner (or kerosene) is poured into the cavity of the chamber; the liquid should dissolve carbon deposits in the chamber within two hours. After which it must be drained, the cavity must be blown out and wiped dry.
The float chamber often has to be cleaned of carbon deposits in cases where low-quality fuel is used. If the car owner carefully monitors the quality of gasoline consumed, the time frame for washing and cleaning may be increased.
How to adjust the carburetor "Oka" 11113
When performing all these operations, one nuance must be taken into account: when removing and installing the carburetor cover 11113, the shut-off needle falls out of it; removal must be done carefully so as not to lose the part, but installed by creating a vacuum (for example, using a rubber bulb, due to vacuum the needle holds and does not fall).
Video: performing repair work on the DAAZ-1111 with your own hands
The specificity of the structure of the cavities of the DAAZ-1111 carburetor is that exhaust gases are not removed immediately, but gradually. That is, the engine unit is forced to experience some difficulties when operating at high speeds. In addition, the entire design of the DAAZ-1111 does not prevent lubricating fluids from entering the carburetor, which can quickly lead to its contamination.
If the ignition system operates without interruption, the following malfunctions may occur on the Oka carburetor:
instability of the engine unit (this may be due to carbon deposits on the fuel nozzles or malfunctions of the economizer);
incorrect operation of the gas pedal while driving (the nozzle holes are clogged);
deterioration in the dynamic qualities of the car occurs due to a critical decrease in the fuel level in the float chamber - the engine simply does not have enough fuel to fully operate at high speeds;
jerks during movement indicate that carbon deposits have formed in the float chamber, therefore the normal movement of fuel in the system is disrupted;
instability of revolutions indicates that the carburetor trigger needs to be adjusted.
However, the main sign that indicates a malfunction of the carburetor can be considered a sharp increase in fuel consumption.
about the solenoid valve
Colleagues, The question is very simple, but I don’t understand it.
The other day I decided that the solenoid valve on my carburetor was not working (sometimes detonation appeared in the muffler area when the engine was turned off). I stopped at the store to buy a new solenoid valve. The seller told me that they come with short and long threads, I unscrewed mine (with the short one), he gave me a new one (checked it for operation). I installed a new one and went. I won’t tell you the details - it doesn’t hold idle. I changed it back and installed the old one. Then, upon arriving home, I began to figure out what was going on. I checked that voltage is supplied to the solenoid valve when the ignition is turned on, I hear the sound of operation on the new one, but it still does not hold idle. So I'm going with the old one. What could be going on here? After all, the solenoid valve cannot work well or poorly, it either works or it doesn’t. And if it is faulty, then it will either always be open or closed.. And no adjustments are provided for it.
Thank you. in advance for clarifications
Re: about the same problem. > If it's the valve, of course.
It's clear what's in it. Everything else works.
Same bullshit by the way. For now I have forgotten and am driving the old one. I'll go through the carb and figure this out at the same time. But it seems to me that the new valve shuts off fuel to the XX system