Cars admin26.02.2020
Welcome, friends, to the DIY car repair website. A car is one solid mechanism consisting of many small components. Each of them has its own task, operating features and operating requirements.
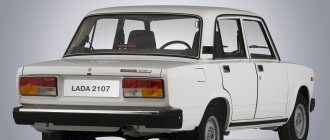
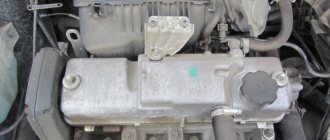
Thus, the rear axle gearbox of the VAZ 2107 is designed to transmit rotation from the engine to the drive wheels.
Purpose of the rear axle gearbox of the VAZ 2107
The main traction unit of a car is the engine. It is the source of energy that is necessary to move the vehicle.
In this case, direct transfer of energy from the crankshaft to the wheels is impossible - the latter will rotate too quickly, and driving the car will become an impossible task.
That is why two components act as “intermediaries” - the gearbox and the rear axle gearbox.
It would seem that one gearbox would be enough to transfer energy (as is done on a motorcycle). But it's not that simple.
A car has not one, but two wheels on an axle, and each of them must rotate at the same speed.
That is why the gearbox is an indispensable component of the car - it “distributes” rotation to both wheels.
In fact, two important devices are hidden in one unit - a differential (its task is to distribute energy to the wheels in equal proportions) and a gearbox (it is designed to reduce the speed of rotation of the shaft).
Correct assembly
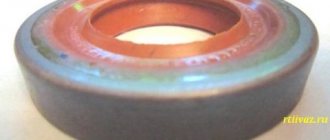
When using old parts, only the oil seal and spacer sleeve are changed. When replacing elements of the main pair, it is necessary to use a new spacer washer for the shaft gear and bearing. The washer is selected according to the size, which can be found on the shaft itself. The adjustment ring is mounted and pressed with an attachment onto the inner bearing race.
Requires installation of a spacer sleeve. It is placed in the crankcase. A new oil seal is installed. Next, put on the flange and tighten everything with a new nut. When installing new bearings, the nut must be tightened with a force of 16-200 kgf meter. After running-in, the force will drop to 6. When using old bearings, tightening occurs in the same way as the oil seal.
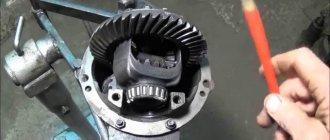
The differential is assembled and installed in place. If the semi-axial gears had axial play, then thickened washers are installed. After this you can screw on the lids.
A specialized wrench is made to adjust the bearings.
The main pair is adjustable. The nut must be tightened from the main gear until the gap disappears. The shtangel will help measure the gap.
Then the second nut is tightened and tightened a couple of teeth. The first nut has a gap of 0.08-0.13 mm. It will be noticeable if you pick up the gear: a faint knock of teeth will appear.
While controlling the gap, slowly tighten both nuts until they increase by 0.2 mm. This ensures that the bearings are tensioned correctly. Next, the gear is turned by hand and backlash is tested. If it is the same in different positions, then locking plates are installed, tightened with bolts. If this is not the case, then they say that the differential box is deformed, and therefore it needs to be replaced.
Diagnosis of axle gearbox failures
Gearbox malfunctions manifest themselves by the appearance of strange noise while driving. But the difficulty is that determining the source of extraneous sound is not so easy.
To accurately identify the cause, it is worth conducting a small diagnosis:
Accelerate the car on a flat road to 20-25 km/h and continue to increase speed (it is advisable to do this as smoothly as possible).
At the same time, listen to unnecessary sounds and record at what speed they appear and disappear.
Having accelerated to the desired speed, release the gas and gradually reduce the speed with the engine. Listen again to the moment when the noise becomes louder or disappears altogether.
Most often, extraneous sound in the gearbox should appear and disappear at the same speed;
Accelerate the car to 90-100 km/h and move the gearshift knob to neutral position.
Now turn off the ignition and drive the car (the car should stop on its own).
Pay attention to noises when reducing speed. If during such a test a suspicious sound appeared, then it clearly did not come from the main gear gears.
If there was extraneous noise during the first test, but not during the second test, then the problem is in the gearbox or drive gear bearing;
Stop the car and gradually increase the speed. If noises appear similar to those in the first check, then the problem is not in the gearbox.
If there are extraneous sounds only during the first experiment, and their absence in the second and third, you can safely “sin” the gearbox.
Replacement procedure
Before proceeding with dismantling the gearbox, drain all oil from it. Remember - never reuse old grease.
In order to free the rear axle, put the car in neutral.
Further:
- raise the rear with a jack;
- The cardan joint, carefully held with a pry bar (so that it does not turn during the process), is disconnected from the drive gear;
- unscrew the 4 nuts securing it;
- taking a flat screwdriver, disconnect the flange;
- the cardan is suspended on a rope, secured to the bottom of the car;
- twist the nut that secures the drive gear;
- remove the washer;
- the flange itself is dismantled;
- turn off the brakes and unscrew the wheels.
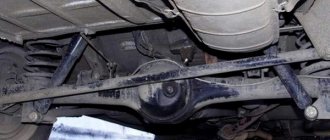
Since it is impossible to replace the gearbox without removing the axle shafts, dismantle them too.
After this, all that remains is to remove the gearbox itself. It is disconnected from the beam by unscrewing 8 bolts.
Whatever the reason forces you to disassemble the rear axle, always check the condition of other moving elements along the way. As previously noted, oil seals most often become unusable.
The main bearings also often wear out due to high loads. If visible defects are found on these elements, they must be replaced. By the way, this element is designed to ensure the correct gear ratio of the power unit. For those who intend to start tuning their “seven”, it is useful to know that installing a superior gear directly into the gearbox allows you to lower the above-mentioned indicator and, therefore, increase the speed. For 2107, the highest allowed number is 4.4.
Features of replacing the rear axle gearbox
If you are convinced that such an important unit is faulty, then only replacing the rear axle gearbox of the VAZ 2107 can help out. In principle, this work can be easily done with your own hands:
- Drive the car onto the overpass (you can work in a pit in the garage).
- Place wheel chocks under the wheels (if you don’t have them, you can put regular stone or brick).
- Drain the oil from the gearbox (before doing this, it is advisable to drive the car a little to warm up the lubricant).
- Wait until all the oil has drained from the assembly.
- Remove both rear wheels one at a time and install supports.
- Remove the brake drums and axle shafts (it is better to remove the latter rather than leave it dangling from the car).
- Unscrew the gearbox and cardan.
- Make sure the gasket is intact and, if necessary, treat it with sealant.
- After 10-15 minutes, install a new gearbox and assemble everything in the reverse order.
- Add oil.
Gearbox repair
When making adjustments and repairs to the rear gearbox, you must have certain skills, as well as follow technology. A mandatory requirement is that you must have special tools, pullers and stands at your disposal. If you do not have all these tools, then it is better to have the rear gearbox repaired by a professional.
If you have never tried to repair rear gearboxes, but really want to do it, it is better to first learn from experienced mechanics. Disassembling the VAZ-2107 axle gearbox is not difficult, but this is a vehicle component that requires very high-quality maintenance. You shouldn't skimp on this.
Signs of a malfunction of the rear axle gearbox of the VAZ 2107
- Choose a flat section of the road and gradually accelerate on it from 20 to 90 km/h. While driving, you should listen carefully and note the appearance and disappearance of extraneous noise from the rear axle gearbox.
- Release the gas and start braking with the engine. While the speed is decreasing, you should also note the moments when noises appear and disappear.
- Accelerate the car to approximately 100 km/h and, switching to neutral, turn off the engine. While the car is coasting, note the presence and disappearance of noise.
To verify the presence or absence of a mono problem like this:
If the noise remains the same when operating without load as under load, the problem is not in the gearbox. Other rear-wheel drive components should be checked.
Disassembling the unit
To disassemble the gearbox, you will need to do the following:
- Unscrew the shank securing nut.
- Remove the flange, then remove the drive gear along with the adjusting rings.
- Remove the oil seal, inner race on the bearing and oil deflector.
- Using a puller, remove the outer rings from the bearings.
- Disassemble the drive gear along with the differential mechanism. Subsequently, the spacer sleeve must be replaced.
When disassembling the mechanism, be sure to mark the bearing caps so that they can be installed in the same way during reassembly. It is recommended to use a pencil or core to make marks. Label the right and left covers to avoid confusion during installation. It is advisable to mark these covers using a core.
Using a drift and a hammer, you need to remove the separator and the inner rings. Please note that you should not knock too hard. The rings are knocked out by lightly tapping in a circle. If you hit only one point, the ring will not come out. When repairing a rear gearbox, the bearings or the main pair are usually replaced. These are the most vulnerable elements of the system.
Reasons for failure of the VAZ 2107 gearbox
- untimely replacement of transmission oil;
- use of low-quality oil;
- operation of the bridge with insufficient oil level;
- Frequent vehicle slipping or operation under extreme load conditions.
To repair the rear axle of a VAZ 2107, you will need:
Work must be carried out on a lift or inspection pit.
Before removing the gearbox, it is necessary to drain the transmission oil that is poured into the rear axle of the VAZ 2107. To do this, place an oil container under the drain hole of the axle and unscrew the drain plug.
What tools are needed for removal
In order to make repairs, you need to remove the rear axle. To do this you will need the following tools:
- Socket and open-end wrenches.
- Punch and chisel.
- Hammer.
- Bearing ring puller.
- A simple pencil (or better yet, a core).
- Torque wrench.
- Set of probes.
- Container for draining lubricant.
- Calipers.
It is advisable to carry out repairs by placing the car on a viewing hole or lift. But if there are no such amenities, you can raise the entire rear part as much as possible above the ground. Just make sure that the front wheels are secured as securely as possible.
Adjustment and installation of the VAZ 2107 gearbox
The gearbox parts are assembled in the reverse order of disassembly. You can press in the bearing rings using a hammer and a special tool (a socket wrench head will do).
Adjusting the VAZ 2107 gearbox
We remove the rear axle from a VAZ 2107 car to replace it or carry out body work.
To carry out the work of removing the rear axle from a VAZ 2107, you will need an assistant.
Removing the rear axle from a VAZ 2107
1. We install the VAZ 2107 car on an inspection hole or overpass (see “Preparation of the VAZ 2107 car for maintenance and repair”).
2. Drain the oil from the rear axle of the VAZ 2107 (see “Rear axle of the VAZ 2107 - checking the level and changing the oil”).
3. We hang up the rear part of the VAZ 2107 (see “Preparing the VAZ 2107 for maintenance and repair”) and remove the rear wheels (see “Wheel of the VAZ 2107 - replacement”).
4. Disconnect the driveshaft from the shank flange of the main gear drive gear (see “Driveshaft of a VAZ 2107—removal and installation”).
5. Place a jack (diamond or hydraulic) under the rear axle gearbox and slightly raise the axle.
6. Disconnect the pressure regulator drive rod from the bracket on the rear axle beam (see “Rear suspension spring - replacement”).
7. Remove the hydraulic brake hose (see “Rear brake hose - replacement”).
8. Disconnect the shock absorbers from the rear axle brackets (see “Rear suspension shock absorber - replacement”).
9. Having lowered the rear axle on a jack, release the springs and remove them along with the upper and lower insulating spacers (see “Rear suspension spring - replacement”).
10. Remove the rear parking brake cable guide from the tip of the front cable and disconnect it from the cable. We remove the ends of the cable sheath from the holes in the body brackets. We remove the two brackets securing the rear cable to the body of the VAZ 2107 car (see “Parking brake system - disassembly and assembly”).
AUTOFIZIK.RU / auto repair
Rear axle assembly and final drive adjustment
We assemble the main gear in the reverse order of disassembly, lubricating the bearings and gears with transmission oil. Having installed the drive gear in the gearbox housing...
... use a torque wrench to tighten the flange nut to a torque of 16–20 kgf.m, while the gear must be rotated for proper installation of the rollers in the bearings.
We install an indicator with a division value of no more than 0.01 mm on a tripod, resting its leg against the end of the flange...
...and moving the shaft by the flange, we measure the axial play of the drive gear.
To eliminate play, remove the spacer ring installed on the gear shaft (see Dismantling the rear axle) and measure its thickness with a micrometer. We select and install a new spacer ring. It should be thinner than the amount of play removed and additionally thinner by 0.05 mm - if the drive gear bearings are new or by 0.01 mm - if the bearings are left the same. If there is no axial play of the drive gear, use a special torque wrench with a scale of up to 0.5 kgf.m to check the moment of resistance to shaft rotation. With proper adjustment, the resistance moment should be 15–20 kgf.cm for new bearings or 7–10 kgf.cm if the bearings are left the same. With sufficient accuracy, the moment of resistance can be measured using a household steelyard...
...hooking its hook onto the hole in the flange.
In this case, the required values will be less - 3.8–5 kgf and 1.8–2.5 kgf, respectively. If the moment of resistance is greater, we change the spacer ring to another one, 0.01–0.02 mm thicker; if it is less, we select a ring of smaller thickness accordingly. Before assembly, the bolts for fastening the parts of the differential box and the bolts for fastening the driven gear, as well as their threaded holes, are degreased and coated with anaerobic sealant. We pay special attention to the cleanliness of the end mounting surfaces of the gears and the gearbox; the slightest contamination or nicks are unacceptable.