Fuse and relay box
The main block with fuses and relays is located under the hood and can be made in 2 versions (old and new). The current diagram will be printed on the block cover.
Option 1
Scheme
Option 2
Installed on cars of early production years, here the fuses are cylindrical.
Scheme
Description
Circuit breakers
| 1 | 8/10A Heater motor Reversing light lamps Rear window heating switch on Rear window heating switch relay (winding) Rear window wiper motor (2104) Rear window washer pump motor (2104) |
| 2 | 8/10A Windshield wiper and washer motor Headlight wiper and washer motor Windshield wiper relay Headlight wiper and washer relay |
| 3 | 8/10A Reserve |
| 4 | 8/10A Reserve |
| 5 | 16/20A Rear window heating element and heating relay |
| 6 | 8/10A Cigarette lighter Socket for portable lamp Clock |
| 7 | 16/20A Sound signals Signal relay Electric radiator cooling fan relay (contacts) Radiator cooling fan electric motor |
| 8 | 8/10A Hazard switch with warning lamp Relay-breaker for direction indicators and hazard lights Turn signal indicator (in hazard mode) Turn indicators (in hazard mode) |
| 9 | 8/10A Generator Voltage Regulator |
| 9 | 8/7.5A Rear fog lamps and their indicator |
| 10 | 8/10A Turn signals (in turn signal mode) Relay - turn signal switch Turn signal indicator Pneumatic valve control system Tachometer Fuel gauge Fuel reserve indicator Parking brake indicator Insufficient oil pressure indicator in the engine lubrication system Coolant temperature indicator Voltmeter Service brake emergency indicator systems Battery charge indicator Carburetor air damper closed indicator Electric fan relay (winding) Electric fan thermal switch Generator excitation winding (generator 37.3701) |
| 11 | 8/10A Interior lamp Brake lamp Luggage compartment lamp |
| 12 | 8/10A High beam headlights (right headlight) Relay for windshield wipers and headlight washers (relay coil) |
| 13 | 8/10A High beam headlights (left headlight) High beam indicator |
| 14 | 8/10A Front side light (left headlight) Rear side light (right light) License plate lights Engine compartment lamp Side light indicator |
| 15 | 8/10A Front side light (right headlight) Rear side light (left light) Cigarette lighter lamp Instrument lighting lamp Glove box lighting lamp Clock (lighting lamp) |
| 16 | 8/10A Low beam headlights (right headlight unit) Relay for windshield wipers and headlight washers (relay coil) |
| 17 | 8/10A Low beam headlights (left block headlight) |
| 18 | Spare |
| 19 | Spare |
| 20 | Spare |
| 21 | Spare |
The cigarette lighter is controlled by fuse number 6 at 8 or 10A.
Relay
| K1 | Relay for turning on the heated rear window (904.3747-10 / 2105 -3747210-18, 2107 -3747210-12) |
| K2 | Headlight cleaner and washer relay (904.3747 / 2105 -3747210-08, 2107 -3747210-02) |
| K3 | Relay for turning on sound signals (904.3747-10 / 2105 -3747210-18, 2107 -3747210-12) |
| K4 | Relay for turning on the electric cooling fan (not used since 2000) (904.3747-10 / 2105 -3747210-18, 2107 -3747210-12) |
| K5 | Relay for high beam headlights (904.3747-10 / 2105 -3747210-18, 2107 -3747210-12) |
| K6 | Relay for low beam headlights (904.3747-10 / 2105 -3747210-18, 2107 -3747210-12) |
Additional items
Under the hood
Additional headlight wiper fuses (2A rating) protect the motor windings. They are located on the supply wires next to the gearmotors.
p, blockquote 18,0,0,0,0 —>
p, blockquote 19,0,0,0,0 —>
The starter activation relay 113.3747 or 90.3747-10 is located in the engine compartment on the right mudguard.
p, blockquote 20,0,0,0,0 —>
p, blockquote 21,0,0,1,0 —>
In the cabin
The windshield wiper relay (PC-514) is mounted under the panel on the left under the trim.
p, blockquote 22,0,0,0,0 —>
p, blockquote 23,0,0,0,0 —>
The ignition relay and the hazard warning and turn signal relays are installed on the front panel behind the instrument panel. The ignition relay (113.3747-10 or 90.3747-10) and the hazard warning and turn signal relays (23.3747 or 231.3747) have a bracket for direct mounting on the body.
p, blockquote 24,0,0,0,0 —>
p, blockquote 25,0,0,0,0 —>
The fog lamp fuse is located in the gear shift compartment, not far from the radio.
p, blockquote 26,0,0,0,0 —>
p, blockquote 27,0,0,0,0 —>
Installing a fuel pump
Before installing the fuel module (fuel pump with fuel level sensor), you must carefully check the condition of the rubber gasket that ensures the sealing of the connection. At the slightest suspicion, it is better to replace it. It is cheap, but re-installing/removing the fuel pump when a fuel leak occurs is a labor-intensive task.
When tightening the eight fuel pump mounting nuts, you must be careful not to strip the threads.
Further operations are performed in the reverse order of removing the fuel pump.
After installing the fuel pump and connecting the pipes and power connector to it, you should check the operation of the system. To do this, you need to start the engine and make sure the connections are tight.
Diagnostics
The primary conclusion whether the fuel pump is working or not can be assessed by ear when the ignition is turned on. If you don’t hear a quiet buzzing noise from behind, then you need to check the voltage supply to the gas tank block and then draw a conclusion about its malfunction.
You can check the serviceability of the fuel pump using the MTL-2 pressure gauge; this is the most correct way. You can somewhat roughly estimate the pressure using air pressure gauges to check tire pressure. To do this, screw a rubber hose to the sensor and connect it to the fuel system.
You can do without instruments at all; to do this, unscrew the fuel hose from the filter, place a container and turn on the ignition. In one minute, about 1 liter should be poured into the container.
The pressure of the VAZ 2107 injector fuel pump when the ignition is on should be 4.0 atmospheres, and when the ignition is running 2.8-3.2. In reality, the pump pressure is different and was slightly less, but this may be an error in the pressure gauge.
The carburetor pump is checked by setting the camshaft position by cranking the engine so as to ensure free movement of the pump foot. The hose is unscrewed from the carburetor or filter and the presence of fuel supply is determined by pressing the foot.
Where is the fuse for the fuel pump VAZ 2110
In any gasoline engine vehicle, a gas pump is used to deliver pressurized fuel from the fuel tank to the dispenser. Depending on the engine modification of VAZ cars, the fuel system may be a carburetor or an injector.
Gasoline pump (PG) on a carburetor internal combustion engine 2110
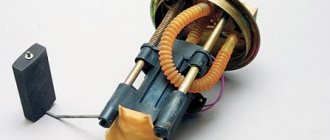
Located behind the valve cover, next to the distributor, it is located in the fuel tank (submersible type) in a car with an engine injector. If the BN fails, the engine will not pull or accelerate, and in many cases the engine will not start at all.
Gasoline pump circuit (electrical)
The design of the electric pump 2110 is quite simple. Block. 12-volt electric motor. BN is installed in the housing; a mesh is installed at its entrance. big filter. The filter element prevents dirt particles from entering the pump housing, which protects the device from clogging and possible damage.
The electrical circuit of the VAZ fuel pump contains the following elements:
- ignition;
- fuse;
- relay;
- wiring;
- the engine control unit.
When the ignition switch is turned on via the relay, power is supplied to the BN terminals and the pump begins to pump gasoline. After the fuel supply line is filled with gasoline, the computer (control unit) issues a command through a relay to turn off the voltage. The fuel system is ready to start the engine; you just need to turn the engine using the starter.
Relay for fuel pump VAZ 2110
A relay in any electrical circuit is designed to make and break a circuit; its main role is to protect circuit elements from high current. When starting an internal combustion engine, the current required to crank the starter reaches 80-300 A, and if the relay is not installed, any element of the electrical circuit may be damaged.
Fuel pump relay VAZ 2110 standard type; Inside the plastic case there is an electromagnetic coil with a core; when an electromagnetic field is applied to the voltage, the contacts close. Relay 2110. Four-pin, rated at 30 amperes.
where is the fuel pump Relay VAZ 2110
Often, due to a malfunction, the relay motor is stopped to solve the problem; The defective part must be replaced. Fuel pump relay (RB) The VAZ 2110 injector is located in the cabin under the dashboard next to the center console. To get to the Republic of Belarus, you need to unscrew two screws of the protective plastic case to disassemble it. Of the three pump relay elements located here, it will be located in the center (numbered 5 in the picture below).
VAZ 2110 fuel pump injector price
2110 electric fuel pumps are made by a variety of manufacturers and can be sold complete with a housing or separately using electric motors. In the BN collection, it only makes sense to change if the lamp (housing) of the device is damaged; often it is only the fuel pump motor that needs to be replaced, since it basically stops working.
Main manufacturers of fuel pumps 2110-2112:
- Weber;
- HOFER (Germany);
- Bosch;
- SEPO (Saratov);
- Pekar (Russia).
On VAZ 2110 gasoline pumps, the cost of the injector can vary; on average, BN can be purchased at a price from 700 to 4,500 rubles. The cheapest products are Hofer and Pekar; the average price for an electric fuel pump (motor) assembled with a Pekar filter screen is about 800 rubles. The most expensive are BN Bosch, the cost of the device is assembled. 4300-4600 rub.
Changing the mesh of the gas pump VAZ 2110
Russian fuel does not always meet quality requirements, and over time, due to poor gasoline, sludge accumulates in the fuel tank. Sulfur also clogs the filter screen of the electric gas pump, because due to the accumulated dirt, the fuel does not completely enter the fuel line, the internal combustion engine is interrupted. To fix the problem you need to clean or replace the coarse filter, but to get into the mesh you need to remove the BN.
Before disassembling, it is necessary to reduce the pressure in the fuel system, otherwise, when unscrewing the fuel pipe, gasoline may flow out through the injectors and fill the entire interior of the car. To relieve pressure, remove the BN fuse, start the engine and wait until it stops. Replace the VAZ 2110 fuel pump grid as follows:
- turn off the ignition;
- on the back seat in the cabin, find the hinges and, by pulling them, remove the lower “seats” (left and right);
- there is under the seat , attached to two screws;
- unscrew the screws and remove the hatch;
- Disconnect the plug from the wires that supply power to the electric fan; to do this, bend the latch and pull out the connector parts;
- Turn the fuel line fittings. main feed and return (position 17 mm);
- unscrew the nuts of the clamping plate of the used pump (fastening here, 8 pcs., 7 mm wrench);
- Small nuts, they need to be put in a jar and not lost. Remove the plate, remove the pump assembly from the gas tank. The BN block with rubber o-ring must be removed to carefully lift the pump to avoid damaging the fuel gauge. When removing the housing, the BN must be tilted, otherwise it will not come out of the tank;
- remove the screen from the fuel pump, install a new part;
- we install the electric gas pump in place. It is important to put things back in their old places. if the pump b/ is pushed out, the fuel pipe connections will not become twisted.
DUALITY VAZ 2110, 2111, LADA 2112 fuel pump. WHY DOES THE Fuel Pump NOT WORK
EXHAUST AND VAZ 2110 EXHAUST PUMP
, 2111, 2112 LADA. HEAT MAN DOESN'T WORK.
VAZ 2110 fuse blows on the fuel pump
Since the fuel pump
I had a buggy one, it turned on, then it didn’t, especially in the morning, I decided to temporarily let it go.
Electric fan faults 2110
If the pump stops working, this could be due to several reasons:
- wiring is damaged;
- fuse;
- the relay has stopped working;
- The BN engine burned out;
- The engine control unit has failed.
When the driver of the VAZ 2110-12 injector engine turns on the ignition, the electric motor starts working. there is a characteristic noise. If there are no sounds, the BN is not pumping fuel.
The easiest way to check is the electric fan fuse, which is located almost the same as the relay, located to the left of the RB.
If the fuse is deflationary, it must be changed. It often happens that the fuse blows immediately after replacement. The main reasons for the malfunction of this phenomenon are:
- The "gas pump" itself is "short";
- Wiring short circuit.
Another common problem with an electric fuel pump is that it pumps fuel but makes a loud noise when operating. Noisy gas pump. a sure sign that this device will not “live” for a long time, and it will soon fail.
How to test a relay
If the electric gas pump does not show any signs of life when the ignition is turned on, this does not mean that it has burned out. The cause of the malfunction may also be a relay. The easiest way to test your RB is by hearing. The relay must be pressed when the ignition is turned on. If you don't hear a click, there is a good chance that the "switch" is faulty.
But it's not that simple. The fault may be “complex”, for example the car does not start on the first try. The cause of the malfunction may lie in the relay contacts of the relay. Checking the pump is very simple, proceed as follows:
- remove the protective cover, under which there are
shoes with relays and fuses; - disconnect the fastenings of the blocks, remove them, leave them on the wires;
- remove RB from the pad, place a jumper between the two opposite pins so we go straight to BN;
- If the pump motor starts to make noise with this connection, it means that the working BN is most likely a hidden fault in the relay.
If the UPS terminal block is not energized, you should look for open wiring, but there may be a poor connection at the point where the wire is connected to the terminal.
Fuel check valve
The VAZ electric gas pump has good performance characteristics, but puts too much pressure on the fuel system. To return the pressure to normal, the fuel line of the VAZ 2110 gas pump is built into the pipeline, located in the “outlet hole” of the BN housing. Dozens also have a pressure regulator located behind the fuel rail.
A valve malfunction causes the ball to lock in the open position, and the fuel pressure in the system can be reset to zero. If this problem occurs, the car starts very hard because all the gasoline from the fuel lines with the ignition outlet returns to the gas tank. Is there any way to fix the valve?
2110 drivers say you can try to push the nipple through the BN flask to keep the ball in place. If this method does not resolve the problem, replace the discharge pump lamp as this case is not covered.
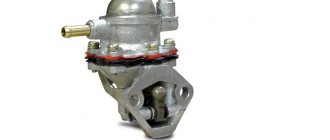
Mechanical fuel pump for dozens of VAZs
The VAZ 2110 (Lada-110) has been produced at AvtoVAZ since 1995, and the first engines of this model were equipped with carburetors. Eight 72-liter VAZ 2110 valve engines. With. were delivered to “tens” by 2000, and the fuel pumps on these engines were, accordingly, mechanical.
The 2110 mechanical fuel pump consists of the following parts:
- metal case (two halves);
- top cover;
- diaphragm pusher;
- two valves;
- return spring.
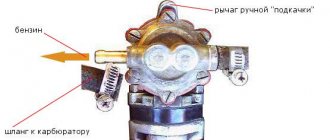
Gasoline is injected from the fuel tank due to the oscillation of the diaphragm and the opening and closing of the valve. When moving, the diaphragm with a pusher is driven by the camshaft eccentric, and the lower BN housing has a manual lever for pumping gasoline.
Faulty mechanical gasoline pump
All parts of a car engine are subject to wear and tear, and the lifespan of a mechanical BN also changes over time. Major mechanical faults:
- Corrugation of cases;
- cracking of the diaphragm;
- valve failure.
If air leaks through the diaphragm, the pump can stop the flow of gasoline into the carburetor, even through a ruptured diaphragm, fuel will enter the crankcase and mix with the engine oil. When gasoline gets into the oil, fuel consumption increases dramatically and the engine does not start properly, especially during warm-up. Checking for gas in the crankcase is quite simple. If the dipstick lights up with the cigarette lighter, a fire will occur, in addition, the smell of gasoline will emanate from the oil pan.
A common defect that occurs in mechanical gasoline pumps is surface deformation at the point where the pump/pump is attached to the accessory housing. If the surface is deformed, engine oil flows at the junction of the planes.
Carburetor fuel pump VAZ 2110 price
Unlike electric-gasoline pumps, mechanical BN pumps are usually cheaper, depending on the manufacturer. The most famous companies that produce gasoline pumps:
The cost of the device ranges from 350 to 850 rubles; repair kits for used mechanical pumps are also sold; the kit includes a diaphragm, rod, and valve. The repair kit is quite cheap. from 70 to 200 rubles, but repairing it does not always make sense, since the pump itself is inexpensive.
An interesting fact is that a gasoline pump for carburetor engines for the “top ten” VAZ is available from both the VAZ 2108-09-099 and the Lada VAZ-classic 2101-07. The “Classic” BN differs only from several other adapters, as well as the installation of the pump from the “Classic” to the car. 2110
Longer fuel hoses must be used.
Diagnostics
The very first thing when diagnosing, as noted above, listen when you turn on the ignition to see if there is any noise from the fuel pump. The absence of a characteristic buzzing may indicate that:
- VAZ 2107 fuel pump fuse is faulty;
- relay malfunction;
- open circuit of the fuel pump;
- motor malfunction;
- ECU malfunction.
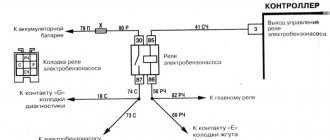
Below is a simplified connection diagram for a VAZ 2107 injector fuel pump:
You can check the fuel pump on a VAZ 2107 injector simply by checking the voltage at its connection block with a tester. The presence of voltage will indicate a malfunction of the electric motor. Instead of a tester (multimeter), you can use a test lamp to diagnose a malfunction.
In the absence of one, this can be done by disconnecting the connection block for the fuel pump and fuel level control and applying voltage with wires from the battery to the place where the gray wire is connected +12 and to the place where the black wire is connected - minus. A humming pump will indicate a faulty fuse, power circuit or ECU.
Selecting a new fuel pump relay
Finding the right relay is not so difficult. For searches, it is best to use electronic catalogs or services for searching for spare parts by their name and vehicle parameters, or by codes. However, you can also search by VIN code. Optionally, the car enthusiast can re-solder the relay. Restoring the track often helps. Relay components are available on radio markets. However, many experts do not advise doing this.
Since the fuel pump relay is designed quite simply and has a long service life, a car enthusiast can look for an original used relay at a car dismantling site. If you want to purchase a new analogue , then you should pay attention to products under the names of well-known brands: Parts Mall, Bosch, Valeo. Packers also offer inexpensive but lower quality analogues. The largest packaging companies are Meyle and JP Group. We draw the attention of car enthusiasts to the fact that cheap gasoline pump relays can be ordered in online stores specializing in goods from China. Chinese relays are extremely affordable in terms of price, but they cannot boast of stable quality. The best choice would be an original relay or a device from packagers and manufacturers that have proven themselves well. Using a relay from a domestic classic (if it is suitable in terms of the number of contacts) is undesirable - it can cope with all key functions, except turning off the fuel pump in emergency mode.
Self-replacement of the ignition switch of a VAZ-2107
The owner of a VAZ-2107 car can change the ignition switch on his own. To do this, it is enough to have a set of simple tools and a little theoretical knowledge.
What is a VAZ-2107 lock?
The ignition switch (hereinafter referred to as the ignition switch) is the main element of the electrical system of the entire car, turning it on and off. It is located under the dashboard, on the steering column on the left. In the off position, the ZZ blocks the steering column, preventing the car from being stolen. Also, an additional means of protection is a key, which is individual for each lock.
Main parts of the ignition switch (ignition switch)
How does the ignition switch work?
The main task of the device is to start and disable all vehicle systems. Turning the key closes the electrical circuit, allowing current from the battery to flow to all devices and appliances of the car. Returning the key to the initial position allows you to turn off most electrical systems. This activates the anti-theft steering lock.
The ZZ VAZ-2107 has four key positions:
III – parking. Initial position – the key can only be inserted and removed in this position. External optics, heater and glass cleaner are working. To unlock the steering wheel, you need to turn it smoothly in any direction. Also, to turn on the lock, you need to twist it after removing the key.
Oh - everything is turned off. All electronics are de-energized and the key is locked in the lock.
I – ignition. The III position systems work, as well as ignition, generator excitation, control devices, turn signals and headlights.
The key in this position with the engine off can burn the ignition coil.
II – starter. Everything works, the starter starts.
The key must be held in position II, since it is not fixed. Also, do not stop at it while the engine is running - there is a high probability of damage to the starter.
Connecting wires to device contacts
In the new "sevens" all the wires from the contacts are collected into one plug, which can be easily removed. If the connection is made separately, then they must be connected as follows:
- Red wire – starter – terminal number 50.
- Double, black and blue - ignition, interior and rear window heater, instruments on the panel - terminal number 15.
- Pink – permanent “plus” of the battery – terminal number 30.
- Brown – permanent “plus” of the battery – terminal number 30/1.
- Black - side and rear brake lights, rear optics - terminal with the letters INT.
Connecting wires by color
Replacement Tools
You will need a minimum set available in every garage:
- Awl/thin screwdriver.
- Slotted and Phillips screwdriver.
What and how we do it on carburetor and injection VAZ-2107
Removing the lock
- Remove the plug with wires, disconnecting the 3Z from the electrical systems.
- Insert the key into the cylinder and turn it horizontally to the “O” position.
- Unscrew the five screws of the plastic column casing.
- Unscrew the side screws securing the device (there are two of them).
- Using a thin screwdriver or an awl, press the locking latch and pull out the 3Z.
- Disconnect the electrical wires from the contacts.
Replacing the contact part
- Using a thin screwdriver, remove the retaining ring securing the contact part in the 3Z housing.
- Remove the contacts from the cylinder.
- Insert new contact element. In this case, it is necessary to align the grooves of the new element with the rotating rod on the cylinder lock.
To replace the contact group, you need to remove the retaining ring
If the “seven” was released before 1986, then it has six contacts for connecting wires. In this case, you need to connect wires 15/1 and 15/2 to one terminal.
Installation, connection of 3Z
- Insert the key and turn it to the horizontal position until “O”.
- Press the latch and insert the lock cylinder into place.
- Connect the wires according to their color and numbering.
- Replace the plastic casing.
- Connect the lock to the vehicle's electrical systems.
When connecting wires, you must strictly follow the correspondence of the wires and terminals, since an error can damage all the electrical equipment of the car.
What if there is no key?
If you lose your ignition key, do the following:
- Remove the plastic casing from the column.
- Use a thin screwdriver or awl to pick up and remove the part on which the digital key positions are marked.
- Drive, swinging, the awl into the gap between the body and the lock cylinder until the fasteners fall out.
- Remove the larva.
- To unlock the column, press the movable element located under the cover.
- Remove the seal and install a new one.
Replacing a locked ignition switch
If the lock is stuck - the key does not turn or is broken and remains in the cylinder, you can remove the faulty element in three ways.
First way
- Disconnect the negative wire from the battery. Remove the steering wheel from the column. The nut (it is located under the Lada logo) for the 24th knob only needs to be loosened, without unscrewing completely. Removing the steering wheel will require physical effort if the spline joint is stuck. When the wheel moves away from the column, unscrew the nut completely and remove the steering wheel.
- Use a Phillips screwdriver to remove the column protective cover.
- Unscrew the locking fasteners.
- Using a thin screwdriver, press the plate through the slot on the left side of the lock and pull out the lock cylinder as far as possible.
- Using a hammer on the plate on the right, turn the lock around the axis.
- Using a chisel, gently hit the plate with a hammer. Underneath there is a lock, held on by lugs.
- Use a suitable tool to break the visible eyelet.
- Pressing the plate again through the slot on the left, move the ZZ by 1 cm.
- Use a hammer to knock out the lock from the reverse side.
Device
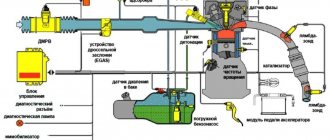
The VAZ 2107 injector consists of the following elements:
- Computer;
- Sensors;
- Fuel pipes and hoses;
- Fuel and air filter;
- Actuators;
- Gas tank;
- Wiring.
The injector power system contains the main element - a computer or ECU. Its permanent memory contains a program (algorithm) in accordance with which the control of actuators is implemented, these include:
- Fuel pump;
- Injectors;
- Idle air control;
- Canister valve.
Each of the above elements performs its own function.
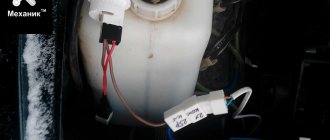
Gasoline pump
Turned on by the ECU output signal through a relay. Has a strainer and fuel level sensor. The gasoline from it passes through the fuel filter. The pump is located in the tank and to remove it, you need to remove the back seat, remove the hatch and unscrew the fastener.
Nozzle
It is a sprayer equipped with a solenoid valve. Triggered by an ECU impulse. Accordingly, the duration of valve opening (the amount of gasoline supplied) depends on the time the pulse is applied. It is installed on a ramp common to all injectors, a constant pressure in which is maintained by a valve. If it is exceeded, the valve opens and gasoline returns back to the tank. The injector enters the intake manifold. The air flow, passing through the intake manifold, carries away a portion of gasoline ejected by the nozzle.
The structure of the VAZ 2107 fuel system
Idle speed control
The fuel system maintains engine idle speed using a regulator. It is a stepper motor connected to a conical shaped control body. Its approach reduces the air flow entering the intake manifold; its removal, on the contrary, increases it.
Canister valve
It is needed to turn on the ventilation of the adsorber, which accumulates gasoline vapors and releases them into the intake manifold at the right moment.
The following sensors are installed on the VAZ 2107:
- Crankshaft position;
- Mass air flow;
- Throttle position;
- Coolant temperature;
- Speed;
- Oxygen content in exhaust gases.
Crankshaft position
This parameter is needed by the ECU to open the injectors in a timely manner. If this sensor malfunctions, the VAZ 2107 will not drive.
Air flow
Allows you to supply fuel in the right quantity. The signal from this sensor is sometimes incorrect. The reason for this may be its malfunction caused by high humidity or low temperature. An air filter with condensation inside or dirty will adversely affect this sensor.
Coolant temperature
The parameter is needed so that the ECU understands whether the engine is warmed up. This is necessary for the correct operation of a cold motor. The mixture is enriched due to temperature correction.
Oxygen concentration
The oxygen content in the exhaust gases must be measured to adjust the composition of the fuel mixture. It doesn't work when it warms up. This is advisable because the mixture is enriched.
Causes
There are several reasons why a VAZ fuel pump may not work:
- no power to the fuel pump;
- motor is faulty;
- pump is faulty.
Let me clarify some points. If the electric motor malfunctions, power is supplied to it, but if the brushes are broken, the rotor or windings are faulty, the motor will not spin and you will not hear a characteristic hum.
If the fuel pump malfunctions, a hum will be heard, but there will not be enough fuel or, in my case, the pump is simply jammed.
What does chip tuning give?
The Togliatti model (VAZ 2107) is popular, despite the large number of modern cars of this class. This is explained by the low price of the car, low cost and ease of repair and maintenance, and high reliability. The engine characteristics are similar to other domestic models, so chip tuning differs little from the tuning process of other VAZ or GAZ models.
Dynamic characteristics and gasoline consumption on “classic” VAZ models have always been at a low level. Many owners of fuel-injected "sevens" strive to adjust power, "gluttony" and other indicators using chip tuning.
Often, flashing the control unit is a necessary procedure for a standard VAZ 2107. Software chip tuning improves the basic characteristics of the car and normalizes the operation of the engine ECU, after which the injector begins to work much better. The procedure not only reduces consumption and improves dynamics, but also extends the life of the injectors and piston group of the engine.
Important: chip tuning of the VAZ 2107 ECU can only be carried out on a fully functional engine that has undergone a thorough technical inspection using special measuring instruments and equipment
TOP 10 programs for flashing cars via laptop
Let us immediately emphasize that utilities for chip tuning on a laptop can be purchased at special tuning workshops. In this case, you will not only receive competent advice, but also buy a licensed product that is exactly suitable for your control unit. However, you will have to pay money.
Firmware for chip tuning can also be downloaded from the Internet, but in this case there is a risk of running into low-quality programs infected with malicious files. Therefore, we recommend downloading only from large and well-known portals for car diagnostics, and carefully responding to signals from the antivirus application in the laptop.
Openbox 3.16.9. This is an analogue of the previous utility, here is a link to the free download and instructions for use: https://elm3.ru/proshivki/prog/openbox-3-16-9. The program can read, delete and load FLASH and EEPROM, perform a full range of measures for manually upgrading the unit;
Chip Tuning pro 3.21. Software for professional chip tuning with wide capabilities: changing settings for idle speed, warming up, operating mode calibrations, editing engine starts, controlling detonation, sensors, mechanisms, emergency modes, etc. https://elm3.ru/proshivki/prog/chip-tuning-pro-3-21;
ChipExplorer 1.95. The software is completely Russified, allows you to edit calibrations, make changes to operating modes, compare the current firmware with previous ones, and upload data to a file. https://elm3.ru/proshivki/prog/chipexplorer-1-95;
WinFlashEcu v 1.14. Cool flasher for ECUs of Soviet cars - VAZ, GAZ, UAZ. https://elm3.ru/proshivki/prog/winflashecu.
We recommend paying attention to the following products:
- ECUSafe (not Russified);
- ELM config (also does car diagnostics);
- Combiloader is one of the most universal, simple and accessible (in Russian);
- Galletto (Russian menu available).
Many users are looking for more professional equipment, which is used in specialized tuning workshops.
A prominent representative is the Pro 7 chip tuning program, which can be downloaded for free from here (with an activation code): https://almisoft.ru/ctp7download.htm.
There are also a lot of programs for flashing a car via an Android phone, without a laptop. Well, some mobile utilities really allow you to competently hack control units. However, we advise you to choose the most rated applications and carefully read recent reviews, especially negative ones.
Chip tuning results
According to the OpenDiag program, the consumption became approximately 0.8-0.9 liters per hour. I don’t know how accurate this figure is, but in other similar firmware (including from the icebreaker) the consumption was 1-1.2 liters. per hour, that is, more.
As for increasing the dynamics of the car, at first glance nothing has changed for the better. I was even a little upset that there was no result. A few hours later my friend called me and said in a joyful voice that she had gone. According to him, there were changes, and they were colossal. The car began to tear from first and second gears, the gaps between gear changes stopped - the car came to life. In general, everyone was very pleased. Apparently, after reflashing the ECU, there was no such result from the very first start, due to the fact that adaptation to the new program had not yet taken place.
Source