To ensure a high level of safety when operating a vehicle, it is necessary to completely transfer all processes that can be automated to this mode of operation. The reverse sensor (hereinafter referred to as RSD) of the VAZ 2115 automatically turns on the lighting when the vehicle moves in reverse. This part can also be classified in this category, because no human intervention is required to activate the lights, which are necessary when the car is moving in the opposite direction.
The features of operating and replacing the reverse sensor of a VAZ 2115 car will be discussed in detail in this article.
Functionality check
Before blaming the sensor for the malfunction of the reverse signals, make sure that the device has actually lost its functionality. To do this, run the diagnostics:
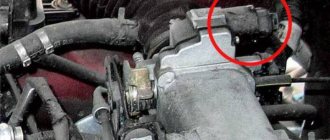
- Turn the wheels to the left all the way and look at the sensor from the driver’s side - there is a protection on the side of the gearbox, and contacts inside it;
- Remove this protection and inspect the device. There are also two contacts going to the sensor;
- Close the contacts on the frog limit switches (this is the same reverse sensor) and start the engine, engaging reverse gear;
- If everything is fine, the wires and contacts are working properly, then the white headlights will turn on;
- If the headlights do not light, use a tester to check the voltage on the wire (orange) and ground;
- If there is voltage, check the light bulb board and the quality of the contacts.
Causes of the problem and solutions
There are several most common reasons why the DZH fails. But there are countermeasures that can return the sensor to operation.
Refinement of the power system
For the VAZ 21053 to drive perfectly, you just need to keep an eye on the air filter and clean the carburetor from time to time. However, the factory design can be slightly modified. Surely, when doing engine repairs, many noticed that the pistons of cylinders 2 and 3 are black, and pistons 1 and 4 are light. This indicates that some cylinders are receiving a rich mixture, while others are receiving a lean mixture. This problem is solved by installing two carburetors, the jets of which will distribute the mixture in equal proportions.
Supply system
It is best to use Weber modifications; in this case, adjusting fuel consumption for each VAZ 2105 carburetor is not so difficult. And Weber’s reliability is better. To install it, you will need a set of plumbing tools, tees, hoses and manifolds from Oka, the markings of which are in the catalog. It is worth remembering that it can be very difficult to achieve synchronous operation of carburetors. And why this happens is difficult to say. Most likely, each VAZ 2105 carburetor is unique, and therefore the fuel consumption adjustment is not ideal. So two carburetors are quite a risk. Although if everything can be set up synchronously, then the VAZ’s internal combustion engine will begin to operate very smoothly. And fuel consumption on a VAZ will increase, but by no more than 1 liter.
After installing two carburetors, you will also have to make air filters. They are usually made from improvised materials. You can also install a zero resistance filter. If the Federal Tax Service is installed on a VAZ 2105 carburetor, additional adjustment of fuel consumption is required. However, it is worth remembering that such a filtration device must be constantly maintained, otherwise the engine life will be significantly reduced due to the ingress of abrasive particles. If you forget about the VAZ 2105 carburetor, then adjusting the fuel consumption can lead to the mixture in the engine becoming lean. By the way, if it is not clear why the VAZ 2105 engine is heating up, then it is quite possible that it is because the mixture is too lean.
Causes of failure
Before you start replacing the reverse sensor (RDS), we recommend checking the condition of the rear lights and determining whether the signal may not be working for other reasons.
| Possible reason | Your actions |
| Burnt out light bulbs | A common and fairly banal cause of problems, which, nevertheless, many ignore. Take out the light bulb, arm yourself with a multimeter and check if they have burned out. Replace if necessary |
| Wiring is damaged | The problem is no less common, but looking for the source of the problems in such a situation is a little more difficult. You will also need a multimeter, which you need to test the wiring and check the resistance readings |
| Poor regulator contact | It happens that during operation the contact of the sensor with the socket is broken. Lack of contact means that the device will not work normally. So check its condition |
| Wiring insulation is broken | If the insulation on the wires near the sensor is broken, this can lead to a short circuit. The result is quite obvious, so check the condition of the wiring and replace it if necessary |
| Fuse burned out | Depending on the type of fuse box, check the condition of the corresponding element in the mounting block. On old-style blocks this is fuse F16, and on new-style fuse blocks you should look at fuse 5. If they are melted, they will need to be replaced. But it is also important to determine the reason why the fuse blew |
| Sensor failure | A failure of the reverse control itself may be indicated by a situation where the lights do not light up at all or, on the contrary, light up without interruption. In the second case, the option of burnt out light bulbs is excluded by itself. |
Replacing a reverse sensor is not a difficult or financially expensive job. Today, the DZH can be purchased at any auto parts store, and its cost is about 100 rubles.
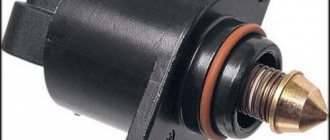
Do-it-yourself IAC cleaning
How to clean the IAC? The procedure for cleaning the device begins with removing the device, we described this above. Once you have the device in your hands, you first need to clean it with a dry cloth and cleaning fluid, which is usually sold in aerosol form. Alternatively, you can use WD-40. In addition to the controller itself, you should also clean the seat. Press the canister with the product several times, with the aerosol stream directed towards the tip of the IAC, which is also called the needle.
It is best to use carburetor cleaning fluid.
Depending on the design features of the IAC, this needle can be either plastic or metal. Clean the sensor needle directly, since liquid should not be allowed to get under the spring into the inside of the device . If you do hit the spring, the regulator will have to be purged with a large volume of air; for this you can use a pump or compressor. If liquid gets into the device mechanism itself, it can damage the lubricant inside it, and this, in turn, will cause a quick breakdown of the device. Choose the correct dosage of the product and do not dose the liquid too much, as this will also force you to clean the spark plugs in the future.
ABOUT THE SIGNS OF DZH MALFUNCTION AND ITS SEARCH
It is safe to say that there can be only one sign when the VAZ 2114 reverse sensor does not work, this is the absence of lighting when driving the car in reverse. But there are quite a few culprits for this. It could be:
- Fuse F16 (15A) has blown;
- Oxidation of contacts in flashlights;
- Poor contact of the connector with the fuse block;
- Broken wires;
- The sensor output terminals have oxidized;
- The light bulb has burned out.
Often the culprit of such problems is the light bulb socket, where oxidation of the contacts occurs due to poor sealing of the lamp.
TROUBLESHOOTING
The location of the reverse sensor on the VAZ 2114 (2115, 21113) has already been clarified, let's talk about how to determine the true cause of the malfunction. To do this, it is advisable to have a measuring device such as a tester or multimeter, a light bulb with two wires, but in some cases you can do without them.
The check procedure could be as follows:
- Open the hood of the car, and then the fuse box cover;
- Check fuse F16 and replace it with a new one if necessary. If after this the lighting does not light up, continue the search;
Find and check fuse F 16
- The device checks the presence of electrical voltage at the fuse legs when the ignition is turned on. It should be equal to 12 volts. If it is absent, poor contact between the connector and the fuse box may be to blame. If there is tension, then move on;
- The search moves down under the car. You need to turn on the ignition and reverse gear. But before that you need to remove the engine protection. After this, check the supply voltage to the DZH connector;
- Connect the device or control light with one wire with ground, and the other end with an orange wire. The “movement” of the instrument needle or the glow of a light bulb indicates the presence of supply voltage;
- The next step is to short-circuit the conductors of the DZH connector to each other. If lighting appears, then we can safely say that the VAZ 2114 reverse sensor has failed. If it is absent, the search continues. The troubleshooting algorithm for VAZ 2109, VAZ 2113, VAZ 2115 is the same.
The diagnosis has been made, and now they are starting to treat it.
Wiring diagram for VAZ-2105 (carburetor, injector) with description
The VAZ-2105 does not have an overly complex electrical part, however, when faced with diagnosing a particular problem, it may take quite a lot of time to identify it. Many auto experts recommend having a VAZ-21053 wiring diagram printed on a color printer. It can also be purchased ready-made, and this will be much better, since the printed version is of higher quality and better readable. It is also worth remembering that there are two types of cars with a fuel supply system:
- Injection.
- Carburetor.
What does an electrical circuit consist of?
The main electrical diagram of the VAZ clearly indicates the location of all components of the electrical circuit:
- generator;
- battery;
- headlights;
- relay;
- warning lamps;
- instrument panel and more.
This diagram shows the entire location of the wires, how they run and what they power. Each wire is designated by a separate color to make the diagram easier to read.
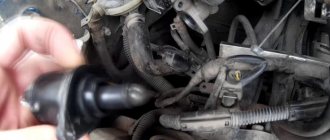
How to replace the reverse sensor
The reverse sensor is a device that switches the rear white lights when reverse gear is engaged. In other words, the sensor is used to ensure that the reversing lights turn on when you put the car in reverse gear.
The reverse sensor for a VAZ is a reliable part, but not eternal. Therefore, sooner or later there may come a time when your reverse lights fail.
If your rear white lights do not work, this does not mean that the reverse sensor has failed. To find out in more detail why the reverse lights do not light up, read the article Reverse lights do not light up.
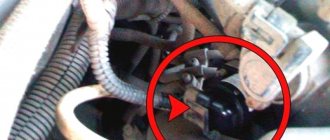
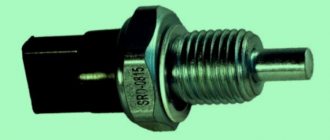
Where is the reverse sensor located?
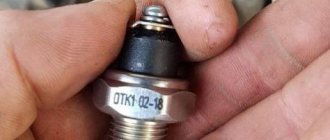
Location of reverse sensor number 7
Finding the location of the reverse sensor is not so difficult. This sensor is located on the gearbox. There are only two sensors on the box: the speed sensor (DS) and the reverse sensor. Reverse sensor photo: the sensor is located at number 7.
How to check the reverse sensor
To check the functionality of the sensor, remove the contacts from it and clamp them together. Then turn on the ignition and put the gear in reverse. If the lights are on, the sensor is faulty and needs to be replaced. And if they don’t light up, then the problem is in the circuit, not in the sensor.
We recommend: How to quickly and competently turn off a car alarm
Replacing the reverse sensor
To replace, we will need transmission oil and an oil container. The fact is that when we pull out the sensor, oil will flow out of the hole that appears and your task is to insert a new sensor in place of the old one as quickly as possible.
- We park the car on the overpass.
- We put it on the handbrake or gear.
- We remove the protection.
- We find the sensor and remove the contacts from it.
- We substitute the container and begin to unscrew the sensor.
- Having taken out the old one, quickly screw in the new one.
Then let it sit for a while and check the oil level in the gearbox. To find out how to check the oil level in the gearbox, read the article How to check the oil level in the gearbox? Add as much oil as needed and put everything back together.
Buy a reverse sensor
You can buy the sensor at any auto parts store for domestic cars. The price for it ranges from 150 to 250 rubles.
Acoustics
Do-it-yourself acoustic tuning of the VAZ-2105 interior is considered a popular option for improving the car. This upgrade involves adjusting the holes for mounting speakers. This action is carried out with an electric jigsaw. Podiums are formed from boards 3 cm thick, and holes for speakers are drilled into them. The main nuance in this matter is the pull of the door handles, which is transmitted to the tongue, because it opens the door lock. It is necessary to take into account that this mechanism must have a reverse motion. Otherwise, the door may slam, but will not close due to the central locking or from inside the car. In this situation, the tip of the rod is wrapped and adjusted in such a way as to gain 5-7 mm for return. The rear doors of the VAZ-2105 are upholstered using a similar principle. The ashtray will have to be removed.
The procedure for replacing the IAC on a VAZ 2114 engine
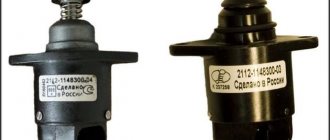
Before replacing the idle speed control of the VAZ 2114, you need to prepare the sensor, the necessary tools and materials:
- As a replacement device, you can buy an IAC marked 2112-1148300-04 “KZTA” or “omega” 2112-114830. When choosing, be sure to check the exit of the needle rod to a distance of no more than 23 mm;
- for work you need a Phillips-head screwdriver, as well as a key “13”;
- Be sure to have rags, WD-40 and carburetor cleaner ready.
Before replacing the device, you must:
- Place the car on a level surface and put the handbrake on.
- Raise the hood and lock it in the open position.
- Disconnect the battery; when replacing the IAC, this is not a requirement, but a mandatory condition.
- Remove the cover, which is the protective casing of the engine.
- After loosening the clamp, disconnect the rubber tube from the air filter pipe, otherwise it will interfere with the disconnection of the pipe itself.
- Unscrew the clamp securing the VF pipe, disconnect and move the pipe corrugation to the side.
- Loosen the fastening screw and pull out the cable running from the gas pedal to the throttle valve.
- Using a rag, clean the surface of the throttle body and around it.
- Lubricate the remote control mounting nuts and IAC mounting screws with WD-40 to make them unscrew better .
- Unscrew the two nuts to “13” and remove the entire throttle assembly.
- Disconnect the IAC connector by removing it from the sensor terminals.
- If there is dirt in the places where the IAC is attached and adjacent to the remote control housing, it must be removed by thoroughly wiping everything with a prepared rag.
- Using a Phillips screwdriver, unscrew the two screws that secure the IAC to the remote control.
- Remove the valve from the mounting socket.
- It is advisable to wash the throttle assembly with carburetor cleaner.
- Install the regulator prepared for replacement on the throttle assembly in the same position in which the device was just removed.
The rubber gasket, which should be sold together with the sensor, must be pre-lubricated with engine oil.
- Tighten the two screws and make sure that the IAC is tightly attached to the remote control housing.
- Place the throttle assembly in place and make sure the mounting nuts are tightly tightened.
- Connect the connector to the valve terminals.
- Attach the cable to the throttle valve and connect the VF pipe and the rubber tube, tightening the clamps.
- Install the protective cover on the engine.
- After installation, the IAC must be calibrated. To do this, connect the battery terminals and turn on the ignition for ten seconds. The ECU will calibrate itself. After this, the IAC is ready for operation.
Recommended: Throttle sensor malfunctions
What does a pump do on a car?
The cooling pump is mounted closer to the front of the cylinder block, and the torque is transmitted by the generator belt. The element solves the function of constant supply of coolant (coolant), which significantly increases the effect of heat removal from the engine.
The part consists of a housing, a shaft with an impeller, a sealed seal and bearings. As a rule, the housing and impeller are made of aluminum or magnesium alloy. As for the impeller, it is made of plastic.
If we keep in mind the design diagram, then the VAZ classic pump consists of two halves: one does not contain any moving elements and is permanently attached to the cylinder block, the other includes moving parts, such as an impeller and bearings.
Bearings ensure the rotation of the shaft. The housing has special channels for supplying and discharging liquid. The impeller rotates, a centrifugal force arises, which throws the coolant towards the outer walls of the housing. Thus, pressure is created, forcing the liquid into a specially designed tube located in the cylinder block (cylinder block). Making a large circle (circulation), the liquid again enters the pump through the lower pipe.
Pump design in the engine cooling system
Due to this precise sequence and fluid circulation effect, the hottest engine elements are cooled.
As mentioned above, the detail on the classic has some features. Due to the fact that the pump consists of two parts, when replacing, many people confuse the front cover with a full-fledged pump. In fact, the name water pump refers to the entire assembly, which also includes pipes.
A sealed gasket is installed between the cover and the pump body to protect against leaks. During the replacement process, it should also be updated.
Repair methods
To repair the reverse signal, you can proceed in two ways. They differ in the way the sensor is accessed.
- Drive the car onto a lift or pit.
- Do the work by climbing under the car.
If you have already encountered a similar problem, then you will probably agree that replacing the DZH is best done using a pit or overpass. This makes access to the sensor as comfortable as possible, plus you minimize the risk of being splashed with oil from the gearbox.
Replacing the DZH is not the cleanest job
Of course, there is another cleanest way - sending the car to a car repair shop. But then you will have to pay not only for the sensor, but also for the services of the specialists. And this is another 2-3 times the cost of the sensor. The choice is yours anyway.
Self-replacement
It’s not difficult to get to and replace a failed DZH on your own. Follow the instructions, do not break the sequence of operations, and then the process will not take you much time and effort.
- Place the car on a pit or overpass. Be sure to apply the handbrake and place the transmission in first gear. This will help prevent your car from accidentally rolling away.
- Remove the protection from the contacts of your sensor, disconnect the contacts.
- Prepare a container into which the oil will be drained when unscrewing the DZH.
- When the container is ready, remove the sensor. In some cases, it may not be unscrewed by hand. In such a situation, use a 22 mm socket.
- Very rarely even the key cannot help, since the sensor becomes stuck to its location. Here you will have to arm yourself with a hammer and chisel and try to remove it as carefully as possible.
- Take out the failed device and insert a new one in its place.
- If oil gets on the gearbox housing, remove it with dry rags. There is no need for extra dirt. Plus, it can lead to a decrease in the efficiency of the device.
- Return all contacts to their places, put the protection back on.
- If a decent amount of lubricating fluid has spilled out of the box, be sure to top it up. Just use fresh ones. By the way, this is one of the reasons to completely change the oil in the gearbox if it has been there for more than the first season.
- The decision to change the oil will simplify the task when removing the sensor. If the liquid is drained in advance, it will not flow in different directions when the sensor is unscrewed. The work will be cleaner, plus you will kill two birds with one stone - replace the sensor and gearbox oil.
Article on the topic: Self-adjustment of the clutch on a VAZ 2114
Removal and replacement
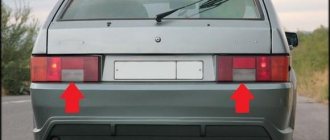
After completing the work, do not forget to check whether the reverse traffic warning system is now working. For this:
- Turn the ignition key, but do not start the engine;
- Engage reverse gear on your gearbox;
- See if the white lights turn on. If yes, everything went great.
How much it costs?
Many VAZ 2114 owners are often interested in the cost of certain spare parts. In the case of DZH, a new device will cost you up to 300 rubles. You can find devices for 100 rubles.
The price depends on the manufacturer, quality level and pricing policy of the auto parts store where you decide to shop.
Additionally, it wouldn’t hurt to purchase WD40, which can be used to clean contacts. Plus, the wires may need to be replaced. We do not recommend doing this on your own if you do not have the relevant experience.
If the culprit for the problem with the rear lights is the light bulbs themselves, replacing them will cost a pittance. Today they cost up to 50 rubles.
Car pump device
In case of many defects, the pump is replaced on a VAZ sixth model, a video about which can always be watched on the Internet. The “six” prefers to change the entire water pump, because Many car enthusiasts do not repair this component of the car cooling system due to its low price when purchased at a spare parts store. The price of a “six” water pump in various retail outlets is quite reasonable, varying from 600 to 700 rubles.
The liquid base (antifreeze) acts as a cooler for the power plant, which heats up during operation. But the cooler is moved using the so-called. “pump” (water pump), which with its impeller blades forces liquid to flow into the supplied pipes. When the “six” water pump is not working, the temperature of the engine begins to steadily increase, which can lead to its overheating, deformation of individual elements and subsequent breakdown. Therefore, it is necessary to replace the pump or repair it. What the water pump consists of can be seen when replacing the oil seal of the VAZ 2106 pump: it is a pump of a centrifugal operating principle, to which the rotational torque is transmitted from the crankshaft pulley of the vehicle’s engine unit. The part is located on the right side of the “engine” and is mounted with a paronite gasket. The product is cast from light aluminum alloys, the shaft of which is equipped with a double-row non-separable bearing without a cage. At one end of the shaft there is a blade impeller, at the other end there is a pulley hub.
An O-ring with the help of an oil seal forces the impeller to be in a state of readiness for operation. Under the action of the rotating impeller, the required pressure is created, with the help of which antifreeze is pumped into the cooling system and supplied to cool the power plant and other components of the vehicle.
All components of the water pump can be seen when replacing the pump seal, which is carried out during plumbing repairs. To find out whether the coolant is circulating in the heating system and whether the “six” pump is functioning, we perform the following simple steps: start and heat the engine to an operating temperature of 90 degrees Celsius and squeeze the upper pipe directed to the radiator with both hands. If the water pump is functioning, you will feel the circulation of antifreeze in the system.
The complexity of modifications to the VAZ 2105
Tuning model
Increasing the power of a VAZ 2105 with a belt motor is much more difficult than, for example, a VAZ 21053. For example, when using a “humpbacked” camshaft, it will be necessary to install a split drive gear. But it simply does not exist for the “five” engine with a belt; it will not be possible to set marks. It would be better then to replace the engine completely, for example, install a 2105 diesel or purchase a kit for conversion to an injector. Still, of all types of VAZ fuel, diesel fuel is the cheapest. And the injector, although gasoline, will also reduce fuel consumption, because its design is such that the jets are controlled electronically.
Deep tuning of a VAZ engine should be carried out only for certain creative reasons. Light modifications to the VAZ 2105 can be done with your own hands without spending a lot of money. For example, if the VAZ 2105 engine is overheating, it is quite possible to modify the power system. And, in addition to this, reduce fuel consumption on the VAZ.
Before starting work, you should carefully read the recommendations, draw up an approximate tuning budget and parts estimate, and familiarize yourself with where the markings and marks are on the parts. It often turns out that the set aside funds are not enough. Probably everyone can guess why this happens. When disassembling the car, it turns out that it is necessary not only to modify the engine, but also, for example, to make a major overhaul of the load-bearing parts of the body. You will also need a diagram or repair book before work. Despite the fact that the markings of different Zhiguli units are different, the literature can be used from different modifications.
Comments
Alexei:
Which lamp should I insert into the brake
light of Lada Priora 21/4 or 21/5?
Teddy Bear E:
Sandro, thank you for the video! Helped!
Maga Aliev:
handsome guy helped
Meirkhan Mihon:
thanks to the author
stason73rus:
But my brake lights on the Priora do not light up, but
the brake light on the rear window is on, the fuse is fine.
what could be the reason? Thanks in advance. marina korshikova:
Sandro, handsome, I watch your videos regularly, they help a lot. I’m just sorry for your viburnum, you did so many experiments on it.
Andrey M:
Thank you, this video was very useful today!
rc models:
sell me the speakers
Denis Denis:
Remove the headlight to change the light bulb!
Gray matter:
Is it possible to touch the light bulbs with your hands? or am I confusing something
Makarov Alexander:
on Kalina1 sedan also
Improved body characteristics
Many car enthusiasts start tuning the VAZ-2105 from the body, but make a lot of mistakes during this work. So, what is better not to do:
Don't rush to install side skirts, bulky spoilers and air intakes. These improvements are absolutely unnecessary, but provided that no powerful parts of the power unit were attached before. Lowering the body is considered a fashionable trend today, which is often used when tuning a car. Cars with low ground clearance have better handling, but at the same time speed parameters are reduced.
Also, the lower elements of the body are at great risk, especially if we take into account the condition of our roads.
What to do?
- Attach additional body parts. Bumpers and other body kit options will allow you to change its shape.
- Tint the windows and repaint the body. This DIY tuning of the VAZ-2105 makes it possible to significantly change the appearance of the car.
Problems when paying with bank cards
Sometimes difficulties may arise when paying with Visa/MasterCard bank cards. The most common of them:
- There is a restriction on the card for paying for online purchases
- A plastic card is not intended for making payments online.
- The plastic card is not activated for making payments online.
- There are not enough funds on the plastic card.
In order to solve these problems, you need to call or write to the technical support of the bank where you are served. Bank specialists will help you resolve them and make payments.
That's basically it. The entire process of paying for a book in PDF format on car repair on our website takes 1-2 minutes.
Comments
Alexei:
Which lamp should I insert into the brake
light of Lada Priora 21/4 or 21/5?
Teddy Bear E:
Sandro, thank you for the video! Helped!
Maga Aliev:
handsome guy helped
Meirkhan Mihon:
thanks to the author
stason73rus:
But my brake lights on the Priora do not light up, but
the brake light on the rear window is on, the fuse is fine.
what could be the reason? Thanks in advance. marina korshikova:
Sandro, handsome, I watch your videos regularly, they help a lot. I’m just sorry for your viburnum, you did so many experiments on it.
Andrey M:
Thank you, this video was very useful today!
rc models:
sell me the speakers
Denis Denis:
Remove the headlight to change the light bulb!
Gray matter:
Is it possible to touch the light bulbs with your hands? or am I confusing something
Makarov Alexander:
on Kalina1 sedan also
Features of repair of VAZ-2104 and VAZ-21043 VAZ 2105 Zhiguli cars
11.2.1 Features of repair of VAZ-2104 and VAZ-21043 cars VAZ-2104 and VAZ-21043 cars have different springs in the rear suspension and a modified electrical circuit for the rear part of the car, due to the use of a station wagon body. The body has a different design of the rear frame, rear seat and additionally has a tailgate. The rest is remo.
11.2.2 Rear suspension Rear suspension springs under a load of 3185 N (325 kgf) are divided into two groups: group A springs - length greater than 278 mm, marked with light brown paint; group B springs (length equal to or less than 278) are marked with blue paint on the outside of the coils.
11.2.3 Electrical equipment The electrical equipment of the VAZ-2104 and VAZ-21043 cars differs from the VAZ-2105 by the additional installation of: – wiper 65 (see subsection 12.2) and rear window washer 64, which are turned on by switch 37 installed on the instrument panel; – lampshade 67 for illuminating the rear part of the body. Power supply circuits
11.2.4 Body
Source