The reverse sensor is a fairly reliable element in the VAZ device, but at some point it can still fail.
This is easy to determine, since in this case the corresponding lights on the car stop working. However, something else is interesting here: the white lights could well have failed without breaking the sensor. To understand the situation, let's try to outline the range of possible problems.
As we have already found out, this device is responsible for turning on the rear lights on the car. If the white light does not appear when the driver backs up, then a pressing problem arises. It is necessary to determine the cause of the malfunction.
Not only the sensor could break, but something else as well. For example, a fuse or some kind of cable.
And without a rear light, driving in the dark is not very pleasant. It is simply difficult to inform other road users about your intentions to move back. In addition, they illuminate the path for the driver himself.
Even if this malfunction does not seem critical (like, for example, a breakdown of the knock sensor), it still needs to be corrected. And you can do this as follows.
Signs of sensor malfunction
To locate the device, just look at the suspension of the 14th VAZ model. There, at the checkpoint there should be two sensors - the one in question and the one indicating the speed of movement. A more labor-intensive way to get the device is to access it through the open hood.
Before diagnosing its performance, possible causes of failure should be taken into account.
These may include the following:
- oxidation of contacts;
- lack of contact with the transmission wiring;
- lack of contact with the fuse console;
- failure of one of the fuses (for example, F16);
- sensor looseness;
- broken wires;
- bulb malfunction.
The last point should not be discounted, since the lamp can also fail. It’s trivial to burn out, in other words. In this case, the reverse sensor 2114 itself will work properly. To find out the truth, you need to take matters into your own hands.
Causes of failure
Before you start replacing the reverse sensor (RDS), we recommend checking the condition of the rear lights and determining whether the signal may not be working for other reasons.
Possible reason
Your actions
A common and fairly banal cause of problems, which, nevertheless, many ignore. Take out the light bulb, arm yourself with a multimeter and check if they have burned out. Replace if necessary
The problem is no less common, but looking for the source of the problems in such a situation is a little more difficult. You will also need a multimeter, which you need to test the wiring and check the resistance readings
Poor regulator contact
It happens that during operation the contact of the sensor with the socket is broken. Lack of contact means that the device will not work normally. So check its condition
Wiring insulation is broken
If the insulation on the wires near the sensor is broken, this can lead to a short circuit. The result is quite obvious, so check the condition of the wiring and replace it if necessary
Depending on the type of fuse box, check the condition of the corresponding element in the mounting block. On old-style blocks this is fuse F16, and on new-style fuse blocks you should look at fuse 5. If they are melted, they will need to be replaced. But it is also important to determine the reason why the fuse blew
A failure of the reverse control itself may be indicated by a situation where the lights do not light up at all or, on the contrary, light up without interruption. In the second case, the option of burnt out light bulbs is excluded by itself.
Replacing a reverse sensor is not a difficult or financially expensive job. Today, the DZH can be purchased at any auto parts store, and its cost is about 100 rubles.
Performance diagnostics
After you have found out where the VAZ 2114 reverse sensor is located, you can begin diagnostics. To do this, you may need light bulbs with wires or a tester. However, there are ways to do without their participation.
The verification procedure itself should proceed as follows:
- The hood must be opened and the cover removed from the fuse console.
- Then check 15A, who is directly responsible for its operation. If the white light does not come on after replacing the fuse, the diagnosis continues.
- The ignition must be turned on to record electrical voltage on the console. If it is not there (and its indicator should be 12 V), then it is likely that the contacts have oxidized. If there is, the check is carried out further.
- And then you need to crawl under the car. The protection is removed from the electric motor, the ignition and the corresponding gear are turned on. Now you can see whether voltage has appeared at the sensor connector or not.
- As mentioned above, if there is no tester with an arrow, you can use a test light. Its glow should make it clear about the existing voltage.
- Then comes the key point: it is necessary to short-circuit the conductors of the sensor in question. When the light appears, all that remains is to state the fact that the VAZ 2114 reverse sensor needs to be replaced.
After completing the diagnostics, you can begin the replacement procedure.
Description of IAC
What is the IAC in the Four with an injector, what signs of malfunction are typical for it, where is the device located? You will find answers to these questions with photos and videos below; first, we recommend that you familiarize yourself with the basic information regarding this regulator.
Installation location and purpose
In VAZ 2114 and VAZ 2115 cars, the XX regulator is a device whose purpose is to stabilize the speed of the power unit at idle. The IAC is used to regulate the amount of air flow supplied to the fuel system when the throttle is closed. Accordingly, the engine speed is automatically adjusted. This regulator is located on the throttle body. The device is fixed in the seat using two bolts.
Operating principle
When you turn the key and turn on the ignition, the rod on the IAC extends to the end, as a result of which it rests against the calibration hole on the throttle line. After this, the regulator begins to count steps and returns the valve to its initial state. The position of the original valve directly depends on the firmware of the VAZ control unit. For example, in a car with a January 5.1 control unit on a fully warmed up engine, the number of steps is 120, and in a Bosch it is about 50.
When the power unit is warmed up, at the time of adjustment the IAC is located at around 30-50 steps. When the number of steps increases or decreases, the volume of air flow that passes through the technological opening changes regularly. When the rod extends, the number of revolutions increases, and when it retracts, it drops. The stroke of the rod is about 250 steps. A certain volume of air is supplied to the motor, which is needed for optimal functioning of the power unit.
The amount of supplied air is regulated by a flow meter - mass air flow sensor - in accordance with the volume, the control module supplies a certain amount of fuel to the engine through the injectors. This ensures an optimal ratio of air and fuel when forming a combustible mixture. If the engine is not warmed up, the control module increases the speed thanks to the IAC, which allows you to use the car for driving without warming up the internal combustion engine.
Which regulator is suitable for VAZ 2114 and 2115?
As for the most suitable regulator for the “Four” and “Fifteen”, judging by the reviews, the best option is the IAC Omega. The catalog number of these devices is 2112-114830. In addition, in practice, devices from the manufacturer KZTA have proven themselves well, number 2112-1148300-04. When purchasing, be sure to pay attention to the mark (in this case 04, but IACs with marks 01, 02, 03 are also produced) on the old and new regulator - they must match.
Replacing the sensor
This procedure is carried out quite simply. Since you need to get under the car, it is strongly recommended to drive it into a pit. In this case, the device will be perfectly visible.
Attention! It should be noted here that contacting a car service will cost much more. Replacement there will be carried out at the price of 2-3 sensors.
Therefore, it is worth performing the procedure yourself. The main thing here is not to waste time installing a new device. If you miss the right moment, oil may pour out of the hole directly onto your clothes. It is better to prepare a basin in advance.
The step-by-step replacement plan should look like this:
- The sensor contacts are released from protection and then disconnected.
- The device is unscrewed with a 22mm wrench. If the tool turns out to be powerless (and this is possible due to the proximity of oil), then you need to arm yourself with a hammer and chisel. True, you should be extremely careful here so as not to splash too much.
- Immediately after removing the faulty sensor, you need to screw in a new one. The reason for such efficiency has already been explained above. By the way, the box should be wiped clean of oil if it has leaked.
- Contacts and protection are returned to their place.
- If necessary, add oil.
Attention! Some car enthusiasts offer an alternative behavior with oil. According to their method, you should get rid of it in advance, so that you can put it back in with peace of mind and clean clothes.
After replacement, you should check the device for functionality: turn on the ignition and reverse gear. In this case, there is no need to start the car.
Repair methods
To repair the reverse signal, you can proceed in two ways. They differ in the way the sensor is accessed.
- Drive the car onto a lift or pit.
- Do the work by climbing under the car.
If you have already encountered a similar problem, then you will probably agree that replacing the DZH is best done using a pit or overpass. This makes access to the sensor as comfortable as possible, plus you minimize the risk of being splashed with oil from the gearbox.
Replacing the DZH is not the cleanest job
Of course, there is another cleanest way - sending the car to a car repair shop. But then you will have to pay not only for the sensor, but also for the services of the specialists. And this is another 2-3 times the cost of the sensor. The choice is yours anyway.
Self-replacement
It’s not difficult to get to and replace a failed DZH on your own. Follow the instructions, do not break the sequence of operations, and then the process will not take you much time and effort.
- Place the car on a pit or overpass. Be sure to apply the handbrake and place the transmission in first gear. This will help prevent your car from accidentally rolling away.
- Remove the protection from the contacts of your sensor, disconnect the contacts.
- Prepare a container into which the oil will be drained when unscrewing the DZH.
- When the container is ready, remove the sensor. In some cases, it may not be unscrewed by hand. In such a situation, use a 22 mm socket.
- Very rarely even the key cannot help, since the sensor becomes stuck to its location. Here you will have to arm yourself with a hammer and chisel and try to remove it as carefully as possible.
- Take out the failed device and insert a new one in its place.
- If oil gets on the gearbox housing, remove it with dry rags. There is no need for extra dirt. Plus, it can lead to a decrease in the efficiency of the device.
- Return all contacts to their places, put the protection back on.
- If a decent amount of lubricating fluid has spilled out of the box, be sure to top it up. Just use fresh ones. By the way, this is one of the reasons to completely change the oil in the gearbox if it has been there for more than the first season.
- The decision to change the oil will simplify the task when removing the sensor. If the liquid is drained in advance, it will not flow in different directions when the sensor is unscrewed. The work will be cleaner, plus you will kill two birds with one stone - replace the sensor and gearbox oil.
Causes of the malfunction and ways to eliminate it
If the reverse lights of a VAZ 2114 do not light up, the reason may be as follows: 1. The light bulb has burned out. We simply replace it with an identical part. 2. Fuses are defective. Replace fuse F 16 and check the others. It is possible that the reason lies in one of them. 3. Contacts have oxidized. Remove the taillight block and clean all the contacts there, as well as at the 3/4 sensor. 4. A situation in which the reverse gear of a VAZ 2114 does not light up may occur due to the fact that there is no ground on the board (located under the lamp). We put it in place or just tighten it. 5. The power supply wire of the Z/X sensor is broken. We find an open circuit and fix it. 6. The travel sensor is faulty. This part must be checked, since it is a common reason why the reverse lights of the VAZ 2109, as well as many other car models, do not light up. Place the car on the overpass, disconnect the wires from the “frog” and connect them “directly”. Turn on the ignition and reverse gear. If the light comes on, this means that the sensor is faulty and needs to be replaced. 7. The contact located on the headlight film has burned out. But this is one of the most common cases when the reverse gear of a VAZ 2115 does not light up, since this malfunction is a “disease” of all Lada SAMARA cars. You can cure it by replacing the standard board with an improved one, or by installing the contact group yourself. We present to your attention some examples of such improvements.
That's all we wanted to tell you about this important and responsible topic. We hope you don’t need to explain how to change the reverse light on a VAZ 2114 or change any of the fuses. However, all other work to “eliminate” this problem is also not particularly difficult.
This light device is not mandatory for use, but the safety of driving a car may largely depend on it. In this article we will look at what a reversing light is, what it is for, and what to do if the reversing light does not light up?
Design and principle of operation of the sensor
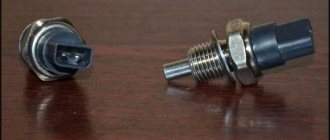
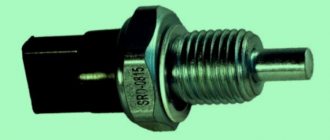
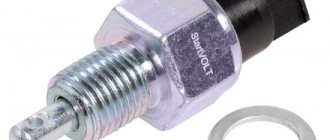
The DZH of the VAZ 2115 car has a very simple design. This product consists of the following parts:
- Sealed housing.
- Non-latching switch.
- Pusher.
- Output terminals.
The sealed housing reliably protects the moving contacts of the switch from the penetration of oil, water and dirt. Part of the outer metal shell is made in the shape of a hexagon, thanks to which the element can be tightened using a wrench.
The switch is driven by a pusher, and a special spring is used to return the contacts to their original position. The electrical system plug is connected to the output contact. The electrical system of the VAZ 2115 uses a device of this type with two contacts.
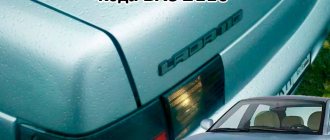
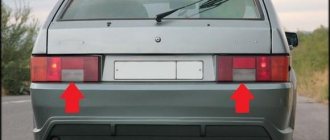
Why do you need a reversing light?
A reversing light is a light device installed on the rear of the car and is activated when reverse gear is engaged. Any reversing light has two functions:
- Creating a small illumination of the road surface
and oncoming objects when reversing in the dark. For example, when parking in reverse at night, a reversing light is simply a necessary thing. It helps us better navigate in the dark and keeps us out of trouble in the parking lot or in the yard. - Informative function
. When you engage reverse gear, the lamp lights up with the appropriate light (daylight), which informs other road users that you are planning to reverse. There are people who have poorly developed visual perception regarding reducing the distance to objects. This means that you can start reversing into a person who will not notice it at all.
Thus, the use of reversing lights is advisable and quite desirable, so they need to be maintained in good working order, and if they are missing, they must be installed.
Operating principle of reversing lights
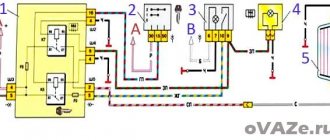
The operating diagram of this device is very simple and consists of the following elements. Two light bulbs connected in parallel into one circuit, which is closed using the ignition switch and a special “frog” installed on the car’s gearbox. When reverse gear is engaged, a pair of “frog” contacts will close and form a chain of light bulbs. So they light up and turn off after the speed is turned off.
It is worth noting that the lamps do not turn on until the ignition is turned on. This is necessary so that leaving the car in reverse does not drain the battery. It turns out that the reverse lamp will only work when the ignition system is turned on.
To protect the electrical circuit of the flashlight, it is equipped with a fuse. It provides protection against short circuits and is a disposable device that must be replaced after tripping.
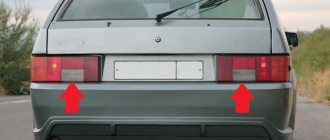
Removing the backplane board
First you need to remove the rear lights on the VAZ 2114, and for this you will need:
- Open rear trunk
- Remove unnecessary things
- Remove decorative trim
- Unscrew the plastic casing
- Take out the back panel
Now you have access to the socket and lamp of the rear license plate lamp, which also needs to be removed. The frog mounting pins are removed and the flashlight is already in your hands. The main thing is not to confuse it with the speed sensor, which is also located on the gearbox.
What to do if the VAZ reverse light does not work
There are times when the light fails and stops lighting up after we have engaged reverse gear. This creates discomfort for the driver when reversing, and also stops informing other road users of your intentions. Therefore, after detecting a malfunction, it is necessary to urgently repair the electrical circuit of the reversing light.
First of all, always check the condition of the fuse. The mounting block can be installed either in the engine compartment or under the instrument panel. In any case, it must be opened and the condition of the fuse assessed. As for the number under which the protective device is located, reference books regarding the electrical equipment of your car will help you here. If the fuse is blown, do not replace it immediately. First, find the short circuit and fix it. To find the location of the short circuit, it is necessary to check the length of the entire wire route. However, if the fuse is intact, then move on to the next step.
Now the performance of the lamp is checked. It is possible that the light bulb has burnt out. To check it, you can use a standard tester, which includes a regular 12-volt battery. Connect it to the lamp contacts and check its operation. If the lamp does not light up, it means it is burnt out and needs to be replaced. However, if the lamps light up, it means that the problem is not in them at all and further diagnostics need to be carried out.
The third in line is a device called a “frog”. The fact is that finding it is not as easy as it seems at first glance. This is due to the fact that it is usually located in the lower part of the car, in particular on the gearbox. During the inspection process, it is necessary to check the contact connections and, if they are dirty (and this is what happens in most cases), clean them. If this does not help in solving the problem, then the fault must be looked for in the car’s ignition switch.
The fact is that the reverse light circuit passes through the car's ignition switch. Disassemble the lock housing and check the condition of the contacts that are responsible for turning on the reversing light. As a rule, in addition to the flashlight, consumers whose power is supplied through the ignition switch also do not work. These may be a heater fan, etc.
Open your car's electrical diagram and note the color of the wires that should supply power to the reverse light. Checking the electrical wiring begins with checking the power to the lamp. Set the tester to 12 volts and place the probes on the terminals at the rear of the car. In this case, reverse gear must be engaged and the ignition must be turned on. If the output voltage is zero, further testing is carried out on the “frog”. If there is power on it, then most likely the wire leading from the “frog” to the reversing light is damaged. If there is also no power, check the mounting block. Power should appear near these two elements. Based on the values obtained, find the faulty wire and replace it.
Description of RZH
Now we suggest that you familiarize yourself with the basic information regarding the reverse control. Where is it located, how to check the device and replace it? Read on.
Location and purpose
The main purpose of the RZH is to activate the white lights in the rear headlights, which indicate that the vehicle is starting to reverse. Thanks to this, other drivers know that the car will make a maneuver. Correct operation of the RZH allows you to prevent a possible collision on the road. As for the location, the device itself is installed on the gearbox - looking at the box, you can see two controllers - speed and RZH.
Principle of operation
The main component of any RZH is the limit switch. When the driver engages reverse, this switch is activated and powered by the battery. The device closes the electrical circuit, resulting in voltage being supplied to the lighting sources located in the rear lights. If the driver disengages the reverse gear, the limit switch is pressed out, as a result, voltage is no longer supplied to the light bulb and it goes out.
Possible problems and methods for eliminating them
A breakdown of the RZH can be recognized by the absence of light from the lamps when reverse gear is activated. Before checking the sensor itself, you need to make sure that the lamps installed in the headlights are working properly.
There may be several reasons for problems:
- The contacts on the rear headlights have oxidized. If such a problem occurs, it is necessary to clean them, which will most likely help solve the problem. If the contacts are severely damaged, they will have to be replaced.
- Over time, when operating under vibration conditions, the regulator may become loose. If the device is working, then simply screw it on and check that it is securely installed.
- There is no contact with the electrical circuit in the box itself. It is necessary to restore the contact of the device and check the wiring.
- In some cases, the reason lies in the lack of contact between the connector, as well as the mounting block with fuses. In this case, you need to check all contacts for signs of burning or damage. If burning occurs, then you should find out the reason why power surges occur in the on-board network.
- In "Fours" it often happens that the safety device in the block burns out (we are talking about any fuses), and this contributes to disruption of the contact circuit. It is necessary to check all safety devices and replace the failed element (the author of the video is the channel In Sandro's Garage).
Video - How to improve the reversing lights on a VAZ 2107
This is how to repair a reversing light. As you can see, this is not at all difficult and you will need basic knowledge of electrical engineering.
21.08.2012
Reversing lights are white lights that light up when reverse gear is engaged.
If the reverse lights are not on, then you find yourself in a very emergency situation: people may not predict your actions, and when parking in the dark, you are unlikely to see anything without rear lights. In this article we will find out what to do if the reverse light on 2114 does not light up.
Why doesn't the reverse light come on?
If your reverse lamp does not light up, then the reason may lie in several problems:
- The reverse light does not light up. We replace the corresponding light bulb. How to replace a light bulb, look at
- Circuit breakers. Fuse f16 simply blew. Look and check, if necessary, replace it. Just in case, check the other fuses and maybe the problem lies there. How to check fuses, see.
- The contacts have oxidized. Remove the taillight unit and clean the contacts. Clean the contacts on the reverse sensor.
- There is no ground on the board. We put the mass or just tighten it. The mass is located under the lantern.
- Broken reverse sensor wire. We check and call.
- The reverse sensor is broken. First you need to check the reverse sensor. To do this, we put the car on an overpass, disconnect both wires from the reverse sensor (frog) and connect them together. Then turn on reverse gear and ignition. If the reverse light does not light up on your 2109, then you need to change the reverse sensor. Read the article
- The contact on the headlight film has burned out. This is a disease of all samars, and it can be treated by replacing the stock board with a modified one, or making the contact group yourself without using headlights. Here are some examples of improvements.
Guide to replacing idle air control
How to replace the IAC on your own:
- First of all, you need to turn off the ignition and disconnect the power supply to the car. Open the hood and disconnect the terminals from the battery.
- Find the regulator and disconnect the connector with the connected wires from it.
- After this, you need to use a screwdriver to unscrew the two screws that secure the IAC, then the regulator can be removed. Sometimes the IAC is attached to bolts, which require an asterisk wrench to unscrew.
- A new regulator is installed in place of the old one. Before placing the IAC in its seat, it is necessary to lubricate the rubber seal with engine fluid.
- Install the IAC and tighten the screws, connect the power plug to the device and do not forget to connect the terminals to the battery (the video was shot by user Ivan Vasilyevich).