The VAZ classic has a fairly simple design. Most functions are implemented mechanically, without the use of complex electronics. Sensors are practically not used, except in places where they cannot be avoided:
- door opening limit switches;
- temperature sensors;
- speed sensors, crankshaft position sensors;
- reverse gear sensor.
Why is it necessary to fix the reverse on the gearbox? The reverse sensor of the VAZ 2107 car has only one function: to light the lights that illuminate the way back. In addition to the fact that the driver will be able to see the road at night, this is a signal for other road users.
Reasons why the reverse lights of a VAZ car do not light up
Why might the reverse lights not light up?
First, you need to find out why the reverse lights do not light up - maybe the bulbs are simply burned out (see Replacing bulbs in the rear light of a VAZ 2110: do it yourself) and you don’t even need to change the sensor? Here are some reasons:
- The reverse lights are burnt out. You can check their performance by removing them from the flashlights and checking them with a multimeter.
- Damaged wiring is another reason. Everything is more complicated here - you will have to search longer. And it is checked in the same way - using a multimeter for continuity or resistance.
- Poor contacts on the reverse sensor. As you know, nothing with poor contact usually works.
- Violation of the insulation on the wires near the sensor leads to their short circuit.
- The fuse has blown (see VAZ 2110: how to replace fuses). Which one needs to be clarified for each car in the repair manual.
- Well, the breakdown of the sensor itself - this is evidenced by both the lights not turning on when reverse gear is engaged, and the constant glow of the lights.
To fix a malfunction of the lights, you may have to perform all the repair points, but you can start with the sensor. The price for it is small - usually about 100 rubles, so you can buy it and change it, and then solve problems as they arise.
Tools
So, what do you need to replace the reverse sensor yourself:
- A set of keys. Although this is even said loudly. You will need a 22 key and in some cases a 24 key
An extended 22mm socket will be needed to remove the reverse sensor
- Multimeter
Be sure to get a multimeter
- Small container for oil
- Screwdriver
- Pliers
- Knife
- Insulation tape
- Hammer
- Chisel
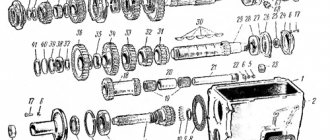
Description of DZH
Purpose
Let's start with the purpose. DZH is a device designed to activate white lamps, indicating that the car is in reverse gear. The device is used to turn on the reversing lights, which allows other road users to know the driver's intentions and the maneuvers he is about to perform.
When it's dark outside, white headlights will also help warn drivers behind you that your car is in their path. This, in turn, helps prevent possible incidents and emergency situations on the road. Where this device is located - the location may vary slightly, but as a rule, the controller is located on the gearbox.
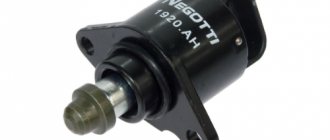
Design and principle of operation
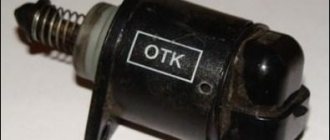
The DZH itself consists of a housing, contacts for connection, a rod, a moving ball, and a return spring.
As for the operating principle, it is as follows:
- The driver shifts the transmission lever to the reverse gear position.
- In this case, the gear shift fork is pressed against the controller.
- Next, the device shorts the cable to ground.
- After this, the light source installed in the rear lights is activated, which warns other drivers that the car has started to reverse.
Symptoms of a problem
What signs of malfunction may indicate a breakdown of the DZH:
- One of the problems that happens most often is oxidation of contacts on the terminals or wiring. This problem is relevant for many car owners. To solve this problem, it is necessary to thoroughly clean the contacts and then install them in place. When performing this work, the battery should be disconnected. If the contacts are inoperative due to the fact that they are burned out, then they will have to be changed in any case. But before making a replacement, it is necessary to find out why the burnout occurred; most likely, the essence of the problem lies in voltage surges in the on-board network.
- The device became loose in its seat. During vehicle operation, the controller may slightly move out of its installation location; this problem is usually caused by high vibrations. In this case, you will simply need to more securely fix the device at the installation site.
- Another reason for inoperability is the lack of contact with the on-board network in the gearbox. In this case, it is necessary to diagnose the condition of the contacts, as well as electrical circuits. If necessary, failed components must either be cleaned or replaced.
- The next problem is that there is no contact between the connection connector and the safety mounting block. In this case, you also need to diagnose the condition of the contacts, as well as clean and change the wires, if necessary.
- Failure of the safety device. In this case, the problem can only be solved by replacing the fuse. If this part often fails, then the reason may lie in the same voltage surges. It is necessary to check the electrical circuit more carefully.
- The reverse light may not turn on because the light source itself, that is, the lamp, has burned out. In this case, you will have to dismantle the optics cover in the trunk and replace the failed device.
- And finally, the last reason for inoperability is the breakdown of the DZH. In this case, you will not be able to repair it, since such devices, as a rule, cannot be repaired. The controller will need to be changed (the author of the video is the Do-It-Yourself Auto Repair channel).
Replacing the sensor
And now it’s time to consider the process of replacing the reverse sensor on various VAZ cars - from 2106 to 2115. Here are the instructions.
VAZ 2107
Let's start with the Classics
Let's start with the VAZ 2107 car. On VAZ Classic models everything is done exactly the same.
Advice! Before replacing the sensor on any car, clean the gearbox housing from dirt to make it easier to find the sensor and to prevent dirt from getting into the oil.
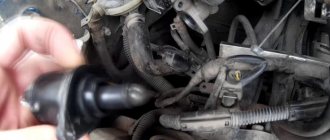
- First, we look for the sensor - it is located on the right side of the gearbox, if you look at the car as it moves. It is very difficult to make a mistake - this is the only part in the gearbox where two wires fit.
Sensor location on Classic
- If the wires are broken, then look for protruding contacts.
- If the wires are still on the sensor, then disconnect them.
- Next, you will need a 22 key. They need to unscrew the sensor. For convenience, it is better to take a longer wrench, since over time the sensor will stick to the crankcase.
- If you cannot unscrew the reverse sensor using a wrench (head), then you need to do this using a hammer and chisel.
Note! The gearbox housing is very fragile. Therefore, be extremely careful not to damage it with hammer blows.
- Then clean the seat from dirt using a knife.
- Remove the metal washer along with the dirt and replace it with a new one.
- Insert the sensor and tighten it using the same wrench until it stops.
- Next you need to put the wires back on. If necessary, crimp the contacts with pliers.
- And now, the replacement of the reverse sensor on the VAZ 2107 is completed!
Some people have a question about oil - whether it will leak or not. In this case it will not leak.
VAZ 2109
VAZ 21099 replacement reverse sensor
Let us remind you that this point applies to the Samara family as a whole, and not just to the VAZ 2109 car:
- Remove the protection from the car engine, if any.
- The location of the sensor on a VAZ 2108 and similar cars is slightly different than on a Classic, since the car has front-wheel drive.
- As the vehicle moves, the sensor is located on the left side.
- If the Classic had to be driven into a viewing hole, then cars with front-wheel drive can simply be lifted under the left front wheel using a jack.
- Again, the electrical wiring leads to the sensor.
- Remove the wires.
- To remove the sensor you will need an extended 22mm socket and a wrench.
- Using the head, remove the sensor.
VAZ 2109 replacement of reverse sensor
Remember! Replacing a reverse sensor on a front-wheel drive vehicle is characterized by small oil leaks from the gearbox housing.
- Prepare a container and, as soon as you unscrew the sensor, place it so that the oil does not spill on the floor.
- Insert the new sensor as quickly as possible.
- Screw it in by hand first and then tighten it using the same socket and ratchet.
- Connect the electrical wiring wires.
- Add the required amount of oil.
VAZ 2110
Cars of the VAZ 2110 family are equipped with engines from the VAZ 2108. Therefore, there is no point in writing the same information a second time. The answer is: VAZ 2110 replacement of the reverse sensor - see the information above.
VAZ 2114
Replacing the reverse sensor on a VAZ 2114 or cars of the Samara-2 family. Instructions:
- The essence of the process is the same.
- Raise the car using a jack.
- If necessary, remove the engine protection, but this may not even be necessary.
- Find the sensor; on new gearbox models of Samara-2 models it has a slightly different location, but finding it will also not be difficult.
- Disconnect the electrical wiring connector from the sensor.
- Using a 22mm wrench (it’s more convenient to use a head, but you can also use a wrench) unscrew the sensor.
- Before removing the sensor from the connector, place an oil container.
Note. It is best to replace the sensor on a cold car, as less oil will leak out. Although this is not important.
- Take out the old sensor and insert the new one along with a new ring.
- Screw the sensor using a wrench or socket.
- Wipe the gearbox housing from oil traces.
- Connect the wires.
- Top up the oil level in the gearbox to the required level.
- Reinstall the engine protection (if necessary).
So, the sensors have been changed. Now you can start checking their functionality.
Carrying out diagnostics
Replacing the reverse sensor VAZ 2107
The simplest method is to measure the voltage at the block to which the regulator is connected. These are terminals D and A. When the ignition is turned on, a voltage of 12 V should be present on them. If the voltage is less than this value, it is worth looking at the battery and generator. It is quite possible that the battery is undercharged. In the same case, if there is no voltage at all, it is necessary to check the entire power circuit of the device and diagnose the ECU.
Set the multimeter to resistance measurement mode. Between pairs of terminals A and B, C and D, there should be a resistance of approximately 53 ohms. Remove the IAC and connect (with the ignition off) to the block. Then turn on the ignition and look at the behavior of the needle - it should extend completely when voltage is applied. If this does not happen, we can judge that the IAC is broken.
Sometimes simply cleaning the regulator helps. To do this, you can use sprays, of which there are sufficient quantities in stores. But in some cases, only replacing the device will help. Of course, this is not a DAAZ carburetor, the cost of the IAC will be many times lower, and there will be no problems with replacement. If, even after the replacement, the engine does not idle, it is necessary to fully diagnose the injector.
The VAZ 2107 idle speed control is removed to replace it with a new one if the old one fails as a result of any mechanical damage. Before removing the regulator, it is recommended to test it with a performance tester; the test comes down to simply measuring the voltage at the terminals of the block, and after removing it, measuring the resistance at the same terminals. To check, you will need a multimeter with voltmeter and ohmmeter mode, as well as a standard set of tools.
The procedure for checking and subsequently replacing the idle air regulator is as follows:
- Connect the negative terminal of the voltmeter to engine ground and turn on the ignition on the car.
- Disconnect the block from the regulator; the terminals will be marked on its body.
- Connect the positive terminal of the Vols and then to the “D” terminal. The voltage at the terminals should be 12V. For any significant deviations from the norm of more than one volt or a complete absence of voltage, the cause may be either a weak battery charge, faulty power wiring or a malfunction of the electronic control unit. After measuring, turn off the ignition.
If the voltage at the terminals is normal, but the regulator does not perform its direct functions, then it must be changed. Removing and replacing the regulator looks like this:
- It is necessary to remove the throttle body, for more information about this, see Replacing the throttle body of a VAZ 2107.
- After that, use a Phillips screwdriver to unscrew the two screws securing the regulator to the damper body and remove it.
- A rubber sealing washer will be installed between the regulator and the housing. Replace it if cracks or other damage is found.
After the idle speed regulator of the VAZ 2107 is removed from the car, it must also be tested with a tester in ohmmeter mode. For this:
- Switch the tester to ohmmeter mode and measure the resistance between terminals A-B and C-D, it should be about 52-53 Ohms. Next, measure the resistance between terminals A-C and B-D, the resistance should tend to infinity or be large enough. If there are any deviations from the norm, replace the regulator.
This completes the repair work. Install the new regulator in the reverse order of removal. Before installing the regulator, measure the length of the valve needle protrusion; it should not protrude more than 23mm. To measure, use a caliper or any suitable ruler. Before measuring, it is necessary to extend the needle to the maximum distance; to do this, apply voltage from the battery to the valve, connecting the positive pole to terminal “D” and the negative pole to “C”. The regulator solenoid valve works slowly, so touch the wires repeatedly until the needle reaches its maximum length. Measure with a ruler and if the needle protrudes more than 23mm, replace the valve.
A malfunction of the idle speed regulator (aka sensor), or its unstable operation, manifests itself as follows: the car engine periodically stalls at idle, when starting the engine, or in a traffic jam, or at a traffic light. Replacing the idle speed sensor on a VAZ 2107 is not a complicated procedure, requiring a minimum of tools and a minimum of knowledge of a repairman, so any owner of a VAZ 2107 can easily replace the regulator with their own hands.
Functionality check
And now the moment has come when everything should work:
- Put the car in reverse gear.
- Turn the ignition key.
- In this case, there is no need to start the car, as some “experts” write about it.
- Positive result - both reversing lights are illuminated.
If a positive result is achieved, please accept my congratulations. If not, then let's dig further.
What to do if replacing the sensor did not help?
Earlier in this article, a list of possible reasons was given for why the reversing lights do not light up. The reason could be any of the above, or it could be all of them. Therefore, step by step you will need to take steps to eliminate each of them, and then you will succeed. A video is also provided to help you, which clearly shows how to replace the reverse sensor.
Video “Visual instructions for replacing the DZH”
Have your neighbors started complaining that when you reverse your favorite VAZ, it’s not noticeable to others? Well, it's time to change the reverse sensor and forget about all the problems, including the neighbors. What could be the reasons for the rear lights not shining? How to do it yourself? Is it difficult and what is needed for this? What should I do in what order? This article provides answers to all these questions; it also contains supporting photos showing how to correctly replace this sensor on a VAZ 2106, 2108 and other models:
- Reasons why the reverse lights of a VAZ car do not light up
- Tools
- Replacing the sensor
- VAZ 2107
- VAZ 2109
- VAZ 2110
- VAZ 2114
- Functionality check
- What to do if replacing the sensor did not help?
Reverse sensor VAZ 2107 5 mortar
If the white lights on the rear of the “Seven” stop glowing when moving in reverse, then the malfunction requires immediate correction. Not only do non-working reverse lights do not meet the technical requirements for the car and traffic rules, but this breakdown misleads other road users and can provoke an accident; as a rule, the reverse sensor on the VAZ 2107 can be to blame.
Usually, in order to eliminate such a malfunction, it is necessary to replace the VAZ 2107 reverse sensor. It is not necessary to spend time and money on a visit to service station specialists - you can diagnose and replace the sensor yourself. But first you need to make sure that it was he who caused the malfunction.
Symptoms of malfunctions
Of course, it is very easy to suspect that the reverse sensor is not working - when you engage reverse gear, the lights do not light up.
In such a situation, there are only three options for the development of events:
- The light bulb itself has burned out, so the element itself may be intact.
- The power fuse has stopped working. It’s not uncommon for him to simply burn out.
- The sensor itself does not work. This does not happen so often, but you will have to check its condition.
Is it because of the sensor?
Indeed, how can one determine that it is the one that has failed and not a fuse or light bulb that has blown? Everything is quite simple.
- You will have to remove the fuse and check it for integrity. For a VAZ 2110 car, it is planned to install a fuse number 19, the rated current of which is 7.5A. It is located in the mounting block, and the mounting block is under the dashboard.
- Check the condition of the lamp. If everything is fine with it too, then there is only one option left - the reverse sensor has broken.
Why don't the reverse lights come on?
There are several reasons why the lamps in the reversing lights may not light:
- The fuse protecting the power supply circuit for the reverse lamps has blown. The breakdown is visible visually; you just need to pull the fuse out of the block.
- The lamps have burned out. To check the functionality of the lamps, they should be removed one by one from the lantern and make sure that there is no break in the spiral using an ohmmeter (multimeter) or a continuity tester.
- Wiring is damaged. You can also check it using a multimeter and a continuity test, but finding a break will be much more difficult.
- Poor contact of wires with the terminals of the reverse sensor. The check should begin with a visual inspection and cleaning of dirt and oxides. Then you can use a multimeter to measure the resistance of the circuit.
- There is a short circuit in the power wires. You can check the absence or presence of a short to ground wire with a continuity tester or a multimeter.
- The reverse sensor of the VAZ 2107 is broken. You can check it with a continuity tester or a multimeter. Visually, the malfunction is expressed in the fact that the reversing lights either do not turn on at all or are constantly on.
Stop signal
The brake light switch is located on the brake pedal hanger holder . The brake light is turned on as follows: when you press the brake pedal, the spring in the switch presses the control pin. At the same time, the contacts in the switch close the brake light circuit. When the brake pedal is released, the pin returns to its original position and the brake light goes off.
If the brake lights do not work on a VAZ-2107, you should make sure that the cause of the malfunction is not in the switch. To do this, you need to unscrew the ends of the power wires and place a jumper between them: if the brake lights turn on, the switch should be repaired or replaced. To replace the brake light switch, you must turn it clockwise 90 degrees and remove it from the mount. After installing the new switch, make sure that the neck of the switch fits snugly against the brake pedal and turn it 90 degrees counterclockwise. The new switch is adjusted automatically when the brake pedal is pressed. The switch operates normally if the brake light is turned on no earlier than the brake pedal has been moved 5 mm, but no later than it has been pressed 20 mm.
Fuse F11 is installed in the brake light circuit, which, in addition, is responsible for the operation of the interior body lighting.
Some VAZ-2107 owners install an additional brake light so that the signals given by the driver are more visible on the road. This type of brake light is usually placed on the rear window inside the cabin and operates on LEDs.
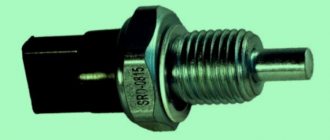
Where is the reverse sensor located on the VAZ 2107?
On the “seven”, as on all “classic” VAZ models, the reverse sensor is located on the gearbox. It is attached to the bottom and right of the gearbox, when viewed in the direction of travel of the car.
It is impossible to confuse it with something else - this is the only part on the gearbox to which it happens that the wires going to the sensor are broken. In this case, it is easy to distinguish by a pair of protruding contacts.
What is needed for replacement
To change the part, you only need two things: a 22mm wrench and a new reverse sensor with a metal washer-spacer. It is advisable to use a socket wrench with a long wrench. But, if you don’t find one, you can get by with a cap or even a carob.
Where is it located and how to check it
To begin replacing the reverse sensor on a VAZ 2110, you must first determine its location.
Device location
But really, where is he? There is nothing difficult in finding this element.
- You will need a trestle or pit. One way or another, you should end up under the car.
- Now look towards the rear wheels of the car and raise your eyes to the gearbox. To the left of it is your desired sensor.
- Can it be confused with other devices? Hardly. Only for this element is provision for wiring from the gearbox. Therefore, you definitely won’t find other similar devices nearby.
Let's start checking. We need to make sure that the sensor has failed, and that replacing it will actually produce results.
To check, do the following:
- Disconnect the terminal from the meter;
- Connect a multimeter to the connectors and turn it on in resistance measurement mode;
- Put the gearbox in reverse mode;
- Start the engine;
- Look at what the device produces;
- If the device shows a resistance of 0 Ohm, plus a beep sounds, then everything is fine, the sensor is working;
- It's bad if the meter shows infinity. This indicates that the sensor has served its purpose and needs urgent replacement.
We recommend: What is a carburetor: device and purpose
How to change the reverse sensor on a VAZ 2107
Before replacing the sensor, it is advisable to clean the gearbox of dirt. If this is not done, it may get into the oil, which is located in the crankcase. Replacement of the VAZ 2107 reverse sensor is carried out in the following sequence:
- disconnect the wire tips from the sensor contacts;
- Using a 22mm wrench, unscrew the old sensor from the gearbox, removing it along with the metal washer;
Note: if the sensor is “stuck” and cannot be unscrewed with a wrench, you can try to unscrew it using a chisel and hammer. However, this must be done extremely carefully so as not to damage the gearbox housing, which is made of a fragile aluminum alloy.
- clean the sensor seat;
- put a new washer on the new sensor and screw it into the gearbox using a 22mm wrench;
- Place the wire ends on the sensor contacts.
Now you know how to change the reverse sensor on a VAZ 2107. After installing the new sensor, pay attention to how tightly the wire tips fit on the sensor contacts. They should not dangle or fall off. If necessary, tighten the tips using pliers. It is a good idea to clean the tips before placing them on the sensor contacts. This way you can be sure of reliable contact on this connection.
DIY replacement instructions
Now let's take a closer look at how the replacement is performed.
Let's consider the procedure using the example of a VAZ 2110 car:
- First, the car is driven into a pit. The area around the installed device must be cleared of dirt, since after removing the device, all dust and debris will get into the transmission. And this, in turn, can lead to its failure.
- Next, the crankcase protection is removed; to do this, you will need to unscrew several bolts.
- Now you will need a small container to collect the oil from the gearbox. When dismantling the DZH, part of the lubricating fluid will come out of the seat, which will subsequently need to be refilled.
- Disconnect the power connector from the controller and unscrew it from the installation location.
- Then clean the socket so that the new device can be installed in the seat without any problems. Install the new controller, do not forget the O-ring.
- Next, you will need to fill the transmission with the required amount of lubricating fluid, that is, what you drained needs to be poured back. But if the lubricant that you collected when removing the DZH contains traces of wear products, for example, metal shavings or sediment, then you need to think about replacing the fluid. Or, at a minimum, you need to fill the box not with collected oil, but with new one.
- Then all you have to do is reassemble all the elements in the reverse order and check the functionality of the installed DZH.
Photo gallery “Changing the DZH with your own hands”
Popular goods
Price for: pcs Article: not specified Availability: Severo-Yeniseiskaya, 40 (Krasnoyarsk)
Delivery throughout Russia and the CIS
Catalog number: 2107-3716630, 21073716630
Before ordering measured goods (meters, kilograms, etc.), consult our specialists. Distribution of measured goods is possible with an error of 2-3 cm and/or 3-5 g. Before paying for the goods, wait for the operator to call; balances may vary. Also check out the list of goods prohibited for shipment
Delivery in Krasnoyarsk and Russia
Delivery in Krasnoyarsk:
— When ordering from 5,000 rub. delivery is free on weekdays from 10 to 18 (except for large/heavy orders) for individuals; — For orders less than 5,000 rub. delivery is paid separately, 200-700 rubles. depending on the area of the city; — Delivery is carried out within 2 working days from the moment the order is confirmed.
Delivery across Russia:
- Post office; — EMS and other express delivery companies; - transport companies; — delivery is carried out only from KrasnoYarsk (delivery is not carried out from KrasnoDar, it is only possible to purchase goods in the store itself).
The reverse light and PARKTRONIC lights stopped coming on. It immediately became clear that the reverse sensor (switch) had died.
— — reverse light switch VAZ 2107 (5-speed gearbox) 74 rubles
— according to the instructions, everything is simple, use a 27 key to unscrew the sensor, insert a new one and you’re done.
- BUT IT'S NOT SO SIMPLE...
- The key barely fits there, the SWITCH is stuck, the edges are licked off with a regular key... - The head won't fit in there, I had to pull the
PANTS
, the switch is long and the head won't fit on it, I had to CUT IT OFF WITH A CHISEL. — — The SWITCH contact has rotted, the terminal has also rotted (((
Why do you need a reversing light?
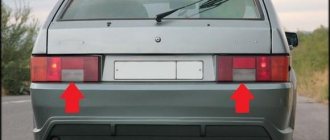
A reversing light is a light device installed on the rear of the car and is activated when reverse gear is engaged. Any reversing light has two functions:
- Creating a small illumination of the road surface and oncoming objects when reversing in the dark. For example, when parking in reverse at night, a reversing light is simply a necessary thing. It helps us better navigate in the dark and keeps us out of trouble in the parking lot or in the yard.
- Informative function . When you engage reverse gear, the lamp lights up with the appropriate light (daylight), which informs other road users that you are planning to reverse. There are people who have poorly developed visual perception regarding reducing the distance to objects. This means that you can start reversing into a person who will not notice it at all.
Thus, the use of reversing lights is advisable and quite desirable, so they need to be maintained in good working order, and if they are missing, they must be installed.
Purpose
Reverse sensor for VAZ 2115
Obviously, the car's reverse mode is designed to accelerate the car in the opposite direction without resorting to a 180-degree turn. This allows you to park more comfortably, maneuver faster and, finally, save time for yourself and other drivers.
A reverse signal is needed to warn surrounding drivers of an upcoming maneuver, similar to the way turn signals or brake lights do, embedded in the taillights.
The reverse alarm is also intended for maneuvering in the dark and in fog. A lamp that has a fairly powerful light beam allows the driver to better see what is happening behind the car and avoid annoying accidents and incidents when maneuvering
In any case, it is worth paying attention to the condition and operation of the lights. This will eliminate most problems and protect the car from accidental damage.
Operating principle of reversing lights
The operating diagram of this device is very simple and consists of the following elements. Two light bulbs connected in parallel into one circuit, which is closed using the ignition switch and a special “frog” installed on the car’s gearbox. When reverse gear is engaged, a pair of “frog” contacts will close and form a chain of light bulbs. So they light up and turn off after the speed is turned off.
It is worth noting that the lamps do not turn on until the ignition is turned on. This is necessary so that leaving the car in reverse does not drain the battery. It turns out that the reverse lamp will only work when the ignition system is turned on.
To protect the electrical circuit of the flashlight, it is equipped with a fuse. It provides protection against short circuits and is a disposable device that must be replaced after tripping.
Thanks Don't like Zhenya G Sep 27, 2012
Thank you very much for the detailed information. The car was bought in poor condition. The circuit for switching on the reverse lights is, to put it mildly, broken. I looked at the circuit from the light bulb to the switch (toad), but then I don’t know. There is a diagram, but I can’t find its description. Maybe someone can tell me? Thanks in advance!
Descriptions of the operation of the elements in accordance with the diagram, at least I don’t remember seeing them. The diagram is read in the direction from the “plus” terminal on the battery through the wires, through the elements and “ground”, that is, the body to the “minus” terminal. In front of you , the so-called interactive diagram. So, lay a path from “+” through the “ignition switch”, “relay and fuse mounting block”, “reversing light switch” and “lantern lamp” to “-” or vice versa.
Electrical diagram of a VAZ 21071 car - side direction indicators; 2 — block headlights VAZ 2107; 3 — headlight cleaners; 4 — sound signals; 5 — electric motor for headlight washer; 6 — control unit for the electro-pneumatic valve of the VAZ 2107 carburetor; 7 — motor reducer for windshield wiper; 8 — electric motor for windshield washer; 9 — brake fluid level sensor VAZ 2107; 10 — ignition coil VAZ 2107; 11 — engine compartment lamp; 12 — ignition distributor VAZ 2107; 13 — oil pressure warning lamp sensor; 14 — spark plugs VAZ 2107; 15 — coolant temperature indicator sensor VAZ 2107; 16 — VAZ 2107 generator; 17 — carburetor microswitch; 18 — battery; 19 — electro-pneumatic valve; 20 — starter activation relay; 21 — starter VAZ 2107; 22 — windshield wiper relay; 23 — ignition relay VAZ 2107; 24 — relay-interrupter for alarm and direction indicators; 25 — brake signal switch; 26 — plug socket for a portable lamp; 27 — reverse light switch; 28 — parking brake warning lamp switch; 29 — mounting block VAZ 2107; 30 — instrument lighting switch; 31 — ignition switch VAZ 2107; 32 — steering column switch for external lighting; 33 — steering column switch for windshield wiper; 34 — steering column switch for windshield and headlight washers, headlight cleaners for VAZ 2107; 35 — sound signal switch; 36 — headlight switch; 37 — direction indicator switch VAZ 2107; 38 — alarm switch; 39 — rear window heating switch; 40 — electric motor of the VAZ 2107 heater; 41 — cigarette lighter; 42 — glove box lighting lamp; 43 — lamp switches located in the door pillars; 44 — fog light switch in the rear lights; 45 — front door open alarm light switch; 46 — signaling lamp for an open front door; 47 — instrument panel VAZ 2107; 48 — oil pressure gauge with insufficient pressure warning lamp; 49 — coolant temperature indicator; 50 — tachometer VAZ 2107; 51 — watch with dial illumination lamp; 52 — control lamp for turning on the direction indicators; 53 — warning lamp for emergency condition of the working brake system; 54 - battery charge indicator lamp; 55 — indicator lamp for turning on the rear fog light; 56 — control lamp for turning on the high beam headlights; 57 — control lamp for turning on the side light; 58 — indicator lamp for turning on the parking brake; 59 — instrument panel illumination lamp VAZ 2107; 60 - voltmeter; 61 — fuel level indicator with reserve warning lamp; 62 — heater motor switch; 63 — lampshade; 64 — additional resistor of the heater electric motor; 65 — rear lights of VAZ 2107; 66 — license plate lights; 67 — sensor for level indicator and fuel reserve; 68 — rear window heating element; 69 — key switch for external lighting; 70 — air damper closed warning switch; 71 — sensor for turning on the electric fan; 72 — electric fan of the VAZ 2107 engine cooling system; 73 - oil pressure indicator sensor; A - order of conventional numbering of contacts in the steering column switch pads
Electrical circuits of a VAZ 2107 car, protected by fuses No. Current, (A) Protected circuits F1 10 Heater electric motor Reversing light lamps Alarm and relay (relay winding) for rear window heating F2 10 Windshield wiper electric motor Headlight wiper motor Good luck!
What to do if the VAZ reverse light does not work
There are times when the light fails and stops lighting up after we have engaged reverse gear. This creates discomfort for the driver when reversing, and also stops informing other road users of your intentions. Therefore, after detecting a malfunction, it is necessary to urgently repair the electrical circuit of the reversing light.
First of all, always check the condition of the fuse. The mounting block can be installed both in the engine compartment and under the instrument panel.
Now the performance of the lamp is checked. It is possible that the light bulb has burnt out. To check it, you can use a standard tester, which includes a regular 12-volt battery. Connect it to the lamp contacts and check its operation. If the lamp does not light up, it means it is burnt out and needs to be replaced. However, if the lamps light up, it means that the problem is not in them at all and further diagnostics need to be carried out.
The third in line is a device called a “frog”. The fact is that finding it is not as easy as it seems at first glance. This is due to the fact that it is usually located in the lower part of the car, in particular on the gearbox. During the inspection process, it is necessary to check the contact connections and, if they are dirty (and this is what happens in most cases), clean them. If this does not help in solving the problem, then the fault must be looked for in the car’s ignition switch.
The fact is that the reverse light circuit passes through the car's ignition switch. Disassemble the lock housing and check the condition of the contacts that are responsible for turning on the reversing light. As a rule, in addition to the flashlight, consumers whose power is supplied through the ignition switch also do not work. These may be a heater fan, etc.
Open your car's electrical diagram and note the color of the wires that should supply power to the reverse light. Checking the electrical wiring begins with checking the power to the lamp. Set the tester to 12 volts and place the probes on the terminals at the rear of the car. In this case, reverse gear must be engaged and the ignition must be turned on. If the output voltage is zero, further testing is carried out on the “frog”. If there is power on it, then most likely the wire leading from the “frog” to the reversing light is damaged. If there is also no power, check the contact terminals of the ignition switch and the mounting block. Power should appear near these two elements. Based on the values obtained, find the faulty wire and replace it.
ABOUT THE SIGNS OF DZH MALFUNCTION AND ITS SEARCH
It is safe to say that there can be only one sign when the VAZ 2114 reverse sensor does not work, this is the absence of lighting when driving the car in reverse. But there are quite a few culprits for this. It could be:
- Fuse F16 (15A) has blown;
- Oxidation of contacts in flashlights;
- Poor contact of the connector with the fuse block;
- Broken wires;
- The sensor output terminals have oxidized;
- The light bulb has burned out.
Often the culprit of such problems is the light bulb socket, where oxidation of the contacts occurs due to poor sealing of the lamp.
TROUBLESHOOTING
The location of the reverse sensor on the VAZ 2114 (2115, 21113) has already been clarified, let's talk about how to determine the true cause of the malfunction. To do this, it is advisable to have a measuring device such as a tester or multimeter, a light bulb with two wires, but in some cases you can do without them.
The check procedure could be as follows:
- Open the hood of the car, and then the fuse box cover;
- Check fuse F16 and replace it with a new one if necessary. If after this the lighting does not light up, continue the search;
Find and check fuse F 16
- The device checks the presence of electrical voltage at the fuse legs when the ignition is turned on. It should be equal to 12 volts. If it is absent, poor contact between the connector and the fuse box may be to blame. If there is tension, then move on;
- The search moves down under the car. You need to turn on the ignition and reverse gear. But before that you need to remove the engine protection. After this, check the supply voltage to the DZH connector;
- Connect the device or control light with one wire with ground, and the other end with an orange wire. The “movement” of the instrument needle or the glow of a light bulb indicates the presence of supply voltage;
- The next step is to short-circuit the conductors of the DZH connector to each other. If lighting appears, then we can safely say that the VAZ 2114 reverse sensor has failed. If it is absent, the search continues. The troubleshooting algorithm for VAZ 2109, VAZ 2113, VAZ 2115 is the same.
The diagnosis has been made, and now they are starting to treat it.
Tail lights of VAZ-2107: operating and maintenance rules
Tail lights occupy a special place in the car lighting system due to their functional purpose and ability to change the appearance of the car using tuning. Safety on the road largely depends on the performance of the rear lights, since it is from the light devices located in the rear of the car that drivers of vehicles behind can understand what maneuver the driver of the car in front intends to take. The rear lights of the VAZ 2107 have their own characteristics that must be taken into account when operating and maintaining the vehicle.
Design and characteristic malfunctions of the rear lights of the VAZ-2107
Structurally, the rear light of the VAZ-2107 car consists of:
- left and right diffusers;
- left and right conductors;
- two 4 W lamps and two sockets for them;
- six lamps with a power of 21 W and six sockets for them;
- four M5 nuts.
The brake light and side lights on the rear light should be red, the turn signal should be orange, and the reverse light should be white . The most typical malfunctions of the rear lights of the VAZ-2107:
- lack of mass on the lantern;
- lamp burnout;
- oxidation of contacts;
- broken or frayed wiring;
- failure of connector contacts, etc.
No mass
One of the reasons that the tail light does not work may be the lack of weight on it. You can check the integrity of the ground wire visually or by ringing it with a tester. The ground wire in the standard configuration of the VAZ-2107 is usually black, and it occupies the extreme position on the connector block. It is followed by wires:
- brake light (red);
- side lights (brown);
- fog lamps (orange-black);
- reverse lamps (green);
- direction indicator (black and blue).
Lamp burned out
The most common malfunction of rear lights is the burnout of one of the lamps. In this case you will need:
- Remove the plastic plug from the trunk side, which is secured with four plastic screws;
Contacts have oxidized
Oxidation or clogging of the contacts of the connector block may be a consequence of their insufficiently tight connection, as well as dust and other small mechanical particles getting inside the headlamp due to wear or drying out of the rubber seal. The processes of oxidation and contamination of contacts can be prevented through regular preventive inspections and maintenance of all elements of the lighting system.
There are many cars whose rear lights do not work at all, or only work halfway; others do not turn on their turn signals and drive with the rear fog lights on. I'm not one of those riders. I do everything so that my car works as it should, so that the moss of signals is visible and does not blind.
Broken wiring
The integrity of the wiring is checked with a multimeter if the location of the break cannot be determined visually. The purpose of each of the wires coming to the connector can be determined from the VAZ-2107 electrical equipment connection diagram.
parking lights
The dimensions on the VAZ-2107 are activated by the leftmost of the four key switches located under the gearbox control lever. This switch is a three-position switch: the side light, along with the license plate light and instrument lighting, is turned on in the second position.
On the fuse block, which is located under the hood of the car near the windshield closer to the passenger seat, the rear side lights fuses are numbered F14 (8A/10A) and F15 (8A/10A). In this case, fuse F14 is responsible for the operation of the side lights of the left front headlight and the right rear light, as well as:
- a lamp indicating the operation of the dimensions;
- license plate lights;
- engine compartment light bulbs.
Fuse F15 is installed in the side light circuit of the right headlight and left rear light, as well as:
- instrument lighting;
- cigarette lighter lamps;
- glove compartment lighting.
If one of these lamps does not work, you should check the integrity of fuses F14 and F15.