On all modern cars, including VAZ models, if you shift the gearshift lever to reverse gear, the corresponding indicator lights up in the lights. If the reverse sensor of a VAZ 2109 or another model is faulty, the light will work intermittently or will not function at all. What could be causing this problem? How to check the device and replace it? More on this below.
Why doesn't the light come on?
Before changing the sensor, you need to figure out whether it really is the problem. The reverse gear may not light up due to the following problems:
- The light bulbs have become unusable. They need to be tested with a multimeter;
- Wiring is damaged. In this case, you will need a multimeter to check all the wires. It is possible that the insulation is damaged, causing a short circuit (short circuit);
- No regulator contact. This happens due to a breakdown at the point of contact between the sensor and the socket. It can be checked visually;
- There is a problem with the fuse. The 2109 reverse sensor may not function due to a blown fuse. On older cars, you need to check element F16 in the block, in others - fuse number 5;
- Sensor malfunction. If, after correcting the problems described above, the lights still do not light up, then the sensor is not functioning.
Examination
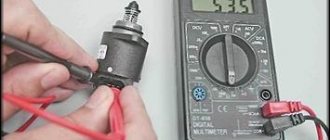
It is easy to check the serviceability of the reverse lamps. You need to disconnect the wires suitable for the device, then connect them together (for example, with a piece of wire). If the headlights come on, then the sensor is faulty and needs to be replaced.
Frequent breakdowns are associated with deterioration in the quality of sensor manufacturing. Over time, its tightness is broken, and oil gets inside. Many inexperienced car enthusiasts associate this with different fuel supply systems - carburetor or injector. But this has nothing to do with this malfunction. You just need to monitor the condition of the sensor from time to time.
How to check the sensor
To check, you need to get close to the element. The following actions must be taken:
- Raise the car with a jack or on a lift;
- Remove the engine protection;
- Get to the sensor, which is located on the side of the gearbox housing;
- Put in reverse gear;
- Check the continuity between terminals 1–3 and 2–4, make sure that it is also present at the “neutral”;
- Shift into other gears and check for continuity, there shouldn't be any.
If there is always continuity, the reverse sensor of the VAZ 2109 is faulty and needs to be replaced.
The principle of operation of the brake light
The brake lights are located at the rear of the car. Red lanterns. They light up automatically if the driver brakes. When the driver takes his foot off the brake pedal, they are also automatically turned off. The presence of stops is mandatory for vehicles.
The lights should be located symmetrically and burn brighter than the side lights. Brake lights are installed on the sides, on the rear window, in the center above the line of the side stops.
Primary and secondary brake lights can be a single bulb, a neon tube, or a set of LED bulbs. The car enthusiast is additionally equipped with a brake light repeater. The rear brake light can also serve as a fog light. You can install a formula 1 brake light (the author of the video is Mikhail Ermolaev).
Replacement of reverse sensor VAZ 2109
Replacing the reverse sensor on a VAZ 2109 is a simple process. Experienced car owners can do everything without difficulty.
The following actions must be taken:
- Place the car on a pit or a lift; in extreme cases, use a jack;
- Remove the (–) terminal from the battery for safety (it is labeled);
- Drain the transmission oil for convenience, otherwise it will leak after removing the product. You will need to unscrew the drain cap, first replacing the container;
- Remove the engine protection;
- Find the sensor, which is located on the side of the gearbox housing, disconnect the terminal from it;
- Unscrew the clamping bolt to “22”. It is located on the crankcase;
- Take a new sensor, lubricate its seal with oil and install it by tightening it by hand and then with the head;
- Connect the wire block;
- Fill with transmission oil. If it has not been changed for a long time, it is better to fill it with a new one;
- Check the lubricant level;
- Install engine protection, remove the car from the jack;
- Connect the terminal to the battery;
- Turn the ignition key, set the lever to the reverse position to turn on the light, check operation.
After all this work, the reverse light on the VAZ 2109 will be in good working order. It is advisable to check the functionality on the go, making sure that it is in full working order.
Replacing a stop repeater with your own hands
If repairing the repeater is not practical, it should be replaced.
The replacement process consists of the following steps:
- Using a wrench, unscrew the fastenings of the rear part of the stop and remove it.
- Then we connect the positive wire of the lighting fixture to the terminal where the brake light frog is located. To do this, you need to run the wire into the luggage compartment, unscrew the trim on the right side, and connect it to the desired terminal. The disadvantage may be a bolt in the luggage compartment.
- Heat shrink should be applied to the wiring. To prevent the wires from dangling, they need to be secured with insulating tape.
- The final step is to check the device for functionality.
Photo gallery
If a repeater with incandescent lamps is installed on the car, then when connecting a device with LEDs according to the above diagram, the lamp control will not work correctly due to different loads. In this case, you should insert the positive wire into the light bulb control unit and connect it to terminal 54H.
As a brake light, a strip with LEDs can be glued to the upper part along the entire length of the rear window. It needs to be connected to a standard device, and it will work in the same way. It is important to maintain polarity. To make the tape less conspicuous, it can be painted black. Attach the tape using double-sided tape. We check for functionality.
What does the second set of fuse boxes do?
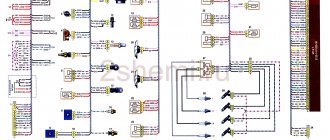
The symbols F1-F20 indicated below in the electrical diagram are the elements that characterize the set of fuses. The electrical circuit in a VAZ-2110 car is protected using fuses based on the specific calculation of the model for the rated current value specified upon purchase.
At the same time, fuses are not responsible for the quality operation of the circuit consisting of a sample battery, a separate type of generator circuit, the ignition system and engine valve starting. To replace a faulty fuse in this mounting block, follow the following plan:
- Find a fuse that has mechanical damage or its body has burned out;
- According to the instructions, determine and eliminate the reason why it turned out to be faulty;
- Install a new fuse using the backup model.
Where are the fuses for the Lada Granta?
The fuse box is located near the driver's left foot. To open the lid, pull the lower left corner of the lid (No. 1) and release the left locking point, then the middle one (No. 2) and the two right locking points (No. 3 and 6). Then release the top points (No. 4 and 5) and remove the cover.
Installing the mounting block cover is done in the following order: first snap the right side of the cover, then the lower ones, and then the upper ones. Make sure that the fastening elements of the cover are aligned exactly with the metal fasteners.
There are symbols on the plastic cover of the mounting block that indicate what each fuse (F) and relay (K) does.
Replacement
The instructions for replacing the reverse sensor will not cause difficulties for more or less experienced car owners, but beginners will have to try to do everything correctly and accurately.
You should not be afraid to change this sensor yourself, because if you follow the instructions and safety measures, everything will work out.
- It is advisable to have a garage with a pit at your disposal. This will make it most convenient for you to complete all operations to replace the sensor.
- Remove the negative terminal from the battery. All work related to car repair and especially its electrical component should begin with this step.
- Drain the gearbox oil. You don’t have to do this, but then when replacing the sensor, oil will start leaking out. By placing a container under the hole, you will save yourself from unnecessary cleaning and oiling of your own garage.
- Remove the crankcase protection, if any. Near the gearbox you will find the sensor you are looking for.
- Disconnect the sensor block from the gearbox.
- In the gearbox housing, the desired regulator is held in place using a mounting bolt. Unscrew the clamping bolt with a 22mm socket or ratchet.
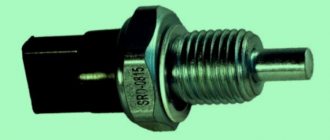
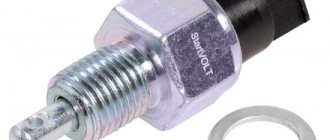
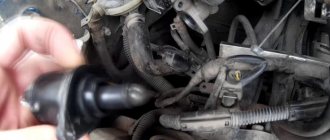
- Armed with the new sensor, you may notice that it somewhat resembles a classic spark plug. On one side of the sensor there is a wire, and on the other there is a button that closes a pair of contacts.
- New DZHs are required to be equipped with O-rings. Before installation, they must be lubricated with ordinary oil - machine oil, transmission oil.
- Install the new regulator in place of the removed device, first secure it by hand, and then tighten the mounting bolt.
- Next up is the electrical wiring. By connecting the block with wires, you will provide the sensor with the necessary power.
- Fill the gearbox with previously drained or new transmission oil. Replacing the reverse sensor is an excellent reason to change the lubricant in the gearbox housing. But the decision is yours.
- Check the gearbox oil level to ensure it meets the specifications.
- Replace the crankcase protection, remove the car from the jack and connect the negative terminal back to the battery.
- Get into the car and put the car in reverse gear.
- If after this the reverse light comes on, everything is fine.
Checking repairs
Theoretically, after replacing the sensor, everything should work as before. But it wouldn’t hurt to make sure of this.
- Engage reverse gear at the gearbox.
- Turn the ignition key. In this case, it is not at all necessary to start the engine. The light will light up if everything is working properly.
- If both lights come on, half the job is done.
- It would be a good idea to additionally check the operation of the sensor while driving. For this you will need an assistant.
- Drive out of the garage, then reverse back. And repeat this several times. If the lamps do not blink and turn on in time, you have succeeded. Congratulations.
If suddenly replacing the sensor does not produce any result, we strongly recommend that you carefully study the possibility of each of the above breakdowns, check the wiring, light bulbs and other components. Obviously, the problem is in one of them or several at once.
Source
Causes of failure
Before you start replacing the reverse sensor (RDS), we recommend checking the condition of the rear lights and determining whether the signal may not be working for other reasons.
Possible reason
Your actions
A common and fairly banal cause of problems, which, nevertheless, many ignore. Take out the light bulb, arm yourself with a multimeter and check if they have burned out. Replace if necessary
The problem is no less common, but looking for the source of the problems in such a situation is a little more difficult. You will also need a multimeter, which you need to test the wiring and check the resistance readings
Poor regulator contact
It happens that during operation the contact of the sensor with the socket is broken. Lack of contact means that the device will not work normally. So check its condition
Wiring insulation is broken
If the insulation on the wires near the sensor is broken, this can lead to a short circuit. The result is quite obvious, so check the condition of the wiring and replace it if necessary
Depending on the type of fuse box, check the condition of the corresponding element in the mounting block. On old-style blocks this is fuse F16, and on new-style fuse blocks you should look at fuse 5. If they are melted, they will need to be replaced. But it is also important to determine the reason why the fuse blew
A failure of the reverse control itself may be indicated by a situation where the lights do not light up at all or, on the contrary, light up without interruption. In the second case, the option of burnt out light bulbs is excluded by itself.
Characteristics of the XX controller
This part is designed to reduce the engine warm-up time. During this operation, rubbing parts often wear out quickly. So: DXX is also designed to reduce contact and wear. This device is mounted in the throttle assembly, which is located in the engine compartment on the left side of the engine.
Purpose and principle of operation
Main components of the device:
- stepper electric motor;
- conical needle combined with a rod;
- springy part.
Idle speed sensor
As shown in the photo, the device has blocks. The main mechanism is highlighted in red - the idle speed sensor VAZ 21099 injector. The adjusting part that controls the engine speed is visible in gray. Blue – a device designed to read information about the crankshaft rotation speed. If the operation is idling, the air flow enters the main cylinders through special channels.
The green color in this diagram is responsible for comparison in the electronic unit. Here the engine speed is taken into account in accordance with the actual speed.
The coolant temperature sensor also receives the necessary signal. Until the comparison circuit receives the necessary information, the engine will operate at higher speeds. At this time, the air is adjusted using the conical part of the needle. A disruption in the air supply often leads to breakdowns and a complete stop of the motor.
Drawing a conclusion, we can say that a certain amount of air enters the engine - exactly as much as is needed for operation in a suitable mode. This volume is taken into account by a special air flow meter. It transmits information to the controller, which, depending on the value, prepares the mixture at the required concentration. After this, it is injected through the injector nozzles into the vehicle network. You can find out where the idle speed sensor is located on the VAZ 21099 injector in the photo below.
Typical faults
Popular and frequent breakdowns of the VAZ 2109 carburetor and injector idle speed sensor include the following:
- engine malfunction;
- refusal to act when the gas pedal is released;
- uncontrolled idling, even when the engine is warm;
- when the gear is switched off, the engine stalls;
- when the engine is cold, the crankshaft does not increase rotation (video author - Devyatochka.remont).