Location and principle of operation of the idle speed sensor
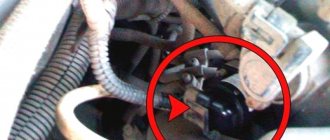
The idle speed control is located next to or on the throttle body. The location of the sensor may vary depending on the make of the vehicle. For example, on Opel and BMW models the regulator is remote, that is, located separately from the manifold.
In most cases, the IAC is secured with two bolts through a rubber O-ring and is located directly in the throttle valve. Difficulties in dismantling and installing the product may arise due to sticking of the bolts; if such a problem persists, then try the simplest method - drilling.
The main task of the IAC is to supply fuel at idle, which helps us save fuel consumption and maintain stable idle speed.
When the ignition is turned on, the sensor rod moves forward to its maximum length and rests against the hole in the throttle pipe.
After the required number of steps have passed, the valve returns to its original position. The number of steps is a constant value, which is set by the manufacturer. When you start the engine, you can watch on the tachometer how the revolutions drop as the engine warms up; this is a process that occurs due to the presence of a sensor.
The more the rod is pushed forward, the more steps are used in the work. The average stroke of the rod is 250 steps. According to this principle, the engine receives the required amount of air for its full operation, and thus the idle speed of the car is regulated. When the engine is not warmed up, thanks to the regulator, the speed increases, which allows you to start moving without fully warming up the engine.
Further work is carried out and adjusted by the mass fuel flow sensor; it analyzes the air entering the engine and gives a command to supply fuel based on the data received. Observing the engine speed, the controller begins to control the regulator. In this way, the required volume of air is monitored and further work is adjusted.
The main task of the IAC is more complete combustion of fuel due to air supply and, of course, reducing wear on the crankshaft bearings.
What does the valve consist of?
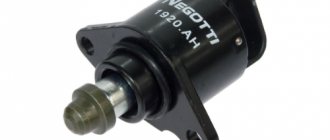
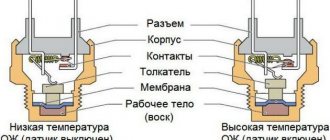
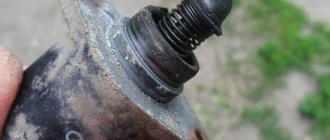
Structurally, the valve consists of a stepper electric motor, a four-position rod and a spring element. it also contains needles. The device is located near the throttle valve and TPS. Some vehicle models provide for fixing this sensor to the damper body. This is done using varnish. However, it also happens that the device is mounted on two bolts with mounting holes. In this mounting option, the main thing is that the distance from the needle to the mounting flange on the device is no more than 2.3 cm.
How the regulator works
When the engine is idling, through an additional air supply channel, bypassing the closed throttle valve, the air necessary for its stable operation enters the engine. The cross section of this channel is regulated by IAC. The amount of air is taken into account by the mass air flow sensor (MAF). In accordance with its quantity, the controller supplies fuel to the engine through the fuel injectors.
Using the crankshaft position sensor (CPS), the controller monitors the number of engine revolutions. Depending on the set mode, the IAC operates, adding or reducing the air supply bypassing the closed throttle valve.
When the engine is warmed up to operating temperature, the controller maintains idle speed. If the engine is not warmed up, the controller increases the speed using the regulator, ensuring it warms up at higher speeds.
Design features
The valve structurally consists of:
- electric stepper motor;
- four-position rod;
- spring element;
- needles.
When IACs first appeared, they were rotary or solenoid mechanisms. Such devices had two positions - open and closed. This contributed to a decrease in the efficiency of engine speed control. Today, cars use four-step sensors, characterized by the possibility of stepwise feed through the bypass.
The idle air control itself is classified as a consumable item and is therefore considered non-repairable. It can be repaired if it malfunctions, but it will be cheaper to replace it completely.
Where is RXX located?
The device should be located next to the throttle valve and TPS. In some cars, the sensor can be fixed directly to the damper body using varnish. Sometimes the device is mounted using two bolts equipped with special mounting holes. The main thing is that the distance from the needle to the mounting flange on the installed device is 2.3 cm.
Connection diagram
Idle air controller connection diagram
One harness consisting of four cables is connected to the idle speed sensor; it comes from the microprocessor module. As a result of this connection, diagnostics may cause certain difficulties. The car owner will not be able to simply apply voltage to the terminals of the device, since the microprocessor module does this pulsed.
Operating principle
In carburetor engines, the problem of enriching the mixture when starting the internal combustion engine was solved by a starting handle and shims. With the advent of electronic ignition, this is done by the idle air regulator in conjunction with other sensors and the computer. Its operating principle is as follows:
- IAC calibration is performed by the ECU controller automatically after detecting this sensor in the system;
- in fact, the IAC is a stepper motor with a conical needle in a special hole in the throttle valve bypass channel;
- The IAC contact does not transmit any signals to the “brain” of the machine, but receives them from the controller, therefore it is not a sensor, but an actuator - an electric valve;
- in turn, the on-board computer “sees” that there is not enough air in the fuel mixture based on the signals from the mass air flow sensor, compared with the signals from the air flow sensor;
- Voltage is applied to the XX regulator, the needle leaves the channel, and the missing amount of air enters the mixture for mixing.
Operating principle of IAC
In addition, the ECU receives signals about the temperature of the coolant and oil in the system. When starting in the cold season, it is necessary to warm up the engine to operating temperature in order to reduce wear on friction parts, so the IAC channel opens slightly to enrich the mixture for the injector, even without the driver pressing the gas pedal.
At the moment of start, the operating algorithm is as follows:
- the key turns, the ignition turns on;
- the rod extends all the way, the needle blocks the bypass channel;
- at the moment the rod rests against the calibration hole, the computer counts the steps backward;
- voltage is applied to the windings, the valve returns to the open position.
The number of reverse steps is programmed in the device firmware. For example, for Basch modifications on a warm internal combustion engine it is 50 steps, January – 120 steps, respectively. In total, the stroke of the rod is divided into 250 steps; the further it extends from the windings of the stepper motor, the greater the number of steps the ECU will count. When purchasing a new IAC, the distance from the mounting flange to the rod needle should be exactly 23 mm.
Injector
Pure gasoline is not suitable for operation of an injection engine, so a throttle valve with an individual sensor of its position at each moment of time is installed at the inlet of the manifold. When starting the engine or stopping the machine with the engine running, the following occurs:
- the computer receives information about the engine shaft speed;
- analyzes how the motor works, that is, clarifies the intended purpose;
- then the readings of the throttle position sensor and the air are compared, that is, the controller “understands” that the damper is closed and a lean mixture enters the cylinders;
- The IAC valve opens, air is supplied bypassing the damper to maintain the speed at the programmed level
In fact, several electronic ignition system devices are involved in the process. If the car stalls or there are symptoms of other malfunctions, diagnostics are performed manually, since this device does not have feedback (self-diagnosis).
In a diesel engine there is no throttle valve, the idle speed regulator is useless, other methods are used to regulate low speeds.
Signs of a malfunctioning idle speed sensor
The main problem will be that this part is not equipped with any type of self-diagnosis. On the control panel you will not see a flashing light or an inscription that will indicate a malfunction of the IAC. Everything will depend on your attentiveness and how you feel and hear your car. Signs that indicate that a part is worth checking include:
- the car began to stall at idle (uneven idle speed);
- a sharp drop or increase in speed during idle;
- when driving on a cold engine, the speed does not increase;
- When changing gear, the car stalls.
There are few reasons why the IAC failed. As they said earlier, this is a fairly reliable part, but it can still fail. There may be several reasons for the malfunction:
- The guide needle is worn.
- Broken contacts inside the part.
- The needle is clogged due to poor quality fuel.
As we all know, fuel is one of the most important components of the operation of both the engine and the car as a whole, and the idle speed sensor is no exception. Most of the reasons for part failure are the use of gasoline with impurities.
A malfunction and inadequate operation of the XX sensor is indicated by any changes in the engine speed. If the part fails completely, you will not be able to start the car without using the gas pedal. And such a procedure will negatively affect the operation of the vehicle as a whole. Manufacturers do not recommend this practice for nothing.
Signs of failure
The main symptoms that the idle speed sensor is not working correctly are:
- speed in parking mode is unstable;
- reduction in crankshaft rotation speed when any consumer is turned on (windshield wipers, headlights, air conditioning, radio, heater);
- no increase in shaft rotation speed when starting the internal combustion engine;
- stopping the engine when turning off a gear or changing gears.
Attention: These symptoms are not 100% the cause of IAC failure, as they are similar to the failure of the TPS damper sensor. However, in the latter version, the Check error lights up, and the idle speed controller is not connected to the engine control system and does not have self-diagnosis.
Checking the idle speed sensor
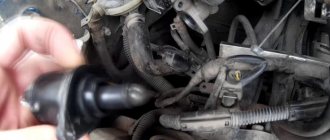
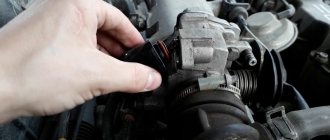
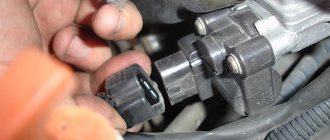
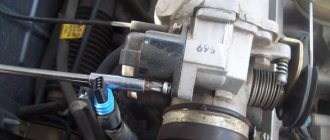
Diagnosing the part is quite easy, but pay attention to a few points. The first problem may be removing the part; most manufacturers attach the XX sensor to screws, and in extreme cases they can be drilled out, but in some variations the part is mounted on varnish. If your regulator is secured with varnish, be careful not to forcefully remove it, as this may damage the intake part of the car. In your case, it would be correct to completely dismantle the throttle assembly and only then disconnect the IAC.
The easiest way to check is, of course, visual inspection. During a visual inspection, the first thing you should pay attention to is whether the needle is dirty. Also pay attention to the condition of the contacts and the throttle valve itself.
If broken wires are found, they must be returned to their place. Solder them and, to avoid corrosion, treat them with varnish.
It would be appropriate, if possible, to check the IAC with a multimeter or a homemade tester. You can check the resistance with a multimeter, and use a homemade tester (you can make one from a mobile phone charger) to check the stroke of the regulator rod.
If you find that the motor is damaged, the rod is completely worn out, or the cone needle is worn out, the part will need to be replaced. Don’t be too upset about this, the cost of the part will only be about 1000 rubles.
Basic faults
The above symptoms of malfunction usually occur in the following cases:
- the throttle valve bypass channel is clogged with dirt;
- the integrity of the wires or coils is damaged;
- The ECU firmware does not match the IAC modification.
Regulator needle is dirty
Checking using the above methods reveals all the causes of the problem. Whenever disassembling the regulator or throttle assembly, it is recommended to clean the IAC with special liquids/sprays.
Main aspects of checking IAC
We figured out how to clean the idle speed sensor, now we’ll take the time to diagnose it. Like cleaning, testing can be done at home.
How to check the idle speed sensor:
- Find the IAC and remove it along with the wires. Unscrew several clamps that secure the throttle assembly with the receiver, then move these elements apart by about 1 cm.
- Using a diagnostic tester, check the IAC circuit - now you should make sure whether there is voltage in the network or not. Connect the tester probes to contacts A and D - as a rule, they are marked on the body. Having connected the probes, you need to activate the ignition and look at the results. The best option is 12 volts. If this parameter is lower, then most likely the problem lies in a poor battery charge, and if it is completely absent, then it is quite possible that the problem lies in the control unit.
- Make sure that the circuit is on the IAC itself. To do this, the tester's probes must be connected to pins A and B, and then to C and D, and you need to set the tester to ohmmeter mode. When checked, the diagnostic parameters should be about 53 ohms. Then the same actions should be repeated with other pairs of contacts, for example A and C, and the resistance should tend to infinity (the author of the video is Ivan Vasilyevich).
There is another option; for this, checking the idle speed sensor must be carried out with the IAC removed. Connect the power cable, then touch the end of the needle with your finger (no force required). During shutdown, the regulator should begin to extend the needle fully, so when you turn, there should be a slight push of the finger.
As you can see, in general, diagnosing a device is not that difficult, but for a quality test you need to understand how to use the tester. If you have no idea how to do this, it is better to seek help from an electrician, but in practice, after studying the instructions for the multimeter, there should be no problems with its use. Of course, the tester itself must be working, otherwise the readings will not correspond to reality and you will only get confused.
Causes of IAC malfunction
- Failure of the electrical part of the sensor. This could be either an open circuit or a short circuit. Also, do not exclude the possibility of burnout of the electric motor winding.
- There is a rubber sealing ring on the IAC rod. Often it simply dries out, which leads to air leaks.
- One of the fuses has blown. We talked about how to check fuses in this article.
- One of the most common problems is contamination of the stem. Often, due to dirt getting into the sensor, the rod jams. Being in one position, the IAC can no longer control the operation of the motor.
- The last reason occurs only on cars that have traveled more than one thousand miles. As a result of long work, the needle wears out. As a result, a gap is created through which air leaks.
How to disassemble the idle speed control (IAC)?
You should disassemble the idle speed sensor very carefully, otherwise we may completely break it.
- To disassemble the sensor, you first need to remove three studs that serve as a housing fixation.
- After removing the pins from the sensor, using little effort, carefully pull out the connector housing. Do not damage the wire contacts or tear them off.
- Look at the cause of the problem.
The simplest thing that can happen is a broken wire. In this case, solder the wire back and cover it with varnish. “Why varnish?” you ask – for protection against corrosion.
The needle guide drive or the guide itself could also be worn out. In this situation, there is nothing we can do except install a new sensor.
Replacement
To work you will need:
- The new regulator is suitable for your VAZ 2114;
- Rags;
- Phillips screwdriver;
- 13mm wrench;
- Carburetor cleaner;
Having the necessary tools and materials, you can get to work.
- Park the car on a level surface and apply the handbrake.
- Raise the hood and secure it securely to avoid unnecessary injury.
- Disconnect the negative terminal from the battery. IAC is an electrical appliance so this activity is mandatory.
- Remove the protective cover from the power supply.
- Loosen the clamp slightly to remove the rubber tube from the air filter fitting. This is necessary so that the tube does not interfere.
- Remove the clamp holding the air filter tube. The ripples separate and move slightly to the side.
- The fastening screw of the cable from the accelerator pedal to the accelerator (accelerator) needs to be loosened slightly.
- The rag removes all dirt near and on the throttle body itself.
- Treat the throttle retaining nut and IAC retaining screws with the almighty WD40. This will make disassembly easier.
- Remove the throttle valve assembly. To do this, unscrew the two nuts with a 13mm wrench.
- Remove the sensor connector from the terminals.
- If there is dirt at the contact points between the DXX and the throttle body, be sure to wipe it off with a rag.
- Using a screwdriver, unscrew the two fasteners that connect the throttle assembly and our desired sensor.
- Remove the regulator from the mounting slot.
- Wash the entire throttle body with carburetor cleaner.
- Place the new regulator in the same position as the disassembled DHX.
- Apply engine oil to the new rubber gasket that should come with the IAC.
- Tighten the two screws and make sure the adjuster fits snugly into the throttle body.
- Replace the remote control and check that the nuts are tight.
- Connect the connector to the terminals of the device.
- Reinstall the cable, tube and tube. Tighten all clamps securely.
- Replace the engine casing.
Replacement procedure
After assembly, a very important stage remains: calibration of the new IAC. To do this, you need to connect the battery and turn on the ignition. 10 seconds is enough. During this time, the electronic control unit is calibrated.
That's all, the new regulator is ready for use. To avoid problems with replacement, watch the video tutorial.
Repair
It is not always possible or even the desire to spend money on buying a new device. Regardless of the reasons, you can try to fix a faulty or faulty inactive sensor using a repair method.
- Try washing the old sensor.
- To do this, disassemble it and thoroughly clean all contacts with a cotton swab dipped in carburetor cleaner.
- In addition, the rod, needle and spring are generously treated with detergent.
- A toothbrush can easily clean greasy areas with carb cleaner.
- Rinse the device again and then return it to its place.
- At such events it was not unusual to achieve an excellent result, the idle was working again as before.
But this is the simplest repair option, which is not always worth relying on. There is a more complex, but at the same time more effective option for repairing the controller yourself in the event of the slightest breakdown:
- Disassemble the sensor, clean its external elements, as indicated in the previous repair method;
- Remove the three pins securing the sensor body;
- Disassemble the regulator housing as carefully as possible. Very slowly and carefully so as not to damage the contacts;
- After disassembly, you may find a broken weld. In this case, the wire is welded and the welding site is treated with special anti-corrosion paint;
- If there are gaps in the regulator body, they are eliminated using sealant. This prevents air from entering through the valve.
If, when disassembling the device, problems arise with winding or the needle is worn out, repair will not help. You'll have to completely change your MAC.
The problem of malfunctioning idle air control is quite common in the case of the VAZ 2114. This element cannot be called the weak point of the car, but no one wants to deal with such a breakdown. As, indeed, with any other malfunction. But where can I get it from them?!
Malfunctions of an inactive sensor are externally similar to the occurrence of malfunctions in other groups of injectors. But at the same time, checking its performance is sometimes much simpler than systematically sorting each node for faults. In addition, its diagnosis will not be difficult even for a driver who has no experience working with an auto electrician.
Cleaning Rules
It often happens that cleaning the idle speed sensor can solve the problem of device inoperability. In general, this procedure is quite simple. Therefore, almost anyone can cope with it.
So, how to clean the idle air regulator:
- First of all, the IAC must be disconnected from the wiring.
- Next, take the WD-40 liquid and apply it to a Q-tip. This stick is used to clean contacts.
- Next, take a small Phillips head screwdriver and unscrew the controller latches, there are two of them. If the fastenings are completely missing, this indicates that the IAC is mounted on varnish; if this is the case, then, most likely, the entire throttle will need to be dismantled.
- Dismantle the DXX and inspect it. If there is dirt or traces of motor fluid on the device, then in addition to the regulator itself, you will need to clean the entire throttle assembly.
- Now take a cleaning fluid (you can use carburetor cleaner instead of WD-40) and apply it to the cone needle and spring. Although carburetor cleaner is better for cleaning! Having done this, you need to dry the controller and put it in place. Before installation, make sure that the distance from the device body to the needle is 2.3 cm. If cleaning does not help fix the problem, then most likely you will have to change the DHC.
Controller connection diagram
Method for checking the sensor using a multimeter
The most reliable and common way to check the functionality of the sensor is to use a multimeter. But to do this, the regulator must first be removed. Typically, it is secured with several screws near the throttle sensor, but on some cars it can be secured with a special solution or varnish.
It is impossible to dismantle the IAC using force, since there is a high risk of damaging the intake system. In such a case, you will have to remove the entire throttle assembly.
To check the electric motor, it is necessary to measure the resistance of the windings. The multimeter contacts must be connected in turn to each of the windings A and B, C and D. If everything works properly, the data obtained will fall in the range of 40–80 Ohms.
As an additional check with a multimeter, the contacts can be swapped. The sensor, in this case, should indicate an open circuit.
IDLE SENSOR CONTAMINATION
Often the cause of improper operation of the idle air regulator is its contamination. In such a situation, you can replace the sensor (which is inexpensive) or clean it. Cleaning the idle speed sensor takes place in two stages: You need to moisten a cotton swab with a special product (for example, which is used to clean a carburetor) and use it to clean the contacts of the sensor. This must be done carefully so as not to damage them; The remaining parts of the regulator can be cleaned mechanically using the product indicated above. Moisten a toothbrush with it, for example, and carefully clean the needle, rod, spring, removing accumulated dirt.
The process of cleaning the idle speed sensor
To stabilize the operation, a cleaning process is required, especially if during inspection you find a clogged needle or throttle valve. To clean the contacts, use a cotton pad: after dipping it in alcohol, wipe them off.
Clean the cone needle with carburetor cleaner or WD-40. After generously spraying the needle, let it dry, after which you can install the part back.
Cleaning the throttle body will take a little more time, but will also not be labor intensive. You will need any cleaning agent: gasoline, solvent, carburetor cleaner, WD - 40. Also use a rag and a brush. Be sure to remove the air filter bell before cleaning, and do not forget to clean the damper on both sides.
Cleaning the idle air control
It is quite obvious that on any car with an injector, the idle speed sensor can fail (IAC VAZ or idle speed controller on a foreign car).
Having discovered the symptoms of malfunction discussed above and signs of malfunctions of the idle speed regulator sensor while the internal combustion engine is idling, the idle speed valve of a VAZ or other car needs to be diagnosed. At the same time, you should not rush to purchase a new sensor to replace without checking the old one. Let us remind you once again that the engine can become unstable for a number of reasons, while the regulator is only one of the possible options. Also, the sensor may be working properly, but dirty.
- First you need to clean the idle speed sensor, since its contamination usually leads to serious failures. In this case, the installation location is such that the sensor becomes contaminated quite actively, and the IAC itself, due to its design features, is sensitive to contamination.
Cleaning the idle speed sensor is not a complicated procedure. The main problem is removing the regulator itself. If you are not sure where the idle speed sensor is located on a particular car, you need to study the manual in advance. As practice shows, the IAC is located near the throttle position sensor. In turn, all that remains is to determine the location of the throttle assembly and TPS.
In fact, it is enough to wet a soft rag or cotton wool with carbicleaner or any other similar cleaner, and then carefully clean the sensor contacts. Next, the remaining elements of the regulator are also actively wiped with a rag soaked in the cleaner. In this case, you can clean intensively (for example, using a soft brush), removing dirt from the needle, rod, and IAC spring.
Cleaning the needle and bypass channel
To provide access to valve parts, removal of the IAC is required using the following technology:
- disconnecting the block from the connector;
- cleaning the connector contacts and plug with a cotton swab soaked in WD-40;
- unscrewing screws with a curved screwdriver;
- removing the regulator to check the condition.
IAC cleaning
Attention: There is no need to disassemble the regulator, just spray the spring and rod with needle with WD-40 spray, wait for it to dry, and at the same time clean the throttle bypass channel.
The adjustment is made by the on-board network controller itself. However, for stable operation of the engine, you should check the distance from the mounting flange to the protruding needle cone. By default it should be 23 mm.
Monitoring and regulation of the idle speed sensor by an electronic unit
The operation of the idle speed sensor is controlled exclusively by the on-board computer ECU. As already noted, the ECU receives signals for this control not from the XX sensor itself (since such a function is not provided for in the part), but from the crankshaft sensor. How is everything going?
- The controller receives current data from the sensor about crankshaft speed;
- Analyzes and determines the current operating parameters of the motor using signals from a bunch of other sensors;
- A comparative analysis is carried out with the readings of the TPS and MAF. Based on the comparison, it determines the degree of closure of the damper and, consequently, the characteristics of the lean fuel mixture;
- Carrying out the task of enriching the fuel with oxygen, the ECU sends signals to move the rod to one of four positions (depending on the voltage of the electromagnetic pulse) and open the IAC valve to supply air in a roundabout way.
Purpose of the IAC regulator
The idle air regulator is used exclusively in electronic ignition systems:
- the proportions of the fuel mixture in the injector are determined by the on-board computer;
- the amount of gasoline or diesel fuel for each cylinder is measured by the ECU;
- the electronic ignition is equipped with sensors DPKV (crankshaft), TPS (throttle valve), MAF (air), DD (detonation), based on the signals of which the fuel pump is activated and the ignition is distributed to specific cylinders;
- when the gas pedal is released, the fuel damper is completely closed, the proportions of the fuel mixture are violated, combustion products are sucked back into the combustion chamber due to the difference in pressure in the intake and exhaust manifolds.
Purpose of IAC
Based on the results of the air sensor signals, the controller makes a decision to further enrich the fuel mixture with air, ignoring the readings of the throttle sensor at this moment.
The chip on the IAC transmits a signal from the ECU; a bypass channel opens in the idle air regulator, through which air passes in the injector or additional fuel in the diesel engine. Engine speeds are leveled, piston and crankshaft wear is reduced.
What do you need to know when replacing the IAC?
To change and install a controller that allows you to regulate idle speed, you need to pay attention to the position of the rod. It must not be allowed to be pushed forward too much. This can happen if the device is connected to the block and the ignition is activated before installation. It is not allowed to push the rod in by hand.
If the valve is installed with the needle extended and the retaining screws are tightened, damage to the unit may occur due to shearing of the worm gear. It is impossible to repair such a sensor. Depending on the vehicle model, after installing a new regulator, it may need to be calibrated. In some cars, this procedure is carried out using special equipment or a stand.
On VAZ cars, calibration is performed as follows:
- A terminal is connected to the negative output of the battery.
- The key is turned in the lock to turn on the ignition for ten seconds. There is no need to start the power unit.
- The ignition is turned off.
User Ovsyuk talked about replacing the idle air valve on his own using the example of a Lada Samara car.
Regulator replacement and calibration
IAC for most models is inexpensive. Therefore, it is advisable to purchase original spare parts. Usually it is not difficult to buy such a part. For almost any car it can be found in physical or online auto supply stores.
The replacement is done like this:
- Check the distance from the seat to the needle on the new part. It is normally 23 mm;
- Remove the negative from the battery;
- Remove the old regulator and replace it with a new one;
- Connect the battery;
- Insert the key into the ignition and turn one turn. There is no need to start the car. In about 5 seconds the sensor should calibrate;
- Turn off the ignition;
- Start the power unit and test the functionality of the DHW. To do this, you need to monitor the speed at XX. If they are normal and all previous problems have disappeared, then the work was done correctly. If the procedure does not help, it is advisable to contact a service station for a professional check and restoration of the car.
You can drive with a broken sensor. This is not prohibited by traffic rules. But operating a machine with such a problem is not very comfortable. Therefore, it is recommended to eliminate it within a reasonable time.
Preventive measures
In order not to encounter a complete malfunction of the regulator in the future, it is worth periodically carrying out the cleaning process described above. How often to carry out the cleaning process depends on how actively you use your vehicle. If the car is a work vehicle, it is recommended to check and clean the sensor once a year; if you use it only for yourself, once every two years will be enough. But, of course, do not forget about the signs of a part malfunction; if they appear, do not delay. This will help you avoid complete failure of the part and enjoy a quality ride.
Together with you, we come to the conclusion that the part is unpretentious, simple in its functionality and use. Don’t forget: timely detection of a malfunction is the key to overall vehicle productivity. The full operation of the engine depends on the serviceability of each of its components, and if you neglect any part, including the idle speed sensor, this can lead to more labor-intensive repair processes and failure of the entire car.
Restoring the performance of the DXX
After testing, the question arises of eliminating the causes of malfunctions or replacing the part. It should be noted right away that this part is initially considered consumable. Breakage, wear or deformation requires replacement of the sensor rather than repair. Fortunately, the low price of the part allows you to do this without much damage to the family budget.
So, restoration means thoroughly washing the channels and voids in the part and restoring the integrity of the electrical circuit - this means sealing the loose pins (and then covering them with protective varnish), eliminating breaks in the winding and wires.
During dismantling, each element of the part should be carefully treated with a special aerosol reagent WD-40. In this case, there is no need to disassemble the part itself into parts; it is enough to process all accessible parts with a directed jet, not forgetting about the bypass channel, which also often becomes the reason for the incorrect operation of the DXH.
There is no need to adjust the regulator after replacement or testing; this is handled by the on-board computer. However, do not forget to check the distance between the needle head and the screw seat (should be 23 mm).
Regular preventative cleaning will help avoid serious problems and significantly increase the service life of not only the idle speed sensor, but also the entire fuel system of the car.
Malfunctions
The peculiarity of the idle speed sensor is that it is impossible to trace the occurrence of a malfunction due to the operation of the on-board computer. The system does not recognize the malfunction, so you will have to do everything manually.
There are several telltale signs that may indicate problems with the XX sensor:
- The car often stops idling;
- There is such a thing as floating speed;
- When starting a cold engine, there is no increased speed;
- If the gear is disengaged, the engine may stop spontaneously.
There are also several errors on the on-board computer, but you should not rely on them alone.
Error code
What does he do
Low idle speed
Increased idle speed
Many people confuse the signs of IAC failure with the throttle position sensor. In fact, the symptoms are very similar. But the point is that the on-board computer reports a failure of the position sensor, and as for the IAC, it is quiet.
Diagnostic methods
Before proceeding with the replacement, we recommend that you really make sure that the cause of all problems with your VAZ 2114 is a faulty IAC. To do this, there are two main ways to check the status of the device.
Explore both options to see which diagnostic option is best for you.
First way
- Buy a tester if you haven't had one before.
- Disconnect DXX from the seat belt.
- If you have a 1.6L engine, be sure to remove the throttle body mounting bracket and move it about 1 inch away from the receiver.
- Use a voltmeter to check if voltage is being supplied to the regulator. The minus connects to ground, and the plus goes to the block - use AD contacts.
- With the ignition on, the tester should show at least 12 watts.
- If there is no voltage, then the problem is in the power circuit or electrical unit of the car.
- If there is voltage, but it is significantly less than 12 W, this indicates a low battery level. Make sure you recharge the battery.
- Having convinced ourselves of the real operation of the chain, we begin to study DXH itself. At this stage, turn off the ignition.
- Connect the terminals to the tester in pairs AB and CD in turn. Normal resistance should be around 53 ohms.
- Change the pairs to AC and BD. When measuring, the resistance should be infinitely large.
If the check shows that the readings do not meet the standards, several actions can be taken:
- Clean the contacts, throttle body, needle needle and other sensor components with carburetor cleaner. They are not difficult to find and are cheaper than specialized cleaning products;
- If possible, try to repair the IAC;
- If repair cannot be made, replace the old sensor with a new regulator.
Faulty sensor
Second way
For this testing option, you will need a simple tester that you can easily make yourself. We offer relevant video instructions
Now let's do the following.
- Unscrew the fastening screws of the regulator and remove it from the socket. You already know where DXH is.
- Disconnect the adjuster from the main shoe and apply the finger of your right hand. In addition, the index. You don't need to put a lot of effort into creating a set.
- The nuance of applying the finger lies in the characteristics of the regulator itself, at the end of which there is a cone-shaped needle.
- If the engine stops working, then if the IAC is working properly, the needle comes out completely.
- One finger will allow you to feel a slight shudder when you turn on the ignition.
- If this discharge is not present, the device is faulty.
The maximum distance from the protruding rod head to the flange is 23 millimeters. When buying a new IAC, be sure to take this into account.
A Question of Choice
When checking the sensor, it was discovered that the device was faulty and required replacement. But what should you choose instead?
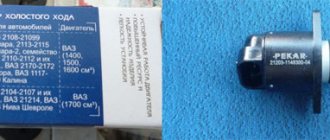
Today, two types of devices from different manufacturers are especially in demand for the VAZ 2114 - OMEGA and KZTA.
In the case of OMEGA, please note the number 21112-114830. If you decide to choose KZTA, the option for you has catalog number 2112-1148300-04.
The last two numbers may be different, and this is a very important point. If your IAC number ends in 01, don't change it to 03 or you will just be wasting your money. The device is replaced with a similar or later number - 01 is replaced with 01 or 02, etc.
The cost of MAK is about 300-400 rubles, depending on the region and the specific store. Be careful, because there are a lot of fakes on the market now.
Idle Air Control Malfunction - Check Engine Signal
Control systems in cars with an injector record deviations in the operation of the fuel regulator. Below are some possible IAC failure codes with decoding:
- P1509 (control circuit overload);
- P1513 (short to ground);
- P1514 (open circuit or other problems at 12 V).
If you receive information about a problem, check the wiring - perhaps the problem lies there. Test codes are received through a special connector using a scanner. You can decipher the obtained values yourself using special tables (search online). If you can't quickly check the system, a thorough cleaning will help delay replacement for some time.
You can determine the serviceability yourself, but this will require skills and an oscilloscope.
Sensor diagnostics
You can check the idle air valve yourself. Its faults can be divided into two parts: mechanical and electrical. There are several verification methods.
Visual inspection
First you need to conduct a visual inspection. In this way, you can detect body defects, needle wear, and carbon deposits. If deposits form, you can clean them with carburetor cleaner. It is also recommended to clean the entire throttle body as it is in a similar condition.
Using diagnostic programs
The operation of the IAC can be checked using a diagnostic adapter and special programs. For example, you can use the simplest ELM327 adapter and the OpenDiagMobile program. In the program menu you need to select the desired position of the XX regulator and watch the operation of the valve. It is better to set it at least 20 steps more than the current position.
Wiring check
For this we need a multimeter. With the engine off, remove the connector from the sensor. We set the measurement limit on the measuring device to 0-20 V DC voltage. We measure the voltage at the connector. Normally it should be 12V.
Checking the regulator resistance
To do this, we will need to measure the resistance between terminals A, B, and C and D after disconnecting the sensor terminal. We move the multimeter to the position of measuring resistance at the limit of 0-200 Ohms (Ω).
The normal value is within 50-55 Ohms. The resistance between A and C, B and D must be infinity.
Checking with throttle assembly
There is another way to diagnose IAC. To do this, you will need to remove the throttle assembly from the studs along with the sensor.
By connecting the valve connector and turning the ignition on/off, you can observe the operation of the IAC live. See how the needle works, if it is rubbing somewhere, check the evenness of the stroke, hear suspicious sounds.
Diagnosis of IAC
Ideally, diagnostics of the regulator should be carried out on a stand that can reproduce the pulses of the on-board computer. In practice, this is expensive; low-cost verification methods are used. In any case, the algorithm of actions at the initial stage is the same:
- the handbrake is applied, anti-recoil devices - shoes - are installed under the wheels;
- disconnect the “-” terminal from the battery;
- knowing where the TPS and MAF sensors are located, the location of the IAC is determined;
- the valve is disconnected from the on-board computer (the plug is pulled out of the connector).
Valve removal
Further steps differ for different verification methods.
Manual check
The simplest method for checking IAC in an electronic intake distribution system is manual diagnostics (an assistant will be required):
- the IAC plug is disconnected from the connector;
- two screws are unscrewed and the device is dismantled;
- the regulator is reconnected to the ECU, but remains in the hands of the master;
- The assistant starts the engine, at this time the rod should be completely retracted into the coils, then, having received an impulse from the computer, extend a certain distance.
Manual IAC check
In other words, the functionality of the stem is checked, the owner makes sure that this part is not bent or jammed inside the valve. However, this does not provide a 100% guarantee that this IAC modification fully complies with the controller ECU firmware. The needle extends, but by an unknown amount. In the first case, the connector is checked, in the second - the plug; the markings are only on the plug.
In the classic version of checking “from simple to complex,” this stage is the initial stage; then you should check the integrity of the wires and coils, the condition of the bypass channel, and needle wear. Only after these steps can you assemble a homemade stand with a pulsed voltage supply for comprehensive diagnostics of IAC.
Diagnostics with a multimeter
At this stage, you will need an IAC tester, which is checked with this device in two modes:
- ohmmeter - when connecting contacts C – D and A – B with the multimeter probes, the resistance should have a value of 40 – 80 Ohms, D – C and A – D should be equal to infinity;
- with a voltmeter - when the ignition is turned on, the voltage reaches 12 - 20 V.
proverka-testerom
Attention: the IAC adjustment is performed automatically by the on-board computer after each connection of the device plug to the connector. After dismantling, it is recommended to lubricate the bypass channel with WD-40 spray to clean it. This measure is preventive, even in the absence of contamination of the bypass channel, in the gap of which the regulator is located.
Pulse testing on a homemade stand
Since the stand costs 1,500 - 1,800 rubles, and the regulator 300 - 500 rubles, purchasing the device is not economically profitable for the average user. A simple circuit without microchips is shown below:
- it uses 6 V charging from any mobile device;
- plug blocks are commercially available;
- First you need to disconnect the IAC from the on-board controller, then check the stroke of the rod;
- a bright glow of the lamp in the diagram indicates a malfunction of the rod itself;
- If the lamp burns at the incandescent level, the unit is considered to be in good condition.
Diagram of the device for checking IAC
Using a cleaning agent will restore the functionality of the rod, but only if it is clogged. If this part is bent, the entire regulator will need to be replaced.
Calibrating a new IAC
What should I do if the test reveals that the sensor needs to be replaced? It needs to be calibrated.
- We check the distance from the end of the rod to the mounting plate, it should be no more than 23mm.
- We disconnect the minus from the battery, de-energizing the ECU.
- Install the regulator.
- We connect the battery back.
- Turn on the ignition for 5 seconds without starting the engine. At this time, the IAC calibration occurs.
- Turn off the ignition to complete the calibration.
- We start the engine and observe the idle speed.
Now you know how the idle air regulator works, how to check it and, if necessary, replace it. As you understand, there is nothing complicated about this and all operations are accessible even to a novice car enthusiast.
Sources
- https://auto-gl.ru/proverka-i-chistka-datchika-holostogo-hoda-6-prakticheskih-sovetov/
- https://automend.ru/articles/chistka-regulyatora-holostogo-hoda/
- https://autodvig.com/toplivnaja-sistema/datchik-holostogo-hoda-66182/
- https://autocentrum.ru/articles/17151-instrukciya-po-proverke-ochistke-i-demontazhu-datchika-holostogo-hoda-svoimi-silami.html
- https://vaz-2114-lada.ru/2012/10/kak-otremontirovat-rkhkh-datchik-kholostogo-khoda/
- https://avtika.ru/kak-pochistit-klapan-holostogo-hoda-inzhektornogo-dvigatelya/
- https://KrutiMotor.ru/kak-proverit-datchik-regulyator-holostogo-hoda/
- https://SwapMotor.ru/ustrojstvo-dvigatelya/regulyator-holostogo-hoda.html
- https://elm327.club/remont-i-obsluzhivanie-avto/raspolozhenie-datchika-holostogo-hoda.html
- https://avtoshkolak.ru/ustrojstvo/esli-otklyuchit-datchik-holostogo-hoda-chto-budet.html
- https://elm3.ru/diagnostika/regulyator-holostogo-hoda-rhh