A properly functioning braking system in any vehicle is the key to the safety of the driver, passengers and other road users. The functioning of the brakes and their effectiveness directly depends on the operation of the master cylinder. Despite the rather long service life of this unit (100–150 thousand km), some of its elements fail much earlier, resulting in the need for repair of the product.
- Purpose and functions
- Principle of operation
Video: how the master cylinder works
- GTZ malfunctions
Checking the brake master cylinder
- Removal
Video: replacing the GTZ repair kit on a “classic”
- Video: how to bleed the brake system on a “classic”
Main brake cylinder VAZ 2101
The central unit of the brake system of the VAZ 2101, like any other classic Zhiguli model, is the master brake cylinder (MBC). Due to this element, the force applied to the brake pedal is converted into hydraulic pressure in the system. We will consider the purpose, functions, malfunctions and repair work of this mechanism in more detail.
Purpose and functions
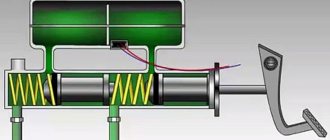
When you press the brake pedal, the GTZ pistons begin to move and compress the brake fluid, increasing its pressure. Under the influence of fluid, the brake wheel cylinders (BWC) are activated. From them come pistons that press the pads against the brake discs (front) and drums (rear). The essence of the GTZ operation is that brake fluid under pressure transmits force from the controls to the working elements.
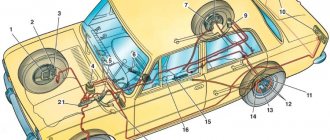
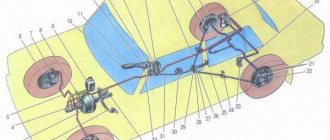
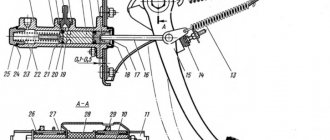
The brake system of the VAZ 2101 consists of the following components: 1 - front brake protective casing; 2, 18 — pipelines connecting two cylinders of the front brake caliper; 3 - caliper; 4 — hydraulic drive reservoir; 5 — brake light switch; 6 — parking brake lever; 7 — adjusting eccentrics of the right rear brake; 8 — fitting for bleeding the hydraulic drive of the rear brakes; 9 — pressure regulator; 10 - brake light; 11 — rear brake wheel cylinder; 12 — lever for manual drive of the pads and expansion bar; 13 — adjusting eccentric of the left rear brake; 14 — brake pad; 15 — rear cable guide; 16 — guide roller; 17 — brake pedal; 19 — fitting for bleeding the hydraulic drive of the front brakes; 20 — brake disc; 21 - main cylinder
The master cylinder has two main functions:
- transmit mechanical action from the pedal to the wheel cylinders;
- ensure effective braking of the vehicle.
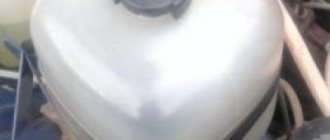
The VAZ 2101 is equipped with a GTZ, consisting of two sections, i.e., designed to work with a dual-circuit braking system. In cars with rear-wheel drive, one circuit is dedicated to the front brakes, and the second to the rear brakes. This design is convenient in that if problems arise with one of the circuits, the second will remain operational and the car can be stopped, albeit with less efficiency. The GTZ on the “penny” is located in the engine compartment next to the reservoir into which the brake fluid is poured.
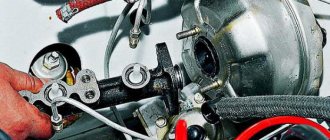
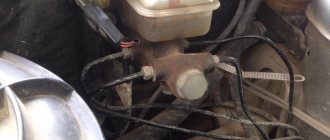
The brake master cylinder is located near the clutch master cylinder and brake fluid reservoir.
Principle of operation
The main parts of the master cylinder are:
- frame;
- tank (reservoir) of the GTZ;
- piston (2 pcs.);
- return springs;
- sealing cuffs.
Brake fluid from the expansion tank is supplied to the mechanism from above via hoses. Structurally, the main distributor is divided into 2 cylinders, each of which has its own piston. A threaded plug is installed at the end facing the front of the car. On the opposite side there is a flange through which the GTZ is attached to the pedal assembly. The force from the brake pedal is applied to the first piston through the rod, and fluid is supplied to the RTC through the corresponding tubes.
The GTZ consists of the following structural elements: 1 - plug; 2 — cylinder body; 3 — rear brake drive piston; 4 — washer; 5 — front brake drive piston; 6 - sealing ring; 7 — locking screws; 8 — piston return springs; 9 — spring plate; 10 — pressure spring of the sealing ring; 11 — spacer ring; 12 — inlet; A - compensation hole (gaps between sealing ring 6, spacer ring 11 and piston 5)
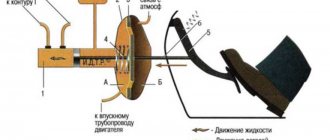
The main hydraulic cylinder functions as follows:
- When the pedal is pressed, the pistons of the main cylinder begin to move and push fluid through the circuit tubes. Under fluid pressure, the wheel cylinders are activated, affecting the brake pads.
- Part of the liquid that did not have time to get into the tubes returns to the tank through special holes.
- When the driver releases the pedal, the pistons return to their original position under the force of the return springs. The liquid from the tubes and reservoir returns to the GTZ.
Video: how the master cylinder works
Which GTZ is better
When you need to replace a gas turbine engine, you have to think about which manufacturer to give preference to. Based on the practical experience of many owners of the VAZ 2101 and other “classics”, the best option is to install a standard part from AvtoVAZ with catalog number 2101–350–500–8. Other manufacturers include:
- "Basalt";
- "Belmag";
- LPR.
Cylinders from the Italian brand LPR are somewhat popular, as evidenced by numerous reviews from car enthusiasts. However, the cost of such a mechanism is slightly higher than the factory one. So, buying an AvtoVAZ GTZ will cost 750 rubles, and for LPR you will have to pay about 900 rubles. In each specific case, the choice depends on your personal preferences and financial capabilities.
The factory master brake cylinder is the best option for installation on classic Zhiguli cars.
The essence of pumping and what is needed for it?
The essence of pumping is to remove excess air from hoses, calipers and tanks during operation. This should be done so that the car’s brakes work flawlessly. Moreover, if there is air in the master brake cylinder or if it has been replaced, then it will need to be pumped first. Before talking about what is needed to complete the work, it is worth noting one important point. Leveling is a very complex process that cannot be done alone. Accordingly, you need to ask one of your comrades for help in advance. Well, as for the tools, for bleeding you will need wrenches, brake fluid and a hose. Before starting work, be sure to check for damage to the hoses and tubes and, if any, replace the faulty elements.
GTZ malfunctions
The VAZ 2101 brake system has many parts that can fail due to wear, poor quality or untimely maintenance. The following characteristic symptoms of problems can be identified:
- slow stopping of the vehicle after pressing the brake pedal. One of the reasons is that the lip seals of the pistons have become unusable, which led to a loss of tightness;
- high pedal effort. This problem appears when the cuffs increase in size, for example, when installing a low-quality repair kit;
- The brake pedal has a short stroke. The working environment, i.e. the brake fluid, has nowhere to go due to the fact that the compensation hole is clogged. In addition, the canal may be blocked by swollen cuffs;
- The car only brakes when the pedal is pressed to the floor. This indicates a complete failure of the lip seals when the liquid goes into the tank and not into the system;
- Brake pads do not move away from the discs and drums, causing them to become hot while driving. The reason lies in the jamming of one of the pistons or the formation of a blockage in the bypass hole.
If the seal is lost, liquid begins to flow out of the cylinder
These symptoms may also appear in the event of problems with other parts of the braking system . For example, a pedal may fail if there is no fluid in one of the wheel cylinders or if air gets into the system. Therefore, for a final diagnosis, it is necessary to pay attention to additional features of the car’s behavior. For example, there are certain signs that clearly indicate problems with other components of the brake system, and not with the GTZ:
- pulling the car to the side when braking;
- jamming of the brake mechanisms on one of the wheels;
- the appearance of sounds uncharacteristic of normal brake operation (creaking, squeaking, grinding);
- heating of brake pads or discs on one wheel.
Checking the brake master cylinder
The most common cause of GTZ problems is wear of the seals. When replacing cuffs, you need to take into account that repairs only make sense if the piston and cylinder walls do not have wear. Otherwise, replacing the rubber seals will not bring any results and soon you will still have to install a new part. Before you start checking the main hydraulic brake drive, you should make sure that there are no problems with other elements of the system:
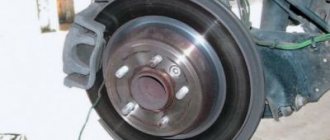
- Inspect the wheels from the inner surface to identify any leaks of brake fluid from the brake fluid brake system.
- Check the integrity of the tank and hoses connecting it to the gas turbine engine, as well as the presence of fluid and its level.
Fluid leaks on the inside of the wheel indicate a leak in the brake system.
A clear sign that there is a problem with the master cylinder is the appearance of liquid on the unit body . A working mechanism should always be dry without a hint of leakage. If the hydraulic drive has lost its seal, it must be dismantled for further disassembly and repair. You can determine that the gas turbine engine bypasses fluid, i.e., it does not enter the system, but returns to the expansion tank when you press the pedal:
- Open the tank lid.
- An assistant is seated in the driver's seat. The engine does not start.
- Your partner presses the brake pedal, and you listen to the sounds coming from the reservoir.
- If gurgling is heard from the container, and the pedal is pressed lightly, it means that the liquid is entering the tank instead of the system. The malfunction lies in the wear of the seals, which are unable to create the necessary pressure in the cylinder circuits.
Rear brake repair
With rear brakes on a penny, everything is not so simple, and the reason for this is the wear of the brake drum. This defect occurs often and it may happen that you install new pads and there are no brakes anyway, because even despite the new pads their thickness is not enough for braking. Accordingly, the handbrake does not hold either.
But the reason for the rear wheels not braking can also be the “sorcerer”, so you need to make sure that it is working.
If the brake cylinder is leaking, then it is necessary to replace the rubber seals; this is not difficult to do; it is not even necessary to remove the cylinder from the car.
Rear brake cylinder
So what should you do with worn brake drums? Another option, and I use it quite often, is to make brake pads with my own hands, namely, rivet pads from a UAZ car onto the VAZ 2101 pads; they are somewhat longer, but the bending fits, and most importantly, they are somewhat thicker than the standard Zhiguli ones.
Nuances of the 1.8-liter unit
On a 1.8-liter engine, the operation of replacing the timing belt is somewhat more complicated. Below are just some of the details of the work:
- There are no timing marks on the timing shaft pulleys. To fix the distributor. the shafts use special grooves made at the ends on the left (from the gearbox side);
- For access to the shaft grooves, there are plugs in the head. But it will not be possible to install the device yet. To do this, you will have to dismantle the intake manifold, valve cover and drive disc;
- To carry out the work, you will need a special device for fixing the distributor. shafts The fact is that if the distributor is set correctly. shafts, the grooves in their ends are located vertically and it will not be possible to fix them with a regular plate, as is done on many engines.
- Fixing the crankshaft is not provided for by the design, so you will have to come up with something for this. For example, you can make a clamp that is installed instead of the knee position sensor. shaft
And this is only part of the features of the work to replace the timing belt on a 1.8-liter X-Ray engine. In reality, everything is much more complicated, since, for example, to remove the manifold, you will have to remove a number of auxiliary devices and their mounting brackets. In general, this type of maintenance is quite labor-intensive.
Is a wheel alignment necessary?
Here, too, you can give clear answers. To your great surprise, there will be two of them - one “yes” and the second “no”. But it all depends on what type of repair you carried out. If new struts have been installed, then wheel alignment needs to be done. Moreover, there are no other options; this procedure is mandatory. But if you used a repair kit, and the position of the strut relative to the hub was planned in advance, then the wheel alignment adjustment procedure is optional.
Of course, it is worth considering that the front struts of the VAZ-2110, the price of a repair kit for which is about 2,000 rubles, can wear out faster if the wheel angles are incorrect. Therefore, do not regret 700 rubles (this is how much the setup procedure costs on average) to drive your car safely.
Analyzing everything that was stated above, we can say that replacing struts on a VAZ-2110 car is not a very difficult task; anyone can cope with it. But it is necessary to replace all the elements, simultaneously checking the balls, rod ends, and hub bearings for play and wear. If you need to replace these elements, it is better to do everything at the same time. This, of course, is an additional expense, but the car’s suspension will work in ideal mode.
VESKO-TRANS.RU
AutoNews / Reviews / Tests
- Home
- Auto garage
- Replacing Piston Rings for VAZ 2107
Replacing Piston Rings for VAZ 2107
Replacing pistons and piston rings VAZ 2107
Replacing piston rings and pistons on a VAZ 2107 is done in cases where the gap between the surface of the ring, piston and the working surface of the cylinder increases, which in turn is accompanied by an increase in oil consumption, a decrease in engine power, and also an increase in fuel consumption. Typically, wear of the pistons is accompanied by wear of the compression rings, and it may also be necessary to bore the cylinder block. Major repairs with block boring must be carried out in a special workshop, because it is unrealistic to carry out such work without special abilities and experience; the most that can be done is to remove and replace the pistons and piston rings.
To replace piston rings and pistons, you need to drive the car into a pit; you will need a standard set of tools. The order of repair work is as follows:
- Drain the engine oil from the engine crankcase by unscrewing the drain plug on the pan. Also remove the pan by unscrewing the bolts securing it with a 10mm socket wrench.
- Remove the cylinder head, having previously removed the air filter, the cylinder head cover and unscrewing the nuts securing the head, remove it from the block.
- We remove the pistons alternately, starting from the first cylinder. We unscrew the nuts securing the connecting rod caps, remove the steel-aluminum liner from the cap and push the piston assembly with the connecting rod upward.
- We remove the piston and connecting rod assembly and secure it in a vice. Using a screwdriver, we remove two compression rings and one oil scraper ring (if the pistons are removed to replace the rings, if the pistons themselves need to be replaced, then there is no need to remove the rings). Using an iron mandrel of suitable diameter, knock out the pin and remove the piston.
Replacing the piston after overheating of a VAZ (classic). Do it yourself!
The video turned out to be very long! Anyone who wants to find out a lot from what is not written in more than one book...
Part 5 Lada Overhaul of VAZ 2107 (1600) Preparation of piston rings for installation
Showed how you can remove and disassemble the engine at home from a VAZ
classic, without winch. I tried...
This completes the disassembly process. Now we need to pick up new pistons. Take the new piston and stick it into the cylinder, the regular piston should slowly lower under its own weight. If the piston fails or does not move, then it does not fit. Also, when selecting, keep in mind that the internal diameter of the cylinder will initially be somewhat smaller, so make the assessment here and there in the middle part of the cylinder.
The next step is to select the rings. Insert the ring into the cylinder and lower it slightly downward, slightly above its middle part. The gap between the ends should be less than 0.2mm or two blades wide.
Next, you need to select a pin for the new piston. Lubricate your finger with engine oil and insert it into the piston. It should be inserted with the usual pressure of a huge finger and should not fall out when positioned vertically. The finger should not fit freely into the connecting rod head; it will have to be seated on the hot side.
Once all the elements have been selected, you can begin assembly. First we assemble the piston and connecting rod with a pin. To press the pin, you will need a special mandrel and a gas burner to heat the connecting rod head. The assembly order looks like this:
- Insert the retaining ring into the piston boss on one side.
- Clamp the connecting rod in a vice, heat its head to 240V°, put on the piston and insert a pin using a mandrel, which will simply fit into the heated head. Push your finger until it rests against the locking ring. Install the second stopper.
At the final stage of assembly, install two compression rings and an oil scraper ring. Lubricate the rings, their grooves and the connecting rod with engine oil. Push the piston into the cylinder from above and secure the connecting rod to the crankshaft. At this point, the repair work on removing and replacing pistons and piston rings of the VAZ 2107 has been completed.
Instructions for replacing the wheel bearing on a VAZ-2107 with your own hands
Removal
Put the car on the handbrake.
Place a shoe under the wheel to prevent the machine from rolling away. Loosen the front wheel nuts. Raise the car and place a support under the body. Remove the wheel. Unscrew the caliper mounting bolts located on the inside and remove the caliper. To avoid damaging the brake hose, it is better to tie up the caliper.
Using a screwdriver, pry up and remove the hub cap. Unscrew the hub nut. After removing the nut and washer, pull out the outer separator. Pull the brake disc towards you and remove it together with the hub. After unscrewing the two guide pins, remove the brake disc from the hub.
Using a screwdriver, pull out the oil seal and separator, and then the spacer ring. Now you need to knock out the clips. Using a mandrel of the required diameter or a drift, knock out both clips with a hammer.
Installation
Before assembly, wash all components with any grease-cleaning liquid. Remove the races from the new bearings and, holding them in a vice, press them into place through spacers (it is best to use the old race as a mandrel).
Lubricate the inner bearing cage and install it in place. Insert the spacer ring, press the oil seal through the spacer, being careful not to damage it. We put on and secure the brake disc with studs.
We install the unit in place. Having pre-lubricated, insert the outer bearing separator into place and, having installed the washer, tighten the nut until it stops. We put on the wheel. We turn it several times to ensure complete seating. Then slowly unscrew the nut until a small amount of play appears. Lock the nut in this position.
We clean the hub cap of old grease, fill it with new one and install it in place.
Having examined how the wheel bearing is replaced on a VAZ-2107, we can conclude that this repair is not so complicated. And if desired, almost every car enthusiast can do this.
Timely maintenance and the use of high-quality spare parts will extend the life of your car
Sources
- https://mylada.net/remont/zamena-stupichnogo-podshipnika-vaz-2110.html
- https://zarulemvaz.ru/zamena-podshipnikov-v-reduktore-vaz-2101-2107/
- https://mashinapro.ru/391-vaz-2107-zamena-podshipnika-stupicy.html
Recycling program
Why did the car attract buyers, albeit few? First of all, the availability of spare parts and components, which were relatively inexpensive. In addition, the attractiveness of the VAZ-21053 for Russians was the possibility of repairing and servicing it on their own (in the garage, on the site, or simply “in the field”). This circumstance somewhat leveled out the low demand for the car, but its prestige on the world market fell hopelessly. The car was no longer equipped with even the most necessary accessories; it got to the point that at the beginning of 2009, the daily mileage counter was removed from the dashboard.
The VAZ-21053 model, just like its “sisters”, has not been modernized in any way during the entire production period. The exterior remained unchanged for years, and the driving characteristics also remained unnoticed by the AvtoVAZ engineering sector. Nobody thought about interior design improvements. The result of such inattention was a drop in demand, which resulted in discontinuation of production.
Compound
Replacing brake water on a VAZ two thousand one hundred nine happens quite quickly and simply. Before starting this business, you should carefully study its composition.
It will be perfect if it consists of:
- Motor oil
- Synthetic base
- Mineral base
Note: it is better to pour liquid into the tank without additional additives. In other words, the same as it was purchased in its original form.
Chassis
The front suspension of the VAZ-21053 is two independent units (left and right), consisting of profiled stamped arms that are attached to the transverse beam using silent blocks. The ends of the levers are connected to the steering axle by means of ball joints. Each pair of levers rests on a steel spiral spring, which, with its upper ring, fits into a special socket mounted in the sides of the engine compartment. A hydraulic shock absorber is installed in the middle of the spiral. Both lever units are connected to each other by a rod, which dampens vibrations and ensures lateral stability of the car.
The VAZ-21053 model was equipped with efficient dual-circuit hydraulics. From the central brake cylinder, pressure was supplied to the front and rear wheels according to a separate scheme. One pipeline connected the cylinder to the left front and right rear wheels, and the other connected the left rear wheel to the right front. This separation provided braking in case of failure of one of the circuits.
The rear brakes, drum type, consisted of two self-adjusting shoes, driven by a hydraulic cylinder. The pads returned to their original position under the action of a spring. The design also included a handbrake mechanism controlled from the interior. The handbrake lever was located in the cabin, between the front seats.
Since 1999, a collapse in prices began on the Russian automobile market, caused by the 1998 default. The VAZ-21053 model, whose engine left much to be desired in terms of gas distribution parameters and some other characteristics, also suffered from unstable market conditions. Stores selling cars, one after another, refused deliveries. Demand for the VAZ-21053, which had not been updated for years, was moderate from 2000 until production closed in 2009. After the Oka minicar was discontinued in November 2008, the Lada-2105 and all its modifications became the cheapest cars on the Russian market.
Checking the wear of oil pump parts
Instructions on how to correctly check and check the wear of parts:
- First, all parts must be washed with gasoline or kerosene and blown with a stream of highly compressed air.
- Inspect the body and cover for cracks and chips. This may cause oil leakage.
If large flaws are found on these parts, a complete replacement of the VAZ 2107 oil pump is necessary.
- First, the gap obtained between the driven gear and the axis on which it is located is determined. Its value should be in the range of 0.017 - 0.057 mm. but not more than 0.1 mm.
- The gap between the hole in the housing and the pump shaft should not exceed 0.1 mm. optimal 0.016 – 0.055 mm.
- Using a flat feeler gauge, the gap between the teeth of adjacent gears is measured; it should be 0.15 mm. but not exceed 0.25 mm.
- Then the size of the gap formed between the largest diameter of the gears and the pump body is measured; its nominal size is 0.15 mm, but not more than 0.25 mm.
Measuring the gap between the housing and the oil pump gear
- Next, the feeler gauge determines the gap between the end of the ruler, which lies on the plane of the oil pump connector, and the end of the gear. Its value should be 0.161 - 0.166 mm, but not more than 0.2 mm.
- Oil pump repair involves checking the pressure relief valve. Seizing can be caused by deposits and contamination on the mating surfaces of the valve and body.
Nicks and burrs can cause a decrease in pressure in the system.
Data for checking spring elasticity
Pump assembly
So:
- A drive gear with a shaft is installed in the housing.
- The driven gear is put on the axis located in the housing.
- The cover is installed.
- A pressure reducing valve is inserted with a spring.
- The intake pipe is attached to the oil pump housing.
Tip: After assembling the device, the rotation of the gear should be smooth without jamming.
This is how an oil pump is installed on a VAZ 2107. Its replacement is clearly visible in the video.
There are cases when problems in the lubrication system of a car are not eliminated, although a new oil pump is installed on the VAZ 2107. The drive shaft or gear may need replacement.
This may be caused by dents, chipping, or marks on the parts. On a car, sometimes it is enough to replace the VAZ 2107 oil pump drive.
Replacing the oil pump drive gear
Under the ignition distributor on a VAZ 2107 car or a plug, depending on the type of engine, with a carburetor or injection, respectively, there is a drive gear in the hole of the cylinder block.
Replacing the oil pump drive on a VAZ 2107 includes installing a new gear:
- The ignition distributor is removed.
- A wooden stick with a pointed end is installed tightly into the splined hole of the oil pump drive gear.
- The gear is removed from the cylinder block.
Removing the gear from the cylinder block