Before repairing the brake cylinder, it is important to understand that it is this mechanism that is faulty. The liquid brake system contains a large number of components, each of which can sooner or later become unusable. Usually these are wheel cylinders, various tubes, drums, pads, and calipers also break. How can you determine that the brake cylinder is faulty?
Finding a “weak spot” is easy - you should pay close attention to the brake pedal. Both “global” and minor changes in its behavior are possible - a clear or insignificant change in the stroke and different reaction scenarios when pressed (too light, too tight) - all this indicates the presence of a malfunction in the GTZ. The system can also be tested on the track - to do this you need to accelerate the car and then brake sharply. You should also check the drive parts for leaks. If there are problems, they must occur.
THC emergency mode is a “useful” tool that confuses beginners
The system is very reliable. If the GTZ malfunctions, the car may well brake, and properly. The mystery lies in the circuit number “2”. If there is a leak in the first number, the mechanism will stop thanks to a device such as a piston. If there is a leak in the second-order circuit, it will experience pressure until it hits the upper part of the housing. Then the pressure level will increase and braking will occur. This is called emergency mode. Of course, it is possible to get to a garage or service station, but nothing more. However, some inexperienced drivers think that if the car brakes, then everything is “okay” with the cylinder. This is a misconception that can be very dangerous if action is not taken in time.
Obvious symptoms
There are a number of specific signs that allow us to make a final conclusion that the master brake cylinder is faulty, and, therefore, begin diagnostics:
- Once the brake pedal is pressed, stopping occurs like a slow-motion movie. The reason is the loss of tightness of the piston cuffs. They can crack and “float”.
- Slowing down occurs only if you press the brakes hard. This is all due to swelling of the piston seals.
- The brake pedal has a short stroke. It is possible to block the passage between the already swollen seal. Due to the fact that the brake fluid does not find a way out, it is worth rechecking the compensation hole.
- Also, “cylinder disease” refers to situations when the brake is active at the end of the stroke. When the cuffs are completely worn out, fluid seeps behind the piston and the cylinder “re-bleeds.” The liquid goes straight into the expansion tank.
- The pads do not want to separate from the drums and brake discs, and heating is possible. A similar phenomenon occurs when the piston or bypass hole is malfunctioning. Often it's a matter of blockages.
Variety of options
But these “symptoms” are possible not only with problems with the GTZ. Let’s say that if there is a large amount of air, the pedal may “fail”. Another option is a brake fluid leak, which should never be written off. Then the car will be too smooth in its stops, you will need to press your foot in to control it. A similar phenomenon occurs if the vacuum booster breaks down - there is a lack of tightness at the joints of the hose, or the membrane is cracked.
You can suspect something is wrong by the characteristic drops on the surface of the case. If leakage occurs, the reasons can be understood through disassembly. If, due to problems with the GTZ, the pedal travel is small, you need to sit behind the wheel and press it several times, start the engine, holding the brake pedal with your foot. She may fall to the floor or not react at all. This indicates that the cylinder needs to be disassembled.
Air leaks in the system are also possible due to blockage of the ventilation hole in the tank lid. When fluid moves, a vacuum may occur in the tank, and the air that penetrates through the cuff compensates for it. As a result, the entire system suffers.
Lada 2114 No comments › Logbook › Replacing the GTZ VAZ 2114
I have one problem here. Namely. In traffic jams. especially at ambient temperatures above 20*C, the brake pedal became soft. And not all the time, but somehow spontaneously. You're stuck in a traffic jam. Once you start, you stop, everything seems ok. The car is slowing down. And during the next braking, the pedal goes almost to the floor. The first time I almost didn’t catch up with the car. The jeep was kind of expensive, but in a panic I didn’t even remember the details. It all happened on the street. Mayakovsky at the traffic light in front of Ave. Cosmonauts. Locals know that there is a slight descent towards the avenue. So here it is. I’m standing there, not touching anyone. Cork. The light turned green. I need to turn right, towards the street. Artinskaya. Let's get moving. I had almost entered the avenue, and then those driving ahead began to slow down. Me too, accordingly. And suddenly the pedal goes to the floor. Fortunately, the speed is low, and I always try to keep my distance. The handbrake saved the day. I stopped and tried to pump the pedal, to no avail. We started moving, and oh, the brakes appeared, and most importantly, there were no more failures until work. I came to work. First of all, I checked the tightness of the entire system, there were no leaks anywhere, everything was dry, like in the Sahara. In the evening, a little afraid, I got home. I read the forums. On one I found a suggestion that the reason for this behavior of the GTZ could be its bypass. Apparently, somewhere, something inside is flowing without creating the proper pressure. And somehow I calmed down and rode with such a malfunction for as much as 2 months. I confess, this is impossible, but there was no time at all. And even with a soft pedal, if you pressed it to the floor, the car still slowed down. And then the day came when I was finally going to change the GTZ. I went to the store in the morning and bought: - GTZ VAZ 21080-3505006-00 with a reservoir Price 1050 rubles - Castrol Brake Fluid DOT4 Brake fluid Price 420 rubles
Malfunctions are consequences of violation of an important operating scheme
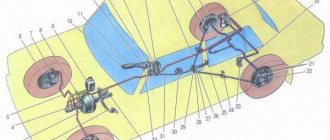
Often breakdowns occur due to the fact that the level of brake fluid undergoes changes and is distributed unevenly in the mechanism. The cylinder itself has two sections that are responsible for braking. One for the front wheel and one for the rear on the opposite side. If the car is rear-wheel drive, then the principle of operation is different - the sections are responsible for the brakes, which are located along the axes.
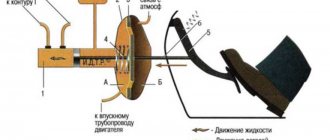
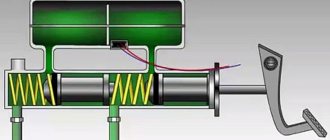
The GTZ starts working when the driver presses the brake pedal. If a vacuum booster is provided, then the system must contain so-called chambers. There are 3 of them - one converts pressing the brake pedal into pressure. Pressing places a load on the piston section, and the brake fluid presses on the caliper, which compresses the brake discs using the pads.
A systematic leak of brake fluid also indicates the need to sound the alarm. This is very easy to notice by careful inspection. The problem is solved by simple pressure, determining whether it is stuck or falling through.
Many drivers forget that the master cylinder can not only wear out, but also rust. Moreover, from the inside. This happens because the liquid itself consists of water and oxygen. If brake fluid leaks from the first section, the second will continue to work. Accordingly, the passage of the first piston through its own section will put the second piston into motion, that is, it will give it the required level of pressure.
But if there is a leak in the second section, then everything will be different. The piston in the section that is working will engage the faulty piston; it will move forward, resting against the limiter and closing the exit path. In the first section, the pressure will increase, and the wheel mechanisms will brake.
Lada 2114 2012 - self-repair
Comments 7
Participate in the discussion can only registered users.
Like brake fluid, tell me =) There is a difference between taking a cheap one and yet one that is more expensive.
This is a very abstract question. You can't feel the difference with your feet. I only took it because of the brand. And her color is not the same as everyone else's. Definitely not a fake.
This is why I asked Mish, the front brake hoses were changed and at that moment we bought the fluid from the common people (turtle-antifreeze synthesis), the fluid was replaced not so long ago, but became dark. It was bought in a hurry without any problems, the main thing is that Dot4, but The manufacturer makes no difference. Now I’m thinking of changing the hoses in a circle and filling in something more solid.
This one doesn't seem to get dark. Most likely your new one is mixed with the old one. Buy Castrol. Bleed the entire system and everything will be ok
Source
How to repair a GTZ
- It is necessary to pump out the brake fluid. It is worth having a syringe with you. When bypassing the cuffs, you need to press the pedal several times, and then suck out the remaining liquid.
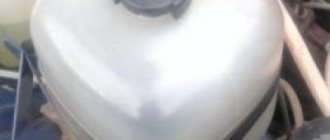
- The expansion tank is removed.
- The contours themselves do not need to be released. You can substitute some kind of container, unscrew the nut on the first tube, move it to the side, and plug it with something. An ordinary wooden stick will do.
- Do the same with the second tube.
- Unscrew the brake cylinder flank and remove it.
After these steps, everything depends on the individual characteristics of the mechanism. Some cylinders are prefabricated, so the sealing means can be replaced. If not, then you will have to tinker with the pistons assembly. Before doing this, the body must be washed and disinfected with alcohol; gasoline should not be used. You need to add liquid, get rid of excess air, and bring the entire mechanism into subsequent action.
Mechanism diagnostics
Checking the brake cylinder is quite easy; to do this, you need to hold down the brake pedal with the engine off. And then start the car without taking your foot off the pedal. If it “fails” under the influence of vacuum, then the system is in perfect order.
If not, diagnostics and restoration of the tightness of the connection of the reverse regulator, which is located on the housing of the intake manifold amplifier, is required. Today, the price of the VAZ 2114 master brake cylinder is low, from 800 rubles. Of course, you can save money and buy a repair kit by replacing the cuffs on the vacuum side of the system, or new rubber bands.
But will this be advisable? New devices will wear unevenly in relation to the old ones, which may lead to the ring breaking or other trouble. So it’s better to buy and install a new gas turbine engine, improving the functionality of the entire system.
If the functionality of the master cylinder is impaired, irregularities in engine operation, decreased dynamics when driving the car, fluid leakage, etc. may occur. Experienced drivers know that they need to clamp the vacuum hose with the engine running, and if the signs of malfunction disappear, it means that the system’s brake booster has failed.
Replacing the master brake cylinder of a VAZ 2114 includes simple manipulations that will be easy for every motorist to perform.
Examination
You should make sure that the master cylinder is the culprit for the malfunction of the brake system. This is easy to do; you don’t even have to go to a service center and spend money on it.
- Press the brake pedal with the power unit off.
- Start the engine without taking your foot off the gas pedal.
- During normal operation, the gas turbine engine fails under the influence of vacuum.
- If the pedal does not fail, you will need to conduct more thorough diagnostics and restore the device to functionality.
Most likely, you will need to restore the tightness of the return regulator connection. It is located on the intake manifold amplifier housing.
Repair kit or new GTZ?
Many car owners face a question when the brake master cylinder fails: how exactly to repair the brake master cylinder. After all, there are two main options:
- Purchase a new GTZ;
- Use repair kit.
First, let's take a look at the price tags.
New GTZ entry-level quality
New high quality GTZ
Purchasing a repair kit and using it to restore the functionality of the brake cylinder entails uneven wear of old and new elements, breakage of rings and a number of other problems. In this regard, we advise you to eliminate the breakdown by completely replacing the gas turbine engine, and not by using a repair kit.
Preparing tools for work
What do we need:
- brake fluid;
- keys “10”, “13” and “17”;
- equipment for unscrewing fittings;
- pliers;
- metal brush to remove oxidation of contacts;
- dry cloth;
- device for tensioning springs;
- new brake cylinder for VAZ 2114.
Before starting work, you need to prepare a place where you can easily lay out all the dismantled parts. Be sure to record their location in the vehicle system.
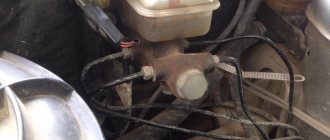
Where do we start repairing the master cylinder? We remove the negative terminal from the battery, then open the hood and remove the remaining brake fluid with a syringe. We unscrew the brake pipes with an open-end wrench (you need to be careful so as not to leak fluid onto other parts of the car).
Removing the main brake cylinder on a VAZ 2114
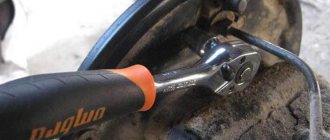
What to do when the thread is rooted and cannot be removed? Let's try to moisten the connection with brake fluid, and after a while, use a No. 10 wrench to remove the hoses. When all the steps taken do not allow you to unscrew the mechanism, you can use a special wrench with a cap slot and a clamping bolt. It should be secured to the nut, tightened with a bolt and rotate the desired part.
In order not to mix up the brake pipes during reinstallation, they must be signed with an identification corrector.
If all efforts are crowned with success, we proceed to unscrewing the master cylinder. Using a 18mm socket, remove the two main nuts of the mechanism that secure it to the amplifier.
Continuing the repair of the VAZ 2114 master brake cylinder, we install a new device with an updated fluid barrel. Next, we return all the parts back in the correct order. Do not fix the hoses too tightly, so as not to break the fastening threads. It is advisable to change the fluid in the system, because the mechanism will need to be pumped.
When installing a filled barrel, the help of another person is required, who will lightly press the brake pedal until liquid flows out of the front holes of the system. At this point, the two front tubes are installed.
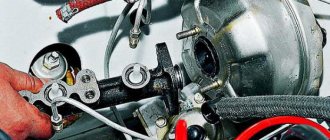
If the vacuum booster does not work correctly, the product must be replaced. To do this, you need to remove the fitting on the left side and turn the cylinder slightly to the side (if possible). Unscrew the hose from the check valve, and in the vehicle interior, remove the locking bracket of the lever pin and the pin itself.
Using wrench No. 13, unscrew the 4 nuts securing the vacuum to the car body. Now you can replace the old unit with a new one.
It is best to secure the vacuum and the brake pedal with a cracker finger, and then screw the frame to the body. It is also possible to change the vacuum hose for better functionality of the main mechanism.
Dismantling
To carry out dismantling work that entails replacing the master brake cylinder, it is necessary to prepare a certain set of tools and materials. It includes:
- Brake fluid;
- Tool for unscrewing fittings;
- Pliers;
- Dry rags;
- Metal brush for cleaning contacts;
- Key for 17, 13 and 10 millimeters;
- Spring tensioner;
- New brake cylinder.
Before starting work, prepare yourself a site where you can place all the elements to be removed. Write down or photograph, or otherwise record where this or that unit was removed from. This will greatly simplify the reassembly procedure.
After all the preparatory activities, you can start working.
- Be sure to remove the negative terminal from the battery of your VAZ 2114. Without this, almost no repair or maintenance work on the car can begin.
- Raise the hood and lock it securely.
- Use a syringe to remove any remaining brake fluid from the container.
- Unscrew the brake fluid supply pipes using an open-end wrench. Unscrew it carefully so that the brake fluid does not get on other units in the engine compartment.
- In some cases, the thread becomes stuck, making it very difficult to remove. In such a situation, we recommend treating the threads with brake fluid and letting it sit for a while. Then the hoses are removed using a 10 mm wrench.
- If these measures do not help, you will need a special wrench with a clamping bolt and a cap slot. It is attached to a nut, clamped with a bolt and rotates the part.
- After dismantling the brake fluid pipes, be sure to mark them with a marker or corrector so that you know which pipe is connected where during reassembly.
- Now you need to remove the brake master cylinder. To do this, first remove the two main nuts that hold the GTZ to the amplifier.
- That's it, the damaged element can be removed from its seat.
- Clean the installation sites so that there are no problems with the new cylinder in the very first months of operation.
- Follow the reverse assembly sequence so as not to confuse the location of certain elements.
- Do not clamp the brake fluid hoses too tightly, otherwise there is a risk of stripping the threads. Restoring connections is a hassle.
- It is recommended to replace the brake fluid used before repair, and then be sure to bleed the brakes.
- To level up, you will need help, so make an agreement with a friend in advance. One will gently press the brake from inside the car, and the other will wait for brake fluid to start coming out of the holes. At this very moment it will be necessary to return the front tubes to their places.
Advice from professionals
- Before completely assembling all the parts into one whole, it is important to treat them with isopropyl alcohol, blow them off and wipe them with a rag.
- Do not allow parts to come into contact with kerosene, gasoline or other oils, as they can damage the integrity of the seals.
- Before replacing the main brake cylinder on a VAZ 2114, it is necessary to restore the working body of the unit in proper condition, remove oxidation, plaque and other contaminants.
- It is important to monitor the sealing of the mechanism and change the O-rings in a timely manner, even if they are still in good condition.
- All units must be lubricated with brake emulsion during assembly.
- It is imperative to change the sealing gaskets that are located under the screws.
- After replacing the main brake cylinder on a VAZ 2114, it is necessary to bleed the hydraulic brake drive to remove air from the system.
- When dismantling blocks with wires, it is necessary to close all openings in the main mechanism and pipeline to prevent dirt and dust from getting inside, or to protect yourself from liquid leakage.
- When disassembling the unit, it is first better to remove the barrel of the master cylinder, and then unscrew the locking screws, which will allow you to effectively and easily access all other components of the system.
- The most common cause of master cylinder failure is leakage of brake fluid, which indicates a faulty cuff of the unit. To see oil stains, you need to open the hood and look at the joint of the unit.
Which brake cylinder should I choose?
Before starting work to replace a worn part, you should decide on the choice of replacement. In addition to the original GTZ, there are other analogue parts.
Most often, 2114 owners prefer to buy factory spare parts, so first let’s look at the advantages of parts from LADA:
- Reasonable price – about 1700 rubles;
- Good quality. The factory version of the GTZ runs for 70-100 thousand kilometers.
The disadvantage is the large number of fakes. We recommend purchasing parts in packaging.
When choosing which brake cylinder to choose for the VAZ 2114, you should consider the option from HOFER. The German analogue differs from the factory version in the quality of the material and lower price. The part number is HF 244102. The price of the spare part is about 1200-1400 rubles. Reviews from owners of cars with an installed HOFER GTZ do not highlight the disadvantages of the spare part, so the option can be safely considered for purchase. Replacing a part is easy, so any of the GTZ options can always be replaced with a factory one. The abundance of analogue spare parts for VAZ allows you to choose parts in different price segments. For stock fans, we recommend taking the factory version from LADA.