Replacing the master brake cylinder
On Lada Priora cars, master brake cylinders manufactured by MANDO - Korea were most often installed from the factory.
It is worth noting that the parts from this manufacturer are of quite high quality and rarely fail, but if such a problem occurs, it is necessary to replace this part with a new one. So, in order to replace the master brake cylinder on a Priora with your own hands, you will need the following tool:
- 13mm split wrench
- 10 mm head
- Ratchet or crank
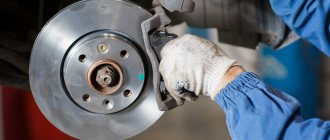
Main signs of GTZ breakdowns
Lada The main task of this unit is to uniformly distribute the working fluid of the hydraulic system along the contours. Therefore, the slightest imbalance leads to a decrease in braking efficiency. To determine the condition of the master cylinder or the need to replace it, experts advise paying attention to factors such as:
- readings of the warning lamp on the dashboard;
- brake oil leaks;
- cracks on the body
If at least one of these signs is detected, repairs should be started immediately. It is possible, of course, to partially restore defective parts, but practice shows that it would be more rational to install a new assembly.
Removal and installation of GTZ on Priora
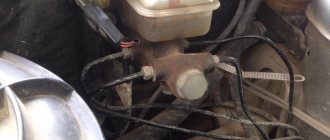
The first step is to pump out the brake fluid from the reservoir using a syringe and flexible tube. Then we disconnect the power connector chip from the tank cap, or unscrew it entirely.
After this, unscrew the two brake pipes on the right side of the GTZ, as shown in the photo below.
The best option is to use a special split wrench designed for unscrewing brake pipes and hoses. The result of the work done is presented below.
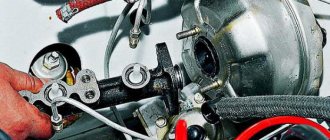
If there is liquid left in the tank, you need to place a container or a dry cloth to drain the remaining liquid. Then we take the head with the ratchet and unscrew the two nuts securing the master cylinder to the vacuum booster.
One is higher and the second is lower. As a result, it is possible to remove the GTZ without any problems.
If it is necessary to replace the cylinder with a new one, we buy the part and install it in the reverse order. It is worth noting that when adding brake fluid to the reservoir, air may enter the system. If this happens, it is necessary to bleed the brake system through special fittings in the cylinders.
The price of a new GTZ for Priora is from 1,500 rubles for the original. It is worth noting that you can buy a high-quality spare part from a car disassembly for half the price of a new one.
Leave a reply Cancel reply
You must be logged in to post a comment.
Source
VUT and GTZ Priora on VAZ 2110
improve the standard brakes of a VAZ 2110 in various ways, and in this photo report we will look at how to install a Vacuum Brake Booster (VUT) and a Brake Master Cylinder (MCC) from a Lada Priora or Kalina on a “top ten” with your own hands.
Required:
- VUT and GTZ Priora or Kalina
- 2 tees from classics
- 4 nuts x 8 for attaching the GTZ and pedal assembly to the VUT (the old ones are not suitable, they are larger)
- One-face brake bleeding device.
- 2 tubes from Priora with fittings 12x1 and 10x1 on the GTZ side, and 10x1.25 on the tee side.
- Brake fluid.
The photo shows:
- On the left is the Prirovskaya tube 12x1.0, and on the right is the “tens” 10x1.25
- On the left is a VAZ 2110 10x1.25, and on the right is a Prirovskaya 10x1.0
- General view of both tubes
If you want the replacement to take place with minimal alterations, then it is better to buy a VUT, GTZ and pedal assembly from a Priora .
We dismantle the frill and remove the right half of the sound insulation of the engine compartment, the left one can simply be bent. Drain the brake fluid and unscrew the brake pipes. In the cabin, remove the terminals from the brake light end switch and unscrew the 4 nuts securing the VUT to the body.
Now you can easily
remove the VUT and GTZ .
If you couldn’t buy a prefabricated kit, then you need to install the pedal from the old VUT into the new one. Next, we assemble the VUT and GTZ into one unit and see that the pedal with standard mounting holes for the VUT will be rotated 90 degrees relative to the vertical position of the brake fluid reservoir.
Removing the master cylinder
We carry out the work when replacing the main brake cylinder and to remove the vacuum brake booster. To gain access to the nuts securing the master brake cylinder to the vacuum booster, it is necessary to unscrew the self-tapping screw of the lower fastening of the bulkhead trim (see “Removing the bulkhead trim”). Having unscrewed the tank cap, remove the cap along with the liquid level sensor. (see “Checking the fluid level in the hydraulic brake reservoir”). Use a rubber bulb to remove liquid from the reservoir.
Using a special “13” wrench for brake pipes, loosen the tightening of the fittings of the two brake pipes.
Using a 13mm socket, unscrew the two nuts securing the cylinder to the vacuum brake booster. Carefully bending the brake pipes, remove the master cylinder from the vacuum booster studs.
Bleeding brakes on Lada Priora
After servicing or repairing the brake system of a Lada Priora, it is necessary to bleed the hydraulic brakes to remove excess air. I don’t think it’s worth talking about what the consequences may be if you ignore this procedure.
– when you press the pedal once – increased pedal travel, its “softness”;
– with repeated pressing of the pedal - a gradual decrease in the pedal stroke with a simultaneous increase in its “hardness”.
Before bleeding the hydraulic drive, it is necessary to identify and eliminate the cause of depressurization.
Helpful advice.
If pumping a hydraulic drive is associated with the repair of one circuit and the serviceability of another circuit is known, then pumping only the circuit being repaired is permissible.
Sequence of bleeding the brakes:
You will need:
"8" wrench, rubber hose, container for collecting brake fluid.
Self-bleeding brakes on Lada Priora
1. Check the level and, if necessary, add brake fluid to the master cylinder reservoir to the “MAX” mark.
Attention. Only add brake fluid of the same brand as that poured into the system.
Please note that on our website there is already a publication about bleeding the brake system of a VAZ 21099 with your own hands. 2
Place the vehicle on an inspection pit or lift
2. Place the vehicle on an inspection pit or lift.
3. If the rear wheels are suspended, first unlock the rear brake pressure regulator by inserting a screwdriver between the plate and the piston. Don't forget to remove it when finished.
4. Clean the air release valve on the brake mechanism from which air is supposed to be removed from dirt and dust.
5. Remove the protective cap from the air release valve.
6. Place the rubber hose over the valve head and immerse the end in a clean, transparent container partially filled with brake fluid (the end of the hose should be immersed in the fluid).
7. An assistant must sharply press the brake pedal 4–5 times (with an interval of 1–2 s between presses). After the last swing, you need to keep the pedal pressed.
8. Unscrew the air release valve 1/2 to 3/4 turn. Air bubbles will be visible in the liquid flowing from the hose. When the fluid stops flowing from the hose, close the air release valve completely, after which the assistant should release the brake pedal.
9. Repeat steps 7 and 8 until there are no air bubbles in the flowing liquid. At the same time, monitor the brake fluid level in the reservoir and, if necessary, add fluid, not allowing the level to drop below the “MIN” mark.
10. Remove the hose, wipe the air release valve fitting dry and put the protective cap on it. Bleed the brakes of the remaining wheels if necessary.
Notes.
Do not reuse brake fluid that was drained when bleeding. If the brake system hydraulic drive is not pumped thoroughly enough, then when you press the pedal at the end of its stroke, you will feel an increased “softness” of the pedal.
Recommendation.
There are two ways to bleed the hydraulic brake system without an assistant. The first is the most reliable: order a turner an aluminum or bronze cover for the main brake cylinder, screw the valve from the camera into it and connect it to the spare wheel with an additional hose; air pressure should not exceed 0.05–0.07 MPa (0.5–0.7 kgf/cm2). The second is not very reliable, but acceptable: connect the rubber bulb to the wheel cylinder fitting - the connection should be very tight. Squeeze the bulb, unscrew the fitting; When the bulb is half full, tighten the fitting. Repeat the procedure three to four times. During test braking, check the operation of the brakes.
Do-it-yourself brake bleeding on the Lada Priora has been successfully completed. Let us remember that the previous article was about replacing the wheel bearing on a Lada Priora.
https://automn.ru/vaz-2170/vaz-25515-10.m_id-1851.m_id2-1874.htmlhttps://wiki.zr.ru/%D0%A0%D0%B5%D0%BC%D0 %BE%D0%BD%D1%82_Priora_43https://vaz-russia.com/remont-vaz-2170-priora/prokachka-tormozov-na-priore.htmlhttps://womaninred.ru/shema-prokachki-tormozov-priora -bez-abs/https://vazgarage.ru/ladapriora/tormoznaya-sistemapriora/340-prokachka-tormozov-na-lada-priora.html
Description of the VAZ 2170 hydraulic brake drive system
The design of the system is based on a dual-circuit circuit with diagonal distribution. That is, one circuit combines the drive mechanisms of the right front wheel and the rear left wheel, the second - the left front and rear right wheels. If one of the circuits fails, the second will be activated, which will ensure an effective shutdown.
The brake drive circuit consists of:
- brake mechanisms;
- master brake cylinder;
- vacuum booster;
- pipelines;
- tank GTZ;
- pressure regulator;
- brake pedal.
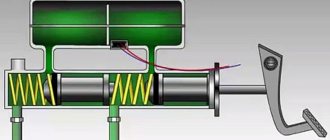
A cylinder with a two-section fluid reservoir is attached to the amplifier cover. It itself has two pistons arranged in series. During operation, the pistons wear out and cannot be repaired - only replaced.
Description of design
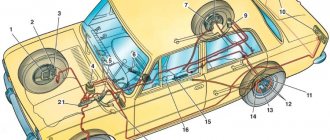
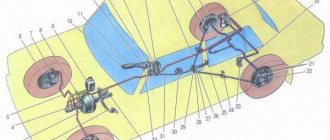
The service brake system is hydraulic, dual-circuit, with diagonally separated circuits. In normal mode, when the system is working properly, both circuits operate. If one of the circuits fails (depressurizes), the other circuit provides braking to the vehicle, although with less efficiency.
Elements of the brake system : 1 — front wheel brake disc; 2 — front wheel brake tube; 3 — front wheel brake hose; 4 — hydraulic drive reservoir; 5 — main brake cylinder; 6 — vacuum booster; 7 — brake pedal; 8 — rear wheel brake tube; 9 — pressure regulator; 10 — rear wheel brake mechanism; 11 — rear wheel brake hose; 12 - floating bracket
The service brake system includes wheel brakes, a pedal assembly, a vacuum booster, a master cylinder, a hydraulic reservoir, a pressure regulator in the rear wheel brakes, as well as connecting tubes and hoses. The brake pedal is a suspended type. A brake signal switch is installed in the pedal bracket - its contacts close when the brake pedal is pressed.
Pedal assembly with vacuum booster and main brake cylinder : 1 - brake pedal; 2 — brake pedal bracket; 3 - vacuum booster; 4 — hydraulic drive reservoir; 5 - master brake cylinder
The vacuum brake booster is located between the brake pedal and the master cylinder and is attached with two nuts to the brake pedal bracket, which in turn is attached to the body. The vacuum amplifier is non-separable; if it fails, it is replaced with a new one. The brake master cylinder is attached to the vacuum booster housing with two studs. On top of the cylinder there is a reservoir for the hydraulic drive of the brake system, which contains a supply of fluid. There are markings for the maximum and minimum liquid levels on the tank body, and a liquid level sensor is installed in the tank lid, which, when the liquid level drops below o, turns on the alarm in the instrument cluster. When you press the brake pedal, the pistons of the master cylinder move, creating pressure in the hydraulic drive, which is supplied through tubes and hoses to the working cylinders of the wheel brake mechanisms.
Technology for replacing a faulty brake master cylinder on a Lada Priora
To work you will need a set of tools:
- a set of keys;
- rubber bulb;
- screwdrivers with flat and Phillips (PH 2) tips.
To access the mount, you must first remove the decorative trims of the windshield frame and the soundproofing upholstery.
, unscrewing the screws. Now you can get started:
- Unscrew the cap of the tank and pump out the liquid from it with a rubber bulb.
- Release the tank clamps and remove it from the GTZ.
- Use a special wrench to “13” to remove the pipelines.
- Unscrew the two nuts securing the cylinder to the vacuum booster.
- Remove the cylinder
- Install the new part in reverse order.
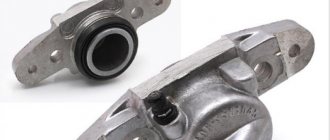
During installation, pay attention to the condition of the sealing ring and, if necessary, replace it. After the operation, be sure to bleed the hydraulic drive.
Replacing the brake master cylinder
To work, you will need a wrench for unscrewing the brake pipes, a 10, 13 wrench and screwdrivers.
We remove the sound insulation of the engine compartment and the windshield frame lining (article - Removing and installing windshield linings for Lada Priora)
Use a rubber bulb or syringe to pump out the brake fluid from the cylinder reservoir
We unscrew the two nuts using a special wrench securing the brake pipes to the brake master cylinder
Disconnect the brake pipes and move them to the side
We plug the tube holes using plugs from the bleeder cylinders
If necessary, remove the reservoir from the master cylinder
Using a 13mm wrench, unscrew the two nuts securing the cylinder to the vacuum booster housing
Install the brake master cylinder in reverse order.
Pay attention to the rubber o-ring, if it becomes unusable it needs to be replaced
Removing the master brake cylinder Lada Priora (VAZ-2170)
We carry out the work when replacing the main brake cylinder and to remove the vacuum brake booster.
To gain access to the nuts securing the master brake cylinder to the vacuum booster, it is necessary to unscrew the self-tapping screw of the lower fastening of the bulkhead trim (see “Removing the bulkhead trim”).
Having unscrewed the tank cap, remove the cap along with the liquid level sensor. (see “Checking the fluid level in the hydraulic brake reservoir”). Use a rubber bulb to remove liquid from the reservoir.
Using a special “13” wrench for brake pipes, loosen the tightening of the fittings of the two brake pipes.
Using a 13mm socket, unscrew the two nuts securing the cylinder to the vacuum brake booster. Carefully bending the brake pipes, remove the master cylinder from the vacuum booster studs.
Using a 13mm wrench, unscrew the fittings of the two brake pipes. We remove the tube tips from the holes of the master brake cylinder...
...and remove the brake master cylinder complete with the reservoir.
The connection between the master cylinder and the vacuum brake booster is sealed with a rubber ring. To remove the tank...
... we move away the two legs of the tank body and remove them from the bosses of the cylinder body. Overcoming the resistance of the rubber sealing bushings, we remove the tank fittings from the cylinder holes...
...and remove the tank. If it is necessary to replace the sealing sleeve...
...remove it from the cylinder body. We assemble the brake master cylinder with the reservoir and install it in the reverse order.
After installation, we bleed the brake system hydraulic drive.
Can DOT-3, DOT-4, DOT-5 or DOT-5.1 be mixed?
Differences between brake fluid classes:
- DOT 3 (glycol base) – for relatively low-speed vehicles with drum brakes or front disc brakes;
- DOT 4 (glycol base) – on modern high-speed cars with predominantly disc brakes on all wheels;
- DOT 5.1 (glycol base) - on road sports cars, where the thermal load on the brakes is significantly higher.
- DOT 5 (silicone) is practically not used on conventional vehicles.
Brake fluids DOT 3, 4, 5.1 (color from light yellow to light brown) are interchangeable, but mixing them is not recommended (it is better to completely replace them), the properties may deteriorate. DOT-5 (dark red) cannot be mixed, it only mixes with itself. In other words, brake fluids can only be mixed by color.
What brake fluid can you recommend? Is it worth changing the usual DOT-4 class for Lada to others, for example, DOT-5.1? Let us remind you that you can easily find any information about your car by its content (Niva, Priora, Kalina, Granta, Largus, Vesta, XRAY).
Keywords: lada xray brakes | Lada Vesta brakes | Lada Largus brakes | Lada Granta brakes | Lada Kalina brakes | Lada Priora brakes | Niva brakes | universal article
Brake fluid Rosdot-4 was developed specifically for cars with disc brakes, taking into account the recommendations of AvtoVAZ specialists. Rosdot-4 is currently one of the best in its class among world analogues. It is recommended to replace the brake fluid after 1.5-2 years. This is due to its high level of hygroscopicity. When using Rosdot-4, it is not recommended to add other brake fluid, as this will lead to a deterioration in the properties of Rosdot-4, and, as a result, a decrease in the efficiency of the braking system.
Brake fluid specifications
| Parameter | Meaning |
| GOST, TU | TU 2451-004-36732629-99 |
| Appearance | transparent homogeneous liquid from light yellow to light brown without mechanical impurities |
| Kinematic viscosity, mm²/sec, at -40°С, no more | 1450 |
| Kinematic viscosity, mm²/sec, at -50°С, not less | 5,0 |
| Kinematic viscosity, mm²/sec, at -100°С, not less | 2,0 |
| Boiling point of dry liquid, °C, not less | 260 |
| Boiling temperature of the moistened liquid, °C, not less | 165 |
| Stability at high temperatures, change in boiling point, °C, no more | 3,0 |
| Hydrogen ion activity indicators (pH), units. pH, within | 9,5-9,0 |
USEFUL TIPS In order to avoid exposing yourself in the future to unforeseen expenses for repairing the brake system, or even the entire Lada Granta car as a whole, promptly replace the brake fluid with fresh one. It is very hygroscopic and absorbs moisture from the air, which, in addition to causing corrosion of brake system parts, lowers the boiling point of the fluid itself, and this can lead to brake failure during frequent heavy braking. Do not reuse brake fluid that has been drained from the brake system: it is contaminated, saturated with air and moisture. If brake fluid comes into contact with wires, plastic or painted body parts, it can cause damage, so always use a clean wiping cloth when pouring. If liquid gets on these parts, wipe them immediately with a clean cloth.
1. Check the brake fluid level in the master cylinder reservoir. When the plug is removed, it should be located between the “MIN” and “MAX” marks marked on the tank body. With the plug installed, the brake fluid level should be at the lower edge of the filler neck, since the brake fluid is displaced by the level sensor float. WARNING A gradual decrease in the brake fluid level in the absence of leaks most likely indicates the need to replace the brake pads. Check the condition of the brake pads on your Lada Granta car (see “Checking the degree of wear of brake pads, brake discs and brake drums”). Untimely replacement of brake pads leads to expensive repairs (replacement of brake pads, brake discs and brake drums)!
Brake fluid is used not only to organize the operation of the braking system, but also to ensure uninterrupted movement of the clutch mechanisms, as is the case with the Lada Kalina car.
This is explained by the fact that in this model the clutch and brake mechanisms have the same operating principle. By pressing the pedal, brake fluid is injected into the brakes, as well as into the clutch mechanism, which ensures braking of the entire vehicle.