Which master brake cylinder is better for the VAZ-2110
The main brake cylinder of the VAZ-2110 can be repaired, but not always.
Currently, many companies produce analogues of the VAZ-2110 GTZ. Most of them are a higher quality product than recommended by the manufacturer.
Products from Fenox or Kraft are in great demand.
For aesthetes, we can recommend a product from Bosch, which costs three times more. In addition, many manufacturers produce parts with or without a tank.
Fenox
Brake cylinder FENOX T2043C3
For example, the company Fenox GTZ has the following article numbers:
- FENOX T2043C3 – this part is without a tank;
- FENOX T2043.5C3 – with tank.
Since the difference between these modifications is small, it is better to purchase a GTZ with a tank, especially if the old one contains dirt that is very difficult to remove.
Symptoms of problems
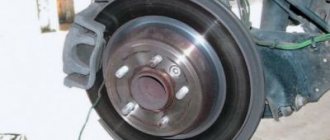
The fluid brake system consists of many parts that can become unusable: pipes, wheel cylinders, calipers, drums and pads. Typical signs of a faulty master cylinder:
- After pressing the pedal, the car stops slowly. The reason is that the cuffs of one or two pistons have lost their tightness - they have cracked or “floated”.
- To slow down, you need to press the brake pedal hard. The phenomenon occurs due to swelling of the rubber of the piston seals.
- The brake pedal travel is too short. The fluid inside the cylinder has nowhere to go because the compensation hole is clogged. Another option is that the passage is blocked by a swollen rubber seal.
- A common symptom is pedal failure, the brakes coming on at the end of the stroke. This indicates complete wear of the cuffs; as a result, liquid penetrates behind the piston and rushes into the expansion tank - the cylinder “bypasses.”
- The pads do not release the brake discs and drums and get very hot when driving. Options: one of the pistons is jammed or the bypass hole is clogged.
The listed symptoms of a GTZ malfunction are similar to malfunctions of other elements. Pedal failure also occurs when a large amount of air enters the tubes or loss of fluid in one of the working cylinders. Sluggish deceleration and increased force on the pedal are often caused by a breakdown of the vacuum booster - a cracked membrane or a lack of tightness at the joints of the hose that takes off engine vacuum.
There are signs that clearly indicate the performance of the main hydraulic cylinder and the malfunction of other elements:
- during braking, the car pulls to the side - the problem lies in a certain circuit or wheel;
- jamming of the brake mechanisms of one wheel;
- creaking and squeaking when braking;
- heating the discs and pads on one wheel.
This is interesting: Replacing the Chevrolet Aveo cabin filter: where is it located, step-by-step instructions
If you filter out the indicated symptoms, it will become easier to check the brake master cylinder in a garage. This also includes obvious brake fluid leaks and the knocking sound of worn calipers.
Common brake master cylinder malfunctions
In order to timely identify faults in the gas turbine engine and eliminate it, you need to know their main symptoms, which include:
- Increased brake pad wear or brake fluid leakage, reducing its level. If a leak is detected, it is necessary to replace the faulty part.
- Reduced braking efficiency (brake softness). This is due to a drop in brake fluid level or mixing with air. If the braking, on the contrary, has become harsher, the brake booster or the valve that regulates the vacuum booster may break.
- Increasing the brake pedal travel. This usually happens if the brakes have been incorrectly adjusted, there is air in the system, or the turbocharger is faulty.
- Uneven braking or a strong drop in the effectiveness of the braking system. The first reason is associated with fluid getting on the brake pads, the other reason is usually associated with wear of the brake discs.
Consequences of brake fluid leakage from the GTZ
When brake fluid leaks from the master cylinder, brake fluid can get onto various parts of the car. As you know, TZ is quite chemically active and often damages other parts of the car.
For example, when liquid leaks, it can fall on the vacuum booster membrane, which will soon lead to its rupture and, as a result, air leakage from the receiver, and of course, replacement of the vacuum booster itself.
VUT membrane rupture
Also, when brake fluid leaks, it gets into part of the engine compartment, behind the steering rack, and causes great damage to the paintwork.
Determination of breakdowns of the GTZ VAZ-2110
You can determine the faulty part yourself; to do this, you just need to know what to look for:
- Brake fluid leaks on the vacuum booster at the junction with the master brake cylinder indicates that the cuff in the cylinder is worn out.
Leaks on the vacuum booster indicate wear on the seal in the cylinder.
- If the brake pedal has become too soft , this may also indirectly indicate wear on the turbocharger. In this case, both the cylinder bore and the piston cuffs may be worn out. Although often a soft brake pedal indicates that the brake system is not pumped.
- The brake pedal may stick , which indicates a blockage in the brake cylinder body.
- If the return springs are broken , the brake pedal will not return to its original position.
In any case, you need to determine for yourself whether it’s worth bothering with disassembling the GTZ and repairing it or immediately installing a new part.
Is it worth buying a repair kit and is it profitable?
Buying a repair kit can save the money spent several times, but it will increase the time costs.
Based on the cost of the GTZ at 1,000 rubles, you need to think carefully about whether it is worth disassembling the brake cylinder for such a sum. Repair kits can be incomplete or complete . In any case, you need to purchase a complete one, since no one will measure the forces on the return springs.
You can also repair the brake master cylinder yourself.
An attempt to save money will result in a long procedure of disassembling, washing and drying all parts. When washing, you need to make sure that no gasoline or oil gets on the rubber parts, as this can damage them.
Therefore, the use of a repair kit can only be justified in the following cases:
- The assembled part is not available for sale.
- Inability to allocate 1,000 rubles for a purchase.
- The desire to understand the brake system with your own hands from beginning to end.
In other cases, it is better to immediately install the assembled part.
Reasons why the brakes might fail
Any problems during the braking process reduce its effectiveness, which can lead to dire consequences for everyone - the driver, passengers, and other road users.
Very often, problems arise simply because the driver uses low-quality brake fluid. If your car suddenly loses brakes, this may be due to several reasons, the main thing is not to blame the master cylinder for all the problems.
Below are the reasons why the brakes on a car fail:
- One of the main causes is usually a leaking slave cylinder. Gradually, slowly or quickly, all the contained liquid flows out of it.
- You should also check the level of brake fluid in the reservoir and the condition of the main brake.
- If traces of smudges are noticeable on the main brake, then this is the reason.
- Another possible cause of brake failure could be that the brake line is torn. For example, rubber brake hoses could fray, partially rot in some places, or get punctures.
- The working cylinders may have jammed;
If it is nevertheless noticed that the main brake cylinder is not working:
- it will show where traces of brake fluid leaks appeared;
- it will be impossible to press the brake pedal;
- on the contrary, the brake pedal can move on its own without the driver making any effort to do so.
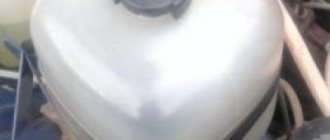
Master brake cylinder with reservoir: 1 — master cylinder body; 2
low pressure o-ring; 3 — drive piston of the “left front-right rear brake” circuit; 4 - spacer ring; 5 - high pressure sealing ring; 6 — pressure spring of the sealing ring; 7 — spring plate; 8 — piston return spring; 9 — washer; 10 — locking screw; 11 — drive piston of the “right front-left rear brake” circuit; 12 — connecting sleeve; 13 - tank; 14 - emergency brake fluid level sensor; A - gap.
Therefore, it is possible to repair the VAZ 2110 brake cylinder, but not always. Most often, if it leaks, a repair kit will help fix the problem and restore the cylinder’s functionality. If the internal mirror in the cylinder is damaged, then, unfortunately, nothing can be corrected, since grinding is prohibited. If everything is not so scary and repairs are possible, you can do it yourself, because the price of the repair kit is quite reasonable, and almost every motorist can afford it.
What tools are required to replace a brake master cylinder?
- key to 17;
- key to 10;
- half-liter bottle of brake fluid;
- syringe;
- brake fluid.
Bleeding the brakes after replacement, should I do it or not?
After the procedure for replacing the brake master cylinder, some inexperienced car owners do not consider it necessary to pump the brakes. If you neglect this procedure, the brakes may fail at the most crucial moment.
It is necessary to bleed the brake system . This procedure is simple, although two people must be involved. The pumping procedure is as follows:
- We need to pump up the brakes. To do this, the pedal is pressed several times, after which it is held down.
- At this time, you need to partially unscrew the brake pipe fitting on one wheel.
- This should remove air from the system. Periodically, an assistant should pump the brakes by pressing the pedal. This procedure must be repeated until fluid sprays out of the tube when you press the brake pedal.
We pump the brakes on each wheel one by one.
- After this, the tube fitting is tightened.
This procedure is repeated on each of the four wheels of the car . Before bleeding the brakes on each wheel, you need to add brake fluid to the reservoir. Only after bleeding the brakes can you go out on the road without fear that the brakes will fail at the most inopportune moment.
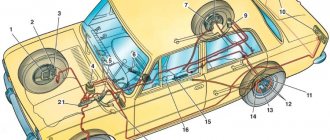
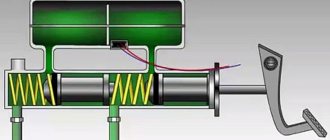
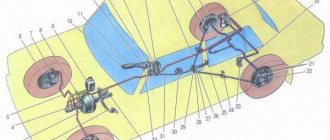
Brake system
Hydraulic brake circuit diagram
If one of the circuits of the service brake system fails, the second circuit is used to stop the vehicle with sufficient efficiency.
The hydraulic drive includes a vacuum booster 6
and a dual-circuit rear brake pressure regulator
9
.
The parking brake system is driven by the brake mechanisms of the rear wheels.
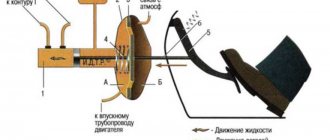
Frame 24
plastic valve.
At the exit from the lid it is sealed with a corrugated protective cover 16
.
The valve body contains the
main cylinder drive
3 23
,
valve body
15
assembly
21
pusher and valve
19
and
20 17
, pusher
18
.
When you press the pedal, the pusher moves 18
, piston
15
, and after them valve
21
until it stops against the seat of the valve body.
In this case, cameras A
and
B
are separated.
As the piston moves further, its seat moves away from the valve and through the resulting gap, chamber B
is connected to the atmosphere.
The air entering through filter 17
, the gap between the piston and the valve and channel
D
creates pressure on the diaphragm
12
.
Due to the difference in pressure in chambers A
and
B,
the valve body moves together with the rod
3
, which acts on the piston of the main cylinder.
When the pedal is released, the valve 21
moves away from the housing seat and through the resulting gap and channel
C
of chambers
A
and
B
communicate with each other.
Pressure regulator drive
Pressure regulator 1
(Figure Pressure regulator drive) is attached to bracket
9
with two bolts
2
and
16
.
In this case, the front bolt 2
simultaneously secures the fork bracket
3
of the lever
5
of the pressure regulator drive.
A two-arm lever
5
on the pin of this bracket with a pin 4 .
Its upper arm is connected to an elastic lever 10
is pivotally connected to the rear suspension arm bracket through an earring
11
bracket 3
Together with lever
5
, due to the oval holes for the fastening bolt, it can be moved relative to the pressure regulator.
This regulates the force with which lever 5
acts on the regulator piston (see here).
The regulator has four chambers: A
and
D
(Figure Pressure regulator) are connected to the main cylinder,
B
– to the left, and
C
– to the right wheel cylinders of the rear brakes.
In the initial position of the brake pedal, the piston 2
(see figure Pressure regulator) is pressed by lever
5
(see figure Pressure regulator drive) through the leaf spring
7
to the pusher
20
(see figure Pressure regulator), which under this force is pressed against the seat
14
of the valve
18
.
In this case, valve 18
is pressed away from the seat and a gap
H
, as well as a gap
K
between the piston head and seal
21
.
Through these gaps, chambers
A and
D
communicate
with chambers
B
and
C.
When you press the brake pedal, fluid flows through the gaps K
and
H
and chambers
B
and
C
enter the wheel cylinders of the brake mechanisms.
As the fluid pressure increases, the force on the piston increases, tending to push it out of the housing. When the force from the liquid pressure exceeds the force from the elastic lever, the piston begins to move out of the body, and after it, the
pusher
20
12
and
17 along with the sleeve
19
and rings
10
.
In this case, the gap M
increases, and the gaps
H
and
K
decrease.
When the gap H
is completely selected and valve
18
isolates chamber
D
from chamber
C
, pusher
20
, together with the parts located on it, stops moving after the piston.
Now the pressure in chamber C
will change depending on the pressure in
chamber
B. With a further increase in the force on the brake pedal, the pressure in chambers D
,
B
and
A
increases, piston
2
continues to move out of the body, and sleeve
19
, together with o-rings
10
and plate
11
,
moves towards plug
16 under increasing pressure in chamber
B. In this case, the gap M
begins to decrease.
By reducing the volume of chamber C
, the pressure in it, and therefore in the brake drive, increases and will be practically equal to the pressure in
chamber
B. When the gap K
becomes zero, the pressure in chamber
B
, and therefore in chamber
C
will increase to a lesser extent than the pressure in chamber A due to throttling of the liquid between the piston head and seal
21
.
The relationship between the pressure in chambers B
and
A
is determined by the ratio of the difference in the areas of the head and piston rod to the area of the head.
When the vehicle load increases, the elastic lever 10
(see figure Pressure regulator drive) is loaded more and the force from lever
5
on the piston increases, that is, the moment of contact between the piston head and seal
21
(see figure Pressure regulator) is achieved at higher pressure in the main brake cylinder. Thus, the effectiveness of the rear brakes increases with increasing load.
If the brake circuit “left front - right rear brake” fails, the O-rings 10
, the sleeve
19
, under the pressure of the liquid in chamber
B
, will move towards the plug
16
until the plate
11
in the seat
14
.
The pressure in the rear brake will be regulated by a part of the regulator, which includes a piston 2
with a seal
21
and a sleeve
7
. The operation of this part of the regulator, in the event of a failure of the said circuit, is similar to operation with a working system. The nature of the change in pressure at the outlet of the regulator is the same as with a working system.
If the brake circuit "right front - left rear brake" fails, the brake fluid pressure pusher 20
with sleeve
19
, sealing rings
10
moves towards the piston, pushing it out of the body.
M
gap increases and the
H
decreases.
When valve 18
touches seat
14
, the increase in pressure in chamber
C
stops, that is, the regulator in this case works as a pressure limiter. However, the achieved pressure is sufficient for reliable operation of the rear brake.
In the building 1
a hole is made, closed with a plug
24
.
Liquid leakage from under the plug when it is squeezed out indicates leakage of the rings 10
.
Master brake cylinder with reservoir
conclusions
Replacing the master brake cylinder on a VAZ-2110 is not difficult. The main thing during this work is attentiveness, because the safety of the driver and passengers depends on the braking system.
Correct replacement of the master brake cylinder of a VAZ 2110 with your own hands
The domestic car VAZ 2110 is equipped with a brake system with separated diagonal contours, which ensures high operational safety. The first type of circuit is aimed at operating the front right and rear left brake devices.
The second type circuit provides the operation of the front left and rear right devices. The presence of two circuits makes it possible to replace them in the event of failure of one of them.
If the system's efficiency drops sharply, this most often indicates a malfunctioning brake master cylinder. To correct the situation, you need to repair or replace a component such as the master cylinder.
Tools that will be needed during the replacement process
To replace the brake cylinder you will need a tool.
Before starting any repair work, you should prepare thoroughly. Replacing the brake master cylinder is no exception. To replace this part you will need:
- Set of keys. Having a variety of sockets and socket wrenches will be a huge advantage.
- Screwdriver Set.
- Round nose pliers will help when changing cuffs.
- Special “brake” wrench for 10.
In addition, during the replacement process, brake fluid will spill out, which is generally advisable to replace with new one. DOT-4 brake fluid is suitable for the VAZ-2110.
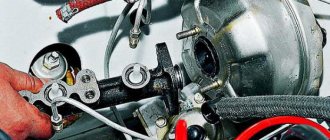
The process of removing the old part
In order to remove the brake master cylinder, you need to open the hood and do the following:
- To get to the part, you will first have to remove the sound insulation. You should not try to tear it off, as it is secured with bolts. Therefore, you should arm yourself with a screwdriver and unscrew all the fasteners. If the sound insulation is not removed after this, it means that not all fasteners have been unscrewed. If you pull the element, it can be damaged. After this, you can start replacing.
We unscrew several screws using a Phillips screwdriver to remove the sound insulation.
Disconnect the terminal with wires.
We disconnect the tubes and put rubber caps on them.
Unscrew the fastening bolts.
Remove the brake cylinder.
At this point, the dismantling process can be considered complete.
Installing a new part
Getting started with installation depends on what part you purchased. If it was assembled with the tank, then this will save the car owner from unnecessary work.
If the new gas turbine engine does not have a tank, you need to install the old tank. Before installation, it must be carefully inspected for cracks, chips and damage. If the tank is in poor condition, you will have to buy a new one. It is for this reason that it is recommended to immediately buy and assemble it.
Further work should proceed according to this algorithm:
- The new part is installed in its place under the hood of the car.
We install the new brake cylinder in its original place.
After all the air has come out, clamp the pipes.
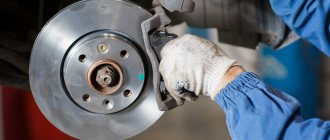
Disassembly
To replace and repair a damaged master brake cylinder
- Carefully disconnect all pipelines from a part such as the main cylinder;
- Disconnect the block equipped with wires from the emergency brake fluid indicator. They are connected by terminals;
- It is necessary to prevent fluid leakage and contamination of the mechanism; to do this, it is necessary to cover the openings of the unit and pipelines;
- Next, you need to remove it along with the tank; to do this, unscrew the fastening nuts that secure it to the vacuum type amplifier;
- After the VAZ 2110 fluid level sensor is removed, you need to drain all the brake fluid from the cylinder and basque;
Diagnostics and repair
From the signs listed above, it is easy to understand that in most cases there is only one source of problems - rubber products that have become unusable. The cuffs crack and swell, as a result they leak liquid and close the discharge holes. Hence the recommendation: all “rubber bands” of the brake system should be changed at intervals of approximately 100 thousand km, without waiting for critical wear.
Reference. Many auto mechanics express the opinion that after replacing the cuffs, the main hydraulic cylinder will not last long. The statement is true if the car owner purchased cheap, low-quality spare parts or installed new o-rings in the cylinder, where internal wear has formed in the walls.
Before checking the GTZ for operability, make sure there are no other faults:
- Inspect the wheel assemblies from the inside for leakage of brake fluid from the working cylinders.
- Check the integrity of the expansion tank and the fluid level in it.
- Start the engine and at idle speed, press the vacuum take-off pipe to the amplifier. If the engine speed has increased noticeably, there is an air leak and the master cylinder is most likely working.
A clear symptom indicating a breakdown of the main hydraulic cylinder is drops of brake fluid on the body . If you discover a leak, feel free to dismantle the unit and disassemble it to look for the cause. Another common problem - fluid flowing through the seals - is diagnosed as follows:
- Open the cover of the expansion tank and place an assistant in the driver's seat.
- Listening to sounds in the tank, give the command to an assistant to press the pedal.
- If the pedal moves easily and gurgling is heard in the reservoir, liquid is entering there. The reason is that worn cuffs are unable to create pressure in the circuits; liquid seeps through the leaks and enters the container.
Also, problems with the GTZ are indicated by jamming or too little pedal travel.
Sit behind the wheel, press it several times, and start the engine while holding the pedal with your foot. If it sinks to the floor or does not budge, disassemble the hydraulic cylinder. This is interesting: Replacing the cylinder head gasket (cylinder head) of a VAZ-2107 (injector, carburetor) with your own hands
To replace or repair the master brake cylinder, you need to remove the unit from the vehicle. Work is carried out in the following order:
- Suck out the liquid from the tank with a syringe. If the cuffs are leaking, press the pedal several times and suck out the excess fluid.
- Remove the expansion tank.
- It is not necessary to drain all brake circuits. Substituting a small container, unscrew the nut of the first tube and carefully move it to the side, plugging it with a wooden stick.
- Repeat the operation with the second tube, unscrew the fastening of the GTZ flange and remove the unit.
Further actions depend on the design of the master cylinder. If the element is completely disassembled, change the rubber seals. Otherwise, you will have to replace the pistons assemblies. Pre-wash the body and all openings with alcohol; do not use gasoline. After assembly, add fluid and bleed the brake system to remove air.