Car painting jobs require attention and knowledge. To make a car look beautiful, it is necessary not only to carefully prepare the surface of the car body, but also to choose a high-quality paint coating. Moreover, the material must be prepared correctly. To achieve a better result, a special car paint solvent is added to it.
Why thin the paint?
When the preparatory work on the body is completed, microcracks still remain on the surface, invisible to the eye. It is necessary to dilute the paint so that it can fill all cracks and microcavities. The dilution process allows you to reduce the viscosity of the composition and density. Due to dilution, the dye better adheres to the surface in a thin and uniform layer.
Also, the specifics of the work depend on the physical properties of a particular coloring composition. If a spray gun will be used as the main working tool, then the paint for painting the car must be diluted to a liquid state. This will allow the coloring material to pass through the spray nozzle better. When working with a brush, the viscosity of the paint should be lower.
Also, the composition must dry quickly so that smudges and other defects do not appear on the body. To minimize the cost of purchasing the necessary materials and at the same time not lose the quality of the painting, you need to know how to properly dilute the paint, depending on its composition.
Measuring viscosity
Any painter should be able to control such a vital indicator as viscosity. For what? So that it corresponds to the recommended value. Again, why? To evenly apply the material to the surface and obtain a coating of the required thickness with the planned properties - beautiful and durable.
“Viscosity” (from Latin viscosus - sticky, sticky) is a value characterizing the fluidity of a liquid.
For what?
For more details, use the example of filler soil. The surface that we cover with it has various kinds of micro-irregularities left after preparation (grinding marks, pores, etc.). In other words, protrusions and recesses. From the deepest to the highest point - approximately 50 microns.
So, if we apply too liquid a filler to this surface, its thin film will not be able to cover these irregularities, and even with a margin for grinding (by analogy: if you put pebbles on the bottom of a jar and pour water without covering the stones with head"). As a result, the surface will remain uneven and the material will, by and large, be wasted. You have to do extra work - reapply the filler, spending twice as much time on repairs.
Let's take the opposite situation with applying too thick filler. It would seem that there certainly shouldn’t be any problems here. No matter how it is. A filler that is too thick and non-flowing, again, will not be able to properly fill all the micro-irregularities - its penetrating ability is too low and it is simply not able to flow into these small depressions (just as a soccer ball cannot fall into a golf hole).
Composition of car paints
All automotive paints and enamels contain three basic components:
- pigment is a powder substance that gives paint the required color;
- binder base - it holds the pigment and ensures adhesion of the material to the surface;
- solvent - with its help the composition is given the necessary consistency.
Different types of dyes have different physical characteristics - elasticity, density, degree of fullness, and hardness of the layer after drying.
Filtering
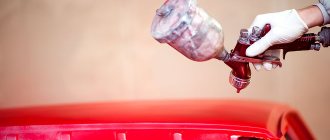
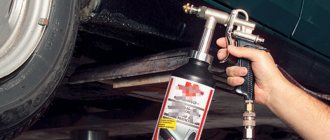
The prepared paint and varnish material must be filtered before filling into the spray gun tank, since it may contain foreign inclusions that got there during the preparation process, clots, etc. Otherwise, it is impossible to guarantee a high-quality surface, because all this debris may ultimately end up on the surface being painted.
For filtration, it is convenient to use disposable paper funnels with a nylon filter insert (mesh size, usually 190 microns). I inserted the funnel directly into the tank, strained it - ready, you can paint!
We fill the paint tank only using a filter funnel.
Types of solvents
Any automotive enamel is sold in liquid form, but this does not mean that it can be used immediately. The manufacturer has already added a solvent to the paint, but just enough so that the composition does not dry out. To obtain an even coating, the material should be diluted additionally. This coating will protect the body from damage and corrosion.
Before mixing paint with solvent, you need to remember that the manufacturer has already added a certain amount. Depending on this, coloring compositions are divided into:
- highly filled;
- medium filled;
- low-filled.
Fullness is a property that determines the volatility and viscosity of the enamel; it helps to understand how much more solvent can be added.
By evaporation rate
Solvents, just like paints, come in different forms; let’s look at their main types. Depending on the evaporation rate, the following compositions are distinguished:
- Slow - they are used for work in the summer or at high temperatures.
- Fast - the components in the composition speed up the drying process and make it possible to work with the material even in winter.
- Universal - allowed for use at average temperature conditions.
According to physical and chemical indicators
Depending on the physical and chemical characteristics, two groups of solvents are distinguished:
- Polar - alcohol, ketones, substances with hydroxyl group molecules. These materials are suitable for working with acrylic paints.
- Non-polar - white spirit, kerosene, a complex of hydrocarbon-based compounds.
In order to accurately determine how to dilute a particular paint, you should find out what solvent the manufacturer used. Match polar to polar or non-polar to non-polar.
Content
However, even if a thinner is not included, the packaging must indicate which one is suitable for this particular paint and its recommended amount. Don’t neglect these instructions: there are many manufacturers, car enamels have different compositions, and if you don’t want to ruin the body of your car or spend money on repainting it, you should read what the manufacturers wrote on the can.
How to dilute car paint and how much to pour such liquid also very much depends on the ambient temperature. So before buying a solvent, it is worth assessing all the conditions in which you are going to paint.
How to dilute paint correctly
The manufacturer indicates on the packaging how much solvent needs to be added to achieve the desired consistency. For example, in the case of using acrylic, which already contains a certain proportion of activator, solvents are added in a minimal volume - the proportion is 10-15% of the total amount of paint.
How to dilute paint if it is a two-component composition? Many people use the following proportions: for 1 liter of paint they use 0.5 liters of solvent and 150 ml of hardener. How correctly the proportion is observed, the quality of the result will be.
To ensure that the paint is prepared correctly, experts recommend using a measuring ruler or flask. This is necessary to ensure that the proportions of the coloring composition, hardener and solvent fully correspond to those recommended by the manufacturer.
You should also obtain the correct viscosity of the diluted mixture - this is determined using a viscometer. You can determine the viscosity by eye - the liquid should drip and not flow in a stream.
Viscosity also varies depending on how and with what the coloring is done. So, for spray guns with a small nozzle, it is necessary that the coloring composition be liquid, but for working with a brush or roller, you can make the dye thicker.
Experts recommend that mixing containers have a strictly cylindrical shape. This is the only way to mix all the ingredients evenly and measure the quantities correctly. The best measuring container is a plastic jar with a lid. There are markings on it that allow you to mix components in different proportions. The base is poured into the container to the required division, and then a hardener or solvent is added there. Using a measuring ruler, the components are conveniently mixed - the paint is diluted.
Often a measuring ruler is sold along with the paint, and on cans of famous brands there are always proportions according to these rulers.
In the video: how to simply dilute paint.
50% hardeners and up to 20% solvent are added to the two-component composition. The degree of dilution of the base enamel can range from 50% to 80%. It’s best to look at the instructions for exactly how to dilute the paint.
Ingredients
First of all, let’s decide on the type of our “paint cocktail”: will it be regular acrylic enamel (which is less likely), or metallic or pearlescent paint (most likely).
Regular acrylic enamel is two-component, with a hardener. The “ingredient kit” for such materials consists of three jars. For example, a liter of paint, half a liter of hardener and 100-150 ml of thinner. That is, when buying a liter of paint, you actually get about 1.6-1.7 liters of diluted paint.
This must be taken into account when selecting paint: some laboratories indicate prices for “thick” paint, and some for “thinned” paint. The difference, as you yourself understand, is huge.
In the case of “metallic”, the base paint is necessarily covered with a transparent varnish on top - without it, spectacular coatings look inconspicuous, and the weather resistance of two-layer coatings is much higher. Transparent varnish, like acrylic enamel, is two-component, with a hardener. But the “base” does not need a hardener - it is one-component.
Thus, the “set” for two-layer coatings already consists of five cans. For example, a liter of “base”, 500-700 ml of thinner for it, a liter of transparent topcoat varnish, half a liter of hardener and 100-150 ml of varnish thinner - a total of 3.3 liters! At the same time, the diluted paint itself was no longer there, the same 1.7 liters.
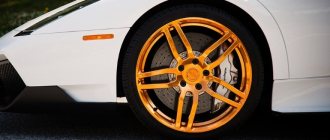
Dilution of metallic paint
Metallic paints differ from traditional ones by the presence of aluminum powder in their composition. These are auto enamels that consist of a binder, pigment, solvent, and small metal particles. The paint should be applied in a thin and even layer - for this it must be liquid. Let's see how to thin metallic paint.
The most commonly used proportion of solvents and coloring compounds is 1:1. But this depends on the method of application of the latter. First of all, the surface is painted with a dry layer - for this you should prepare 2 parts of dye and 1 part of solvent. Then a second thick layer is applied, basically in a ratio of 1 to 1. After drying, another similar layer is applied, but thinner.
To paint a car well, you need to choose the right dye and color. There are many colors to suit every taste, and we already know how to dilute them correctly. Therefore, high-quality results are guaranteed.
Additional recommendations (2 videos)
Various solvents (23 photos)
Basic mistakes
Achieving consistently high quality of work performed is possible only by following technological recommendations for the use of certain materials. There is simply no other way for those who want to repair modern cars and repair them efficiently.
Meanwhile, ignoring technological requirements remains the main (!) cause of defects and errors. As they say, “...how many times have they told the world”...
But “free morals” have always been and will be: we adjust the spray gun “by ear”, we mix the paint “by eye”, we forget about the strictly defined “lifetimes” of products prepared for use.
Diluent
To thin metallic paint, a special base thinner must be used. Universal thinner for acrylic products or different solvents will not work. The evaporation rate of the thinner must correspond to the temperature in the workshop. A fast thinner will evaporate too quickly and the metallic particles will not have time to lay down as they should, which will give a lighter shade. If the thinner is too slow, the metallic particles will sink into the paint, making the paint shade darker. In addition, too slow a thinner can cause spots and streaks to appear, since metallic particles will float in the paint for a long time and are located randomly.
p, blockquote 4,0,0,0,0 —>
p, blockquote 5,1,0,0,0 —>
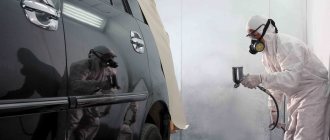
Secrets of car painting: learn from the professionals
Like any type of work, car painting has its own difficulties and nuances. In our article we will lift the veil and tell you some secrets of painting a car. First of all, let's start with how to choose the right paint. Let’s immediately say that choosing paint by computer is a self-comforting effect. The computer does not carry out spectral analysis, but, using the auto code, will produce the formula available in its memory.
It is best to contact a professional colorist who can more accurately select the required color. Please note that the colors on the car and in the bank should be compared under the light of a lamp designed for daytime and evening lighting.
Nuances in the selection of car enamels
Nuances in the selection of car enamels
Now let’s look into the secrets and nuances that the car enamels themselves have.
- Melamine alkyd auto enamel. Let's start with melamine alkyd paint, which is usually called synthetic. This paint air dries, but there are others that only need a 130 degree box. When choosing such a paint, be sure to read its drying properties to make sure that you bought what you need. In addition, this enamel requires a hardener. It is this that increases the strength of the coating and reduces drying time. This paint has the disadvantage that you cannot polish the car immediately after drying.
- Acrylic enamels. Now let's reveal the secrets of painting a car with acrylic enamels. Please note that the included hardener must be added to the last drop. To prepare the paint, you must follow the following order: first add a hardener, and only then a solvent, which regulates the working viscosity of the paint.
- Nitro enamel. As for nitro enamel, we do not recommend using it to completely cover a car, since its coating is not weather-resistant. It is good for repairing individual small parts. Now let's look at the secret of painting a car with metallic enamel. Let us immediately stipulate that this paint is absolutely not weather-resistant and requires varnishing. Paint provides only color and nothing more. We recommend using only two-layer systems, as they practically do not cause smudges.
- Metallic. And now about metallic, which shines like mother-of-pearl or gives a chameleon effect. In this case, three-layer enamel is used. If we consider the technology, then a layer is added to the two-layer system, which acts as a substrate for the main paint. Let's reveal the technology itself and the painting sequence:
- Layer number one is applied to the primer, which is called primer-tonor. Please pay attention! Do not confuse this paint with regular primer. These are completely different things. The main function is to cover the primer and give the base color, because the next two coatings have an almost transparent base.
- Paint application number two. This is usually mother of pearl. The application is done in a very thin layer, so as not to interrupt the main color, but only to give it a certain texture.
- The third layer is applied varnish, which also has a transparent base.
We especially pay attention to the fact that the overall thickness of the coating affects the color. That is why we advise you to first fill your hand until the desired color is uniform and only then start painting the entire car. This painting process is the most complex, but the result is much better than conventional coating.
Secrets to creating a paint splatter
Secrets to creating a paint splatter
Let us tell you the secret of painting a car, which lies in the correct creation of the test - spraying paint. Please note that a colorist in an auto store sprays with a gun under a pressure of 2.1 bar from a distance of 20 centimeters, and you, usually, under a pressure of 2.5 bar from a distance of 40 centimeters, and therefore the color will appear lighter. This must be taken into account.
The following car painting secrets are about using a colorless base. In terms of performance characteristics, this pigment is similar to metallic, only colorless. It is good to use if the car needs partial repairs, especially relevant for transitions. The point is that metallic contains shavings. When covering only with metallic in three layers, the chips drown in the layers of paint and the surface differs as needed, which is why a transition is necessary. If you first apply a colorless base and then dust it with a metallic paint, the chips no longer sink, but are distributed evenly and give exactly the color that was originally planned. In addition, if you need to make transitions when painting, then you will need a product called a transition solvent.
Now let’s talk about the secrets of car painting related to diluting the enamel. As a rule, any paint manufacturer also produces a solvent for it. In principle, you can use it. There are universal solvents, but they are not always good. Sometimes this can affect the quality of the paint, especially if you chose metallic. When using an unsuccessful solvent, metallic can change the trajectory of the spread, and this, of course, will affect the color. For metallic paints, it is best to use the solvent recommended for it by the manufacturer.
It is necessary to pay attention to the proportions when diluting the paint. If you want to use ready-made paint, then they are diluted within 20-60%. If the composition is selected on a computer, then the paint can be quite thick and must be diluted in a one to one ratio. Be sure to read the instructions included with the paint, this will help you correctly determine the ratio of thinner to paint.
How to select and apply car varnish?
How to select and apply car varnish?
Next, we continue the topic of the secrets of painting a car when coating it with varnish. Returning to the topic of metallic paints, since this is the most popular option for car coating, we draw attention to the fact that the choice of varnish must be given special attention and this issue must be approached with all seriousness and care. Varnish, when applied to metallic paint, plays two roles: weather resistance and shine of the entire coating of the car. Varnishes are divided into two types: HS and MS.
- The first, namely HS, refers to hard varnishes. It is applied in one and a half layers, while the first layer is applied very, very thinly, practically just dusted, and the second one can be applied, as expected, thickly. This varnish differs from the second one in that it has low fluidity and reduces the likelihood of smudges. The quality of this varnish is excellent, and the cost is not high.
- The second type of varnish is MS. Its structure is soft. It is applied in two or even three layers. It spreads beautifully, but if you go too far with the thickness of the layer, it will give a lot of smudges. When dry, the surface is easily polished. You will really like the shine that results.
However, despite the fact that varnishes dry quite quickly at room temperature, usually 20 degrees, they must be protected from dust getting on the surface. We recommend drying the varnish in a prepared, thoroughly washed garage. Only in this case, you can get shine without any dust.
So, we have revealed to you the secrets of car painting that will help you decide on the choice of enamel. But there are a few more tips, which we will discuss below. First of all, before painting, you need to remove all parts that can interfere with painting. If they are left untouched, moisture can accumulate underneath them, which will further promote corrosion.
If you need to paint not the entire car, but only part of it, then it is not necessary to cover those parts that do not need to be painted with paper. There are special protective compounds for this. We recommend trying the following product: 100 percent composition is as follows: 40 percent chalk, 10 percent water, 30 percent glycerin and 20 percent dextrin. This mixture is then easily washed off with water, but it should not get on the surface that is being painted.
Secrets of applying putty
Secrets of applying putty
It's time to reveal the secrets of car painting using putty. Please note that putty does not improve the protective properties of the coating, but can greatly worsen the mechanical characteristics. It is best to do without putty, but if this is not possible, then we advise you to adhere to the following rules when puttingty:
- Any putty should be applied only to the surface that is primed. The exception is epoxy putties based on polyesters.
- The thickness of the layer applied using putty should be minimal. This is due to the fact that cracks may appear, since the internal stress of the metal can be high.
To determine the permissible thickness of the putty layer, it is necessary to determine the value determined by the shrinkage of the material. With the exception of epoxy putties, shrinkage is small, so the permissible application layer is determined by up to 2 millimeters. Other putties have much higher shrinkage, which is why they need to be applied in several thin layers. In this case, each layer must be dried. The recommended total thickness of all layers should not be more than 0.3 millimeters.
We would like to remind you of one important fact that does not relate to the secrets of painting a car, but is a very important point in these works. This is a safety technique. Don't forget to use a respirator and rubber gloves. This is very important for your health. We hope that our advice and the secrets revealed here will help you paint your car yourself with better quality and skill.
High-quality polishing is the key to long-term body protection!
Polishing secrets from professionals
Now let's talk about some secrets of painting a car at the polishing stage. The polishing process itself includes three stages of work:
- Using sandpaper to remove excess paint;
- Restorative polishing using a special paste;
- Polished for high shine and protective properties.
Polishing can be done either by hand or using a polishing machine. In the first case, you apply the paste to a napkin and rub it in evenly, distributing it over the body. There are aerosols, their use simplifies this procedure. After the layer is applied, it is allowed to dry until traces of a white coating appear, and then wiped with a clean, dry cloth. To make the surface shine, you need to make 10-20 circular movements on one wiped area.
If you decide to use a machine, you will need special circles - attachments. One is for rough polishing, the other is for final polishing. Here are some polishing tips:
- The rotation speed of the machine when grinding should always be 1500-2000 rpm;
- You should always keep the polishing wheel parallel to the car surface being treated;
- During the first few penetrations, moderate pressure should be applied, which decreases with subsequent penetrations;
- It is necessary to clean the polishing wheel more often, using only a special cleaning tool;
- If the circles still remain, then you need to reuse the double-action machine with a foam circle on which a special composition is applied.
To get an excellent result, we recommend polishing the car’s surface not once, but twice. The first time you should polish with a medium-abrasive compound and use rough circles for this, which will help remove deep scratches. And the second time it is necessary to carry out the work with a non-abrasive composition, with which you can create a bright shine, but here it is already necessary to change the attachments to soft circles. We recommend that you wash your car thoroughly between polishing sessions.