Painting work is one of the most expensive pleasures for a car owner, so it is very important to protect the new coating as much as possible from various damages, so that you don’t have to repeat the procedure again soon. To do this, you need to understand the questions of whether it is possible to wash the car immediately after painting, how to operate it, and after what time it is allowed to polish the fresh paintwork.
How to repaint car rims yourself, painting rims from a spray can
How to paint wheels with a spray can? It’s quite simple if you use car paints in an aerosol, following a simple technology.
If you decide to repaint your car's rims yourself, then first you need to decide how many cans of paint for the rims you need to buy, what auxiliary materials you may need and how to prepare the rims for painting.
Painting car rims - materials and tools
The need to repaint your car rims may arise because the wheel parts have defects from collisions with curbs, have lost their appearance after a long period of use, or perhaps you just want to change their color.
If you need to paint rims that do not have defects or rust, then it is quite simple - clean, apply auto primer from a can, apply aerosol auto paint, or paint directly, without primer, when the rims are in good condition. Good paint in car spray cans will allow you to carry out this work quickly and efficiently.
Note! It is better to buy car paint in cans, primer and car varnish of the same brand, then there will be no problems with the compatibility of materials. https://www.youtube.com/embed/8dNki2TXg0Q
When the stamped parts of the wheel still have some defects, the following tools and materials should be prepared:
- car shampoo;
- glasses, gloves;
- tape, thick paper or film;
- sandpaper P120 and P800;
- a wire brush for a grinder or grinder, if you need to clean off rust and remove old paint;
- a small brush for cleaning dirt on folds, adhesions, and hollows;
- degreaser;
- aerosol rust converter;
- automotive putty, if you need to fill up noticeable damage;
- primer in a can;
- spray paint for rims.
Note! Cast wheels are cleaned with sandpaper, without using a brush on a drill or grinder. Cast wheels are made of a softer metal alloy than stamped ones and a brush can leave rough scratches on their surface
Painting car rims - preparatory work
The wheels need to be removed from the car. Advice about painting rims with a spray can without removing the wheel leads to the fact that when painting, the primer or car paint often leaks onto the calipers and brake discs (the consequences are easy to guess).
Wheel tires can also be removed, although this is not necessary. Painting wheel rims (both stamped and cast) is possible with the wheel assembled; you just need to carefully lay it with paper, pushing it between the rubber and the edge of the rim.
The part to be painted must be thoroughly washed and all bends of the part and hard-to-reach places, including welding joints on stamped disks, must be cleaned.
Then you need to clean the surface from corrosion and old peeling paint. Cleaning is done with sandpaper or a brush, after which the surface is cleaned and sanded with sandpaper (fine fraction).
A rust converter is applied to the cleaned part. It is convenient if it is a rust converter in an aerosol. After the converter has dried (see the instructions, the time can be up to 6-8 hours), the entire part is thoroughly degreased.
Painting car rims - primer
The primer is a binding layer between the metal and the car paint; it improves the adhesion strength of paints and varnishes.
The primer is sprayed in an aerosol can at a temperature of 20 ºС, maybe a little warmer. You should not carry out painting work in the heat, because... both primer, paint, and car varnish in an aerosol dry quickly when sprayed and can form a fine-grained matte finish rather than a smooth glossy one.
The primer in an aerosol can is sprayed from a distance of about 25 cm in light layers with drying between layers. Exact recommendations are always given by the manufacturer.
Painting car rims with spray paint
Aerosol paint for wheels is sprayed in several layers. The spray layers should be thin and lightly color the surface, gradually giving the discs a final color and finished look. If you immediately apply a thick layer of paint, streaks will appear, the paint will take a long time to dry, and will dry unevenly. Good paint in car spray cans dries quickly, drying between layers is 15-20 minutes, it is enough to apply 2-3 layers.
If desired, painted wheels can be coated with another layer of varnish, but this is not necessary; if you did not use metallic paint, it is certainly better to protect it with a layer of auto varnish.
You can buy car paint in cans of any color, including metallic paint or “flat” colors, depending on who you like. To paint 4 discs you need 2-3 spray cans. If you plan to paint in two colors, then use 2 aerosols of each color.
Return
Is it possible to paint a car in a garage?
Is it worth the risk and start painting? Considering the disadvantages of garage conditions, truly high-quality coating can only be done with good experience. Painting in a garage has many differences from carrying out the procedure in a special chamber, where all conditions are provided. Professionals do not advise beginners to take on such a complex task or to first study in detail all the features and specifics of the work.
Differences between painting in a garage and painting in a special chamber
The differences between the two types of painting are primarily in cramped conditions. In a regular garage box there is no space for conveniently laying out materials and tools. The time for preparing the room and the painting procedure itself will be longer, therefore, there is a higher risk of disrupting one of the stages. It is difficult to create a constant temperature in the garage - there is a draft from the door, the heat is distributed unevenly, so car paint dries unevenly quickly.
Another important difference: it is not possible to maintain perfect cleanliness in the garage - dirt, dust, hairs, and other particles can get on the painted parts. You will have to first remove from the room everything that could harm the paint.
It will take even longer.
The lighting problem is no less important. Garages rarely have high-quality lighting installed, so in one part the lamps shine stronger, in others there is a shadow, and visibility is worse. Making an even, high-quality coloring will not be easy. You will have to bring additional lighting sources, otherwise the quality will suffer.
The lack of an exhaust hood is no less unpleasant, since in winter a cloud of paint and varnish will irritate the respiratory tract. Microdroplets will not allow you to see well; they will settle on the surface and spoil it. The same sediment settles on the painted parts of the car; they will have to be additionally sanded. To create a high-quality coating, you need supply and exhaust ventilation in the room.
How long should paint on a car dry and when can you start washing the car?
How to polish the varnish after painting a car?
Have you thought about painting the car body or its individual parts yourself? Then you will definitely have standard questions that many car enthusiasts ask, and in this article we will try to answer them.
How long does it take to dry a car after painting?
As you yourself understand, this time interval directly depends on many factors. Firstly, this is the temperature regime, which must be maintained at +18 - +22 degrees Celsius. Secondly, it is the type of paint itself. Acrylic enamel and nitro enamel dry quickly enough, and after just a few days you can operate the car. Other types of paints and varnishes require a longer drying period. Thirdly, this is the use of additional equipment in the form of air-heated convectors or IR heaters, which can significantly speed up the paint polymerization process, and you will gain in terms of the time it takes such a coating to dry.
Let's look at the approximate time intervals that you will need to carry out the work. If you paint in a garage, the varnish and paint will set in 6–7 hours when using a spray booth or IR panels, and about 1–2 days simply by maintaining the temperature in a ventilated garage. But determining exactly how long the paint on a car dries is quite difficult even for an experienced master. Usually they choose time with a margin so that the car can sit and the paintwork gains the required level of strength, and this is a period of about a week.
https://youtube.com/watch?v=BnVTQGeOnlA
How long after painting a car can you drive?
It all depends not only on the type of material, but also on the operating conditions. If you drive carefully, without getting caught in the rain or driving into mud, then after 2–3 days you can use your car. The best option would be to let the car sit for about 14 - 20 days, but not every car enthusiast is ready to leave their vehicle for such a period of time. Such a long term is obtained due to the fact that in addition to the paint itself (base), you also cover the car body with varnish, which also takes a long time to dry. First of all, the varnish dries, and then there is a gradual crystallization and drying of the base itself.
How long after painting can you wash your car?
Experienced professionals advise not to wash your car for a month, especially avoiding high-pressure washing. This is due to the slow polymerization of the paint under the varnish, and using mechanical force can damage the coating. The minimum period of time after which you can start a car is 15 days. After this period, you can use auto chemicals.
Here are some tips for washing your car after painting.
- For the first 15 to 30 days, do not use chemicals to wash your car.
- Do not use a high pressure washer.
- It is better to wash with soft rags or washcloths, and never use hard brushes.
Of course, there are cases when car enthusiasts wash their vehicle at a car wash within a few days. But the question is, are you ready to risk your money? If not, then it's better to wait.
Is it possible to separate and leave the scene of an accident without consequences?
- as a result of an accident, damage was caused only to cars, and there are 2 of them - no more and no less,
- the circumstances of the incident do not give rise to controversy,
- both have valid MTPL policies.
In general, 2.6.1 was probably written in such a way that participants fill out a Euro protocol before driving away after an accident. However, literally this point was described only in the form of criteria for drawing up a European protocol as conditions for leaving the scene of an incident - that is, it is not necessary to fill out a notice.
If I am a victim and just don’t want to wait, is it possible to leave the accident?
Of course, it is not for nothing that one of the criteria was mentioned above - the absence of disagreements regarding the circumstances of the accident. If the second participant wants to call the police, then you should not leave either. Moreover, now you think that it was not your fault that you got into an accident. However, inspectors may decide otherwise. And then it is no longer possible to avoid deprivation of rights for a long period.
If there are victims
In all cases, if after an accident there is harm to people’s health, you should call the traffic police and follow their instructions. Clause 2.6 precisely contains the requirements in the presence of victims, and it clearly states this obligation.
It also happens that you got into an accident and decided to separate from the second participant, deciding that he was at fault, and you have no claims against him, or if he compensated you for the harm caused on the spot. But he returned to the scene and called the police. As a result, the original culprit presented the circumstances in a light favorable to himself, and... you already become the culprit. And, since you left the scene of the accident, you will face deprivation of your license. The best “cure” for such auto frame-ups is a receipt indicating all the data: the date and time of the accident, damage, the culprit, fulfillment of the conditions for drawing up a European protocol, the absence of claims from each of the parties and compensation for damage by one of the participants to the other, indicating the amount.
Drying features depending on equipment
Car rental with purchase in Moscow - goodokrent
ATTENTION! A completely simple way to reduce fuel consumption has been found! Don't believe me? An auto mechanic with 15 years of experience also didn’t believe it until he tried it. And now he saves 35,000 rubles a year on gasoline! Read more". If the enamel is dried without additional drying devices, then the drying of the main top layer lasts approximately 5-6 hours
All layers harden completely after just 24 hours. You can find out about this data by reading the instructions that come with the paint. Drying also depends on the drying method. Most often this process is carried out using special devices called “paint booths”. These car dryers directly affect the quality and speed of drying of the enamel. Almost every salon has such spray booths for painting cars. There are the following devices that act as paint booths, on which the drying time depends:
If the enamel is dried without additional drying devices, then the drying of the main top layer lasts approximately 5-6 hours. All layers harden completely after just 24 hours. You can find out about this data by reading the instructions that come with the paint. Drying also depends on the drying method. Most often this process is carried out using special devices called “paint booths”. These car dryers directly affect the quality and speed of drying of the enamel. Almost every salon has such spray booths for painting cars. There are the following devices that act as paint booths, on which the drying time depends:
- Convection chambers provide the fastest drying time. Work happens faster due to the large amount of heat that goes to the car through heated air. This process is comparable to using a conventional fireplace with a fan. The difference here is that the air masses are evenly distributed over the surface and do not pass further. Despite the fact that drying of the car body enamel after painting occurs as quickly as possible, the paint does not suffer from this and is securely fixed.
Infrared drying of a car is, of course, good, but how does paint or enamel behave and how long does it take to dry in a mixed-type chamber? Due to the rapid exchange of energy, the enamel dries 2-3 times faster than if drying took place passively (the car was parked in a ventilated area). This is a simple and safe method, but there is one important feature: you are unlikely to be able to properly dry parts that are fenced off by another plane. That is, internal parts may not dry to the desired level, so when drying such elements, infrared drying is most suitable. Thermal drying chambers would also be an excellent solution. Here, infrared drying does all the work. The air is accordingly heated by infrared radiation. Infrared drying of enamel does not require an active medium, because it is carried out by a large number of panels heated by gas, incandescent lamps and various other reflectors, which contain an infrared base. The infrared wave and its length directly depend on the temperature of the source. Probably the most effective device for this action will be a flameless gas burner equipped with ceramic nozzles. The gas-air mixture creates a reaction similar to a small explosion. In this case, the nozzle heats up to 900 degrees, and then an infrared wave with a length of 2 microns comes from it. When an infrared wave hits the enamel of a car, it causes the molecules to vibrate. In general, the metal of the body gets very hot.
Signs of engine tripping
How to determine if a cylinder has failed:
- After a cylinder failure, the power unit will shake at idle speed. Unfortunately, an inexperienced driver is unlikely to notice this immediately after a breakdown. The fact is that this symptom occurs over time. And if you notice that the engine is shaking, it means that the problems started a long time ago. And after the cylinder failed, the engine worked for a long time and became worn out.
- The spark plug became dark, smoked, and carbon deposits formed. This sign indicates that the spark plug should be replaced. But this is at best, and at worst, such a symptom means that the machine is not working properly. Even though spark plugs can be used for quite a long time, they should not be sooted. A slight change in shade is allowed.
- The exhaust system began to sound differently. This also indicates a cylinder failure.
- If the car picks up speed poorly, both at low and high speeds, then the engine is not functioning properly. The reason could be either a cylinder failure or another engine failure.
- The car began to consume more fuel. In this case, you should definitely check the operation of the engine. This symptom indicates a serious problem with the motor.
- The engine speed “floats”, you can see this by the jumping arrow on the dashboard.
- When you accelerate or drive a car, it moves jerkily.
Common questions from car owners
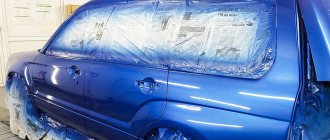
Some body parts are removed for painting
Car owners have many questions related to caring for their vehicle after painting. Let's answer the most common ones.
How long does it take for a car to dry after painting?
The time required for crystallization differs among different paints. Only acrylic paint on cars dries quickly; for other products, the drying time is 14-28 days. It takes the same amount of time as paint to dry on a machine. To find out the drying time for a specific product, check the package instructions.
When can you wash your car after painting?
The car can be washed carefully after the paint has completely dried. The time required for crystallization of each composition is indicated by the manufacturer on the packaging. The first 2-3 washes are performed in a special way.
How to properly wash a car after washing?
After painting, you need to wash the car carefully
The first car wash after painting should be gentle on the paintwork. Below are the basic rules for its implementation:
- When washing for the first time, it is better not to use detergents. If the body is very dirty, you can use special car detergents. Do not wash the car after painting with household products (washing powder, soap solution, etc.), as they react with wet paint and cause it to fade.
- For the first wash, only soft sponges can be used. Brushes, even those with soft bristles, will leave marks on the surface. Do not use sponges that were used to wash the car before painting. The dirt particles contained in their pores scratch the fresh paint.
- Do not wash the car after painting using high pressure washers. Use a hose that supplies cold or slightly warm water with low pressure. If you don't have a hose, a garden watering can can be useful, just keep in mind that it will take a lot of water to thoroughly rinse the surface.
- Do not dry the car naturally after painting it. Calcium and magnesium salts contained in tap water, when dried, form whitish spots and streaks that eat into car paint. It is better to blot (not wipe!) the body after washing with soft napkins.
How to properly wash a car after painting?
For the first time after painting, wash the car as follows. The surface of the body is moistened with water from a hose or watering can. Apply detergent to a damp sponge, gently wipe the car, and then rinse thoroughly. It is better to treat one side of the car, and after rinsing, the other. In this case, the detergent composition will not dry out and will be washed off more easily.
Do not rub the surface with force. It is better to soak dried stains, rinse with running water and only then treat with a sponge.
Where and when is the best time to wash your car?
Washing a car in an automatic car wash is faster than manually.
It is better to wash indoors or in a shaded place, adhering to the following rules:
- You cannot wash a car that has been left in direct sunlight; it is better to wait until the body has cooled down. When cold water comes into contact with a hot coating, the paint fades.
- Do not wash your car in direct sunlight. Water droplets are small lenses that refract sunlight and cause whitish spots to appear on the surface.
- You can’t wash your car in a strong wind for two reasons. The first is that the wind raises dust, which damages the new paintwork and a so-called “cobweb” appears on it. The second reason to avoid wind is that the air flow causes the cleaning solution to dry out quickly and create whitish stains that are difficult to wash off.
- The paintwork is negatively affected by low temperatures, so owners try to postpone painting until the warmer months. If painting was still necessary, refrain from washing for as long as possible.
When can you polish your car after painting?
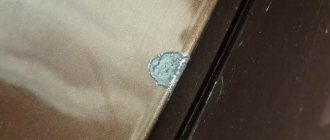
Polishing car parts eliminates paint defects and protects the new paintwork. Polishing of the machine is carried out only after the final crystallization of the varnish or paint. This is due not only to the risk of damaging fresh paint, but also to the fact that most defects appear after drying.
The first polishing after painting must be carried out especially carefully.
Car polishing can be either protective or abrasive. With the protective method, a special composition is rubbed into the surface of the body - car polish. If defects appear on the surface of the body after painting, abrasive polishing is necessary. With this method, irregularities are polished using polishing machines using abrasive pastes. After painting, polishing begins at minimum machine speed.
What not to do while washing
In order not to spoil the fresh paint layer when washing a car, you should consider what you absolutely should not do: – Under no circumstances should you wash your car immediately after a trip on a hot sunny day! The car must first cool naturally, otherwise the painted layer may become cloudy. – Do not wash your car in the sun, but only in the shade, as drops of water drying in the sun will cause the paint to fade unevenly. – You can’t wash your car in the wind. Specks of dust and debris brought by the wind and remaining on the surface of the body will become an abrasive, and this is a threat of scratches. In windy weather, a washed car will dry faster and white spots may appear on the surface from the shampoo used. They will have to be scrubbed thoroughly, and this does not help preserve the varnish layer. – Don’t even think about using a high-pressure apparatus to wash your car! Everything is done entirely by hand. How to wash a car We have already figured out how many days after painting you can finally wash your car - after 14. Now you need to figure out how to carry out this procedure so as not to harm your four-wheeled friend. At the same time, gentle washing should be done not only the first time after painting, but also 2-3 subsequent times. The ideal weather for washing is cloudy and cool. For washing, use a soft sponge and a light stream of water. Wet dirt can be removed with a soft cloth. If the dirt has already dried, first soak it well with water and then remove it.
Important! Never use a brush or rag to scrape off the dirt, otherwise you will need repainting very soon!
You should start washing your car from the roof. First, wet it with a gentle stream of water from a hose. If there is no running water, then use a garden watering can. After wetting the surface, dilute the shampoo in a partial bucket of water. Soak a sponge in this solution and wash (you can use a spray bottle if desired). Don't forget to wet the sponge in water as often as possible! After this, rinse off the detergent with a gentle stream of water from a hose fitted with a nozzle. At the very end, you should dry the body by walking over it with a soft cloth.
Please note that you should never wash your car with hard water, as it will leave white stains.
To avoid the solution of water and shampoo from drying out on the surface of the body and the appearance of white spots or streaks (they will have to be removed by rubbing these places with a damp cloth, which in our case is undesirable), you can not wet the entire car at once, but half at a time. After rinsing one part, apply shampoo to the second, and then rinse.
General rules for operating the machine after painting
Immediately after painting, you need to handle the car very carefully. If travel cannot be avoided, try not to visit places where there is a lot of dust (for example, country roads). Also, do not drive on recently repaired roads, especially in areas of “pothole repair”, where bitumen residues may be present. Protect a freshly painted car from rain, sun, snow, do not scrape off dirt from it manually, and do not allow it to be hit by pebbles or other objects.
https://youtube.com/watch?v=0e7oULFCmts
After complete crystallization of the coating, it is recommended to polish the body. They do not use abrasive polishing, but protective polishing, which will protect the layer of new paint from damage. Gently rub the polish into the surface of the body, allow the composition to dry, and then immediately put the car into operation. The above tips will significantly extend the life of the paint film. It’s worth taking care of your car so that you don’t have unnecessary problems and unnecessary expenses in the future.
Adviсe
- One way or another, skill is important when spray painting. Practice on unwanted body panels. Feel the process. Everything should happen easily.
- In some stores where paint and varnish materials are selected and sold, you can buy a can of paint with the desired color of paint.
- If the can was stored at a low temperature, then it is better to preheat it by dipping it in warm water (about 50 -60 degrees) for 1-2 minutes.
- Some cans of paint may contain components that are not compatible with the old coating of the car and it will wrinkle (see article). Check its effect on a substrate with old paintwork in a hidden place. If such a problem arises, you will first have to apply an insulating primer to the entire surface.
- When painting a large area, you need to shake the can periodically.
- When spraying for a long time, drops may collect from the nozzle, which must be wiped off in time so that they do not fall on the freshly painted panel.
- The nozzle must be kept clean. If the nozzle is clogged, place it in a container with solvent.
- Remember to wear a respirator and work in a ventilated area.
- Try not to raise dust during and after painting, as it will easily stick to the fresh coating.
- After painting, clean the nozzle by blowing it out, turning the container upside down. Plain air should come out. Next, wipe the nozzle with a cloth soaked in solvent.
Print article
Preparation
- When washing clothes, they should not contain zippers or metal components that could scratch the paint. This happens when you need to reach the far side of a large roof or hood. Remove rings, bracelets, watches. They also scratch the paintwork.
- The body should not be hot. Choose a non-hot day or park the car in the shade, under a canopy, or in a garage. It is also convenient to wash early in the morning or evening. On hot panels, soapy water will dry out before it has time to work.
- If possible, use a hose with an adjustable nozzle.
- It is important to use the right techniques to keep your paintwork in good condition. Don't use kitchen towels with unnecessary rags. This will only lead to additional scratches. Also, do not use dishwashing detergent. It is quite aggressive, it will wash away the protective composition of the paintwork and dry out the rubber seals.
- Spray cleaners are popular. They eliminate or shorten the process of scrubbing off difficult-to-remove contaminants. You just need to spray the cleaner, wait a while for it to absorb, then rinse off. The article “dry washing, how it works” describes how to wash only using a spray detergent and microfiber.
- For wheels it is better to take a separate sponge. For hard-to-reach places it is convenient to use a toothbrush.
- The shampoo acts as a lubricant, softens friction, and reduces the likelihood of scratches.
- Remove the tag from microfiber towels as it will scratch the paint.
It is recommended to perform 2-3 procedures after coloring only with water
For the first wash it is important:
- purchasing special shampoos that contain wax, or products with silicone;
- choosing a suitable place and time;
- use of special equipment.
The car must be thoroughly wetted manually with low pressure of water (medium temperature water is used for washing cars). Apply shampoo with wax, which was previously diluted in water. Wash surfaces with a soft sponge. Wash the car from top to bottom, and you also need to wash and rinse one side first, and then the other, to avoid the detergent drying out. To rinse the sponge (new!) use running water. Then the car is watered generously with clean water. The washed car is left to dry.
To prevent damage to the paintwork, you must follow these recommendations:
- Try to use only good detergents from well-known manufacturers (each surface has its own).
- Before washing, leave the car in the shade or indoors to allow it to cool, which will prevent further clouding of the varnish.
- Choose a windless location to avoid dust that will scratch the varnish. In addition, due to faster drying in the wind, whitish streaks may appear.
- Avoid exposure to directed sunlight, which can turn drops into lenses that burn through the coating. Cloudy, windless weather is ideal.
- During operation, protect the vehicle from exposure to harmful factors, primarily the external environment.
Video: how to properly wash a car
When using special shampoos, the wax included in the composition creates a film on the surface that protects the coating and also increases the interval until the next wash.
Preparing the equipment
To avoid wasting time, prepare the necessary equipment and tools in advance.
So, you may need:
1. Portable spotlight.
High-quality lighting from all sides of the car is very important. Otherwise, you may not notice the difference in shades and ruin your work.
The ideal option is to illuminate the car from all sides.
2. Vinyl drill bit.
A useful thing for removing old corrosion on a car body. With its help you can quickly remove excess paint, areas with severe rust, putty and primer.
The advantage of such nozzles is that they do not heat the surface and do not harm the metal.
3. Construction hair dryer.
A reliable assistant if you have to remove moldings from your car, various stickers or decorative components. In general, everything that is held on by glue is easier to dismantle after proper heating.
4. Orbital sander.
Very useful for preparing the body for putty and leveling the body before painting. In addition, a grinding machine will also come in handy at the final stage, when polishing.
5. Polishing machine.
Can speed up the body processing process after all work is completed
In addition, find (buy) foam pads (it is important that they have different densities) and sheepskin polishing pads
6. Painting mask.
Essential if you care about your health. Paint and varnish emit dangerous and harmful fumes that should not enter the lungs. You can buy this product or ask your friends.
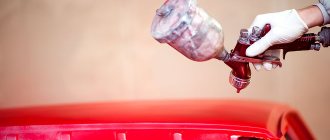
7. Painting gun.
One of the main tools for painting the body. With its help you can apply paint, varnish and even liquid primer or putty to your car.
8. Not a big paint gun.
The small size is useful for touching up small areas. The nozzle diameter is about a millimeter, so you can set up a “torch” the size of a ten-kopeck coin.
9. Compressor.
One of the most important elements. Without it, it is impossible to paint the car body efficiently and quickly. Of course, it makes no sense to buy it for a one-time job. If you wish, you can rent equipment or look for it from friends.
But that is not all.
You will need a lot of related materials:
1. Abrasives:
- sandpaper for a plane, sandpaper with different grain sizes and densities;
- grinder wheels.
2. Putty.
You will need a universal type, finishing, with fiberglass (works well with deep scratches) and nitro putty (finishing, one-component).
By the way, with the help of nitro putty it is much easier to remove small paint drips after the work is completed.
3. In addition, you will need:
- acrylic primer;
- polishing pastes (of various types);
- wet wipes (help remove grease from the surface);
- antisilicone (also used to combat fat);
- developing powder (to identify all defects);
- matting paste;
- masking tape.
Examples of acid primers
A good body coating can only be achieved if you choose high-quality products. It will be easier for beginners when choosing if they know proven brands that are in demand by professionals. For this reason, popular types will be described below.
A good body coating can only be achieved if you choose high-quality products.
Phosphating reactive primer DUR 1:1
Russian soil manufacturer. The substance is distinguished by its rapid drying, reliable adhesion to the surface, and creates a good anti-corrosion layer. The hardening process occurs due to the presence of catalysts; it is a two-component composition.
The substance is distinguished by its rapid drying, reliable adhesion to the surface, and creates a good anti-corrosion layer.
Body 960 Wash Primer
Two-component type, suitable for different types of metals. Before treating the surface, it is necessary to mix the two components that come together in the package; the layer is made no thicker than 10 microns. It dries very quickly, no preliminary sanding of the product is required; any two-component products can be applied on top, with the exception of elements containing polyester.
It dries very quickly, no preliminary sanding of the product is required.
Radex CR 1+1 with activator
An effective product that creates reliable protection against corrosion, also consists of two components, shows good adhesion to the surface and protects the metal from rust for a long time. Suitable for various metals.
An effective product that provides reliable protection against corrosion.
Reoflex Washprimer 2K 1+1
Primer is used to protect damaged paintwork from rusty formations, and, if there is no coating at all, it effectively protects the metal. It dries in 15 minutes if the room temperature is kept above +20 degrees.
Primer is used to protect damaged paintwork from rust formations.
Mobihel Primer
A one-component primer, which works well as a protector of metal surfaces from corrosion, must first be mixed with a thinner and applied by spraying. Drying at +20 degrees is 60 minutes.
A one-component primer that works well as a protector of metal surfaces from corrosion.
Acid soil is able to cover up traces of rust and create reliable protection for the metal surface for a long time from various environmental influences. The main thing is to choose proven products, then the result will be strong and durable.
Why is varnish applied to the body?
No one will simply apply varnish to a car body; this serves several purposes:
- Giving the painted surface of the car a special shine, gloss, and depth of color.
- Performs protective functions against paint damage by mechanical and chemical means.
- It is possible to repeatedly restore the paint surface by polishing or grinding.
- The service life of the coating after painting is extended.
In addition, it should be noted that varnishing a car after painting will not allow the base layer to fade under the influence of ultraviolet rays. In addition, the body is not afraid of the effects of salts used to treat the road surface.