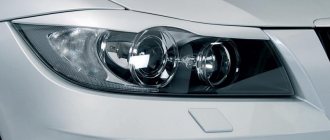
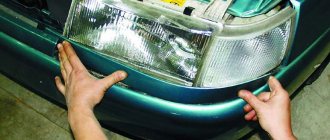
Have you decided to tune your car yourself? You can start with the simplest thing - stick eyelashes on the headlights. After applying the eyelashes, your car will have an interesting predatory squint.
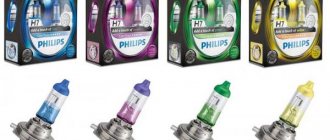
It's very easy to apply eyelashes. But it should be remembered that eyelashes are different from eyelashes. Eyelashes bought on the market from someone unknown may not stick well, because it is unknown what they are made of. It is better to buy eyelashes from trusted companies in the store. And there will be no problems with the sticker. You can, of course, save money and cut out eyelashes yourself from vinyl film, for example, but will you succeed? Will your car look cheap with homemade eyelashes? So, what to glue with?
With double-sided tape
One way is to use 3M double-sided tape (preferably red). Scotch 3M is a success in eyelash stickers, but only if it is not a fake!
You need to glue in a warm room, preferably in warm weather. Clean the surface, degrease it and it’s better to warm it up a little, you can use a hairdryer, you can put a halogen lamp nearby (on a cold surface - it won’t last long). Don’t get it wet for a couple of days (don’t wash your car) and don’t go out into the cold right away. Apply the tape to the eyelash, cut along the contour and in one (!) precise movement - towards the headlight. Ready. To calm your soul and conscience, by gluing the eyelash around the perimeter with tape, you can apply a sealant into the cavity, but this is a “forever” option and do you need it? Natural eyelashes should not cover anything... And if they lie on the elastic bands, it is better to trim the eyelashes.
For adhesive sealant
For construction silicone sealant, which is sold in any hardware store.
This is another way to stick eyelashes. It holds very tightly, but then it’s a problem to tear off the eyelash. You just need to choose a water- and heat-resistant sealant.
Transparent adhesive sealant. It is still in a tube and fresh - white. And when it completely hardens, it becomes transparent. Wash everything until perfectly clean, degrease. We take the eyelash, spread it with sealant, then take the place on the headlight where we are going to glue it. Apply the eyelash to the headlight. We remove excess sealant. Then we use masking tape to tighten it properly. The car should sit in the garage for a couple of days.
And finally, a video to help.
Eyelashes for headlights on KIA - decoration or necessary accessory
KIA cars are quite popular in Russia for many reasons. And their expressive appearance is one of the features that the owners want to improve a little. How to connect fog lights to a viburnum. For example, purchase and install
eyelashes for headlights of KIA Ceed
, Range or any other model.
Gills on the eyelashes add visibility to turn signals
And we will study why they do this and how this process occurs within the framework of this publication.
Psychology of decoration
no one will say that installing eyelashes will make the car go faster or reduce fuel consumption How to connect fog lights to a viburnum:. A short guide on how to adjust the light of a Niva car. Properly adjusted headlights on a vehicle are a prerequisite for safe operation. This desire reveals a prestigious trait, such kitsch, as if this is not plastic products or a car, but the business card of a successful person (see article - tuning the headlights on a Pajero). how to remove the headlight and replace it, how to remove the headlights, how to install a Touareg headlight. And the perception of its owner depends on how expressive it turns out to be. In this case, about a KIA car enthusiast.
Eyelashes for headlights made of epoxy resin and fiberglass
This option for making eyelashes is the most labor-intensive, but the quality of the product when used is at a very high level. At the same time, all the bends and design features are repeated down to the smallest detail. It is with the help of this method that eyelashes are obtained well for foreign-made cars, the headlights of which are heavily slicked, and their surface is curved in both planes. And covers for headlights with a corrugated surface can generally be made only in this way.
To make eyelashes, you will need the following tools and materials:
- fiberglass;
- epoxy resin, and if you don’t have it, you can use epoxy glue;
- household tape and masking tape;
- a brush with short and hard bristles;
- roller of small width;
- rubber gloves to protect the surface of the hands;
- respirator to protect the respiratory tract of a worker.
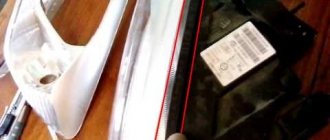
It is better to remove the headlights from the car before starting work. Firstly, it will be more convenient to work with them, and secondly, it eliminates the possibility of staining the surface of the hood or bumper with resin.
The surface of the headlight is covered with masking tape, onto the surface of which the contours of the eyelashes are applied.
The removed headlights are placed on a surface covered with oilcloth. The surface of the headlight is covered with household tape. Painting tape is glued over it. The latter should be applied in such a way that the joints of household tape are glued - this is done to eliminate the possibility of particles of epoxy resin or glue penetrating the headlight.
The contours of the eyelashes are drawn on the surface of the masking tape using a marker. This is necessary in order to determine the limit of gluing thin or thick fiberglass.
However, we must remember that thin fiberglass allows layers to be applied more accurately, especially in places where the glass is sharply curved. Making blanks using thin fiberglass will require more time.
Sequence of work:
- Fiberglass is cut into narrow strips. Their length should be slightly greater than the width of the headlight.
- Epoxy glue is diluted at the rate of 1 part hardener to 10 parts glue. Violation of the proportions can lead to the glue hardening too early or taking a very long time to harden. In this case, the strength characteristics will be violated.
- Next, put on rubber gloves and apply a thin layer of resin to the tape. In this case, the contour of the drawn overlays should overlap by approximately one centimeter.
- We lay thin fiberglass fabric on the resulting layer of resin. Its surface is rolled with a small roller until the epoxy resin shows through.
Resin and fiberglass must be applied in several layers - Another layer of epoxy glue is applied to the fiberglass with a brush, on top of which the fiberglass is again placed. In this case, the edge of the new layer should overlap the boundaries of the first by five millimeters. And again the surface must be rolled until the resin passes through the pores of the fabric. As a result of the roller treatment, all air bubbles should be completely removed from the space between the layers.
- The last layer of fiberglass is generously filled with epoxy resin. The total thickness of all layers must be at least 4 mm. The finished product is left for about a day to allow the epoxy resin to dry completely. The headlight should be positioned in such a way that the surface of future eyelashes is strictly horizontal. This will avoid smudges and unevenness.
- After the resin has completely dried, the covers are removed from the headlights. As a rule, this is not difficult to do - the surface of household tape is very slippery and masking tape comes off easily.
- Now you need to remove all the tape from the surface of the headlights and wash them with some solvent or gasoline.
- A pattern is applied to the eyelash blank with a marker, according to which it is cut using an electric jigsaw or grinder.
- The cut trims are tried on the headlights. If everything is normal, then the surface of the eyelashes is treated with sandpaper. First, rough sanding is used, and then finishing is done using fine sandpaper.
- The surface, treated to a perfectly smooth state, is primed and painted to match the color of the car body. In this case, as a rule, after applying the first layer of paint, small defects are revealed. They can be removed using finishing putty. The surface is again sanded, primed and painted. At least 3 layers of paint must be applied.
- Well-dried eyelashes are attached to the headlights using double-sided tape.
An artistic look at eyelashes for cars
If a painter looks at this action, he will definitely associate it with the finishing touch on the painting.
See:
The hands of the “owner-artist” lovingly apply the finishing touch
Moreover, since the eyelashes for KIA Sid headlights are purchased unpainted, the whole process:
recalls the process of creating an artistic canvas.
The plastic eyelashes have yet to be painted and installed
In such creativity, the car owner shows his desire to improve the appearance of his car, which is generally commendable.
What is it and why are they used?
Not everyone really knows what eyelashes are. This is an interesting and unusual element of external tuning, which is presented in the form of narrow small overlays. They are installed on the head optics. Such a small change can significantly change the external perception of the vehicle. But here the correct choice of size is of great importance. If you install eyelashes that are too large, they will disrupt the correct operation of the light, which is why the headlights will not be able to function fully. Using cilia, rectangular headlights can be made semicircular, and semicircular headlights can be turned into rectangular ones. You should not perceive eyelashes purely as a decorative element. The materials used to make the linings form an additional protective layer for the vehicle's optics. Yes, they will not protect against strong mechanical shocks, but they can easily prevent the negative impact of small gravel, stones and other debris.
Eyelashes are not large in size and are not pronounced elements. But sometimes you are surprised how strong the effect is after installing them. That's why they are widely popular among tuning fans. Moreover, even those who hold more conservative views and are afraid to make any significant changes decide to put on eyelashes. Little things like eyelashes on the head optics actually significantly affect the appearance of the vehicle. And the main advantage here is that a similar result can be achieved with minimal financial investment. But before making and installing such an external tuning element on your car, it is recommended to become better acquainted with the types of eyelashes, as well as take an objective look at their strengths and weaknesses.
Vaz how to install eyelashes on headlights and how to attach them. (stas alekseev)
EARNING ONLINE IN CASHBERY I invite you to Twitch.
New KIA concept car – designers never stop experimenting with the shape and placement of headlights
Note! KIA passenger cars were initially produced taking into account fashion trends. How to remove a headlight on a Nissan Qashqai video. Rinks 05 May 2022. Are your headlights original? My headlights have a completely different base in the low beams. From the Briza model of the 70s to ultra-modern concept cars, the shape of the optics is constantly changing.
Types of eyelashes
Automotive eyelashes come in several types, such as:
- Protective pads. They are designed to protect headlights from any mechanical damage, which sometimes does happen on the road. Such elements of the car's exterior can prevent stones from under the wheels from getting into external optical devices, preserving the appearance, technical characteristics and functionality of the latter. As a rule, protective pads are made of very durable plastic. This material is suitable for additional drawings and images to be applied to it. An alternative to protective overlays can be a transparent armored film on glass.
- Chrome eyelashes. They can highlight the exterior of the car if the design of the vehicle already contains some parts made of the same material. In this way, you can increase the harmonious design of the car, making it more expressive, attractive and interesting. Otherwise, it is inappropriate to use chrome eyelashes on headlights.
- Plastic overlays. This type of eyelashes is used most often. This is due to the fact that plastic linings are more universal and cheap. They can have a completely different appearance, completely matching the car, regardless of what make and model it is. Additionally, headlights are often tinted along with them. This allows you to emphasize the tuning carried out, making it more expressive and noticeable.
Additionally, it is worth noting that LED headlight covers have recently gained popularity. They differ primarily in the backlight function, which in turn can improve the illumination of the road surface at night.
There are several types of car eyelashes
In some cases, drivers install homemade film eyelashes on their headlights. They are one of the cheapest accessories that allow you to tune the external optical devices of a vehicle.
We install it ourselves
If you are more interested in the practical side of the issue, and are not at all concerned about the opinions of others, as well as psychology, then the following instructions will allow you to quickly and correctly install this decoration on your KIA car.
- we buy plastic blanks;
- we paint them in a color that we choose ourselves;
- arm yourself with double-sided tape;
- We use it to secure the eyelashes on the headlights.
Tip: making headlight stickers would also be a useful addition. This transparent film, when hit by a stone, will distribute the kinetic energy over a larger area, thereby protecting the headlight from damage (see article - KIA headlight repair). Video: how to adjust headlight of astra headlight do-it-yourself car repair, how to adjust headlights on an Opel Astra g, how to adjust headlights on an Opel Astra g. How to remove a headlight on a Tuareg The Volkswagen Touareg has bi-xenon headlights with gas-discharge lamps. Its price is significantly lower than the cost of a headlight unit from a car dealer.
And now about the same thing, but in more detail:
- degrease the surface
of the plastic eyelash. To do this, we will use antisilicone - a special degreaser for sealant. You should not use alcohol-containing solvents; they may prevent the paint from drying properly; - Using a can of paint, paint it and leave it to dry. Quick-drying automotive paints allow parts to be used in literally 30-40 minutes;
- degrease the surface
of the headlight; - We mount a strip of tape on the back of the eyelash and tear off the protective paper layer;
- Apply it to the surface of the headlight and press it.
That's it, the work is finished and you can operate your car.
KAMA EURO-532 205 60 r16 tires will be a good addition to your car - elegant and reliable.
Making your own eyelashes
There is a category of motorists who prefer to do many things themselves. For them, there is no problem in making eyelashes for headlights with their own hands. The procedure is not the most complicated, but it requires attention, accuracy and consistency in the actions performed. If you are also interested in how you can make eyelashes on the headlights of your vehicle, listen to a few recommendations and follow step by step.
- First you need to determine what shapes and contours the tuning element will have. To do this, you can take a regular marker and draw the expected eyelash on the body. If you are not satisfied with something, you can erase and reapply the lines. It is extremely important that the result satisfies the car enthusiast.
- To transfer the line you like to the second headlight to get identical lines, you can use a template pattern. Simply take masking tape, stick it along the contour of the drawn lines, and then transfer it to the second block. Try to match the template as accurately as possible with the contours of the wings and radiator grille. Now draw a line again on the second headlight.
- There is no need to dismantle the optics. You can install the eyelashes directly on the headlight assembly. But first it is recommended to cover all areas of the body around with protective material. This can be polyethylene or the same masking tape.
- Based on the template, you should make markings on the fiberglass from which the eyelash itself will be made. It is important to draw straight lines and make a cut along them. Fiberglass is not difficult to process, so you can easily handle this material with your own hands. The work uses polyester resin.
- The adhesive tape applied to the headlight is treated with resin, then glass mat 300 is applied. It should also be impregnated with resin.
- While the resin has not hardened, apply another mat of the same type and go over the resin again. The last layer is applied to the previous ones. Try to collect all excess polyester resin. To do this, use a brush or other convenient tool.
- Once the fiberglass has hardened, it will be easy to remove from the tape. All that remains is to saw off the material along the line that you applied as a marking.
- Next comes the decorative stage. It is necessary to process the resulting overlays with fine-grained sandpaper, achieve perfectly smooth edges, and also apply a layer of paint and varnish. The driver chooses the decor option himself. You can apply it yourself, or entrust the work to a professional painter.
- If you decide to paint it yourself, first apply universal putty to the workpiece, sand it and lubricate it with putty. The treated surface should be perfectly flat and smooth. Therefore, always keep sandpaper at hand. And use only sanding blocks. If you work with your fingers, you are more likely to wear off the leather than be able to work the fiberglass properly.
- When the putty has dried, a layer of primer is applied on top. This will allow you to further use layers of the selected paint material, or apply some patterns.
- Having made the eyelashes, they should be installed on the head optics of your vehicle. You will need fairly thin, but definitely double-sided tape. It is applied along the entire length of the headlight. Next, remove the second protective layer and carefully place the eyelash on top. Press firmly and hold for 15-20 seconds. Once the glue sets, the tape will not let go of the overlay just like that.
General information about eyelashes
Eyelashes are small pads that fit tightly to the headlight and cover its part (usually the top) . The main function is decorative: such elements are used to visually change the shape of the optics, but they also serve as protection against mechanical damage and environmental influences if you are not driving very carefully.
Photo gallery: images of eyelashes on headlights
In addition to the variety of shapes and colors, the main parameter for classifying eyelashes is the material of manufacture. The most popular eyelashes are made from self-adhesive film, PVC and fiberglass. To understand which material is better to choose, we will consider the pros, cons and difficulties of working with each of them.
Varieties
Having decided to do a little tuning for your car, you should start by choosing the material itself. There are several types of products on the market. At the same time, the eyelashes for car headlights differ in the material of manufacture and functional purpose, but all of them can be easily installed with your own hands. When choosing eyelashes from film or plastic, you should determine in advance what effect you want to get and what you are striving for when doing such tuning yourself. Some eyelashes for headlights can serve a purely protective role, others a decorative one. As a result, all products are divided into 3 categories.
- Protective eyelashes. These products serve a more practical than decorative role. Their main task is to provide additional protection for body elements and the headlights themselves. They take on mechanical loads, impacts from various small stones and debris flying from the road and from cars in front. This is a great way to extend the life of head optics and prevent damage to the housing. Eyelashes should not be seen as a panacea for all attacks, but they can make their contribution to protection. For the manufacture of such elements, transparent thermoplastic is used. It is easy to apply different patterns and designs to the material, which will add decorative properties to the eyelashes.
- Chrome plated. Their main function is to give the car an exclusive and unusual appearance. Chrome parts always look good inside and outside the car. If the car itself already has some chrome-plated parts, the eyelashes will harmonize perfectly with them. For the linings, a different base is used, which is coated with chrome. And here it is extremely important that the coating is done with high quality and using good materials. Otherwise, the chrome layer will quickly wear out and lose its original appearance.
- Plastic elements. The most common eyelashes are in the form of dense extensions or thinner films. Plastic is very affordable, versatile, and varied in appearance. This reveals the main advantages of plastic or polymer eyelashes. For novice tuning fans, these elements will be the optimal choice. They can be easily selected for different cars to achieve the desired result. Already painted eyelashes are available for sale, as well as unpainted structures, which the car owner can decorate at his own discretion.
Each motorist will decide which eyelashes to choose individually. Plastic products are rightly considered the most universal. Their huge range and low price explain their high popularity. Chrome eyelashes are not suitable for everyone and not in all situations, so chrome should be used with extreme caution. As for protective eyelashes, even plastic products also provide good protection from mechanical damage. But they are superior to them in the decorative component. And since we are talking about tuning elements, the issue of appearance comes first.
Adhesive tape
Today you can find any colors and textures of self-adhesive film to make eyelashes for headlights from it.
The easiest way to make eyelashes is to use “self-adhesive”. To work with the film, no special skills or tools are required, it is cheap, you don’t have to paint it, you can choose any color, you don’t need to remove the headlights, and the entire process of making eyelashes will take you no more than 40 minutes.
It would seem that these are continuous advantages, but they are also disadvantages at the same time. The film is inexpensive, but it looks cheap on the car, does not require painting - and does not exactly match the body color, it is easy to use - and therefore anyone can do the same.
In addition, the service life of the film on the headlights is limited: the edges of the “self-adhesive” after washing lift up and tear, dirt gets clogged into scratches from stones, and after only 3 months of driving on Russian roads, such tuning will not improve, but will spoil the appearance of the car. Keep in mind that 10 years ago, when stores were not yet overflowing with car accessories, tuning studios were developed only in the capital, and ordering tuning via the Internet was just becoming a reality, eyelashes made from film could cause admiration and a desire to “do the same.” Today it is difficult to surprise anyone with them.
Using vinyl and tinted film for manufacturing
This method is the simplest and fastest, and when used, it takes 5-10 minutes to make products. True, they will look worse than those that require a lot of time and a large amount of materials to produce.
Making eyelashes from film is quick and easy
If you narrow the headlights using a black film, then such eyelashes will look harmonious on cars of the same color, but not very well on cars of a different color. But this problem can be easily solved, since finding a film that harmoniously matches the color of the car today is not at all difficult.
Having opted for vinyl film used for car wrapping, the driver can give free rein to his imagination. After all, its color range, sold through car dealerships, is very wide. And eyelashes cut from carbon-fiber vinyl will look very original.
How to make eyelashes for headlights from film: video
Among other things, headlight light does not pass through the vinyl film, while the tint film does. And in this case, the material for making eyelashes can be picked up near workshops that specialize in wrapping cars with vinyl - they always have a lot of waste.
Before you start making eyelashes, you need to make a cast of them. For this purpose, the upper part of the surface of the headlights should be covered with masking tape. This must be done so that it does not reach the central part a little. After this, using a pencil or marker, a drawing of future eyelashes is applied to the tape. It should be taken into account that too wide eyelashes can significantly reduce the luminous flux of headlights. And they won’t look very stylish.
Next, the tape is cut along the drawn lines. After this, you need to move some distance away from the car and look at what the eyelashes look like from different angles. If necessary, necessary adjustments should be made.
If everything is satisfactory, then the tape is carefully removed and the non-adhesive side is applied to the tape glued to the second headlight. The outlines of the template are copied onto it and the second set of cilia is cut out. The tape removed from both headlights is pasted onto the film. To do this, select the side on which there is no transparent protection. Now you can cut eyelashes from the film with scissors.
The resulting products are applied with the adhesive side to the surface of the headlights, which is previously degreased with a solvent. If the shape of the headlights is too convex, then the film must be molded during the sticker process. A hair dryer is used for this purpose.
What you can make from plastic with your own hands
Plastic eyelashes look more presentable. The cost of a sheet of plastic is low, and you can buy it at a building materials store or at a manufacturing advertising agency. A wide selection of colors allows you to choose the material to match the color of the car and do without painting, and making eyelashes does not require any special skills from you. You will have to spend more time and effort on such eyelashes, since it is necessary to dismantle the headlight. For special tools, you will need a hair dryer.
The easiest way to make and install eyelashes for headlights
To make eyelashes you should use:
- PVC sheet 2–3 mm thick or other suitable plastic;
- construction hair dryer;
- Phillips screwdriver;
- three types of sandpaper for plastic (coarse, for initial sanding, for final sanding);
- degreaser;
- clean cotton rag;
- double-sided tape (or sealant);
- pencil.
As a rule, the headlight is mounted with 2-3 bolts from above and has additional lower mounts. Finding the upper mounts and unscrewing the bolts is not difficult (you will see them immediately after you open the hood), but to get to the lower ones, if they are present in your car, you will have to remove the bumper.
Then you need to act according to the algorithm below.
- From the PVC sheet, cut a sufficient piece to fit the eyelash with allowances for the engine compartment and side parts of the headlight, bordering the radiator grille and wing.
- Apply the cut sheet to the removed headlight and, heating it with a hairdryer, smooth it until the sheet completely follows the shape of the headlight.
- Do the same with the second headlight. When the plastic hardens in the desired shape, outline the boundaries of the eyelashes on it with a pencil, leaving a small allowance - about 0.3 mm - and cut out according to the drawing.
- Sand the edges with sandpaper, starting with the coarsest sandpaper to refine and level the edges, and moving on to fine sandpaper to get rid of possible nicks, scratches and make the edges perfectly smooth.
- Let's move on to installation: clean and degrease the headlight, do the same with the inside of the eyelash.
- After the degreaser has completely dried, we glue double-sided tape to the headlight, carefully attach the cover and enjoy the updated look of the optics.
Photo gallery: a simple way to stick eyelashes
Be careful with the hairdryer. The sheet may melt to a liquid state and you will ruin the workpiece. If you do not have experience in handling a heat gun, it is better to practice in advance on another sheet, heating it and studying how it will deform.
Before using a hairdryer, examine the material of your headlight. Nowadays, cheap optics from Chinese manufacturers have become widespread, which are often made not of glass, but of plastic. If one is installed on a car and you heat it with a hairdryer, the headlight can be thrown away.
I would like to add a few words about painting plastic eyelashes: it is believed that painting is not necessary, since you can match the plastic to the color of the car, and, if desired, change its color with self-adhesive film. But it is almost impossible to achieve an exact color match, and since the plastic is more matte than the paintwork of the car, the plastic eyelash may look foreign.
If the plastic wears out over time, it will look unattractive. Therefore, we recommend spending a little more time and painting the plastic eyelashes before installation.
How to dye eyelashes
To paint plastic eyelashes you should use:
- sandpaper;
- degreaser;
- clean cotton rag;
- cans of varnish, acrylic primer and paint.
Varnish, primer, and paint can be found in specialized stores that sell automotive paint. When purchasing, pay attention to the use of plastic materials. When choosing paint, if you want to match the color exactly, use your car's paint code, which is located on the metal plate under the hood (when the car has not been repainted).
Important design details
Before you paint the manufactured eyelashes yourself, you should think about the design of the blank itself, which will work in tandem with the headlights. After making shells from fiberglass and polyester resin, many people rush to cut the workpiece into pieces without thinking through their steps in advance. To avoid common mistakes, listen to a few useful tips:
- Check in advance how the eyelash will look on the surface of the car's head optics housing. To do this, always make templates, apply them, correct mistakes, and only use a sample that satisfies all parameters to make the eyelashes yourself;
- Use good, sharp pruning tools. If you work with dull knives, the edges will turn out uneven and a large number of burrs will form. You start correcting them, and in the end you can cut out unnecessary things, break the shape and get a completely different result than you originally expected;
- Putty, sandpaper and primer. These are extremely important stages that largely determine the appearance and service life of a hand-made eyelash. Be sure to wrap the sandpaper sheets around a wooden block with a smooth surface. By pressing the sandpaper with your hand, you risk ruining the workpiece, creating an uneven and uneven surface. This is due to the fact that your fingers press with different forces on the sandpaper. Therefore, the putty is removed in different layers;
- If irregularities appear, do not rush to skip them and move on according to plan. It is better to spend more time, but re-putty, sand and prime the surface;
- The primer plays a big role in the quality of application of paints and varnishes. Primer allows the paint to adhere better and provide a long-lasting visual effect. If you simply apply paint over fiberglass or unprimed putty, it will soon peel off, begin to bubble and fall off.
By following these recommendations, you will be able to achieve the desired result. Those who do not want to bother making eyelashes themselves can easily purchase them ready-made from various manufacturers. Considering the current assortment, it will not be difficult to find exactly those elements that will fully satisfy your taste and match the appearance of the vehicle itself.
Fiberglass
For several reasons, this is the most difficult execution option: there is no ready-made material (the trim will have to be sculpted from scratch), the headlight must be dismantled, and painting is required. But the result is worth the effort: if you set out to make eyelashes from fiberglass, you will end up with a high-quality, durable product.
Easy way to make, paint and install
To make fiberglass eyelashes we need the following set of tools:
- crosshead screwdriver;
- masking tape;
- pencil;
- brush;
- epoxy resin;
- several sheets of fiberglass;
- primer;
- clean cotton rag;
- degreaser;
- putty;
- three narrow spatulas (3, 5 and 8 cm);
- grinding machine (grinder with grinding wheels or long and hard manual labor);
- acrylic paint;
- sandpaper;
- varnish
We dismantle the headlight and begin the process of installing the eyelashes.
- We cover the headlight with masking tape (to avoid accidental contact with resin, it is better to cover it completely, and not just the part on which the eyelash will be placed).
- We decide on the shape, make a stencil and cut out fiberglass fabric on it (from 2 to 5 layers for each eyelash; the quantity will depend on the quality of the fiberglass fabric and the volume of epoxy resin), with allowances for polishing the edges.
- We begin to create a blank: using a brush, place a thin layer of epoxy resin on the headlight, carefully apply a pre-cut sheet of fiberglass, press, smooth and leave to dry. This is a slow process, the layer can dry from 1 to 5 hours, depending on the temperature and humidity in the room.
- After complete drying, apply subsequent layers in the same way.
- Then we remove the workpiece, correct the shape with coarse sandpaper and carefully sand the edges, removing the most obvious roughness on the eyelash.
And then we work according to the standard scheme, which was described above. We degrease, apply putty, wait until it dries, and sand. Degrease, prime, sand. We degrease, paint and varnish, wait until it dries.
It is easier to work with a removed headlight, but you can do without dismantling if you cover the adjacent elements of the car with film. Choose a thick film - thin epoxy resin will corrode.
Photo gallery: proven method of making eyelashes
We install it on the headlight using double-sided tape or sealant. Let's enjoy the victory! A lot of time and effort was spent, but such eyelashes look great and will delight the eye for many years.
Video: making your own eyelashes
Installation recommendations
Since eyelashes are small and lightweight structures, regardless of the material used for their manufacture, there is no need to use any serious fastenings here. The best option for installing eyelashes on car headlights is to use double-sided tape. This is an affordable material that can be purchased at any office supply store. All that remains is to figure out how to properly stick the eyelashes on the headlights.
- You can glue the element to the headlights immediately after the homemade eyelash has completely dried, or after purchasing a product you like. Gluing two surfaces together is extremely simple. Even beginners in this matter should not have problems with how to decorate headlights;
- First you need to stick the tape to the headlight unit itself. It is advisable to apply the material along the entire contour of the future eyelash in order to obtain a stronger adhesion;
- This option of gluing tape will also prevent the creation of empty cavities under the eyelash, under which a head wind can blow and cause the decor to simply fall off at some point;
- Then the top protective layer is removed from the tape, and the eyelash itself is applied. Do this carefully and precisely along the contours so that no displacement occurs.
There are alternative types of fastening. You can use various fasteners and screws. But they involve drilling the car body or the headlight unit itself. And this is an extremely undesirable event, since problems can arise if the seal in the optics is broken. The minimum is the formation of condensation. Water in headlights has never led to anything good.
Eyelashes are an interesting, original and fairly easy to install tuning element for any car. They do not require large financial expenditures, but they allow you to achieve excellent results in changing the external perception of the car. Buying ready-made eyelashes or making them yourself is a purely individual question. If you are somehow not satisfied with the existing assortment, and you want to do something unusual, then try making eyelashes yourself.
LEDs as the basis for fashionable headlights
There are eyelashes that are mounted in the headlight housing, namely, from LED strip. However, on July 21, 2016, a new law was introduced to tighten measures for installing tuning. Ordinary eyelashes are not prohibited if their presence does not interfere with the supply of light.
LED tuning elements look stylish: it’s a pity that they are prohibited
But the installation of LED eyelashes is a change in the design of lighting fixtures not provided for by the manufacturer (except for those cases where LED eyelashes were installed on exactly the same model, but in a different configuration). For this, according to current legislation, you may face a completely legal deprivation of your driver's license for a period of 6 to 12 months. Is the game worth the candle? You decide.
Tuning does not have to be expensive and labor-intensive. Even without special training, you can create an original part with your own hands in a few hours, which will attract the attention of other car enthusiasts. Tuning your favorite car yourself is always a pleasant and interesting experience that you will remember every day when you look at the transformed car. Stock up on everything you need and try making eyelashes - you won’t regret it!
Residential module for a trailer: buy or make it yourself
- fiberglass;
- masking tape;
- brushes;
- epoxy;
- primer;
- rags;
- putty;
- spatulas;
- sander;
- paint (preferably acrylic);
- sandpaper;
- varnish;
- set of tools.
Get ready for quite a long and careful job. But if you put in the effort, the result will fully justify itself.
The essence of the procedure is as follows:
Benefits of overlays
- the ability to minimize the gap between the hood and the headlights;
- creating an original appearance of the front of the car;
- simplicity and low cost of tuning;
Flaws:
- some difficulties with fastening;
- the likelihood of losing eyelashes when moving at high speeds.
Description of the process of installing eyelashes on headlights
To install the products on a car, you will need the following tools:
- stationery knife;
- double-sided tape, 6 to 9 millimeters wide;
- alcohol wipes;
An important condition for installation is the room temperature, which must be at least 21 o C.
Before installing the accessory on the car, you must:
- clean the car headlights with a damp cloth from dirt and dust;
- dry the surface of the headlights;
- degrease the car headlights with alcohol wipes in places of contact with double-sided tape;
- carefully open the package with accessories;
- remove the instructions included in the kit and study it;
- remove the products; if the lashes are supplied without tape, you will need to apply double-sided tape yourself;
- Before applying double-sided tape, wipe the inner surface of the eyelashes with alcohol wipes and treat the surface with a primer;
- stick tape on the inside of the eyelashes, along the entire perimeter of the products;
- after sticking the tape, remove part of the protective film from the tape so that it protrudes beyond the contour of the product by 2-3 centimeters, this will facilitate the installation process;
- before gluing the eyelash, treat the surface of the headlight with a primer;
- visually determine the installation location;
- apply an eyelash, check the gaps;
- remove the protective film from the double-sided tape;
- Carefully press the eyelash to the surface of the headlight;
Original eyelashes - extensions
- Women's eyelashes. One of the original car tuning options is “3D” eyelashes. Today they are especially popular among female car enthusiasts. The shape of the pads resembles human eyelashes and is made of durable elastic plastic. Depending on the specific car model, the eyelashes can be attached to the edge of the hood adjacent to the headlight, or to the glazing of the headlight unit so that they do not distort the luminous flux.
- LED eyelashes . Original eyelashes can be made from LED strip. To do this, it is enough to buy 1 meter of DWF-W tape and high-quality glue. The peculiarity of installing such cilia is that they are glued inside the headlight. Therefore, you first need to remove and disassemble the headlight unit. The tape can be cut to any length, a multiple of three LEDs. The power supply for the LED eyelashes is connected to the dimensions circuit, observing the appropriate polarity.
Sheet plastic as a material for DIY manufacturing
Currently, a lot of plastic has appeared on sale, sold in sheets of different thicknesses. And it is this that can be used to make eyelashes for headlights. Just don’t buy heat-resistant plastic for this purpose, since it cannot be given the required shape by heating.
Plastic option for Audi 80: video
You can use sheet plastic with a thickness of no more than one and a half millimeters. It is attached to the headlight using double-sided tape, without heating. But, as experience shows, it is better to use plastic with a thickness of about 2.5 mm. It will not only be more reliable, but also more beautiful.
The preliminary work for making the template is the same as in the previous case. The only difference is that to cut out the eyelashes you will have to use an electric jigsaw rather than scissors. The cut blanks must be applied to the headlights to determine the need for changes.
Next, the edges are processed to a rounded state. For this purpose, you can use either a fine file or a grinder. The flat surface is treated with waterproof sandpaper No. 600. This is done so that the adhesion coefficient of the surface increases during subsequent treatment with a primer. The latter is an acrylic two-component primer.
But before priming and painting the plastic eyelashes, they should be formatted according to the shape of the headlights. A hair dryer is used for this. The surface of the plastic is heated to a plastic state, after which it is given the desired shape. This will increase the reliability of attaching the plastic eyelashes to the surface of the headlights using double-sided tape.
If you don’t have a hair dryer at hand, you can get by with a regular kettle. At the same time, it is even more convenient to work with it than with a hairdryer, since in this case both hands are free. The water in the kettle is brought to a boil, and a plastic part is brought to its spout, the surface of which is heated by the steam.
The easiest way to make eyelashes
We make a template and cut out the desired part. You must act carefully so that no burrs remain. Finally, carefully sand the surface of the product and sand it. The big advantage of using plastic eyelashes is the ability to choose the shapes you want and change their color without using paint. You just need to apply the self-adhesive film in the color you like. But, nevertheless, remember that before attaching the cilia you need to thoroughly clean, degrease and dry the surface of the headlights. Ideally, the plastic should bend well and be small in thickness.
Film eyelashes
Eyelashes for headlights made of film are the simplest and least expensive option, but they have the appropriate quality and service life. For this work you will need black glossy film, electrical tape and tape, tracing paper, pencil and scissors. The pattern is made from black electrical tape and tracing paper, then the outline of the future eyelash is transferred to self-adhesive and cut out. Previously, we talked about how to make vinyl stickers for a car from the same film.
In order for the eyelashes to be denser, they can be made in two layers. They will flutter in the wind, so carefully calculate their length so that their beauty does not interfere with proper lighting.
Simple stylish headlight tuning
With the help of eyelashes you can emphasize the individuality of your car with minimal investment. The stylish and simple accessory began to be used after manufacturers applied a new hood design, which is called “Bed Boy”.
It involves creating an aggressive appearance for the front of the car by covering the upper cut of the headlights with the protruding part of the hood. During the tuning process, changing the hood configuration is quite difficult. It is much easier to install plastic covers on the headlights - cilia, which you can make yourself. They are easy to install and can be removed at any time if necessary. With the hood, such manipulations cannot be performed so quickly and cheaply.