Replacing glass in a VAZ 2110 headlight
When your car has problems with the headlights, you shouldn’t get upset right away, because you can do all the work yourself. One of the most common and not at all difficult car repairs is replacing the glass in the headlight of a VAZ 2110. Even novice drivers can handle this job. This article will tell you how to quickly and without much difficulty carry out a process called replacing glass in a VAZ 2110 headlight.
How to change the headlight glass of a VAZ 2110
Tools you will need:
- key for 10,
- screwdriver.
It is not necessary to completely disconnect the headlight; you can change the glass without completely removing the bumper and without disconnecting the hydraulic corrector and wires.
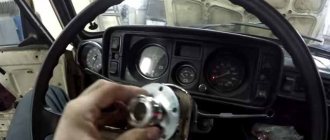
First you need to unscrew a couple of screws securing the radiator grille and remove the grille to gain access to the screw securing the headlight to the body. If the car is newer, then you need to unscrew the fastening screws on the gusset; older cars do not have it.
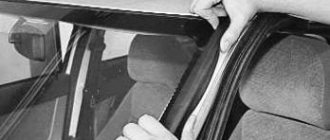
After this, the screws of the turn signal are unscrewed, then it is dismantled. Next, the headlight nut is unscrewed, and the headlight can be removed by prying the latches. Now you can pry and remove the glass. The procedure is shown more clearly in the photo above.
Necessary tool
Headlight VAZ-2110.
To begin with, you should understand that you will need structural knowledge of the car. To remove a headlight from a VAZ-2110, a motorist needs to assemble a set of tools , namely a 10mm wrench and a ratchet with an extended head.
Before work, the headlight must be washed to prevent dirt from getting inside.
The process of dismantling the headlight on a VAZ-2110
When the car enthusiast has assembled everything, you can proceed directly to the removal process:
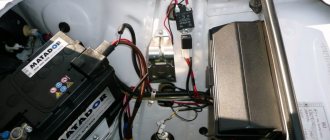
- We remove the negative terminal from the battery.
- At the back of the headlight, disconnect the wire block.
At the same time, scroll and pull out the headlight range control. Disconnect the headlight wiring and remove the corrector. - Unscrew and dismantle the radiator grille.
Unscrew the fasteners and remove the radiator grille. - After this, the headlight itself, or rather its mountings, will become accessible.
Now you need to unscrew three bolts. Unscrew the fastening elements of the headlight. - We snap off and remove the “eyelash” under the headlight.
We unclip the fasteners and remove the eyelash from under the headlight. - Unscrew the bolts securing the central cover.
Unscrew the bolts securing the central block of the eyelash. - Under the eyelash, there is another headlight mounting bolt.
It also needs to be unscrewed. Find and unscrew the hidden headlight mounting bolt. - Now you can remove the headlight from the car by pulling it towards you.
- If the headlight is made by Kirzhach, then you need to unscrew the turn signal from the block.
It is attached with two screws. Using a screwdriver, unscrew the turn signal from the headlight.
The headlight is now removed. The headlight unit is installed in the reverse order of disassembly.
Checking technical fault
This procedure is carried out every 2-3 months, regardless of the technical condition of the VAZ turn signal. First of all, attention is drawn to power wire No. 3, which is red. It comes from the positive terminal of the battery. The VAZ turn signals receive the electrical energy required for operation only when the ignition system is turned on. The procedure for performing a check is as follows:
If any of the above actions could not be completed, this indicates a technical malfunction. It is recommended not to delay in resolving the problem. Continued operation of the 2110 with a malfunctioning turning system increases the likelihood of an accident.
A loose connection or broken light bulb is a common cause of the dashboard light blinking too frequently. You can verify this visually. If the VAZ turn signal works in normal mode, then the problem is hidden precisely in the broken contact of the 2 elements. In second place in terms of frequency of occurrence is a faulty relay.
Disassembling the headlight and removing the glass
Once the headlight is removed from the car, you can begin the disassembly process. It is worth understanding that over the entire production period of the car, the appearance and body of the headlight have changed, so disassembly will be different, but the processes are still similar.
The VAZ-2110 was equipped with headlights manufactured by Kirzhach and Bosch.
Let's consider the dismantling process separately.
Kirzhach
There is nothing difficult in disassembling the Kirzhach headlight. The glass itself is glued to the sealant. Therefore, to remove it you will need a stationery knife. Let's look at the operation itself step by step:
- Take a utility knife and very carefully cut the old sealant.
Using a utility knife, cut the sealant to remove the headlight glass. - Now you can dismantle the glass.
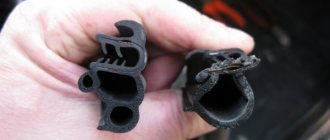
When installing new glass, it is necessary to change the seal and use sealant for gluing. Old and new headlight glass with sealant. - We take out the headlight bulbs by turning them counterclockwise.
- To remove the light diffuser, you just need to unscrew a few screws inside the headlight and the parts will fall out on their own.
- Assembly is carried out in reverse order.
Bosch
Disassembling a Bosch headlight is slightly different from Kirzhach, namely in the presence of latches of the headlight glass to the body.
All other operations are carried out the same way. As in the case of the Kirzhach headlight, it is necessary to use sealant during assembly, despite the presence of latches.
Using a screwdriver, disconnect the glass from the body.
Tuning headlights Kirzhach
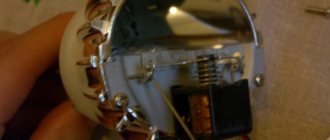
The uniqueness of Kirzhach headlights is that with a little modification their glow can be significantly improved. By changing individual elements, experienced car enthusiasts expand the light output and make it brighter. To repair the Kirzhach VAZ-2110 (2112) headlight, first remove it, then disassemble it in the following order:
Particular attention should be paid to removing the glass. It is glued to the sealant, so you first need to heat the sealant with a hairdryer, and then carefully remove the glass using a sharp knife. Unscrew the 3 bolts and remove the reflective gasket. There is no need to remove all the internals, or completely disassemble the modules.
For modernization, we only need low beam units. We unscrew them using a screwdriver.
Repair of the VAZ-2110 (2112) headlight unit by modification can be performed in various ways:
- Moving the lens. Repairing headlights 2110 (2112) by moving the lens towards the reflector will lead to a decrease in the curvature of the reflection area. Thus, the angle of incidence and reflection of the rays will change for the better. It should be remembered that excessive lens displacement can lead to overheating. An offset of 10 mm is optimal.
- First, we take measurements and mark the cut location on the module.
- We saw off and make cuts for fastening.
- We attach the lens to the module.
2. Sewing the modular ring. In the standard version, the edges of the modular ring, which are located under the lens, cover the light flux. If you repair VAZ-2110 (2112) headlights by grinding off the ring by 1 mm, you can increase the luminous flux by 10-15%. This procedure will not affect the strength of the module structure.
3. Changing the shape of the reflector. Repairing headlights 2112 (2110) by changing the shape of the reflector will increase the width of the luminous flux of the headlights. The reflector has a round shape and is made by stamping from sheet metal. If you squeeze it with your hand, resting it on the floor, you get an oval.
It must be remembered that the width of the flattened part should be no more than 93.2 mm. Otherwise, the light beam will be severely deformed. In order for all the fastenings to match, the reflector fastening should also be made oval.
All these modifications can be done either individually or in combination. In any case, after the modernization is completed, it will be necessary to repair the headlight adjustment of the VAZ-2110 (2112).
Remember that unqualified modifications can lead to disastrous consequences. If you are unsure of your capabilities, entrust the issues of modernizing your car to professionals.
conclusions
As practice shows, it is not difficult to dismantle and disassemble the headlight on a VAZ-2110. Difficulties may arise during assembly , and especially when gluing glass and body. Otherwise, there shouldn't be any special problems.
Damage, desire to carry out tuning, replace old devices with new ones. These are the most common reasons why motorists begin to think about how to remove the headlight on a VAZ 2110. In our material today, we will understand the nuances of lighting equipment on the domestic “ten”, talk about the procedure for dismantling the device, as well as removing the glass from head optics.
Tuned
Main signs of a faulty or dim headlight
Replacing glass on a headlight on a VAZ 2110
The problem associated with road lighting overtakes every motorist, but what to do in this situation is an individual matter. If, for example, the flashlight starts to work poorly, you can replace it completely; for this you need to buy sealant and new spare parts, and then, after dismantling the old flashlight and applying a new sealant, insert the headlamp into the place where the old one was. It is very important to prevent dirt from getting into the connections. The first signs that the car light is not working properly:
- Shaking headlights;
- Darkening and deterioration of lighting;
- Poor adjustment of the light beam;
- Malfunction of the hydraulic corrector.
Types of lighting equipment
Lighting devices installed on a VAZ 2110 car can be from two different manufacturers - domestic Kirzhach and foreign, or rather German, Bosch. Moreover, the type of headlights used directly depends on the year of manufacture of the car.
Bosch optics
Both devices have a block in their design that includes low and high beams, dimensions and direction indicators. That is, there are no fundamental differences between them, but it will be useful for you to know certain nuances.
- Equipment from the domestic manufacturer Kirzhach is characterized by glass sealing, which causes certain difficulties during replacement. Also, the low beam area is equipped with a lens. This makes the flow limited but more targeted compared to its German counterpart.
- In the case of Bosch, the glass is fixed with special latches, and sealing is done using rubber gaskets. They are easier to remove. But there are no lenses for low beam. There is a reflector here, due to which the boundaries of the glow are more blurred.
Many believe that Kirzhach is superior to Bosch optics in many respects. But this opinion can be called controversial.
But when it comes to dismantling and replacement, here German devices are the clear favorite, since they are much easier to disassemble.
Types and types of lanterns
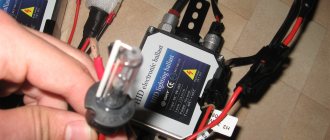
The search for high-quality headlights should be undertaken with all responsibility, although it is not easy. The main problem is that domestic cars are mainly sold on products that come from China or Taiwan. For example, a significant part of xenon flashlights are from there. This kind of product often comes with low quality indicators and lasts much less than their factory counterparts. And high-quality products always cost much more. Headlights for a VAZ 2110 car come in two popular varieties. Both types of lanterns are of fairly high quality, but differ in their shape and appearance, as well as functionality.
- Headlights from Bosch. Bosch flashlights have reflectors, but do not have lenses in their design;
- Kirzhach headlights have both a reflector and lenses.
Dismantling
Replacement
To solve the replacement issue, you will first need to dismantle the headlight unit. By following fairly simple instructions, you will quickly understand the device and be able to remove it.
- Disconnect the negative terminal from your battery. This way you will de-energize the car, thereby protecting yourself from electricity.
- Remove the radiator trim.
- Disconnect the connectors with wires from the flashlight. Don't forget to disable the second one too.
- Now press the latch on the hydraulic corrector cylinder, turn it clockwise 90 degrees, which will allow you to remove the element from its seat. You will also see hoses there. There is no need to turn them off. They won't bother you.
- The headlight unit is held on by three bolts, which can be unscrewed with a regular wrench.
- Slide the light back and then to the side, moving towards the center of the car. Move until the hook disengages from the wing.
- The top bolts on the bumper will have to be loosened. There is no need to completely dismantle them.
- Press the trim from below until the flange disengages from the buffer. This will allow you to remove the cover.
- There is a nut at the bottom that holds it in place. It needs to be unscrewed.
- Now pull the headlight unit towards you, disconnect the block from the turn signals. That's it, the device is dismantled.
Article on the topic: How to change the rear struts on a VAZ 2114 with your own hands (video)
Disassembly
After removing the device, it can be replaced with a new one, the old one can be repaired, or the optics can be tuned. Here the decision depends entirely on your needs and wishes.
Foggy
Disassembling the headlight unit is not a tricky task. But there are some peculiarities:
- Unscrew the two screws that are responsible for fastening;
- Disengage the two hooks located on the turn signals from the headlights;
- Thus, the optics is disassembled into two components.
Removing glass
In fact, replacing headlight glass on a VAZ 2110 is not a rare event. It may be required if a large number of microcracks have formed on the glass, it has become cloudy or simply cracked due to an impact, collision or careless parking.
Changing glass
The removal procedure depends on the type of flashlight you are dealing with.
Replacing glass on Bosch optics looks quite simple. You need to press the latches, after which the glass can be easily removed.
But when installing a new one, do not forget to look at the condition of the rubber seal. This is a consumable item that is best replaced immediately. Additionally, craftsmen advise using a sealant. This procedure is not mandatory, but it improves the quality of installation and protects the interior of the headlight from the same condensation, for example.
But if you have Kirzhach, we sympathize a little. In this situation, it will be much more difficult to remove the glass. But this does not make the procedure impossible.
- Arm yourself with a flathead screwdriver and insert it into the corner of the glass. This will create a gap of sorts.
- With your other hand, take a sharp utility knife, thereby cutting off the sealant.
- If the sealant has hardened firmly, try heating it with a regular hairdryer. Hurry up with removal, as the composition will quickly harden.
- In any case, you will have to dig deeper into the headlight. Be careful not to damage the glass. If it is already cracked and needs to be replaced, you can resort to more aggressive glass removal methods.
- When installing new glass, use a softer sealant that is used in construction.
Article on the topic: About the VAZ 2105 mounting block
Replacing headlights is not as difficult as it might seem at first glance. Such repairs have their own nuances and features, but if you follow the instructions and be careful, you will definitely be able to do everything with your own hands.
Share with friends on social networks:
Home -> About equipment -> Maintenance and repair -> How to replace the front headlight glass
Reasons for replacement
Replacing glass on a VAZ 2110 headlight
Why do you need to change the glass on your headlights? Here are just a few reasons:
- A separate glass will cost much less than a whole headlight , and the reason why you have to change the glass is a small stone that gets into and breaks the glass of the headlight. A crack in the glass causes the headlight to shine dimly and the road illumination becomes poor at night.
- Over time, the glass of your car's headlights can become significantly dull, which also leads to poor road illumination at night. Polishing the glass is unlikely to help in this situation; it is much easier to buy new glass and replace it on the headlights.
- The easiest way is to find glass for a headlight on the private market and buy it second-hand. It will be much cheaper than in a store, and it’s not profitable to buy the headlight itself in auto stores; it will cost at least five thousand rubles for each headlight.
- The headlights fog up and do not have time to dry on short trips. A regular flashlight may sweat, but it dries completely after a short trip. If this does not happen, it means moisture is somehow getting into the headlight. This can happen either through a damaged case or through a crack in the glass.
Note. Some seal the damage with sealants, but it would be better to replace the headlight or the glass in it.
- Another reason why headlights fog up is condensation deposits inside the headlight itself.
Work order
| Unscrew the two screws securing the turn signal and remove it. There are two plastic washers under the turn signal mount; it is advisable to put them in place during reassembly. |
| Unfasten (if any) the six fastening latches, hooking them on the side (it happens that the headlight glass is held in place only by the sealant). Now, armed with pliers and wearing gloves, we prick the headlight glass and use the pliers to pull out the remains. Be careful, the fragments are very sharp! If old sealant remains in the glass recess, it must be carefully removed with a knife. |
| Often there is a desire to wipe the shiny headlight reflector from dust; remember that this layer is very fragile and can be easily erased with strong pressure. Wet both the rag and the reflector thoroughly, or better yet, just blow through the reflector. Pour silicone sealant into the recess around the perimeter of the headlight and place a new headlight glass on top. |
| If you have a headlight with clip-on brackets, then snap them on and put everything back together. It is more convenient to install the bracket by first hooking it onto the headlight housing and pressing it from above, snapping it onto the glass. If the glass was held in place only by sealant, then we make 3-4 turns of electrical tape on both sides, after 2 days it will be possible to cut it off. |
| When replacing the headlight glass, try not to twist the wing screws for adjusting the direction of the headlight beams. The adjusting screws rotate the optical element in the vertical (outer screw) and horizontal (inner screw) planes. If you change the settings, you will have to go to a service center to adjust the headlights! |