The water pump is the main and rather capricious element of the cooling system of any car. This also applies to VAZ 2110/11/12 cars. A working pump ensures high-quality engine cooling. Its failure threatens the car owner with serious problems, including major repairs of the power unit.
The pump is a centrifugal type pump that provides forced circulation of antifreeze through the engine cooling circuit. Due to this, excess heat is removed from the engine. Structurally, the pump is quite simple.
An impeller is located in a cast iron or aluminum casing, which is driven through a shaft. The tightness of the structure is ensured by the oil seal and gasket between the pump housing and the cylinder block.
Coolant is supplied through the central channel. When it hits the impeller, due to the centrifugal force, the coolant is thrown towards the walls of the housing. Through the distribution channel, the liquid flows to the pipes and then into the engine cooling jacket.
When the temperature reaches a certain value, the thermostat opens, which leads to cooling of the liquid in the radiator. The coolant then returns to the centrifugal pump. This ensures the circulation of antifreeze.
The pump is the main element of the engine cooling system. Self-diagnosis of the pump is quite simple and will take no more than 10 minutes. The verification procedure is as follows:
- The engine warms up to operating temperature (91˚C for VAZ 2110).
- For safety reasons, a thick glove is worn on the right hand.
- The coolant supply from the radiator is cut off. To do this, squeeze the pipe by hand. If the pump is working properly, you will feel the antifreeze pressure inside the hose. If the pipe compresses easily, then the pump is faulty.
All actions should be carried out with extreme caution, since the coolant gets very hot, and you can get burns from the surface of the motor or pipes.
To identify problems with the pump, it is enough to pinch the coolant supply pipe.
Diagnosis of pump faults on VAZ 2110/11/12
A pump malfunction can be identified by the following signs:
- While driving, extraneous noise appears from the timing belt.
- The pump loses its seal and begins to leak.
- The timing belt breaks.
The most capricious element of the VAZ 2110/11/12 pump is the bearing. If it is severely worn or if the timing belt tension is incorrect, the pump cannot be repaired.
One of the symptoms of a pump malfunction is the appearance of a leak. Operating a car with a faulty pump can lead to the following serious consequences:
- damage or breakage of the timing belt, often leading to a major engine overhaul;
- When the engine overheats, the rubber elements of the cooling system, valve covers and cylinder head gaskets are destroyed.
The pump is changed along with the tension roller and timing belt every 50 thousand kilometers. If signs of wear appear, these components are replaced before the time specified by the manufacturer.
Kinds
Depending on its purpose, the pump can be:
- Water (circulates coolant to prevent engine overheating).
- Fuel (supplies fuel to the engine cylinders and maintains pressure in the fuel system).
Pumps are also distinguished:
- Mechanical.
- Electrical.
The latter are more popular and cost more.
Gasoline pumps are classified into the following types:
- Geared.
- Vacuum.
- Centrifugal.
- Roller.
According to originality, a pump for a VAZ 2107 car can be:
- Original (manufacturer is AvtoVAZ plant).
- Non-original (manufacturers are other companies).
According to the manufacturer, you can buy a new pump for VAZ 2107 of the following brands:
- AvtoVAZ.
- HEPU.
- PEKAR.
- RENAULT.
- FINWHALE.
- LUZAR.
- AOTON.
- TZA.
Pump selection
When purchasing a new pump, you should adhere to the following rules:
- You should choose a reliable manufacturer, giving preference to well-known brands and avoiding cheap counterfeits.
- You need to pay attention to the product catalog number - 21081307010 for VAZ 2110/11/12.
- The product must have original packaging with trademarks and holograms characteristic of each manufacturer.
- A gasket should always be supplied with the pump.
- The package must contain a warranty card that allows you to exchange or return the pump if defects are found.
A high-quality pump should include not only the original packaging, but also a warranty card with a gasket. The cost of a new pump for an 8-valve engine starts from 800 rubles, and for a 16-valve engine - from 1 thousand rubles. In a car service center, the work of replacing a pump is estimated at approximately 1 thousand rubles. The most popular are water pumps produced by TZA and HEPU.
[custom_ads_shortcode3]
Let's summarize
In general, repairs are quite accessible for doing it yourself, but you need to immediately prepare for a significant time investment. Work can last for 2-6 hours. When replacing the radiator, it is necessary to change the coolant. Work with 8-valve and 16-valve engines is carried out in the same way. If the car has air conditioning, you will have to remove and install it during the repair, but not on all models. It is advisable to replace the bushings at the same time. The work is completed by checking the functionality of the engine and the condition of the coolant. Namely, whether it is boiling.
For greater clarity on replacing the VAZ 2115 injector cooling radiator, you can watch this video:
Source
Procedure for replacing the pump on a VAZ 2110/11/12
After preparatory steps, such as: searching for a garage box (if you don’t have one for personal use), preparing keys (open-end sockets), purchasing spare parts and coolant, you can get to work. To explain as briefly and clearly as possible how to change the pump on a VAZ 2110, we will describe the process in the form of step-by-step instructions:
- It is advisable to install the machine above the inspection hole. As an option, an overpass is suitable;
- It is recommended to carry out plumbing work on a de-energized car, so you should unscrew the negative terminal from the battery;
- remove the expansion tank cap, this will prevent the formation of a vacuum in the cooling system;
- A 5-liter container (at least) should be installed under the engine to drain the coolant, since it is recommended to change the pump when the antifreeze or antifreeze on the VAZ 2110 is almost completely drained. Otherwise, when the pump is removed from its seat, the contents of the system will spill out randomly;
- On the back of the block there is a coolant jacket plug, which should be unscrewed with a 13 mm wrench and the liquid should be drained into a container placed under the engine. Screw the plug back;
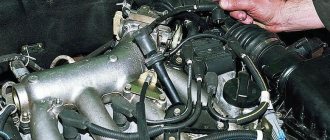
- Next, you should unscrew the timing drive casing (with a 10 mm wrench), secured with three bolts;
- disconnect the casing and set it aside;
- it is necessary to set the gas distribution mechanism to the top dead center according to the marks. Having moved the gearshift lever into neutral, rotate the camshaft gear by the mounting bolt (19 mm wrench) until the marks on the inner timing drive casing align;
- you have to check the mark on the flywheel: remove the rubber plug in the upper part of the crankcase on the right side of the engine and shine a flashlight into the opening;
- the correct position should be fixed by inserting a metal rod or a powerful screwdriver into the camshaft gear;
- loosen the roller nut (17mm wrench) and use a tension wrench to turn the roller mechanism counterclockwise, reducing the belt tension;
- Next, remove the belt and roller;
- unscrew the bolts of the internal timing drive casing (2 pieces) and the pump bolts (3 pieces). It is more convenient to work with a 10 mm socket wrench (head);
- remove the casing and put it aside;
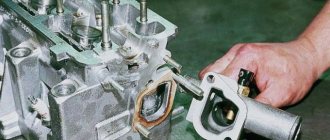
- use a slotted screwdriver to pry up the edge of the pump and pull it out of its seat;
- The installation site must be cleaned before installing a new pump;
- a new pump gasket can be lubricated on both sides with a thin layer of high-temperature automotive sealant;
- insert the new pump into the seat and tighten the mounting bolts;
- Next, you need to return the dismantled parts to their place, observing the reverse order. After installing a new kit: pump, belt and timing pulley, you can count on a certain service life of the parts declared by the manufacturer.
Important! Do not tighten the timing belt too much. It’s easy to check the correct tension: the installed belt can be turned 90° with your fingers (with the teeth facing out), but no more.
After final assembly, it is necessary to fill the system with coolant to the specified level. We start the engine and warm it up to operating temperature. All hoses should be hot, and when they are compressed, the hand will feel internal circulation. This is an indicator of the correct operation of the cooling system.
Types
The following types of CV joints are available for sale:
- External , which are installed in the hub and transmit rotation from the drive shaft axis to the wheels.
- Internal , transmitting rotation from the gearbox to the wheel drive.
Depending on the type of design, auto grenades can be of the following types:
- Tripods . Spherical rollers are used to transmit torque. These elements are located on the support fingers.
- Ball . Consist of balls, a separator and grooves. Torque is transmitted by moving the balls along the grooves.
- Twin cardan shafts . They consist of two universal joints connected to each other.
- Cam . Available in shaped discs and forks. Fist grenades can withstand heavy loads.
Also, grenades can be in the following condition:
- New.
- Used, refurbished.
- Old, requiring minor repairs.
Available for sale:
- Original.
- Non-original car grenades for VAZ 2114.
The latter are produced under the following brands:
- TRIALLI.
- TORQUE.
- LOEBRO.
- HOLA.
- FINWHALE.
Depending on where the purchase was made, the grenade can be:
- From the car market.
- From the point of dismantling transport for metal.
- From the online store.
- Purchased through a private advertisement.
- From an auto parts store.
Disassembling the pump
The pump is disassembled in the following sequence:
- The removed pump is wiped with a dry cloth.
- Using a special puller, the pulley is removed.
- The bearings are knocked off the shaft with a hammer.
- The shaft is removed from the pump housing.
- The impeller is removed.
- The oil seal or what is left of it is removed.
- The insides are thoroughly washed and cleaned.
If the pump is leaking, the seal must be replaced. The cause of a whistle at high speeds is usually a strong shaft wear.
What is this?
A grenade on a car is understood as a device that transmits torque and drives the wheels. Acts as an important component of the front suspension. The part looks like a bearing that moves in different planes. The CV joint acts as the connecting link between the transmission and the wheel.
It happens that a grenade malfunctions. The reasons for premature wear of a part are:
- Driving style is too active.
- Poor quality of the road surface.
- Installation of low-quality, defective CV joint.
- Use of low quality lubricants.
- Damage to the boot and the entry of dirt and sand into it.
An experienced driver will guess that it is time to change the CV joint by the appearance of the following signs:
- A characteristic crunching sound appears when the car starts moving or makes a turn.
- Jerking occurs when accelerating the car.
- Appearance of grease on the inner surface of the wheels.
Replacing the oil seal
The oil seal is a rubber seal consisting of a metal rim, a spring and rubber. In any case, when disassembling the pump, the oil seal should be replaced, since the rubber wears out quickly. The procedure for replacing the oil seal is as follows:
- The old seal is removed from the shaft.
- The seat is cleaned of dirt.
- A new seal is installed.
Pump leaks are usually caused by worn out seals.
[custom_ads_shortcode3]
What else needs to be changed along with the pump?
Usually, when replacing the pump, the timing belt with rollers and tensioner should also be replaced. If the timing chain drive is chain driven, you should carefully inspect the chain for stretching. Pumps often fail at the moment when the life of the timing mechanisms is already completed.
If a belt breaks or the timing chain stretches and jumps, many engines will require repair of the cylinder head, which will be a very expensive undertaking. Therefore, when replacing the pump, you should carefully examine the timing system and, if necessary, replace components. Moreover, the entire mechanism will be disassembled.
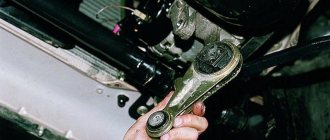
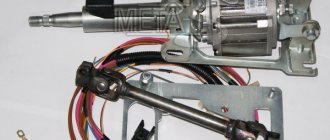
Installation of an additional pump on a VAZ 2110/11/12
The interior heating system in VAZ 2110/11/12 cars often fails to cope with its responsibilities in the cold season. This problem can be solved by installing an additional pump in the cooling system.
To heat the interior of the VAZ 2110/11/12, an additional electric pump from the GAZelle is installed. The VAZ 2110/11/12 stove functions normally only at speeds of at least 2 thousand rpm. At idle, slightly warm air enters the cabin. The fact is that to increase the air temperature, the coolant must circulate faster. The problem is solved by installing an additional pump and accelerating the circulation of antifreeze through the stove. As a result, the temperature in the cabin ceases to depend on engine speed. For these purposes, an electric pump from a GAZelle is installed.
Tools required for repairs
If you want to do the repairs yourself, you need to prepare the following tools:
- keys for 8 and 10;
- screwdrivers;
- heads for 8 and 10;
- pliers;
- container for draining antifreeze;
- jack;
- sealant;
- rags.
Independent work is completely justified, since as of March 24, 2019, the average price for replacing a cooling radiator for a VAZ 2114 and other models is 2.2 thousand rubles. Which will more than double costs.
Installation of an additional pump
To install an additional pump, you need to do the following:
- Coolant is drained from the cooling system.
- A part of the outlet pipe of the stove is cut out, equal to the length of the pump without taking into account the fittings.
- The fittings are coated with sealant, the hoses are put on and secured with clamps.
- To attach the pump to the body, use a special bracket that wraps around the pump and is attached to the body with two self-tapping screws. You can make such fasteners yourself or purchase them in a store. The bracket can also be attached to suitable studs on vehicle components.
- To control the pump, a button is installed in the cabin that supplies power from the positive terminal of the battery. In this case, it is advisable to supply voltage through a relay.
The additional pump cuts into the return pipe of the stove and is secured using a special bracket. After installing the additional pump, antifreeze is poured into the system. After starting the engine, check the pump and pipes for leaks and test the operation of the new device.
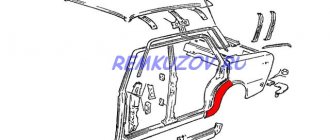
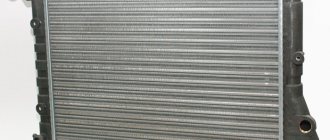
Changing the VAZ 2114 cooling radiator with your own hands
VAZ 2114 is considered one of the most striking examples of success of the domestic automobile industry. This model is a modified version of the VAZ 2109 and differs from it in the design of the front part of the body, updated headlights and hood, radiator grille design, as well as plastic moldings and spoilers. However, as it became known, the car is susceptible to radiator failures, which can lead to overheating, and as a result, to engine failure.