In a car service, replacement of CV joints, internal and external, is carried out with a minimum of discomfort for the car owner: quickly and at an affordable price. Carrying out such a responsible operation as replacing the outer or inner CV joint on a car, our craftsmen guarantee the exceptional quality of the work performed and the spare parts used.
Replacing a CV joint (replacing a grenade) - the design and principle of operation of this unit
CV joint - or constant velocity joint - is a device that transmits torque from the differential to the wheels. The CV joint consists of the following parts:
- Frame;
- Separator;
- Clip;
- Balloons;
- Clamps;
- Retaining rings;
- Protective cover (dust boot).
The spherical body has grooves for the balls, just like the CV joint cage. The cage is designed to hold the balls in position (just like any regular bearing). Thanks to its design, this joint can transmit rotation at almost any angle of deflection of the shafts (up to 350 degrees), and transmit it evenly. The boot also protects the internal surfaces of the hinge from moisture, dust and dirt, which increase friction and prematurely wear out this unit.
Prices for replacing the CV joint boot
| Name of works | Domestic cars | Foreign cars: | SUVs, minibuses |
| Replacing the drive assembly | from 1,000 rub. | from 1,500 rub. | from 1,500 rub. |
| Replacing the CV joint | from 1,000 rub. | from 1,500 rub. | from 1,700 rub. |
| Replacing the CV joint boot | from 1,200 rub. | from 1,500 rub. | from 1,600 rub. |
Replacing a grenade (CV joint) - signs of a malfunction of this unit
A malfunction of the outer CV joint and the inexorably approaching replacement of the outer CV joint will show the following symptoms:
- Distinct clicks from under the wheels when turning;
- Barely perceptible jerks at the moment when the car starts moving.
How to replace a grenade on a Lada Priora?
According to the manufacturer's advice, replacing a grenade on a Priora means installing a new front wheel drive assembly - 2 CV joints and an axle shaft on each side. Because the newest unit costs a lot of money, together with the work it comes out to a very large sum. Therefore, in practice, only the worn-out part of a given unit is replaced - the external or internal grenade, or even both. If you know how to change these parts without the help of others, you can significantly save on car service costs.
Where to replace a CV joint in Moscow?
To carry out replacement work, we invite you to visit the Alian car service center. Our service center is conveniently located for all residents of NEAD and the districts of Altufevsky, Babushkinsky, Losinoostrovsky, Bibirevo, Lianozovo, Otradnoye, Sviblovo, Northern Medvedkovo, Yuzhnoye Medvedkovo, Yaroslavsky, Metrogorodok, Chelobityevo, Vostochnoye Degunino, Nagornoye and the city of Mytishchi.
The metro stations closest to the car service are Medvedkovo, Babushkinskaya, Bibirevo, Otradnoye and Sviblovo, as well as the 92nd km of the Moscow Ring Road, Nizhny Dzhamgarovsky pond and park.
When you first visit our service, you will receive a 10% discount on all services.
When is replacement required?
The hinge mechanisms of the Lada Priora, which transmit rotation from the engine to the front wheels, are considered quite reliable and in some cases cover 100-150 thousand km. Grenades should be replaced in the following ways:
- the car's mileage is more than 100 thousand km;
- the parts of the unit have become unusable, as evidenced by crunching sounds when turning the front wheels.
The first type of substitution is preventive. It is recommended for motorists for whom the car is a tool for earning money, which must be constantly in combat readiness and serve without fail. Replacement due to wear and tear is the most common option; it is practiced by most Priora owners.
In order to change expensive CV joint parts as rarely as possible, it is important to detect torn boots, through which dirt and dust enter the mechanism. It is impossible to repair grenades; they only need to be replaced. It is much easier and cheaper to change leaky anthers so that the assembly lasts as long as possible.
Preparing for work
To replace grenades, you need a car lift or an inspection ditch, since part of the disassembly work is done from below. The following tools and devices will be needed:
- a regular set of socket heads with a knob;
- mount;
- open-end wrenches;
- metalworking tools, which include screwdrivers, hammer and pliers;
- a device that helps press the control rod ball pin out of its socket in the rack.
If you don’t have a puller for the control rod, then it’s easy to find one from familiar car enthusiasts or just buy it, it’s cheap. This is a metal cylinder with a slot and a bottom into which an extrusion bolt is screwed. To carry out the replacement in the inspection hole, a jack with a wheel wrench is also useful to lift the car. To completely disassemble the unit, it is better to have a vice and purchase CV joint-4 thick lubricant.
Disassembly procedure
The first operation is not removing the wheel, but unscrewing the large wheel bearing nut. It is caulked, so it will be much more difficult to loosen when the car is raised. After this, the wheel bolts are loosened and the car is raised with a jack.
Do not forget to place reliable stops under the rear wheels to secure the car.
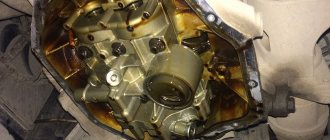
If the Priora has an iron oil pan protection installed, then it must also be removed in advance. In addition, it would not hurt to partially empty the oil sump of the checkpoint (Checkpoint - a point designed to control passage (visit) and access to the territory of any facility)
to avoid watery lubricant leaking out of the open hole after removing the drive.
Installing the latest hinges
After disassembling the drive, you need to install new parts and reassemble the box in reverse order. The replacement is done as follows:
- The small clamp is put on the axle shaft first, and then the new boot. Use a clamp to wrap around the end of the casing and tighten it. It is better to unscrew the boot in the other direction so that it does not interfere with the installation of the hinge.
- Add SHRUS-4 lubricant to the hinge mechanism. According to the annotation, the external grenade must contain at least 40 cm³, and the internal grenade must contain at least 80 cm³ of thick lubricant.
- Place the grenade on the shaft, making sure the splines match. Using a wood attachment, press it in as far as possible with gentle hammer blows.
- Pull the boot onto the grenade, apply a large clamp and tighten it. In the same order, the operation is performed on the other side of the axle shaft.
Now the drive assembly can be placed in the space. To avoid mixing up the places of the hinges, you should follow the mark placed on the axle during disassembly. The assembly is installed in the space from the inspection ditch, the splined part of the internal grenade is inserted first. To seat it in the slots all the way, you will have to rest the axle on the lower lever and apply several blows with a hammer through a piece of wood from the other side. The upcoming assembly proceeds in reverse order.
Source: korchim.ru
How to install a new CV joint on a VAZ.
Be sure to follow this sequence for installing new parts:
- Small clamp.
- Grenade boot.
- Large clamp.
- Retaining ring.
- The CV joint itself.
First, we clean the drive shaft from dust, dirt and old grease.
Most CV joints come with lubricant, a boot, two clamps and sometimes a new hub nut. If suddenly there is no lubricant in the kit, it is better to use graphite lubricant, and if it is not available, then simple lithol.
First of all, we put on a small collar. Then the boot (it should go behind the limiting washer) and a large clamp. Then we put a retaining ring on the drive shaft. Now open the tube of lubricant and completely squeeze it into the grenade. Now it's time to put the CV joint on the drive. Because of the locking ring, it will be difficult to insert the drive into the grenade, so we take a hammer and lightly, trying not to damage the thread, press the grenade into place. Now you need to put the boot on the CV joint and tighten the clamps.
Assembly occurs in reverse disassembly sequence, but there is one nuance! Do not overtighten the hub nut! This may cause the bearing to hum. The hub nut must be tightened with a force of 225.0–250.0 N*m. Of course, few people have a torque wrench. So, tighten the nut tightly, but not with all your might. In theory, a force of a maximum of 25 kg will need to be applied to a meter-long knob. But, the extension pipe will spring back under such force, so how can you describe it exactly? But obviously there is no need to jump with weight.
I hope I helped you. If you have any questions, ask them in the comments.
What is this?
Under the grenade, auto mechanics and motorists understand the mechanism that ensures the transmission of torque when the wheel is turned up to 70 degrees around its own axis. The grenade is also called a homokinetic joint and CV joint.
The lemon consists of the following parts:
- Bottom part.
- Grooves.
- Frame.
- Separator with balls.
The fact that it’s time to start looking for the newest grenade on the Priora can be easily realized by subsequent changes in the condition of the car:
- The occurrence of grinding, crunching, clicking noises when driving in a carriage (the noise increases with sharp acceleration, turns, and overcoming obstacles on the road).
- Insignificant jerks when starting the machine.
Reasons on which the cost depends
Grenades on Priora are sold at various sales points. Motorists note a wide range of prices for this spare part. Traders explain the wide range of prices by the impact on the price of the following reasons:
- Property.
- Originality.
- Part type.
- Manufacturer's fame.
- Popularity of the implementer.
- Space for making a purchase.
- Need to order delivery, installation.
Factors influencing price
To buy a profitable, high-quality grenade for a VAZ 2114, you need to go to many places that sell auto parts. When comparing the cost of this spare part, novice drivers wonder why the price range for CV joints is so wide. The fact is that sellers take into account the following factors when forming prices:
- State.
- Variety.
- Quality.
- Originality.
- Place of purchase.
- Popularity of the selling company.
- Brand.
- The need for delivery or replacement of auto parts.
Varieties
CV joints are classified according to their design features into four types:
- Ball bearings (more common, found in all types of rear-wheel drive passenger cars).
- Paired (used very occasionally, have a complex system).
- Rusks (they are mostly equipped with buses and trucks).
- Tripoid (used in internal systems, characterized by axial movement).
Based on their location, grenades can be divided into two types:
- External (connects wheel hubs and axle shafts).
- Internal (connect the axle shafts and the box).
Depending on the design, grenades may have:
According to the manufacturer, all CV joints on Priora can be divided into two types:
The extreme ones are the cheapest. They are represented by the following brands:
There is also systematization by place of purchase of the part. According to it, CV joints are:
- From an online auto parts store.
- From the car market.
- From a store that sells spare parts for cars.
Assembly procedure step by step
We carry out the entire list of assembly operations in a Lada Kalina car in strictly reverse order. During the procedure, it is necessary to take into account some nuances.
- First, we put the boot on the axle shaft. If this is difficult, then its surface can be lubricated with the grease supplied with the new hinge kit.
- Now we fill the same grease into the CV joint bearing, and the remainder into the internal cavity of the boot.
- We install the hinge on the axle shaft. We also use a hammer, applying a shock load to the body. The retaining ring should be replaced.
- When the “grenade” “sits” in its place, we push the boot, after squeezing it with our hands to remove excess air. We install clamps.
- We do the same when replacing the internal hinge.
- Now we install the axle shaft into the transmission housing until the shaft engages with the side gear. Don’t forget to fill the unit with oil afterwards.
- We insert the outer joint into the steering knuckle until it fully engages with the splined race of the hub. Screw on the central nut (do not tighten it).
- We return the ball joint to its place.
- We hang the wheel and do not tighten its fasteners too much.
- We lower the car (we do not unload the jack completely). Tighten all fasteners to the required torques. We remove the jack and stops. Replacement of the outer CV joint is complete.
The owner of LADA Kalina will spend no more than 3 hours of his time to complete the full list of replacement actions. We check the correct installation of the hinges. To do this, we start driving the car with the wheels turned out as far as possible. We observe the absence of crunching and other characteristic sounds from the axle shaft. Now you know how to change a faulty CV joint.
Lada Granta buy on credit
Installation of 16 cm speakers in the front doors of Lada Granta
Grant brake pads
Approximate prices
In Russia, a motorist can purchase a CV joint for a Priora brand car at a cost of 1,100 to 1,600 rubles .
Approximate prices depending on the type of auto parts:
- External lemon - from 1100 rubles per set.
- Internal – from 1200 rubles per set.
Approximate prices for products from various manufacturers:
- AvtoVAZ - about 1600 rubles .
- Pilenga - about 1200 rubles .
- LGR Holding – about 1300 rubles .
- Hofer - about 1280 rubles .
- GKN – about 1500 rubles .
Where is the best place to shop?
If the lemon valve in a Priora car has failed, then you need to start looking for the latest spare part. There are many places for selling such parts in Russia. Therefore, the motorist should not have any problems with the choice.
It is recommended to decide on the place of purchase in advance. In total, the owner of a Priora has three options:
- Visit a store that sells Russian and imported spare parts.
- Go to the car market.
- Consider offers from online auto parts stores.
The choice of location depends on preferences regarding the manufacturer and financial status. If you want to purchase an unusual part from the AvtoVAZ plant, then it is better to make a purchase in a special store. Nowadays, almost everyone orders auto parts from online stores. But it is necessary to be aware of all the dangers that a motorist faces when choosing this place of purchase:
- They may send you a defective part.
- They may send you a used spare part instead of a new one.
- They may ask you to transfer funds and not send anything.
If you want to save money and the popularity of the manufacturer is not important, then you can visit the car market. Parts from little-known companies are sold here. You may come across a Chinese counterfeit of a famous brand. Therefore, when choosing a car market as a place of purchase, you must be careful.
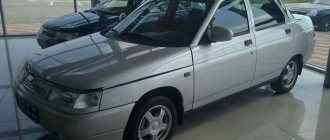
Replacing a grenade on a Priora
Lada Priora is a fairly reliable car among Russian products, but, as annoying as it may sound, this car also has to be repaired. Well, our roads, to put it mildly, are not of the best quality. Therefore, the chassis suffers especially - springs, springs, ball joints and, naturally, CV joints.
If you need to replace a grenade on a Priora , then according to the AvtoVAZ annotation you need to change the entire drive completely, for which you are supposed to go to a service station. But this mechanism costs a lot of money, so is there any point in this operation? Maybe it’s enough to just change the CV joints themselves and repair everything yourself?
How to find out if you need a new lemon for a Priora? Any option, of course, is individual, but the first and most common symptom is a crunching sound, which is especially noticeable when turning the steering wheel. But it’s worth paying attention to the fact that if you pretend that you don’t notice anything and drive with such a symptom (one, separate sign of the disease)
further, then a bad scenario is entirely possible - the drive will simply vomit, which can lead to extremely sad consequences. Therefore, it is necessary to repair it as quickly as possible.
It is better to buy parts for repairs in a special store - this way there is much less chance of running into a fake, compared to the car market, and there is a certain guarantee for spare parts. How much does a lemon cost on a Priora? It is difficult to give an exact figure (it changes constantly), and there are many different manufacturers on the spare parts market.
You can purchase either a cheap Chinese grenade of unknown properties, or a spare part from a well-known brand (even a Russian one), which naturally costs more than its Chinese counterpart, but the service life is obviously longer. In general, we can say that the cost of a lemon for a Priora is quite small, compared to similar parts for almost all foreign cars.
Please note that the external lemon on the Priora changes in pairs. You can, of course, buy one - but two are better. Otherwise, the wear will be uneven and anyway, after replacing one grenade, sooner or later the second one will also become unusable.
We jack up the car, remove the necessary wheels and carry out an external inspection. The boots of CV joints (they look like rubber “accordions”) also constantly wear out and require replacement. If cracks are visible (even microscopic ones), it is better to change them immediately, not forgetting to “fill” with lubricant (it is included with the CV joint and is also sold separately).
If the anthers are not changed in time, then dust or debris that gets through them can “sentence” a grenade extremely quickly. The anthers are relatively cheap and can be changed quite easily. Especially if there is access to a pit or, even better, a lift. Changing boots and CV joints from the ground is much more problematic.
Source: priorapro.ru
Replacement results
Failure to replace the boot in a timely manner will result in the “grenade” breaking, which in turn will make it impossible to use the car. Regular inspection of boots and CV joints will prevent dirt from getting into the part.
If you find breaks in the boot, you should purchase new ones and install them. When replacing boots, you should inspect the CV joint to make sure it is in good condition. This will not take much time, but will preserve the integrity of the CV joint and save money.
If you nevertheless looked at the cracks and tears in the protective case and did not have time to replace it at the initial stage, but realized the problem from the characteristic sounds, then it is necessary to replace the damaged “grenade” as soon as possible. After the repair has been carried out, it is recommended to check the car; to do this, you need to drive it in a circle and accelerate a little on a straight road. The absence of creaking and tapping sounds is a sign of correct installation.
How to replace a grenade on a Lada Priora?
According to the manufacturer's advice, replacing a grenade on a Priora means installing a new front wheel drive assembly - 2 CV joints and an axle shaft on each side. Because the newest unit costs a lot of money, together with the work it comes out to a very large sum. Therefore, in practice, only the worn-out part of a given unit is replaced - the external or internal grenade, or even both. If you know how to change these parts without the help of others, you can significantly save on car service costs.
Signs of failure of the outer grenade (CV joint).
There are two options here:
- signs that your grenade has already broken,
- signs that the grenade will soon come out and break.
How to understand that a grenade will soon break.
Of course, the first sign of a malfunction of the external grenade is a crackling sound. If you hear a crackling noise while driving with the steering wheel turned, it is definitely a CV joint. The greater the angle of rotation of the wheel and the harder you press on the gas, the louder the clicks.
Another sign that does not always appear is vibration on the steering wheel at speeds greater than 80 km/h. The vibration is only slightly similar to the vibration from an unbalanced wheel. It usually manifests itself as a slight twitching of the steering wheel.
How to understand that the outer CV joint has broken.
If the CV joint breaks, the car will stop moving. In any gear engaged, press the gas, the speed increases, but the car does not move.
How to understand that it is the outer CV joint that has broken, and not the internal one or the clutch in general (the first signs of failure are similar to the signs of a clutch failure)? First of all, start the car and put it in any gear. Next, open the hood and look in turn at each of the shafts going from the box to the wheels (one short, the other long). If any shaft is spinning, it means that the CV joint has broken on this side.
I recommend not just visually looking at the shaft, but touching it with some long, hard object, such as a stick. The main thing is that there is nothing on it that can wrap around the shaft!!! When you touch the shaft with a stick, if it is spinning, you will feel a slight vibration. This is usually done in the dark, because it is difficult to understand whether a cylindrical object is spinning, especially in the dark.
When is replacement required?
The hinge mechanisms of the Lada Priora, which transmit rotation from the engine to the front wheels, are considered quite reliable and in some cases cover 100-150 thousand km. Grenades should be replaced in the following ways:
- the car's mileage is more than 100 thousand km;
- the parts of the unit have become unusable, as evidenced by crunching sounds when turning the front wheels.
The first type of substitution is preventive. It is recommended for motorists for whom the car is a tool for earning money, which must be constantly in combat readiness and serve without fail. Replacement due to wear and tear is the most common option; it is practiced by most Priora owners.
In order to change expensive CV joint parts as rarely as possible, it is important to detect torn boots, through which dirt and dust enter the mechanism. It is impossible to repair grenades; they only need to be replaced. It is much easier and cheaper to change leaky anthers so that the assembly lasts as long as possible.
Basic faults
The main problem due to which a CV joint can become unusable is the ingress of a large amount of dirt into it. This happens when the anthers are damaged, so their integrity should be checked regularly. To do this, you just need to look under the car, first turning the wheels completely in any direction, and if you find lubricating fluid, ruptures or cracks in the cover, replace the damaged part. By shaking the drive shaft a little by hand, you can check the condition of its play.
Also, the reasons for the failure of the CV joint may be its expired service life, since it is limited, and poor quality of the part (defective).
Less common is damage to the retaining ring, in which the axle shaft comes out slightly from the part during sharp turns. This contributes to the appearance of damage on the “grenade”, and after some time to its complete failure.
Cracking and knocking noises when turning the wheels are harbingers of external joint malfunctions. Signs of damage to the internal grenade are crackling clicks and strong vibration that transfers to the body during acceleration.
Preparing for work
To replace grenades, you need a car lift or an inspection ditch, since part of the disassembly work is done from below. The following tools and devices will be needed:
- a regular set of socket heads with a knob;
- mount;
- open-end wrenches;
- metalworking tools, which include screwdrivers, hammer and pliers;
- a device that helps press the control rod ball pin out of its socket in the rack.
If you don’t have a puller for the control rod, then it’s easy to find one from familiar car enthusiasts or just buy it, it’s cheap. This is a metal cylinder with a slot and a bottom into which an extrusion bolt is screwed. To carry out the replacement in the inspection hole, a jack with a wheel wrench is also useful to lift the car. To completely disassemble the unit, it is better to have a vice and purchase CV joint-4 thick lubricant.
Disassembly procedure
The first operation is not removing the wheel, but unscrewing the large wheel bearing nut. It is caulked, so it will be much more difficult to loosen when the car is raised. After this, the wheel bolts are loosened and the car is raised with a jack.
Do not forget to place reliable stops under the rear wheels to secure the car.
If the Priora has an iron oil pan protection installed, then it must also be removed in advance. In addition, it would not hurt to partially empty the oil sump of the checkpoint (Checkpoint - a point designed to control passage (visit) and access to the territory of any facility)
to avoid watery lubricant leaking out of the open hole after removing the drive.
Installing the latest hinges
After disassembling the drive, you need to install new parts and reassemble the box in reverse order. The replacement is done as follows:
- The small clamp is put on the axle shaft first, and then the new boot. Use a clamp to wrap around the end of the casing and tighten it. It is better to unscrew the boot in the other direction so that it does not interfere with the installation of the hinge.
- Add SHRUS-4 lubricant to the hinge mechanism. According to the annotation, the external grenade must contain at least 40 cm³, and the internal grenade must contain at least 80 cm³ of thick lubricant.
- Place the grenade on the shaft, making sure the splines match. Using a wood attachment, press it in as far as possible with gentle hammer blows.
- Pull the boot onto the grenade, apply a large clamp and tighten it. In the same order, the operation is performed on the other side of the axle shaft.
Now the drive assembly can be placed in the space. To avoid mixing up the places of the hinges, you should follow the mark placed on the axle during disassembly. The assembly is installed in the space from the inspection ditch, the splined part of the internal grenade is inserted first. To seat it in the slots all the way, you will have to rest the axle on the lower lever and apply several blows with a hammer through a piece of wood from the other side. The upcoming assembly proceeds in reverse order.
Source: korchim.ru
CV joint replacement
You can make the replacement yourself; to do this, you need to stock up on the necessary tools:
- key at 17, 19;
- heads at 13 – 17, 30;
- balloon;
- mounting blade;
- knob;
- jack;
- pliers and lubricant.
Having prepared the tools, we move on to the car.
For convenience, we drive the car onto an overpass or inspection hole. We put the handbrake on and engage the gear. For greater safety, you can put clamps under the wheels; only the rear two are enough.
The inner and outer CV joints are located on the shaft drive, therefore, the technology for replacing them is almost identical.
CV joint replacement
- We remove the crankcase protection; to do this, unscrew two bolts at the front to 17 and 2 nuts at the back to 19.
- Drain the lubricating fluid from the box (about 1/3 of the total volume).
- We use a wheel wrench to remove the wheel bolts of the side of interest.
- Take the 30mm head and unscrew the outer CV joint nut.
- Raise the car using a jack.
- We take a 13mm wrench and unscrew the two bolts (you can knock out one of the pins) from the hub that hold the ball joint.
- Using a mounting blade (mount), we move the hub away from the reaction rods.
- Pull the strut towards you and pull the CV joint pin out of the hub.
- Move the shaft drive to the side.
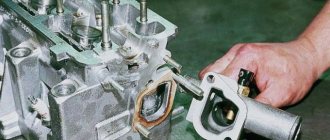
- Open the hood and use a pry bar to remove the inner CV joint from the box. To do this, you need to insert a mounting blade between the parts and pull it sharply towards the box.
- After the CV joint has moved a little, we move to the wheel arch and pull out the shaft drive with two “grenades”.
- We take pliers and remove the large and small clamps of the protective cover from the grenades.
- If the boot is damaged, we tear it off, and if not, then we move it to the center.
- We hit the inner race of the inner CV joint as hard as possible with a hammer until it falls off. We do the same thing, on the other side.
- Remove the rings from the shaft drive.
- We put rings from the new CV joint kit on the shaft and a new boot.
- We hammer in a new “grenade” with a hammer.
- Lubricate the CV joint with grease, and squeeze the remainder into the boot.
- Using clamps, we fix the boot on the “grenade” and the shaft.
- We do the same with the other CV joint.
- We take the shaft drive, screw the nut onto the outer CV joint and use a hammer to hammer it into the box.
- We assemble the parts in reverse order.
Replacing the outer CV joint and CV boot in the Lada Priora
Replacement of external CV joint in Lada Priora
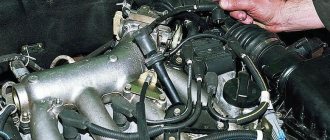
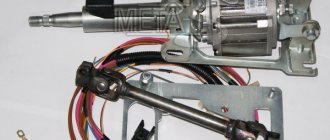
I began to notice that when entering a left turn, a rumble occurs, if I give it the gas, it starts to tap. The verdict is that the outer right CV joint must be replaced. Finding the CV joint caused some difficulties. Preference, naturally, to the best German company GKN. But no matter how hard I tried, finding this company under ABS was not a success. Maybe I found it poorly and this company makes CV joints for VAZs with ABS, if anyone knows, write the catalog number, I will be grateful. My choice was external CV joint 2108-2170 GKN SPIDAN catalog number - 20817 - 2500 RUR set
CV JOINT KIT AND A COUPLE MORE PARTS)
We solve the ABS problem. I bought the ABS ring separately, the cost in question is 100 rubles
Lightly press the ring onto the CV joint.
Ready. To be on the safe side, I smeared cool welding on the sides of the ring, although it was put on with effort, it won’t be excessive
Replacement is all according to the manual. The CV joint comes with German clamps, there is an extremely good tool for them, 5 seconds and you're done
Regarding the CV joint: I was extremely surprised by the small resource of the CV joint. At 99 CV joints in critical modes and slipping in corners, I lost 80 thousand and I still don’t know how much. Here I have 30 thousand cars and one can say that they are used sparingly, but it’s kind of bad for him, it’s somehow unclear.
Replacement of outer CV joint boots on Lade Priora
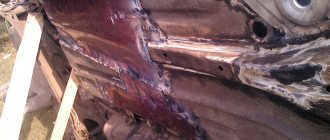
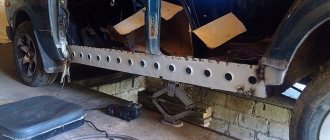
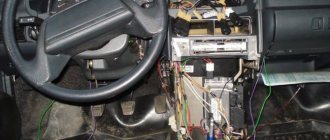
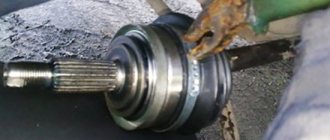
While removing the front left wheel, I found a torn rubber band on the outer CV joint. I was very surprised and upset. Although I didn’t care about the CV joint. Tada decided to check the right one too, and it was not in vain, there was a crack about mm in the same place.
Yesterday I changed it to the newest one from the factory. There is no photo of the work, because... my hands were covered in oil. Operating procedure:
· remove the plug from the hub nut;
· Unscrew the nut and loosen it slightly. Unfold it carefully! I had to edit the first 3 turns on the CV joint
(there is an M20 thread, I don’t remember the pitch). It's like there's raw iron on the threads.
· loosen the wheel rim bolts;
· drained the oil from the box;
· turned on the 1st speed and unscrewed the nut;
· unscrewed the ball joint bolts;
· turn the steering wheel all the way to the right (because I changed the boot on the left wheel)
· pull the stand towards you, current without vandalism)
· remove the outer CV joint from the disk;
· pulled the drive out of the box; It didn’t work out the first time, but it worked out.
· clamped the drive in a vice and knocked down the outer CV joint
Then washing, cleaning, inspection, put on a new boot, put in CV joint-4 lubricant and put the CV joint on the drive. Later reassembled in reverse order
Having surfed the Internet, I found that these rubber bands last for 2 years. I have had 4 years.
How to remove a vaz shruz
Having determined that it is the external grenade that is broken, we begin to remove it.
How to unscrew the hub nut on a VAZ?
First of all, unscrew the hub nut. To do this, take a 30mm head and a lever, the larger the better. We put bricks under the wheels to prevent the car from rolling (simply putting it in gear is not an option, the wheel will spin) and begin to unscrew the hub nut.
In this matter, the more you weigh, the better, since I very often lacked my weight and leverage of about one and a half meters. I got out of the situation in the following way: I stood completely on the lever, as close to the edge as possible, thereby giving maximum tension to the nut, and hit the lever with a hammer. Usually this method helped me unscrew even the most soured wheel nuts.
One more nuance: if the outer walls of the head come into contact with the walls of the hub, it is better to lubricate the head with mining or lithol, or, in extreme cases, with silicone grease. Thanks to this trick, the head will not bite in the hub.
How to remove a grenade?
The hub nut is unscrewed, now we remove the wheel, unscrew the two bolts that hold the ball joint, disconnect the suspension arm and the hub, move it to the side of the car while lightly tapping the grenade, remove it from the hub.
At this point there are two options:
- The grenade is already broken.
- Replacing the grenade due to its crunching sound.
In the first case, you simply remove the outer part of the CV joint from the shaft, then the retaining ring from the drive shaft and knock off the cage with a hammer.
In the second case, removing the CV joint becomes more difficult. You need to deflect the grenade relative to the shaft at the maximum angle so that the bearing balls and their cage are visible.
Now use a hammer to break the jumpers of the cage between the bearing balls and take out the balls one by one. When you take out the last ball, you can remove the body of the grenade, and then its inner part sitting on the shaft, after first removing the locking ring from the shaft.
Of course, you can simply try to knock the grenade off the shaft, but due to the locking ring this will be problematic.
That's it, the CV joint is completely removed. Now let's start installing the new part.