Starter activation relay VAZ 2108, 2109, 21099
On a VAZ 2108, 2109, 21099 and similar cars, the starter is turned on not directly, but through a relay.
Purpose of the starter switch relay VAZ 2108, 2109, 21099
The starter switch relay is designed to reduce the load on the ignition switch contacts when starting the engine with the starter. Since the starter is the most powerful consumer of electrical energy in the electrical equipment of a car, if it was turned on directly, the ignition switch would burn out very quickly.
— Where is the starter activation relay installed for VAZ 2108, 2109, 21099
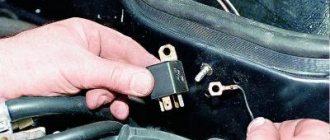
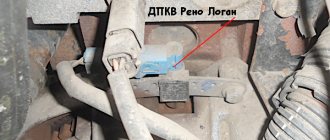
The starter switch relay for VAZ 2108, 2109, 21099 is installed on the engine compartment panel.
Where is the starter relay installed?
— Starter activation relay device
The starter activation relay consists of a coil (copper wire winding) with a magnetic core located inside.
— How does the starter relay work?
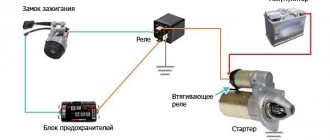
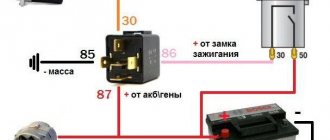
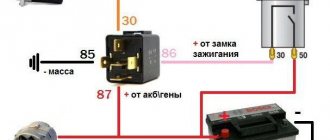
After turning the key in the ignition switch to the “Starter” (II) position, its contacts “30” and “50” close. Voltage is supplied to the starter activation relay (relay contact “85”). It is triggered (the contacts inside the relay are closed) and supplies voltage to terminal “50” of the starter traction (retractor) relay. The retractor is activated and the starter turns.
— Connection diagram for starter relay
— Faulty starter relay
The most common malfunction of the switching relay is when the starter stops turning on.
Oxidation of relay contacts or ground
Relay burnout due to short circuit
A “break” in the electrical circuit may also occur, which should be taken into account when diagnosing a malfunction.
“Culprits” of the malfunction of the VAZ 21083 starter relay
A faulty relay must be replaced with a new one; if the contacts are oxidized, we clean them and check its operation.
— Applicability of the starter activation relay on VAZ 2108, 2109, 21099 vehicles
In the electrical circuit for switching on the starter of a VAZ 2108, 2109, 21099 car and their modifications, a starter switch relay 111.3747-10, 97.3747-10 and their analogs are used.
— Characteristics of the starter activation relay 111.3747-10
Rated voltage - 12 V
Operation voltage: no more than 8 V
Release voltage - 1.5 - 5.5 V
Winding resistance - 85±5 Ohm
Notes and additions
The starter is the most powerful consumer of electrical energy in a car's electrical equipment (1.3 kW). When starting the engine, the current consumed by it can reach 400 A, which is a lot. Therefore, all connections in its electrical circuit must have reliable contact. Otherwise, the starter may “shoe” because its collector is dirty.
Source
Dismantling
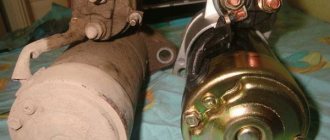
There should be no problems with the dismantling process. The main thing here is to remove the starter, since the required relay is held on it. Therefore, dismantling is carried out as an assembly.
- Turn on the handbrake, disconnect the battery by removing the negative terminal from it.
- A wire with a large cross-section goes from the battery to the contact of the relay. It can be turned off by unscrewing it using a 13 key.
- Remove the thin winding power wire from the solenoid relay.
- Using the same 13mm wrench, unscrew the three mounting nuts holding the starter to the clutch block.
- You can remove the device through the bottom or top. If you chose the top, then you need to slightly rotate the starter around its axis and remove it.
- The lower output is more difficult, since here you need to remove the crankcase protection. But if parallel work is carried out that requires similar manipulations, problems will not arise.
Replacing the starter switch relay on VAZ 2108, VAZ 2109, VAZ 21099
Welcome! Starter activation relay - many will now think that we are talking about a retractor relay, in fact this is not so, in total the starter has two relays, one that turns it on and the second that extends the bendix and pushes its gear onto the crankshaft pulley (The second is the same retractor relay), if the first one fails (happens rarely, mainly due to overloads on it or due to faulty wiring), you will not be able to start the starter and therefore the car will not start; if the second one fails, there will be a little another situation, namely, the car may also not start and the clicking will occur when the key is turned, but this can be said even less, but if this relay fails completely and does not return the bendix to its reverse position, then the following will happen: When you turn the key, the starter will start turning the car's engine and eventually it will start, but when you return the key after the engine has started in the reverse position, the bendix on the starter will not come back (the solenoid relay does not work) and in a very short time the starter will become unusable .
Note! To change the relay, which is only responsible for turning on the starter, you need to stock up on: Only one “8” wrench, for the most part you don’t need to take anything else, but maybe one more wrench so that, just in case, you can remove the minus terminal from the battery!
Summary:
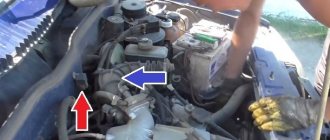
Where is the starter relay located? It is located in the engine compartment and is attached there to the car body using one single nut; in the photo below this relay is indicated by a red arrow, and the blue arrow shows the air pipe behind which this relay is located.
Checking status
Before changing the relay, make sure that the problem with starting the engine is related to this component.
To do this, consider two situations that indicate its malfunction.
| Situation | Your actions |
| The relay makes clicks, but the armature does not spin | If there are clicks from the relay, check the condition of the armature. To do this, the terminals of the retractor relay are bridged with a large screwdriver or a piece of welding cable to the terminals at the ends. Taking a thin wire or a screwdriver can easily burn the terminals. When the armature is working, after closing the terminals, the armature will spin, which can be determined by the sound. Consequently, the solenoid relay itself has failed and requires repair. |
| The relay is completely silent | Even if there is silence after closing the terminals, the problem should be looked for in the starter. The relay no longer plays any role here. |
Having discovered that the relay has served its purpose, it must be replaced or repaired, if possible.
How to replace the starter switch relay on a VAZ 2108-VAZ 21099?
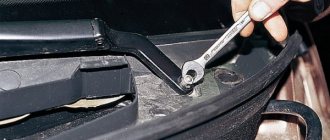
1. If you carefully read the above text, you will immediately guess how to remove this relay, but we will still instruct you, find this relay in your car (the location is shown in the photo above), you see a block of wires connected to it, then disconnect it, and after it is removed and set aside, take a wrench in your hands and unscrew the relay mounting nut with it and then remove it, by the way, if the work is done in the rain or in very wet weather or if you are simply afraid of a short circuit in the wiring (B In this case, all the wiring will burn out and will require replacement), then protect yourself by disconnecting the wire from the minus terminal on the battery; if you don’t know how to do this, then study “this article”, it says everything in the first paragraph.
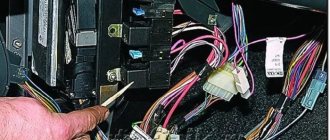
Note! To check whether the relay is working or not (We don’t recommend buying a new relay just like that, always check everything), you can use two different methods, the first is that you have to remove the cover from the mounting block and pull out from there a relay with exactly the same marking as you have a relay for turning on the starter, after removing these two relays, replace these two relays and try to start the car, if it doesn’t start, then it’s not the relay and you need to look for the problem either in the starter itself or in the ignition switch, the second method implies that you will find the wire bring the jumper (Indicated by a blue arrow, the wire can also be used) and its conclusions to the wire block, namely to its contacts “30” and “87” (These are the lower and upper contacts of the block, take a closer look at the relay on it, they are marked or for clarity, take a look in the photo they are indicated by a red arrow, although there is a block from a completely different car, but it is almost the same and on it you can understand where these two contacts are located), if the car starts immediately (Don’t forget to remove the jumper when it starts to start) then it’s all in relay, if not, then look further (When you do the second method, do not forget to turn the key in the ignition until all the devices light up)!
Additional video clip: For more detailed information about checking the relay using the classic example, see the videos below:
Source
Principle of operation
It all works like this: when the engine is not running, the armature of the retractor relay is pulled out of the housing due to the action of the spring on it. The same spring holds the Bendix and gear through the fork in a position where there is no engagement.
When the ignition key is turned to the start position, the solenoid relay is first activated.
The electrical energy supplied to the coils of the solenoid relay ensures the appearance of a magnetic field inside the housing.
This field acts on the armature, and it, overcoming the force of the spring, enters the body, after which the retracting coil is turned off and ceases to create a magnetic field, but in the retracted position the armature is held by the holding coil with its magnetic field.
In this case, the armature pulls the fork, which in turn moves the bendix forward along the rotor shaft, and its gear engages with the flywheel ring.
Read more: Kamaz water pump repair
The armature, entering the housing, pushes the starter relay rod, and, moving, closes the contact plates of the positive terminals with each other.
Electricity from the battery is supplied to the brushes of the starter motor, and its rotor begins to rotate. And since the gear has already engaged, the rotor begins to rotate the flywheel.
After starting the power plant and turning the ignition key back, the power to the holding coil stops, its magnetic field disappears and the armature comes out of the housing under the influence of a spring.
At the same time, it disengages the bendix through the fork and stops acting on the relay rod. He, in turn, moving away, opens the contact plates, and the starter is completely turned off.
VAZ 2109 21099 2108 - fuses and relays
VAZ-2109
“Sputnik” was popularly called “
nine ”, was produced in a hatchback body and represents a 3-door version of the VAZ 2108 . The VAZ 21099 was also assembled on this platform . Therefore, the arrangement of blocks and the purpose of their elements are common. This series of cars was produced from 1984 to 2011 mainly with gasoline engines (injector and carburetor). In this material you will find a description of the fuse and relay blocks of the VAZ 2109 2108 21099 with diagrams and examples of execution. Let's highlight the fuse responsible for the cigarette lighter.
Where is the fuel filter located?
The fuel filter (TF) on the VAZ-21099i is designed to clean gasoline from debris, dirt and various impurities; it is a monolithic structure with a rigid metal body and a filter element inside. The frequency of its replacement is every 20-30 thousand km of the distance traveled, also if the car begins to move jerkily, and diagnostics showed that the fuel pump is clogged.
It’s easy to find out where the fuel filter is located; to do this, you need to install the car on an inspection hole or a car lift. The TF is located on the bottom of the body, next to the rear beam and the gas tank, and is secured with a special clamp, which is tightened with a bolt and nut.
Before you start changing the filter, you need to relieve the fuel pressure, otherwise when you unscrew the fuel fittings, gasoline will splash under high pressure. You can relieve pressure in the line using a special nipple located at the rear of the fuel rail. Before starting such an operation, it is necessary to prepare a plastic container into which gasoline should be poured, then unscrew the safety cap.
To release the pressure, you can use a standard flat-head screwdriver; when you press the nipple valve, gasoline will come out of the system.
After removing fuel from the line, we proceed to replacing the fuel pump.
Related articles:
- The influence of the fuel vapor recovery system on the operation of the Lada Kalina engine. Modern technologies are developing, equipment is becoming more complex and sophisticated, and progress does not bypass motor vehicles. Carburetor cars were very simple, and understanding them [...]
- Front spar of the VAZ-2109 - replacement, repair, cost of work The VAZ-2109 is a car that does not have a strong body; iron corrodes quite quickly, and almost all body parts rust. Replacement of the front side member is required […]
- Features of replacing the VAZ-2114 oxygen sensor, signs and causes of malfunction In connection with tightened environmental standards, all cars began to be equipped with additional systems that reduce the toxicity of exhaust gases, and on almost every car with […]
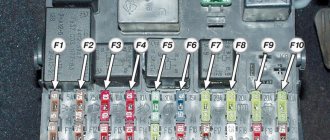
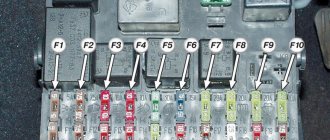
Fuse and relay box
The main block with fuses and relays is located under the hood, in the rear, in the installation compartment on the left, under the protective cover.
Option 1
Fuse designation
p, blockquote 10,0,0,0,0 —>
| 1 | 8A Right fog lamp |
| 2 | 8A Left fog lamp |
| 3 | 8A Headlight cleaners (at the moment of switching on), headlight cleaner switch-on relay (contacts), headlight washer switch-on valve |
| 4 | 16A Coil of the radiator fan relay, electrical circuit of the switch and heater motor |
| 5 | 3A Hazard switch in turn signal mode, turn signal switch, turn signal switch, turn signal indicator light, turn signal indicator light, reverse optics switch, reverse lights, tachometer, voltmeter, gasoline level indicator, gasoline level sensor, gasoline level indicator light , coolant temperature indicator, temperature sensor, warning lamp and emergency oil pressure sensor, brake emergency lamp, brake system hydraulic switch, hand brake switch |
| 6 | 8A Brake light switch and bulbs, interior lighting |
| 7 | 8A Room lighting lamps, indicator lamp for turning on the dimensions, illumination lamp for the heater and cigarette lighter handles, glove box illumination lamp, switch and instrument panel illumination lamp |
| 8 | 16A Signal, signal switch, radiator fan motor |
| 9 | 8A Left side lamp, left rear side lamp |
| 10 | 8A Right side lamp, right rear side lamp, fog light switch, fog light indicator light |
| 11 | 8A Turn signal switch and breaker, turn signal lamps, warning lamp in emergency mode |
| 12 | 16A Cigarette lighter, socket for carrying lamp |
| 13 | 8A High beam right headlight |
| 14 | 8A Main beam of the left headlight, high-range optics warning lamp |
| 15 | 8A Low beam right headlight |
| 16 | 8A Low beam left headlight |
Fuse number 12 at 16A is responsible for the cigarette lighter.
Relay purpose
p, blockquote 12,0,0,0,0 —>
| K1 | Headlight wiper relay |
| K2 | Relay - turn signal and hazard warning light switch |
| K3 | Windshield wiper relay |
| K4 | Lamp health monitoring relay |
| K5 | High beam relay |
| K6 | Headlight washer relay |
| K7 | Relay for switching on glass lifts |
| K8 | Horn relay |
| K9 | Fan relay |
| K10 | Rear window defroster relay |
| K11 | Low beam relay |
Option 2
Photo - diagram
p, blockquote 15,0,0,0,0 —>
| 1 | 10A Headlight cleaners (at the moment of switching on) Headlight cleaner switching relay (contacts) Headlight washer switching valve |
| 2 | 10A Direction indicators and hazard warning relay (in hazard mode) Hazard warning lamp |
| 3 | 10A Rear lights (brake lamps) Interior lighting |
| 4 | 20A Rear window heating element Relay (contacts) for turning on the rear window heating Plug socket for a portable lamp Cigarette lighter |
| 5 | 20A Electric motor of the engine cooling system fan and its activation relay (contacts) Sound signal and its activation relay |
| 6 | 30A Electric glass lifts of front doors Relay for turning on electric glass lifts |
| 7 | 30A Headlight cleaners (in operating mode) Relay for turning on the headlight cleaners (winding) Heater fan electric motor Window washer motor Rear window wiper gear motor Rear window washer timing relay Windshield and rear window washer activation valves Relay (winding) turning on the electric fan of the engine cooling system Relay (winding) ) switching on the heated rear window Indicator lamp for heated rear window Glove box lighting lamp |
| 8 | 7.5A Left fog lamp |
| 9 | 7.5A Right fog lamp |
| 10 | 7.5A License plate lights Engine compartment lamp Instrument lighting lamps External lighting control lamp Heater lever illumination panel Cigarette lighter lamp Left headlight (side light) Left rear light (side light) |
| 11 | 7.5A Right headlight (side light) Right rear light (side light) |
| 12 | 7.5A Right headlight (low beam) |
| 13 | 7.5A Left headlight (low beam) |
| 14 | 7.5A Left headlight (high beam) Indicator lamp for turning on the high beam headlights |
| 15 | 7.5A Right headlight (high beam) |
| 16 | 15A Turn indicators and relay-interrupter for direction indicators and hazard warning lights (in turn signal mode) Turn signal indicator lamp Rear lights (reversing lamps) Motor gearbox and windshield wiper activation relay Generator excitation winding (when starting the engine) Brake fluid level indicator lamp Oil pressure warning lamp Carburetor air damper warning lamp Parking brake warning lamp "STOP" indicator lamp Coolant temperature gauge Fuel level gauge with reserve warning lamp Voltmeter |
Additional block
It is located in the cabin, under the panel on the right, mainly on cars with injection engine types.
Decoding
p, blockquote 32,0,0,0,0 —>
| 1 | 15A Main relay |
| 2 | 15A Injection system power supply circuit (non-switchable voltage input) |
| 3 | 15A Fuel pump |
| K1 | Main relay |
| K2 | Electric fuel pump relay |
| K3 | Cooling fan relay |
We have also prepared a video on this publication on our channel. Watch and subscribe.
p, blockquote 34,0,0,0,0 —> p, blockquote 35,0,0,0,1 —>
Still have questions? Ask them in the comments.
Comments 3
Hello. I have a VAZ 99. Year of manufacture 1998. The car has been converted. I have an injection one. ECU January. Now the question is - is there a difference in the carburetor fuse block from the injection one? I have a block before the 1st sample (finger type), the car sometimes does not start, in general there are a bunch of reasons. A month ago I opened the block, water got in there, I didn’t bother and bought a used one exactly like this and installed it. after replacement even more problems. Should I install another block? Please let me know.
For the injector you need a block in which the side connector goes up (in the catalog it is designated 2114 or 2115 (newer modification)), and the pin connector is for the carburetor, most likely your fan is not working and the generator is not charging at idle, and little things Problems
Hello. Tell me please. I have a VAZ-2109. fuse box option-2. fuse f-13 left headlight does not light low beam. There is no power to this fuse. everything else rang. I don’t know where to dig next?
Source
vtulka_0.jpg
How can you get it out yourself? If you were able to notice that the starter sometimes cranks your power unit with tension when the battery is fully charged, then the culprit for the phenomenon is the armature, which touches the stator. A small problem is enough for the starter shaft to become slightly misaligned: the narrow gap disappears completely. But sometimes the reason lies in severe wear of the bearing (front). You can sleep peacefully for a day: this problem can be quickly solved. To eliminate it, you need to prepare a tap of suitable size, find a drill chuck, take a long bolt and an old bushing, a jar of nuts and a box of nails. Now it’s worth disconnecting the battery, the starter, and then removing it from the “coat,” that is, removing the wiring. Happened? Proceed to unscrew the lower bolt of the device and remove the remaining fasteners from the starter.
We take the sword and install it in the chuck of a hand drill: let's try to make a thread in the sleeve. Carefully! Carry out the following actions at low speeds. A marksman is like a girl: the object is fragile. Excessive force or slight misalignment can break it. God forbid this happens: you have to fork out money for a new product. Although you can carry out resuscitation using a long threaded bolt, turning out new grooves. Once they are ready, you need to insert the nails so that their tips protrude no more than a centimeter above the end.
It turned out to be a real masterpiece of futurism! We mount it into the bushing, perform manipulations, trying to pull out the fragment, while doing everything smoothly, without distortions. As soon as we succeed in cutting the revolutions, we pull out the tap, then insert a bolt of a suitable size and pull the sleeve out. This operation can be performed several times. The starter likes to be capricious due to the misalignment of the shaft, so after some time it will again be difficult to hold the bushing. What to do? Definitely don’t wipe the sweat from your face, finish repairing the VAZ 2109 starter, repeating monotonous actions. Get ready for a shopping trip. While you are enjoying the smell of iron, your significant other will buy a magazine where they will read an article about the history of the VAZ 2109 brand and regret that they purchased a non-domestic unit at a lower price.
