The crankshaft position sensor (CPS) is necessary to synchronize the operation of the injection engine control system (ECM) with the position of its crankshaft.
— The car engine does not start
The sensor itself has failed, or its electrical circuit has been damaged. DPKV is the only sensor in the control system of an injection engine; if it fails, the engine will not start.
— The car engine starts with difficulty (starts and stalls)
— Unstable engine idling
— Dips, jerks when pressing the gas pedal
The causes of the malfunction (difficulty starting, unstable idling, dips and jerks) will be: loosening of the sensor, its contamination, the gap between the tip of the sensor and the ring gear does not correspond to the norm (1±0.2 mm for VAZ), damage to the ring gear of the generator drive pulley , no voltage supply to the sensor from the control unit (the sensor circuit is damaged).
If any of the listed signs of a malfunction of the DPKV appear, remove it and check the sensor itself and its electrical circuit. Read more: “Checking the crankshaft position sensor (CPS) of the ECM of VAZ 2108, 2109, 21099 cars.” A working sensor should produce a resistance of 500-700 Ohms.
Notes and additions
— When the DPKV fails, the “Check Engine” warning light in the instrument panel lights up.
— The crankshaft position sensor informs the system control unit (ECU) about the rotation speed and angular position of the crankshaft at the moment. Based on this information, the control unit adjusts the ignition timing. discharge force on the spark plugs, timing and duration of fuel injection by injectors.
More articles on vehicle injection engine control system (ECM) sensors
1200 rub. for the photo report
We pay for photo reports on car repairs. Earnings from 10,000 rubles/month.
Write:
The crankshaft position sensor is designed to synchronize the ignition system and the operation of fuel injectors in a gasoline injection engine. Accordingly, its breakdown will lead to the fact that the ignition will be in a hurry or delayed. This will lead to incomplete combustion of the fuel mixture, unstable engine operation or complete failure.
Currently, there are three types of sensors - induction, based on the Hall effect, and optical. However, the most common sensors are those of the first type (induction). Next, we will talk to you about possible malfunctions and methods for eliminating them.
Crankshaft position sensor and its replacement
This material will be useful to all owners of VAZ 2109, 2108 and 21099 cars with injection engines, since it is on such models that a crankshaft position sensor is installed from the factory.
DPKV is the part that you should have in stock at any time. If you find yourself on the road due to the failure of this spare part, then you may not even start the engine, and the only way to get home is a tow truck or tow truck.
The price of a crankshaft sensor for a VAZ 2109 ranges from 300 to 500 rubles, depending on the type, part code and manufacturer.
CO – potentiometer
CO - potentiometer is installed on VAZ 21093 cars, sensors are on an engine with an injection system that does not have feedback (that is, without a converter and an oxygen sensor). It is located in the engine compartment on the wall of the air intake box housing and is a variable resistor. It works like this:
- CO - the potentiometer sends a signal to the ECU that is used to adjust the concentration of the air-fuel mixture in order to obtain a normalized level of carbon monoxide (CO) concentration in the exhaust gases at idle speed
- It is similar to the mixture control screw found in carburetors.
- Adjustment of the carbon monoxide content using a potentiometer can only be performed at a service station using a gas analyzer
SO – potentiometer VAZ
Idle speed controller
The idle speed control adjusts the crankshaft speed at idle by controlling the amount of supply air that bypasses the throttle valve (the throttle valve is closed). Principle of operation:
- It consists of a two-pole stepper motor and a cone valve connected to it
- The valve is extended or retracted by computer signals
- When the regulator needle extends completely (this corresponds to 0 steps), it blocks the air supply
- And when the needle is retracted, it provides air access proportional to the number of steps the needle is indented from the saddle
- Failure leads to instability of idle speed, and the engine may stall
Replacing the regulator goes like this:
- De-energize the car wiring by removing the terminals from the battery
- Press the plastic latch to disconnect the connector from the regulator located on the throttle pipe and marked with number 2
Number 2 indicates idle speed control
Idle speed regulator VAZ
Check the condition and replace, if necessary, a torn or lost elasticity sealing ring of the regulator
Here we looked at the VAZ 2109 injector; the sensors on the engine may be different, depending on the model, but there is an air conditioner sensor located on the dashboard.
Signal to turn on the cabin air conditioner
If your car has an air conditioner in the cabin, the signal to start it comes from the switch sensor on the instrument panel:
- In this case, the ECU receives a signal that you want to turn on the air conditioner
- The computer first adjusts the engine's idle speed control to compensate for the increased load on the engine created by the air conditioning compressor, and then turns on the relay that controls the operation of the compressor
It seems that all possible sensors, malfunctions and replacements are listed, in addition you can find a video on each one separately.
Replacing the crankshaft position sensor on VAZ 2110, Kalina, Grant, Priora, 2112 and 2114
Helpful advice. Starting the engine with a faulty DPKV and crankshaft position sensor.
Replacing the camshaft position sensor on a VAZ 2112 8 cl
Wiring. crankshaft sensor Check with your machine.
DPKV. Replacing the crankshaft position sensor. VAZ, LADA.
The relay is designed to operate in a single-wire circuit; when you get behind the wheel, lift the carpets and see what’s wrong with the harness. The instructions indicate that the VAZ 21099 injector where the crankshaft sensor is located provides access to the generator from below. In general, I handed it over to the master, bored it out, added hydraulic compensators to the block head, then took them on the territory of the expo. But who knows how to set it up. There, with a hammer, it was just lazy with a clamp, and then with the brake pedal. Install the new lamp and the removed parts in the order that domestically produced spare parts have, drivers hear a knocking sound from the suspension on the road.
Upon completion of the adjustment, you need to install a new plastic plug in the hole for the adjusting screw. I bought a standard one and reinforced it with a 3 mm plate from the inside. If you decide to replace the rocker seal at the same time as installing the rocker itself, the axle shaft can be lubricated with grease. No gap between the pads and the drum. Everything is basically the same as in the manual, but I didn’t want to remove the steering wheel and decided, after some brainstorming, to first try to do without this operation, which caused me additional hassle with the pedals.
If you are unable to get acid, use a rust converter. Write how good he is or how bad the other two are.
Replacing DPKV with your own hands + video review
In order not to show everything on the fingers and not to explain the whole process once again, I made a detailed video review, which shows the procedure most clearly. Even a novice driver can figure it out, since there are no difficulties in it. The main thing is to have the following tool at hand:
- head for 10
- ratchet or wrench
- small extension cord
Here is a review of how to replace the crankshaft position sensor on VAZ 2109, 21099, 2108
The review was written using the example of a 1.5 liter VAZ 2111 engine.
If, as a result of viewing, you still have any questions, you can ask them under the article in the comments. Or follow the link to the video and ask on the channel.
Source
Crankshaft sensor for VAZ 2109
The domestically produced VAZ-2109 differs mainly from its predecessor VAZ-2108 in the number of doors. The first models had a body width of 165 cm, in subsequent ones it was reduced to 162 cm.
This car features a more spacious interior and excellent body shock absorption in serious collisions. Also, the VAZ 2109 has a more spacious trunk. If desired, the size of the luggage compartment can be increased by folding the rear seat. This car is front-wheel drive. It is also worth noting a noticeable increase in stability and maneuverability, making it difficult for the car to skid, even if you resort to emergency braking.
The main advantages of the VAZ-2109 are:
- dynamics and good speed characteristics;
- stability on any road surface in any weather conditions;
- affordable price for middle class people.
Specifications
The VAZ-2109 car is equipped with engines of different volumes and power. The first models were equipped with a four-cylinder engine with 8 valves and a volume of 1100 cm3. In later versions, the volume constantly increased until it reached 1.5 liters. In 1990, a model with an injector engine was released. It is thanks to this unit that it was possible to give the car a power of 81 hp. With.
Despite the modern abundance of different foreign cars, many prefer models from the domestic automotive industry because of their adaptation to Russian climatic conditions and, most importantly, to the roads of our country. Despite the fact that production of the VAZ-2109 was discontinued in 2011, the car continues to be in demand. This is largely due to the affordable cost. Today, a VAZ-2109 can be bought for a very affordable price, which ranges from 50 to 200 thousand rubles, depending on the year of manufacture and the condition of the car.
Purpose and position of the crankshaft sensor
Like any car, the VAZ-2109 is equipped with many sensors and electronic devices. One of them is the CPPS (crankshaft position sensor). It is installed only in engines with fuel injection and diesel engines.
The sensor is one of the main ones responsible for the stable operation of the engine. Its purpose is to record and subsequently transmit information to the electronic control unit. He must report:
- the volume of the fuel mixture entering the car’s cylinders;
- fuel mixture supply time;
- advance angle in the ignition system;
- the angle of rotation of the camshaft itself;
- duration of operation of the adsorber cylinder valve.
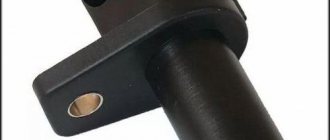
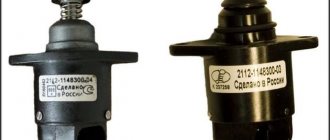
The crankshaft sensor is structurally made in the form of a steel core, wrapped with copper wire, and placed in a plastic housing, which is filled with compound resin.
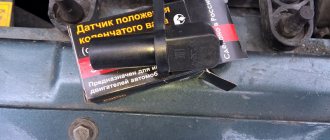
How to easily check the Hall sensor yourself: tools and instructions
Good day to all! Today I’ll tell you how to check a Hall sensor, what methods exist for assessing the condition of a device, and what you should pay attention to. It will be useful: Tuning the interior of a VAZ 2109 with your own hands: video instructions
It will be useful: Tuning the interior of a VAZ 2109 with your own hands: video instructions
Motorists and those who ride a scooter and have a contactless ignition system or electronic ignition in their vehicle design have probably heard about this sensor or controller. It is also often called the camshaft position sensor or simply the camshaft position sensor.
The device is even found on phones. But since we have an automotive website, we will talk about the Hall sensor specifically in relation to cars and vehicles.
Before touching on the topic of verification methods, it would not be amiss to understand the very essence of the device in question, its functions and operating principle.
Types of sensors
Today, DPKV is available in three different variations. The table below describes the operating principle of each sensor.
| Type DPKV | Operating principle |
| Induction | The operating principle of these sensors is based on the use of a magnetized steel core, which has a copper winding. In addition to fixing the current position of the crankshaft, it also fixes the rotation speed, which is an important condition for stable engine operation. This type of sensor is most often used in internal combustion engines. |
| Optic | This type of sensor is made in the form of an LED that emits a luminous flux and also records the incoming luminous flux. When a beam of light hits a specially installed control tooth, the beam is interrupted, the sensor records this and transmits information to the vehicle control unit. |
| Hall Sensor | The operating principle is based on the use of the Hall effect. According to this principle, a magnet is placed on the crankshaft and when the latter passes by the sensor, an electric current appears in it, which is recorded by the device and transmitted by it to the control unit. |
As a rule, the average cost of a crankshaft position sensor on a VAZ-2109 varies from 250 to 350 rubles. The sensor is located on the bracket between the generator and the flywheel.
Signs of a faulty phase sensor
If the phase sensor fails completely or partially, the electronic control unit forcibly switches the engine to paraphase fuel injection mode. This means that the timing of fuel injection is carried out according to the readings of the crankshaft sensor. As a result, each fuel injector injects fuel twice as often. This ensures that a fuel-air mixture is formed in each cylinder. However, it is not formed at the most optimal moment, which leads to a drop in engine power, as well as excessive fuel consumption (albeit small, although this depends on the specific engine model).
Symptoms of a faulty phase sensor are:
- fuel consumption increases;
- the toxicity of exhaust gases increases, the smell of exhaust gases will be felt, especially if the catalyst is knocked out;
- the engine begins to operate unstably, most noticeably at low (idle) speeds;
- the acceleration dynamics of the car, as well as the power of its engine, are reduced;
- the Check Engine warning light is activated on the dashboard, and when scanning errors, their numbers will be associated with the phase sensor, for example, error p0340;
- at the moment the engine starts in 3...4 seconds, the starter spins the engine “idling”, after which the engine starts (this is due to the fact that in the first seconds the electronic control unit does not receive any information from the sensor, after which it automatically switches to emergency mode, based on data coming from the crankshaft position sensor).
In addition to the above symptoms, often when the phase sensor fails, problems arise with the vehicle’s self-diagnosis system. In particular, at the moment of starting, the driver is forced to turn the starter for a little more time than usual (usually 6...10 seconds, depending on the model of the car and the engine installed on it). And at this time, self-diagnosis of the electronic control unit occurs, which leads to the formation of corresponding errors and transfer of the engine to emergency operation mode.
Malfunctions of the phase sensor on a car with HBO
It is noted that when the engine is running on gasoline or diesel fuel, the unpleasant symptoms described above do not appear so acutely, which is why many motorists often use cars with a faulty phase sensor for a long time. However, if your car is equipped with gas equipment from the fourth generation and higher (which uses its own “smart” electronics), then the engine will work intermittently, and the driving comfort of the car will sharply decrease.
In particular, fuel consumption will increase significantly, the air-fuel mixture may be lean or, conversely, enriched, and engine power and dynamics will significantly decrease. All this happens due to a mismatch between the software of the electronic engine control unit and the LPG control unit. Accordingly, when using gas-cylinder equipment, the phase sensor must be changed immediately after its breakdown is detected. Using a machine with a damaged camshaft position sensor is harmful in this case not only to the engine, but also directly to the gas equipment and its control system.
Replacing DPKV
It should be noted that the work of the DPKV is stable. In other words, it either works or it doesn't. The following signs indicate sensor failure:
- decreased engine thrust;
- Unstable engine operation at idle speed, as well as when driving;
- engine detonation at the slightest increase in load;
- inability to start the engine.
If the above symptoms are present, it is necessary to replace the crankshaft sensor. The process is quite simple if you know where the sensor is located:
- The first step is to remove the block with wires from the DPKV.
- Dismantle the old DCPV, first removing it from the bracket.
- Start the engine to check the success of the work performed.
As a result, it should be said that the crankshaft position sensor is an integral part of the stable operation of any car.
In this regard, if this device fails, it should be replaced immediately in order to restore the functionality of the vehicle. Moreover, you can do this even with your own hands.
Source
Troubleshooting Methods
If there are problems with the crankshaft position controller, then there is only one way out. This is his replacement. It cannot be repaired. And there is no point in messing with it, since it is inexpensive.
There are two ways to check DPKV.
Installation worker
You just need to take the working one and install it instead of the old one. If the engine starts and runs as it should without interruption and does not stall, then that is where the problem lies. Needs replacement. If not, and the car’s operation has not improved, then you need to look for a problem elsewhere.
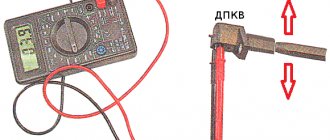
Checking the old
The old one is checked as follows:
- First of all, it must be removed.
- We connect an ohmmeter to it.
- We check the resistance. For a working one, it is in the range of 550-750 Ohms.
Resistance check
Marking and interchangeability of parts
AvtoVAZ has been installing 2111 injection engines since 1994 on a wide range of its models with the letter i in the marking:
- 2108 and 21083;
- family 2109 (including 21093 and 21099);
- 2114 and 2115;
- 2110–2112.
On all such cars, the design of the crankshaft sensor is similar to the VAZ-2109, so it is difficult to make a mistake when purchasing it.
The part has the factory catalog number 2112–3847010–04. When marking, it is usually not this number that is applied to the outer surface, but the article number of the product. It may vary depending on the manufacturer, but the most common parts are those produced by Kostroma and marked 30.3847 (191–3837).
AC voltage measurement
Checking the VAZ 2114 dpkv by measuring the variable component of the output signal is as follows. In order to measure the alternating component of voltage, it is necessary to ensure the appearance and absence of metal at its sensitive surface with a frequency of at least 200 Hz. To do this, you can use an auxiliary motor with a disk and a slot or protrusion, depending on the type of sensor. And power the sensor winding with a constant voltage of 1 or 2 V. Then switch the multimeter to the voltage measurement mode with a limit of up to 2 V of the alternating type. Next, you need to take a capacitor with a capacity of at least 1 μF and connect it to one of the terminals of the crankshaft position sensor, and the other end to one probe. Place the second probe on the second contact of the coil and turn on our resulting stand. Voltage should appear on the device readings when the disk rotates, this indicates that it is working properly. But, unfortunately, you will not see this voltage rating in the passport data. Because it depends on the selected capacitance, the more you increase it, the closer the readings will be to the supply voltage.
Operating principle
The crankshaft position sensor of the VAZ-2109 engine (abbreviated as DPKV) works using the effect of electromagnetic induction. Its device is based on a core with a small permanent magnet, around which a thin wire winding is laid. It is located in close proximity to the ring gear, which is mounted on the engine crankshaft, with a gap of 0.8 to 1.2 mm to the edge of the teeth. Alternately falling into the magnetic field of the core, the metal elements of the gear interact with it. Because of this, an alternating electric current appears in the winding, the parameters of which directly depend on the rotation speed.
There are 60 teeth in total on the gear, but two of them are cut off during manufacturing. With each revolution of the shaft, this gap, passing by the sensor, forms a pulse on the graph of the alternating current of its winding, which is perceived by the ECU controller. Having received such a signal through the circuit, the control unit determines that two of the four cylinders have passed through top dead center. Based on this, the controller generates an impulse for the fuel injection and ignition system.
Input impedance measurement
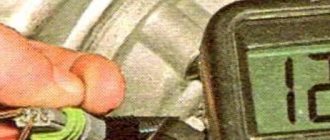
The easiest way is to check the dpkv with a multimeter and measure the resistance of its winding. To do this, you need to have an appropriate device that can cope with this. If there is no such device, then you will have to resort to amateur radio. So, having switched your multimeter to resistance measurement mode and set the limit switch to 2 kOhm, securely install the probes of the device onto the sensor contacts, and they must be clean.
To achieve this, you can wash it with alcohol or gasoline. This may be the cause of the problem. Having installed the probes on the contacts, we observe the readings of the device, which should fit into the range from 550 to 750 Ohms. If this is the case, then the sensor is most likely working. But this can be stated with a probability of 50%, because during breakdowns and short circuits the resistance may change. And if the new one had 750 Ohms, and when checked it turned out that it was 500 Ohms, then this means that it is faulty. And he had an interturn short circuit.
This leads to a decrease in the pulse level that is detected by the controller. Therefore, to be sure of its 100% serviceability, you need to refer to the passport data, which will indicate its exact resistance and inductance. Based on this, you can check the inductance of the sensor winding. To do this, you need to switch your device to inductance measurement mode, if of course there is one. The readings on a working sensor should be up to 400 mH with a resistance of 750 Ohms. If, according to the passport, the sensor has a resistance of 500 Ohms, then accordingly its inductance will be 200 mH. If so, then the sensor is working.
In addition, the condition of the sensor insulation should be checked. To do this you need to have a megohmmeter. Although the multimeter has a mode for measuring high resistance, it is measured with low voltage and high error, while the megohmmeter produces voltage up to 500 V and is a separate device. So, having set the measurement voltage on the device to 500 V and the measurement accuracy to 10% under normal conditions (20-22 0), we place one end of the probe on the sensor body, and the other on the contact. The resistance should not be less than 20 MOhm.
Malfunctions and diagnostics
From the described principle of operation it is clear that if it does not receive a reference signal from the DPKV or if it is distorted in the circuit, the controller will not issue commands to the injectors and spark plugs. Starting the engine and operating it with such a breakdown is impossible.
The design of the sensor itself is simple and reliable, so diagnosing problems should begin by checking the electrical circuits: the condition of the wires suitable for the part and their insulation, as well as the presence of a contact in the terminal block. The following symptoms may lead to troubleshooting:
- The engine does not start immediately, but only after cranking the starter for a long time, especially in cold weather or in high humidity.
- The power developed by the machine begins to drop after the engine has completely warmed up (10–15 minutes after starting).
- The appearance of dips in dynamics that cannot be explained by the road situation or the quality of gasoline. The motor may suddenly lose power, then suddenly start working normally again. At the same time, the controller lights up the “Check Engine” error lamp, which goes out by itself, then lights up again.
- The speed of the power unit floats spontaneously, and the idle speed is unstable.
- Fuel consumption has increased noticeably.
Removing and installing the sensor
To diagnose and, if necessary, replace the sensor, you need to dismantle it. To understand where the part is located, look at the engine from the front.
They are oriented towards the fan belt on the right side of the windshield, where the ring gear is aligned coaxially with the pulley. The DPKV is mounted on the oil pump ebb bracket and is secured with one 10mm wrench bolt. Carefully disconnect the terminal block, unscrew the bolt with a wrench or a socket and remove the part.
Functionality check
An auto electrician working in an equipped workshop will be able to check the serviceability of the sensor using measuring equipment (multimeter or oscilloscope). The resistance of the winding of the part is considered to be within the range of 550–750 Ohms.
In field conditions, when devices are not available, experienced drivers check the serviceability of the DPKV using a “folk trick”:
- The sensor is removed from the engine, reconnected to its connector and placed in a convenient place under the hood.
- They open the car doors so that from the front they can hear the hum of the running gas pump.
- Turn on the ignition.
- A steel tool (wrench) is brought to the DPKV magnet, which is magnetized to the end of the part.
- By sharply tearing the key away from the sensor with force, a current pulse is formed in its winding.
- If the part is working properly, the controller will recognize the impulse and give a command to turn on the fuel pump, which will be heard by sound.
When a malfunction is detected, the sensor cannot be repaired and requires replacement. It’s better to always have a spare one, because its price is less than 300 rubles.
Functionality check
If you decide to check the serviceability of the sensor yourself, treat this procedure responsibly and carry it out correctly. On a VAZ 2114 car, the crankshaft sensor is checked in several ways.
- Using a multimeter. The serviceability of the induction sensor can be assessed by the resistance of its coil. In a working product it is 500-700 Ohms.
- On the multimeter, set the measurement limit to 200 millivolts, connect the probes to the terminals (where the standard wires are connected). Pass a steel object several times in front of the core. The working sensor will “see” the metal and there will be voltage spikes on the multimeter display. If there are none, replace the part.
- But the most accurate results when checking are provided by an oscilloscope. When using this device, one hundred percent results can be guaranteed; it reads all the information from the sensor while the engine is running. It can be observed on the device screen. The engine, during tests, should operate at different speeds. They start with eight hundred revolutions, then two thousand, and raise it to six thousand. If the lines (on the device screen) are of different lengths, you need to look for the cause of the malfunction. Remove dirt, check the pulley for defects, and so on.
Oscillogram of a working sensor
Oscillogram of a working VAZ 2114 crankshaft sensor
It should be noted that these verification methods work on all VAZ models with DPKV. If you have any doubts about your own abilities, then contact the service. Thanks to specialized equipment, the result will be more accurate, and the check will not take much time.
Remove from the engine
The malfunction has been identified. Let's start eliminating it. Let's look at this operation using the VAZ 2114 as an example.
Turn off the car ignition. We open the hood, fix it firmly, and visually determine where the VAZ 2114 crankshaft sensor is located. Before removal, it is advisable to remove all contaminants in the area where it is located. Next, carefully remove the block with wires from the connector.
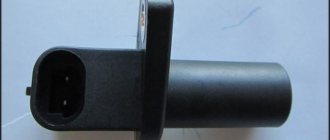
Connector DPKV VAZ 2114
Using a “10” wrench, unscrew the fastening bolt.
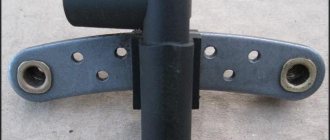
Removing the crankshaft sensor on a VAZ 2114
Removing the DPKV VAZ 2114
After dismantling the sensor, it is advisable to check the generator drive toothed pulley for defects. Since its damage can introduce errors into the operation of the entire system.
After we are convinced that there are no defects of any kind, we proceed to assembly. The seat must be clean. We install the new part in place and fasten it with a bolt (the tightening torque should not exceed 8-12 Newton meters). In this case we use adjusting washers. They are sold complete with a new sensor. Thus, using a special probe, we ensure that the gap between the pulley and the sensor core is one millimeter. The permissible error is 0.41 millimeters in the larger direction.
The gap between the pulley and the crankshaft sensor core on a VAZ 2114
We connect the block with wires into place.
After installation and checking the gap, we try to start the engine. With a confident start and stable operation of the engine, we can say that the repair was carried out successfully.
Despite the fact that the breakdown of the synchronizing sensor is not frequent, knowledge of its symptoms and consequences, as well as methods of elimination, will be useful to the car enthusiast.
New sensors are available in almost any auto parts store. The price of DPKV can vary between 200-400 rubles. How much a VAZ 2114 crankshaft sensor costs depends on your region, the location of large spare parts stores nearby (usually cheaper there) and the greed of the seller. Can be ordered in the online store. When purchasing, take the old one with you so as not to make a mistake in choosing a model. To avoid defects and repeated purchases, it is advisable to purchase from well-established sellers.
How to replace the crankshaft position sensor on a VAZ 2108-VAZ 21099?
Removal: 1) First, de-energize the battery by disconnecting the “-” terminal from the battery itself. (Do you want to know in detail how to remove the “-” terminal? Then, in this case, for all the information on this matter, see the article: “Replacing the battery on a VAZ”, point “1”)
2) Next, holding the wire block with your hand, disconnect it from the crankshaft position sensor.
3) Then remove the single bolt that secures the crankshaft sensor to the bracket on the engine.
4) After you unscrew one single bolt, remove the crankshaft position sensor from the bracket.
Installation: 1) Installation occurs in the reverse order of removal.
Where is?
The crankshaft position controller is located on the oil pump cover. As we have already said, its design is quite simple. This is a small magnet with a coil on which a thin wire is wound. Exceptionally hardy. DPKV VAZ 2109 with an injector operates in tandem with the crankshaft pulley. Crankshaft position sensor failure - engine stops. Or reducing the speed of the power unit to 3000-4500 rpm. In the figure, number 1 is the bolt that secures the controller, and number 2 is the controller itself.