The crankshaft position sensor (timing sensor) is one of several sensors in the electronic engine control system (ECM).
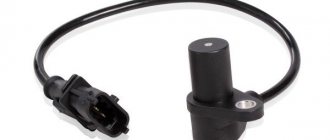
An inductive crankshaft position sensor (2112-3847010-04, 30.3847, 191-3837, etc.) is installed on the engine 2111 of fuel-injected VAZ 2108, 2109, 21099, 2113, 2114, 2115 cars. Purpose of DPKV
The crankshaft position sensor is designed to generate signals by which the controller (ECU) synchronizes its operation with the cycles of the working process in the engine: it determines the crankshaft rotation speed, the moment of fuel injection into the cylinders, and calculates the volume of injected fuel based on the rotation speed.
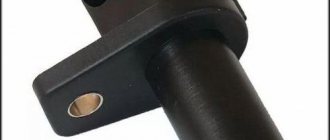
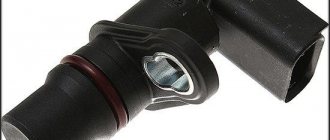
The crankshaft position sensor for injection engines of VAZ 2108, 2109, 21099 cars is an electromagnet (winding with a steel core inside) that generates an electromagnetic field.
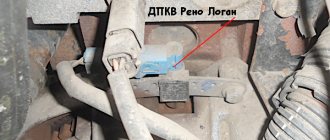
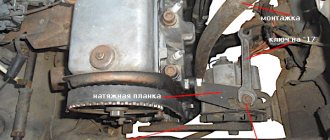
The crankshaft position sensor is installed on the oil pump cover next to the ring gear of the generator drive pulley on the engine crankshaft. The gap between the sensor and the ring teeth is 0.8 – 1.2 mm. The crown has 60 teeth, two of which are cut off.
Operating principle of DPKV
The operation of the sensor is based on the principle of electromagnetic induction. When the engine crankshaft rotates, the teeth of its pulley pass through the electromagnetic field created by the sensor. This causes alternating current voltage pulses to appear in the sensor circuit. Based on their frequency, the controller determines the crankshaft rotation speed.
When a gap of two teeth passes past the sensor, a so-called reference signal is formed in the sensor circuit. Using it, the ECU determines that the pistons have passed the top dead center either in cylinders 1–4 or in cylinders 2–3 of the engine. And gives the command to inject fuel.
If the crankshaft position sensor fails on fuel-injected VAZ 2108, 2109, 21099 vehicles, it becomes impossible to start the engine. In some cases, there may be jerks and interruptions in engine operation when the vehicle is moving, difficult starting and unstable idling, detonation and misfiring. Read more: “Malfunctions of the crankshaft position sensor DPKV.”
Considering the reliability of the DPKV, you should first check the wiring going to it, the connecting block, the correct mounting on the engine, oiling and contamination, and the serviceability of the crankshaft pulley (rotation of the ring gear). Read more about the diagnostics of DPKV on the website “Checking DPKV injection engines VAZ 2108, 2109, 21099”. Notes and additions
— Electromagnetic induction – in this case, the occurrence of an electric current when a metal object enters the electromagnetic field of the sensor.
— After turning on the ignition, the controller (ECU) first interrogates the DPKV, receiving a synchronization pulse from it. Starting the engine and its stable operation is determined by the precise synchronization of pulses from the DPKV and the pulses that control the opening of the injectors and the ignition module.
More articles on the VAZ injector
— The operating procedure of the injection system of the injection engine of VAZ 23108, 2109, 21099 cars
— Diagram of the power supply system for the injection engine VAZ 2108, 2109, 21099
— Idle speed sensor VAZ 2108i, 2109i, 21099i
— Coolant temperature sensor (DTOZH) for injection VAZ 2108, 2109, 21099
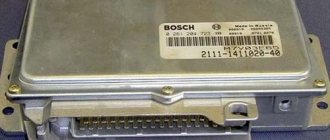
— ECM controllers (ECU) used on injection VAZ 2108, 2109, 21099
Checking the crankshaft position sensor (CPS) ECM VAZ 21083, 21093, 21099
If the crankshaft position sensor (ECM) of VAZ 21083, 21093, 21099 cars fails, it will be almost impossible to start the engine.
This is the only sensor whose malfunction will prevent the entire injection engine control system from working, since it is from the signal from it that the control unit (ECU) determines the position of the crankshaft, rotation speed, and calculates the torque and amount of fuel injection.
Checking the crankshaft position sensor (CPS)
To check, you will need a voltmeter or other measuring device in voltmeter mode.
— We remove the DPKV from the engine.
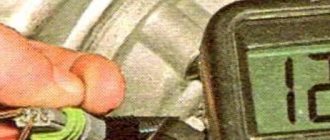
— We connect a voltmeter to its terminals (with a measurement limit of up to 200 mV).
— Quickly bring a screwdriver blade or other metal object near the end of the sensor.
If the sensor is working properly, we observe voltage surges. If it is not working properly, there will be no voltage surges. We replace it with a new one.
Notes and additions
— Special attention should be paid to the gap between the end of the sensor and the teeth of the crankshaft pulley. It should be 1±0.41 mm. The gap is specified by design and is not adjustable, but may increase due to the presence of dirt in the place where the sensor is attached. In this case, the sensor may also not work. To ensure normal operation of the DPKV, dirt must be cleaned from underneath it.
Source
Oscillogram of DPKV VAZ
An oscilloscope is used to accurately diagnose the operation of the DPKV. By connecting the oscilloscope probes, an oscillogram of the DPKV operation will be displayed on the monitor screen, on which you can clearly distinguish the point where the teeth skipped and measure the signal value in volts based on the maximum amplitude of the 58 teeth located between the skip points.
Crankshaft position sensor VAZ 21083, 21093, 21099
The crankshaft position sensor (timing sensor) is one of several sensors in the electronic engine control system (ECM).
An inductive crankshaft position sensor (2112-3847010-04, 30.3847, 191-3837, etc.) is installed on the engine 2111 of fuel-injected VAZ 21083, 21093, 21099, 2113, 2114, 2115 cars.
Crankshaft position sensor ECM VAZ 21083, 21093, 21099
Purpose of DPKV
The crankshaft position sensor is designed to generate signals by which the controller (ECU) synchronizes its operation with the cycles of the working process in the engine: it determines the crankshaft rotation speed, the moment of fuel injection into the cylinders, and calculates the volume of injected fuel based on the rotation speed.
DPKV device
The crankshaft position sensor ECM of the injection engine 2111 of VAZ 21083, 21093, 21099 cars is an electromagnet (winding with a steel core inside) that generates an electromagnetic field.
DPKV location
The crankshaft position sensor is installed on the oil pump cover next to the ring gear of the generator drive pulley on the engine crankshaft. The gap between the sensor and the ring teeth is 0.8 – 1.2 mm. The crown has 60 teeth, two of which are cut off.
Operating principle of DPKV
The operation of the sensor is based on the principle of electromagnetic induction. When the engine crankshaft rotates, the teeth of its pulley pass through the electromagnetic field created by the sensor. This causes alternating current voltage pulses to appear in the sensor circuit. Based on their frequency, the controller determines the crankshaft rotation speed.
When a gap of two teeth passes past the sensor, a so-called reference signal is formed in the sensor circuit. Using it, the ECU determines that the pistons have passed the top dead center either in cylinders 1–4 or in cylinders 2–3 of the engine. And gives the command to inject fuel.
DPKV malfunctions
If the crankshaft position sensor on a VAZ 21083, 21093, 21099 injector fails, it becomes impossible to start the engine. In some cases, there may be jerks and interruptions in engine operation when the vehicle is moving, difficult starting and unstable idling, detonation and misfiring. The Check Engine light comes on. Read more: “Malfunctions of the crankshaft position sensor DPKV.”
Considering the reliability of the DPKV, you should first check the wiring going to it, the connecting block, the correct mounting on the engine, oiling and contamination, and the serviceability of the crankshaft pulley (rotation of the ring gear). Read more about the diagnostics of the DPKV on the website “Checking the DPKV ECM of the injection engine 2111 VAZ 21083, 21093, 21099”.
Notes and additions
— Electromagnetic induction – in this case, the occurrence of an electric current when a metal object enters the electromagnetic field of the sensor.
— After turning on the ignition, the controller (ECU) first interrogates the DPKV, receiving a synchronization pulse from it. Starting the engine and its stable operation is determined by the precise synchronization of pulses from the DPKV and the pulses that control the opening of the injectors and the ignition module.
Source
Lada 2109 Modified with a file) › Logbook › Signs of dying DPKV and diagnosis
What is a crankshaft position sensor (CPS), I think, most people don’t need to be told; on a VAZ it is a magnet with a winding installed on the low tide of the oil pump and with its working part “looking” at the gear teeth of the crankshaft auxiliary units. “Auxiliary” is perhaps a strong word, because the only unit that it rotates through the serpentine belt is the generator pulley))) 2 teeth are missing on this gear, so the controller determines the current position of the crankshaft and counts the number of revolutions per minute. Indirect signs of the beginning of sensor failure: 1) You have to turn the starter for a long time, especially if the car has been standing for several days without moving in damp weather. In the most severe cases, after long cranking, rare flashes begin, sometimes the car stalls or works unstably, plus unburned fuel in the plug, carefully poured by the ECU before unsuccessful starts, explodes. Once it is possible to start, the car can drive and start as usual. 2) After a long trip (more than 15 minutes), the asshole begins to feel that the car is not as fast as it was at the beginning, although there may be no obvious failures. 3) Sometimes the car rushes like a tank (in the same weather, on the same gasoline, etc.), and sometimes it crawls like a turtle, although there may be no obvious failures either, the car is just stupid.
Crankshaft position sensor and its replacement
This material will be useful to all owners of VAZ 2109, 2108 and 21099 cars with injection engines, since it is on such models that a crankshaft position sensor is installed from the factory.
DPKV is the part that you should have in stock at any time. If you find yourself on the road due to the failure of this spare part, then you may not even start the engine, and the only way to get home is a tow truck or tow truck.
The price of a crankshaft sensor for a VAZ 2109 ranges from 300 to 500 rubles, depending on the type, part code and manufacturer.
Replacement
There is nothing particularly difficult about replacing the DH on a domestic nine. Therefore, even a novice driver can take on the job with his own hands.
- Disconnect the negative terminal from the battery.
- Disconnect the armored wires from the distributor, disconnect the hose from the vacuum corrector.
- Next, remove the gas cable and put it aside for now so as not to interfere with the process.
- Unscrew the bracket fasteners that hold the wires. Remove the bracket from the stud and move it aside. Otherwise he will disturb you.
- Be sure to draw a straight line on the auxiliary drive housing and distributor. This location will allow you to avoid disturbing the ignition timing during reassembly.
- Disconnect the power supply with wires.
- Remove the plugs from the clutch housing and turn the flywheel with a screwdriver so as to set the piston of the first cylinder to the top dead center position.
- To remove the distributor, you need to unscrew two more mounting nuts holding the device.
- Remove the cover from the distributor, remove the slider and pull it up. Only a little.
- Remove the dust cover.
- Now unscrew the mounting bolt to remove the plug.
- We also need to unscrew the bolts that hold the plate of our desired sensor.
- Remove the vacuum corrector mounting bolts, remove the retaining rings, corrector and rod.
- To get the wires out, you will need to release the clamp there.
- Remove the mounting plate and unscrew the mounting bolts, which will allow you to finally remove the failed Hall sensor.
- It is now necessary to install a new sensor and assemble the unit, proceeding in the reverse order.
It is important not to change the ignition settings
Don’t forget, after completing the work, be sure to check whether your carburetor VAZ 2109 is working correctly, and whether you have violated the ignition timing.
The main difficulty in the process of replacing the diesel engine is the need to get to the sensor, as well as the existing risks of disrupting the proper operation of the carburetor. But if you act carefully and strictly according to the instructions, problems can be avoided.
Loading …
Replacing DPKV with your own hands + video review
In order not to show everything on the fingers and not to explain the whole process once again, I made a detailed video review, which shows the procedure most clearly. Even a novice driver can figure it out, since there are no difficulties in it. The main thing is to have the following tool at hand:
- head for 10
- ratchet or wrench
- small extension cord
Here is a review of how to replace the crankshaft position sensor on VAZ 2109, 21099, 2108
The review was written using the example of a 1.5 liter VAZ 2111 engine.
If, as a result of viewing, you still have any questions, you can ask them under the article in the comments. Or follow the link to the video and ask on the channel.
Source
How to replace the crankshaft position sensor on a VAZ 2108-VAZ 21099?
Removal: 1) First, de-energize the battery by disconnecting the “-” terminal from the battery itself. (Do you want to know in detail how to remove the “-” terminal? Then, in this case, for all the information on this matter, see the article: “Replacing the battery on a VAZ”, point “1”)
2) Next, holding the wire block with your hand, disconnect it from the crankshaft position sensor.
3) Then remove the single bolt that secures the crankshaft sensor to the bracket on the engine.
4) After you unscrew one single bolt, remove the crankshaft position sensor from the bracket.
Installation: 1) Installation occurs in the reverse order of removal.
Checking the functionality of the crankshaft position sensor:
1) First you will need to connect a “multi-meter” to the removed crankshaft position sensor. 2) And then check the crankshaft position sensor for resistance.
Note! If the crankshaft position sensor is fully operational, the “ohmmeter” should show you a result of “550-750” Ohms!
Source
Replacing DPKV with your own hands + video review
In order not to show everything on the fingers and not to explain the whole process once again, I made a detailed video review, which shows the procedure most clearly. Even a novice driver can figure it out, since there are no difficulties in it. The main thing is to have the following tool at hand:
- head for 10
- ratchet or wrench
- small extension cord
Here is a review of how to replace the crankshaft position sensor on VAZ 2109, 21099, 2108
The review was written using the example of a 1.5 liter VAZ 2111 engine.
If, as a result of viewing, you still have any questions, you can ask them under the article in the comments. Or follow the link to the video and ask on the channel.
The crankshaft position sensor (CPS) is necessary to synchronize the operation of the injection engine control system (ECM) with the position of its crankshaft.
— The car engine does not start
The sensor itself has failed, or its electrical circuit has been damaged. DPKV is the only sensor in the control system of an injection engine; if it fails, the engine will not start.
— The car engine starts with difficulty (starts and stalls)
— Unstable engine idling
— Dips, jerks when pressing the gas pedal
The causes of the malfunction (difficulty starting, unstable idling, dips and jerks) will be: loosening of the sensor, its contamination, the gap between the tip of the sensor and the ring gear does not correspond to the norm (1±0.2 mm for VAZ), damage to the ring gear of the generator drive pulley , no voltage supply to the sensor from the control unit (the sensor circuit is damaged).
If any of the listed signs of a malfunction of the DPKV appear, remove it and check the sensor itself and its electrical circuit. Read more: “Checking the crankshaft position sensor (CPS) of the ECM of VAZ 2108, 2109, 21099 cars.” A working sensor should produce a resistance of 500-700 Ohms.
Notes and additions
— When the DPKV fails, the “Check Engine” warning light in the instrument panel lights up.
— The crankshaft position sensor informs the system control unit (ECU) about the rotation speed and angular position of the crankshaft at the moment. Based on this information, the control unit adjusts the ignition timing. discharge force on the spark plugs, timing and duration of fuel injection by injectors.
Dismantling and installation
So, you have determined that the DPKV has failed. Therefore, there is nothing left to do but replace it. To do this you will have to dismantle the old device.
- Turn off the ignition and open the hood. Securely secure it to avoid unpleasant blows to the back or head.
- Remove any dirt from around the sensor so that it can be removed and visually inspected.
- Disconnect the wiring block from the corresponding connector.
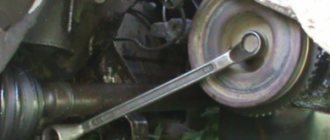
- Using a 10 mm wrench, you can easily remove the crankshaft sensor mount.
- Remove the damaged device.
- At the same time, be sure to check the generator drive timing pulley. It is not uncommon for damage to appear on it, due to which the device cannot operate correctly. These teeth cause error codes to appear on the on-board computer.
- If there are no defects and nothing prevents the installation of a new device, begin assembly.
- If necessary, clean the installation site of the DPKV.
- Place the new measuring device in the socket and tighten the mounting bolt. In this case, do not exceed a tightening torque of more than 12 N m.
- Be sure to use the adjusting washer, which is already supplied by responsible sensor manufacturers.
- Using a special feeler gauge, make sure that there is a gap of 1 millimeter between the pulley and the DPKV core.
- The gap error can be no more than 0.41 millimeters in the upward direction. Under no circumstances should the gap be less than the required 1 mm.
Price issue
As we have already noted, VAZ 2114 owners are not often faced with the need to change the DPKV. But always be prepared for such troubles.
You don’t have to spend a lot of money purchasing a new sensor. The price depends on the store and region where car parts are sold. On average, a recreation center costs about 200-400 rubles.
Replacement at a service station is still a cost around the cost of several sensors. Therefore, think about who exactly will do the work - you or the car service specialists.
Based on the types of repairs that a car enthusiast is able to perform on his own, one can judge his qualifications and experience in operating a car. If for the owner of a 9th VAZ series car, replacing the crankshaft oil seal of a VAZ 2109 does not present any difficulties, then we are dealing with a trained car owner who will not contact a car service center for every trivial breakdown.
When and why is the VAZ 2109 crankshaft oil seal replaced?
Replacing the crankshaft oil seal is a rather complicated procedure, but quite doable even in an ordinary garage that does not have special devices and professional tools.
Sensors VAZ 2109 carburetor
Modern cars have a microcontroller to control the operation of all vehicle systems. In order for the microcontroller to receive information from various vehicle components, a large number of different sensors are installed on them. One sensor indicates the temperature in the cabin, another is responsible for exhaust toxicity, the third monitors the position of the headlights, the fourth determines whether the driver is sitting in the seat or not, and so on. It gets to the point of insanity: the low beam light on the car burns out, but it won’t start. The controller throws an error, which is also not so easy to decipher. This is understandable - this is the bread and butter of automaker service centers. In this regard, the old VAZ 2109 looks very attractive: they have very little electronics. Yes, and that one is very primitive. The coolant temperature sensor has failed - no problem, the generator does not work - also a problem, drive until the battery runs out. For modern foreign cars this is impossible: the controller will see a malfunction, prohibit the engine from operating and will require the driver to eliminate the malfunction. Compared to the injection model, the carburetor VAZ 2109 has fewer sensors. Of these, the only one that really affects engine operation is the Hall sensor. The remaining sensors are needed to inform the driver about the state of the vehicle systems, or to turn on/off actuators. Let's list the sensors of the VAZ 2109 carburetor: 1. Hall sensor 2. Coolant temperature sensor. 3. Oil pressure sensor. 4. Fan switch sensor. 5. Reverse sensor. 6. Parking brake sensor. 7. Throttle valve limit switch. 8. Speed sensor. * Many people mistakenly claim that the VAZ 2109 carburetor has an idle speed sensor. It is not true. The VAZ 2109 carburetor has an idle speed solenoid valve. A valve is not a sensor, it is an actuator. It does not transmit its signal, but rather receives control voltage from the idle speed economizer. 1. I would call the Hall sensor the most important sensor in the VAZ 2109.
Without it, the car engine will not start. Remove every single other sensor and the machine will work. It will not work without a Hall sensor. The purpose of the Hall sensor is to transmit pulses about the rotation of the engine camshaft to the commutator. The sensor is designed to determine the moment a spark is formed by the switch. Without it, there will be no spark and, accordingly, the engine will not start. The sensor is installed in the housing of the ignition distributor of the VAZ 2109 and connected directly to the switch. In case of malfunction, we can easily replace it. 2. The coolant temperature sensor is designed to display the engine temperature on the panel.
Signs of breakdown
If the DC fails, the car itself will notify you that there is a fault. To determine problems with the diesel engine, there are certain signs coming from the engine:
- You simply cannot start the engine;
- There are interruptions in the operation of the power unit - the smooth running becomes not so smooth, jerks appear;
- Idle speed is broken or completely absent;
- The engine may suddenly turn off or stall;
- Motor power is noticeably lost.
Before you run to the engine compartment and change the Hall sensor, first you need to make sure that it is the cause of all the troubles with the engine. Still, the signs are indirect, and they can be caused by a malfunction of other elements of your car.
Installation location
Checking status
There are several main methods that are used today to check the current state of the Hall sensor. Let's get to know each of them in more detail, and you decide for yourself which one you will use the next time you check the DH on your VAZ 2109.
https://youtube.com/watch?v=loxwayrjpVM
| Verification method | Your actions |
| Replacing an old device with a new one | This is the simplest method, which will require you to have a spare Hall sensor on hand, of which you are confident that it will work. Simply remove the old sensor, insert the new one in its place and try to start the car. If everything works, you have found the reason. If not, you will have to look for the source of the problems in other systems. |
| Checking the output voltage | For this method, you will need a tester connected to the output of the device. If the Hall sensor is working properly, the tester will show values in the range of 0.4-11 Volts. If the data does not meet the established standards, the household will have to be replaced |
| Simulation of device operation | A popular method in which you deceive your own car by simulating the operation of the Hall sensor. You need to remove the plug block, turn on the ignition and connect outputs 3 and 6 together. If a spark starts to jump, you can be sure that your sensor has failed. |
| Checking without additional devices | Here you don't need a tester or voltmeter. First, connect the lead from the coil to the spark plug, and connect the thread of the spark plug to ground. Remove the carriage with the sensor and attach the connector. Now you can turn on the ignition. Using a screwdriver, move the tool near the device - the Hall sensor. If a spark appears on the spark plug, this indicates the serviceability of the DH. If not, the conclusion is obvious. |
Device check
If you discover that the DC is faulty, you should definitely replace the device. We do not recommend delaying this event.
Design and functions of DPKV
This vehicle unit allows you to adjust the fuel injection system of your vehicle. In addition, the DPKV is responsible for the synchronization of the functioning of each of the fuel injectors and the entire ignition system of the car. The crankshaft position sensor device has the following elements:
- Sample of a nylon frame;
- Steel magnetic cores;
- Winding kit for which thin copper wire is used;
- Wiring insulation (usually resin or enamel is used).
The main purpose of this position sensor is to create synchronized operation in the ignition system and when operating a set of fuel injectors. If this spare part malfunctions, unstable operation occurs during fuel supply. Additionally, your engine may suddenly stop running at full speed, causing wear on the valves and cylinders.
How does the fuel system receive the signal from the sensor?
While the sensor is operating, the on-board computer (microcontroller inside the car) determines the specific position of the piston at a certain moment of its operation in each of the cylinders. To regulate operation using a sensor, the process is built according to the following plan:
- The crankshaft has a special gear in which 2 teeth are specially omitted.
- When the crankshaft moves, all the teeth pass next to the DPKV sensor, greatly distorting the state of its magnetic field.
- As a result, pulses are generated in the inductance coil of this device, which are sent to the on-board computer database. In this case, the missing 2 teeth are the starting or zero point, thanks to which the computer determines the initial position of the shaft.
- Next, the computer inside the car counts the number of pulses sent by the device and determines the position of the crankshaft in each period of time.
- After this, the return signal is sent by the computer to the sensor responsible for triggering the fuel injector, which already supplies fuel to the ignition system.
Thus, if the DPKV works correctly, the car will operate at the highest performance, while consuming a minimum of fuel.
Advice: the electrical diagram on the VAZ-2110 will easily help you find out the cause of the sensor malfunction. It shows the location and combination of all elements of the car.
How to check for sensor malfunction with the device?
Despite the fact that a sensor malfunction is usually determined by the above symptoms, this may not be enough for a correct diagnosis, since different types of breakdowns have the same symptoms. Dips during acceleration can also occur when other parts are deformed, such as the ignition system or braking system, and this also occurs when the engine itself malfunctions.
You can definitely check the sensor using the following method:
We buy a voltmeter (it’s easy to find in any car store) or a multimeter, which is even better. On the multimeter we turn on the voltmeter function, measuring 200 mV. Now we connect the probes to the sensor. And then the most interesting thing: take any screwdriver (necessarily with a metal rod) and hold the screwdriver close to the sensor. The data on the voltmeter will change, monitor its data: if the device shows 0.3 V, then the device is working properly; If the readings fluctuate, replace the sensor without a doubt.
Crankshaft position sensor (CPS) for the engine of injection VAZ 2108, 2109, 21099
The crankshaft position sensor (timing sensor) is one of several sensors in the electronic engine control system (ECM).
An inductive crankshaft position sensor (2112-3847010-04, 30.3847, 191-3837, etc.) is installed on the engine 2111 of fuel-injected VAZ 2108, 2109, 21099, 2113, 2114, 2115 cars.
The crankshaft position sensor is designed to generate signals by which the controller (ECU) synchronizes its operation with the cycles of the working process in the engine: it determines the crankshaft rotation speed, the moment of fuel injection into the cylinders, and calculates the volume of injected fuel based on the rotation speed.
The crankshaft position sensor for injection engines of VAZ 2108, 2109, 21099 cars is an electromagnet (winding with a steel core inside) that generates an electromagnetic field.
The crankshaft position sensor is installed on the oil pump cover next to the ring gear of the generator drive pulley on the engine crankshaft. The gap between the sensor and the ring teeth is 0.8 – 1.2 mm. The crown has 60 teeth, two of which are cut off.
The operation of the sensor is based on the principle of electromagnetic induction. When the engine crankshaft rotates, the teeth of its pulley pass through the electromagnetic field created by the sensor. This causes alternating current voltage pulses to appear in the sensor circuit. Based on their frequency, the controller determines the crankshaft rotation speed.
When a gap of two teeth passes past the sensor, a so-called reference signal is formed in the sensor circuit. Using it, the ECU determines that the pistons have passed the top dead center either in cylinders 1–4 or in cylinders 2–3 of the engine. And gives the command to inject fuel.
If the crankshaft position sensor fails on fuel-injected VAZ 2108, 2109, 21099 vehicles, it becomes impossible to start the engine. In some cases, there may be jerks and interruptions in engine operation when the vehicle is moving, difficult starting and unstable idling, detonation and misfiring.
Considering the reliability of the DPKV, you should first check the wiring going to it, the connecting block, the correct mounting on the engine, oiling and contamination, and the serviceability of the crankshaft pulley (rotation of the ring gear). Read more about the diagnostics of DPKV on the website “Checking DPKV injection engines VAZ 2108, 2109, 21099”.
— Electromagnetic induction – in this case, the occurrence of an electric current when a metal object enters the electromagnetic field of the sensor.
— After turning on the ignition, the controller (ECU) first interrogates the DPKV, receiving a synchronization pulse from it. Starting the engine and its stable operation is determined by the precise synchronization of pulses from the DPKV and the pulses that control the opening of the injectors and the ignition module.
More articles on the VAZ injector
— The operating procedure of the injection system of the injection engine of VAZ 23108, 2109, 21099 cars
Marking and interchangeability of parts
AvtoVAZ has been installing 2111 injection engines since 1994 on a wide range of its models with the letter i in the marking:
- 2108 and 21083;
- family 2109 (including 21093 and 21099);
- 2114 and 2115;
- 2110–2112.
On all such cars, the design of the crankshaft sensor is similar to the VAZ-2109, so it is difficult to make a mistake when purchasing it.
The part has the factory catalog number 2112–3847010–04. When marking, it is usually not this number that is applied to the outer surface, but the article number of the product. It may vary depending on the manufacturer, but the most common parts are those produced by Kostroma and marked 30.3847 (191–3837).
Where is the crankshaft position sensor located?
This component is located in a bracket, which is installed in the central area of the pulley on the generator drive. As a rule, on most modern cars it is not installed end-to-end, but with a gap of 1-1.5 mm near the structure of the toothed pulley itself.
For ease of disconnecting and adjusting the DPKV, a 50-70 cm wire is connected to it, which has the necessary connectors for keys. To align and adjust the position, you only need to adjust the washer secured above the seat of the element itself. Adjusting the washer can be done either by you yourself or by specialists at a car service center - in any case, it will allow you to avoid early breakdown of the engine cylinders and significantly reduce fuel consumption.
Main symptoms of DPKV malfunction
The main signs of problems with the crankshaft position sensor:
- The process of “detonating” the engine (a characteristic knocking sound appears when the hydraulic compensators are operating) during a greater load on the car, when driving onto high mountain surfaces at low speeds.
- The engine runs unstably - a sharp drop in rpm at idle is followed by an equally sharp increase. Also, your car may simply stall when idling, both while driving on the highway or when stopped for a while, for example, at a traffic light.
- The engine does not gain speed, although it is running at full power.
- The motor power periodically drops and rises in the absence of any external factors influencing this process.
- The aerodynamic characteristics of the car are significantly reduced.
- Problems arise when starting the engine (it stalls quickly or does not start at all).
- The spark disappears when the system is ignited - it either does not appear or may be completely absent.
If you find at least 3 of the above symptoms, then the problem lies in the crankshaft position sensor.
Tip: the indicated list of faults may also indicate the occurrence of other problems during engine operation. For example, sudden changes in engine power and a decrease in speed may indicate a blockage in the fuel pump itself. That is why before repairs it is necessary to diagnose not only the engine, but also the same wheels. You can see what pressure indicators should be according to the standards in the tire pressure table.
Sensor malfunctions
The following symptoms may indicate a malfunction of the crankshaft sensor:
- the engine stops unexpectedly;
- the engine is unstable during idle;
- obvious missing sparks are noticeable;
- Engine power is noticeably reduced, especially on inclines;
- engine speed spontaneously increases or decreases;
- under various dynamic loads, the appearance of detonation is noticeable;
- difficulties starting the engine and much more.
All of the above examples, taken separately or together, indicate that it is time to change the sensor. To fully verify that it is necessary to replace the crankshaft sensor on a VAZ 2110 or other models, you need to conduct testing.
Sensor performance test
There are several ways to check the sensor. Each method requires the presence of certain instruments. Let's look at two main verification methods that give accurate results.
Replacing the crankshaft sensor VAZ 2114
After removing the sensor, and how to do this will be described in detail below, you need to carefully inspect it. A visual inspection will help determine the condition of the core, terminal block and the contacts themselves. If traces of dirt are noticeable on the sensor and prevent a normal inspection, they should be removed using a cloth soaked in alcohol or gasoline.
Also, the contacts must always be clean. In addition, when dismantling, you need to pay special attention to the distance between the sensor core and the disk. If it is not close to the value of 0.6-1.5 mm, then the sensor most likely has defects. If everything is normal, this does not mean that the sensor is working. Only an ohmmeter will allow you to determine the presence of obvious malfunctions in the operation of the crankshaft sensor
This device should measure the resistance of the synchronization sensor winding. The normal value output by an ohmmeter should be 550-750 ohms. To be sure, it is recommended to check in advance the exact parameters in the car’s operating instructions, which may vary depending on the manufacturer. If the value given by the ohmmeter measurement differs from those indicated, then there is a problem with the sensor.
Replacing the crankshaft sensor on a VAZ 2114
Another verification option involves more extensive testing. To carry it out, you will need the following tools:
- voltmeter;
- inductance meter;
- megohmmeter;
- network transformer.
When measurements are carried out using this method, the air temperature should be 20-22 degrees. As for the winding resistance, we measure it using the method described above. So:
- To determine the inductance of the crankshaft speed sensor winding, you will need to use an inductance meter. It will show how an inductive coil, capacitance and resistance work. The normal inductance value should be 200-400 MHz.
- The insulation resistance is checked using a megohmmeter. At a voltage of 500 V, this figure should not exceed 20 MΩ.
Based on the results that the devices give, you can find out exactly whether the sensor is working or not.
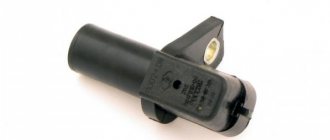
Options for crankshaft sensors on the VAZ-2114
How to check the crankshaft sensor
Crankshaft position sensor
When considering the issue of crankshaft sensor malfunction, it is worth paying special attention to the possible options for this part. According to the technical data of the manufacturer, there are several products that can be distinguished by design features and operating principle:
- Inductive. Inside the product there is a metal rod, which is surrounded by a magnet. The entire product has a copper winding, which is connected to the connection wires. When a metal part is located next to the sensor, a pulse appears on the rod and goes to the ECU.
- The hall sensor is located inside the crankshaft sensor. When a metal product is attached to it, its state changes.
- Frequency. In this case, the electronic control unit sends a certain pulse, and when a metal part approaches the sensor, the frequency of this pulse changes, which gives a signal to the ECU.
Symptoms of a problem
Location of the crankshaft sensor near the flywheel
There are not many signs of a malfunctioning crankshaft position sensor. As practice shows, in many cases, problems with the product are caused by the fact that dirt or plaque adheres to it, which prevents the data from being read, or makes this operation incorrect.
So, let's look at the main signs of a DPKV malfunction:
Schematic designation of the location of the crankshaft sensor relative to the flywheel
- Unstable idle mode.
- The revolutions are floating. This will be visible from the tachometer reading on the dashboard. It will look like this: the car picks up speed, and then it drops sharply in the same operating mode.
- Loss of power.
- Acceleration failures.
- The car starts very poorly.
In this case, it is worth dismantling the sensor and diagnosing it. It can be done in a simple way - with a multimeter, or if you have an oscilloscope - with this device.
A clear example of the location of the sensor relative to the flywheel
Also, in addition to signs of malfunction, it is worth considering the reasons why the crankshaft position sensor may fail:
- Deformation or destruction of the housing.
- Short circuit that damaged the winding.
- Wear.
Diagnostic methods
With the sensor removed, diagnostic operations can be carried out that will accurately determine the condition of the product and its performance. So, let's look at the methods for diagnosing DPKV:
- Using a multimeter. In this case, it is necessary to close the power supply connectors to resistance. The normal value should be 500-700 Ohms.
- The second method also involves using a multimeter. A reading of 200 millivolts is set on it, and a metal object is brought to the sensor core. If the sensor is working properly, then a fluctuation in readings will be visible on the multimeter.
- Using an oscilloscope. This device shows the most accurate result from all diagnostic methods. The test is carried out in different modes: at 800 rpm (that is, at idle), 2000 and increasing up to 6000. Depending on the result on the screen, the cause of the malfunction can be determined.
Oscillogram for checking the crankshaft sensor
Functionality check
If you decide to check the serviceability of the sensor yourself, treat this procedure responsibly and carry it out correctly. On a VAZ 2114 car, the crankshaft sensor is checked in several ways.
- Using a multimeter. The serviceability of the induction sensor can be assessed by the resistance of its coil. In a working product it is 500-700 Ohms.
- On the multimeter, set the measurement limit to 200 millivolts, connect the probes to the terminals (where the standard wires are connected). Pass a steel object several times in front of the core. The working sensor will “see” the metal and there will be voltage spikes on the multimeter display. If there are none, replace the part.
- But the most accurate results when checking are provided by an oscilloscope. When using this device, one hundred percent results can be guaranteed; it reads all the information from the sensor while the engine is running. It can be observed on the device screen. The engine, during tests, should operate at different speeds. They start with eight hundred revolutions, then two thousand, and raise it to six thousand. If the lines (on the device screen) are of different lengths, you need to look for the cause of the malfunction. Remove dirt, check the pulley for defects, and so on.
Oscillogram of a working sensor
Oscillogram of a working VAZ 2114 crankshaft sensor
It should be noted that these verification methods work on all VAZ models with DPKV. If you have any doubts about your own abilities, then contact the service. Thanks to specialized equipment, the result will be more accurate, and the check will not take much time.
Remove from the engine
The malfunction has been identified. Let's start eliminating it. Let's look at this operation using the VAZ 2114 as an example.
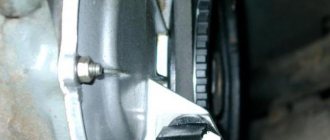
Turn off the car ignition. We open the hood, fix it firmly, and visually determine where the VAZ 2114 crankshaft sensor is located. Before removal, it is advisable to remove all contaminants in the area where it is located. Next, carefully remove the block with wires from the connector.
Connector DPKV VAZ 2114
Using a “10” wrench, unscrew the fastening bolt.
Removing the crankshaft sensor on a VAZ 2114
Removing the DPKV VAZ 2114
After we are convinced that there are no defects of any kind, we proceed to assembly. The seat must be clean. We install the new part in place and fasten it with a bolt (the tightening torque should not exceed 8-12 Newton meters). In this case we use adjusting washers. They are sold complete with a new sensor. Thus, using a special probe, we ensure that the gap between the pulley and the sensor core is one millimeter. The permissible error is 0.41 millimeters in the larger direction.
The gap between the pulley and the crankshaft sensor core on a VAZ 2114
We connect the block with wires into place.
After installation and checking the gap, we try to start the engine. With a confident start and stable operation of the engine, we can say that the repair was carried out successfully.
Despite the fact that the breakdown of the synchronizing sensor is not frequent, knowledge of its symptoms and consequences, as well as methods of elimination, will be useful to the car enthusiast.